Table of Contents
Advertisement
Quick Links
Advertisement
Table of Contents

Related Manuals for A.O. Smith aosbath D25A2


Summary of Contents for A.O. Smith aosbath D25A2
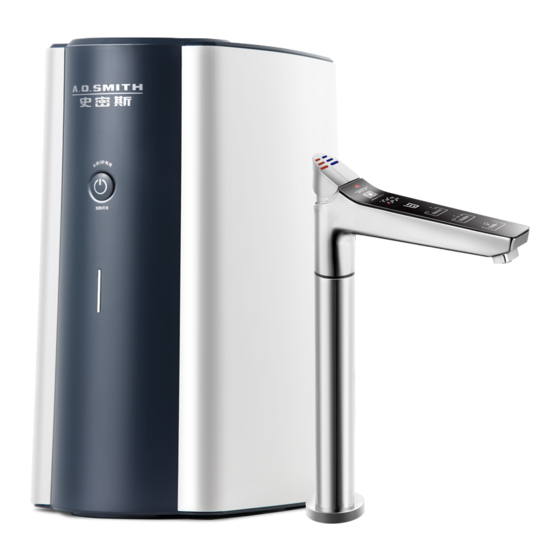
- Page 1 User Guide Hot Water Dispenser, HWT3...
- Page 2 1. IMPORTANT Please read this manual carefully before using the product and store it for future reference. If the user installs the hot water dispenser by themselves or does it by using the self-prepared installation materials, AOS Bath will not be liable for any adverse effects on the normal operation and service performance of the system.
-
Page 3: Product Information
Examples of abnormal conditions The power plug and the power cord are overheating; the power cord is damaged or there is an intermittent power supply; the tank is damaged or misshaped, parts are loose; tank emits smoke and has a burnt smell; steam jets from the faucet for over 10 minutes;... - Page 4 3. OPERATION GUIDE INSTRUCTIONS Hot water Room temp button water button Child Lock The child lock only shuts off the hot water channel. Tap indicator to unlock. After 8 seconds of inactivity, the child lock automatically activates again. 2. Filter Life Indicator Different colours are displayed according to the life of the individual filters.
-
Page 5: Initial Setup
7. Tank Flush Unlock the system to access this feature. Next, press and hold the key for 3 seconds. The faucet will discharge hot water and drain the tank. To cancel or pause, touch the key again to stop. Caution: Water discharged from the faucet is hot. INITIAL SETUP If system is reinstalled in an area of significant altitude difference, please repeat the initial setup steps to allow for recalibration. -
Page 6: The Water Tank
DISPENSER PRECAUTIONS 1. Water can only be dispensed continually for a maximum of 10 minutes. 2. Operating two buttons at the same time will stop the flow of water. To resume, return both buttons to their original position and try again. 3. -
Page 7: Preparation Before Installation
4. INSTALLATION GUIDE The system must be installed by an authorized personnel from AOS Bath as the system can only be activated with unique activation codes from the manufacturer. Note: The hot water tank is specifically designed to be an under-sink tank and may not be installed on the countertop or mounted on a wall. - Page 8 3. Insert the base 2. Install base reinforcement Tear off the double-sided tape on the base Insert the of the base reinforcement and paste it at mounting base Mounting into the hole the inline at the base of the hole. base from above.
-
Page 9: Wiring Diagram
WIRING DIAGRAM Faucet Exhaust data cable Water purifier data cable Room temp. water outlet water outlet Purified water feed tube Power cable PRECAUTIONS 1. Use a dedicated power socket. 2. Before connecting the new water purifier to the hot water tank, ensure the water purifier has been flushed correctly. -
Page 10: System Diagram
5. SYSTEM DIAGRAM EXPLODED VIEW DRAWING Top cover LED display Steam sensor Check valve Heater cover & steam condenser Power button Right panel Solenoid valve Water level sensors Left panel Thermal insulation Heating indicator Heating element Fuse Water pump Power supply board Water temp. -
Page 11: Electrical Diagram
SYSTEM Solenoid valve Faucet dispenser Room temp. water outlet valve Purified water direct from filter Exhaust and inlet Hot water tank inlet valve Tank cover and steam condenser Water Water pump Tank level sensors Heating element Printed ELECTRICAL DIAGRAM circuit board Steam sensor Hot water Temperature sensor... -
Page 12: Troubleshooting
6. TROUBLESHOOTING TROUBLESHOOTING Fault Possible Causes Corrective Action Hot water or exhaust pipes are blocked Check for blockages on both pipes Child lock is on Unlock the child lock No or low hot water No hot water in tank Wait for water to refill and try again flow Air bubbles in dispenser unit Try again after 10 seconds...