Table of Contents
Advertisement
Available languages
Available languages
Quick Links
Installation
Instructions
Questions? Call 800.GE.CARES (800.432.2737) or visit our Web site at: GEAppliances.com
BEFORE YOU BEGIN
Read these instructions completely and carefully.
IMPORTANT –
•
instructions for local inspector's use.
IMPORTANT –
•
codes and ordinances.
Note to Installer –
•
instructions with the Consumer.
Note to Consumer –
•
instructions for future reference.
• Skill level – Installation of this appliance requires
basic mechanical skills.
• Proper installation is the responsibility of installer.
• Product failure due to improper installation is not
covered under the Warranty.
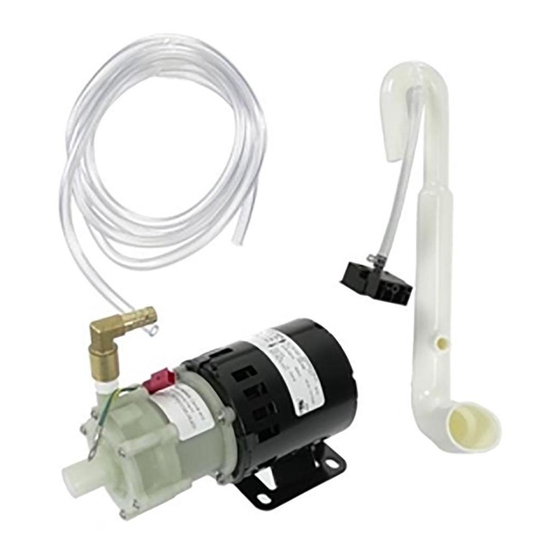
KIT CONTENTS:
1 - Drain Pump (1)
2 - Rubber Pad (1)
3 - Hardware [bolts (2), spring washer (2),
washer (2), pressure switch assembly
screw (1), ground screw (1)]
4 - PVC Drain Pipe (1)
5 - Plastic Snap Ring (1)
6 - Discharge tubing (clear)
7 - Large Metal Clamp (1)
8 - Small Metal Clamp (1)
Save these
Observe all governing
Be sure to leave these
Keep these
Drain Pump
Kit UPK4
WHAT YOU WILL NEED:
3/8" open/box wrench or adjustable wrench
Drill with phillips head bit or #2 Phillips screwdriver
Slip joint pliers
Side cutting pliers
NOTE: This pump can be installed in a cube ice machine or
a nugget ice machine.
7
1
4
8
6
2
5
31-1000617 Rev. 0
3
10-21 GEA
Advertisement
Table of Contents

Related Manuals for GE UPK4


Summary of Contents for GE UPK4
- Page 1 Installation Drain Pump Instructions Kit UPK4 Questions? Call 800.GE.CARES (800.432.2737) or visit our Web site at: GEAppliances.com BEFORE YOU BEGIN WHAT YOU WILL NEED: 3/8” open/box wrench or adjustable wrench Read these instructions completely and carefully. Drill with phillips head bit or #2 Phillips screwdriver IMPORTANT –...
- Page 2 Installation Instructions INSTALLING PUMP KIT (Cont.) DISCONNECT ELECTRICAL POWER REMOVE DRAIN TUBING Remove the plastic snap ring from the white drain WARNING pipe. Move the ring sides up and down as shown Electrical Shock Hazard to unlock and remove. Save this ring. Death or serious injury can result from failure to Snap follow these instructions.
- Page 3 Installation Instructions INSTALLING PUMP KIT (Cont.) INSTALL NEW DRAIN TUBING INSTALL THE DRAIN PUMP (Cont.) Install the new white drain tubing in the accessories to the drain pump and clamp with the Using the hardware from the kit, attach the pump snap ring included in the kit.
-
Page 4: Finalize Installation
Installation Instructions INSTALLING PUMP KIT (Cont.) CONNECT DRAIN PUMP TO ICE CONNECT DRAIN PUMP TO ICE MACHINE (Cont.) MACHINE (Cont.) IMPORTANT Locate the pressure sensor connector in the ice Ground the pump to machine behing the 2 holes in the flange shown the machine cabinet using the green ground wire in the diagram below. -
Page 5: Instructions D'installation
Instructions Ensemble de pompe d’installation de vidange UPK4 Des questions? Composez le 800.GE.CARES (800.561.3344) ou visitez notre site Web sur : Electromanagersge.ca AVANT DE COMMENCER CE DONT VOUS AUREZ BESOIN : Clé ouverte/polygonale 3/8 po ou clé réglable Veuillez lire toutes ces instructions attentivement. - Page 6 Instructions d’installation INSTALLATION DE L’ENSEMBLE DE POMPE DÉBRANCHER L’ALIMENTATION RETIRER LE TUYAU DE VIDANGE ÉLECTRIQUE Retirez l’anneau de retenue en plastique du tuyau de vidange blanc. Écartez les côtés de l’anneau en sens AVERTISSEMENT opposés comme illustré pour déverrouiller et retirer. Risque Conservez l’anneau.
- Page 7 Instructions d’installation INSTALLATION DE L’ENSEMBLE DE POMPE (suite) INSTALLER LE NOUVEAU TUYAU INSTALLER LA POMPE DE DE VIDANGE VIDANGE (suite) Installez le nouveau tuyau de vidange blanc (dans les À l’aide d’une clé et de la visserie fournie, fixez la pompe accessoires) sur la pompe de vidange et fixez avec sur le plancher de la machine à...
-
Page 8: Terminer L'installation
Instructions d’installation INSTALLATION DE L’ENSEMBLE DE POMPE (suite) RACCORDER LA POMPE DE RACCORDER LA POMPE DE VIDANGE À LA MACHINE À VIDANGE À LA MACHINE À GLAÇONS (suite) GLAÇONS (suite) Repérez le connecteur du capteur de pression dans IMPORTANT Mettez la pompe à la terre sur la machine derrière les 2 trous dans le rebord comme la carrosserie de la machine à... -
Page 9: Instrucciones De Instalación
Instrucciones Kit de la Bomba de Instalación de Desagüe UPK4 ¿Preguntas? Llame a 800.GE.CARES (800.432.2737) o visite nuestro sitio web en: GEAppliances.com ANTES DE COMENZAR QUÉ NECESITARÁ: Llave abierta/de caja de 3/8” o llave de ajuste Lea estas instrucciones en su totalidad y atentamente. - Page 10 Instrucciones de Instalación INSTALACIÓN DEL KIT DE LA BOMBA DESCONECTE LA CORRIENTE RETIRE LA TUBERÍA DE DESAGÜE ADVERTENCIA Riesgo de Retire el anillo de retención de plástico de la tubería de Descarga Eléctrica desagüe blanca. Mueva los laterales del anillo hacia Si no se siguen estas instrucciones, se podrá...
- Page 11 Instrucciones de Instalación INSTALLATION DE L’ENSEMBLE DE POMPE (suite) INSTALE LA NUEVA TUBERÍA DE INSTALE LA BOMBA DE DESAGÜE DESAGÜE (Cont.) Instale la nueva tubería de desagüe blanca en los Usando las herramientas del kit, adhiera la bomba a la empalmes de la bomba de desagüe y sujete la misma base de la máquina de hielo usando una llave.
- Page 12 Instrucciones de Instalación INSTALACIÓN DEL KIT DE LA BOMBA (Cont.) CONECTE LA BOMBA DE CONECTE LA BOMBA DE DESAGÜE A LA MÁQUINA DE DESAGÜE A LA MÁQUINA DE HIELO (Cont.) HIELO (Cont.) Ubique el conector del IMPORTANTE Ensamble del Conecte a tierra la Interruptor de sensor de presión en la Presión de...