Table of Contents
Advertisement
ASME A112.18.1 / CSA B125.1
Model/Modelo/Modèle
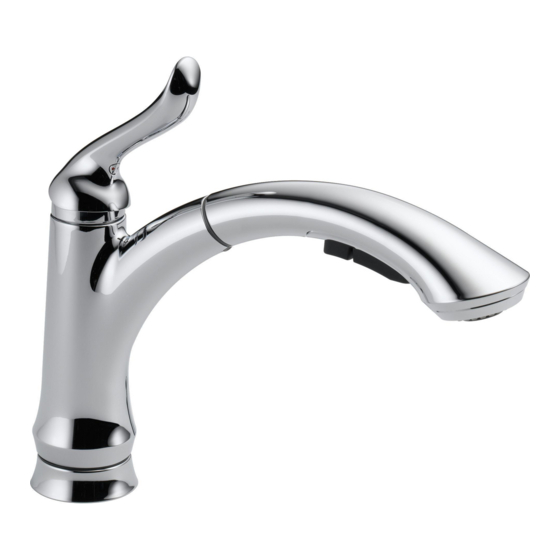
4353-DST
Series/Series/Seria
Write purchased model number here.
Escriba aquí el número del modelo comprado.
Inscrivez le numéro de modèle ici.
WARNING: THIS FAUCET IS NOT TO BE USED WITH PORTABLE
DISHWASHERS! / ADVERTENCIA: ¡SESTA LLAVE NO SE DEBE UTILIZAR
CON MAQUINAS LAVAPLATOS PORTATILES! / AVERTISSEMENT: ON NE
DOIT PAS BRANCHER UN LAVE-VAISSELE PORTATIF SUR CE ROBINET!
MEETS OR EXCEEDS — ASME A112.18.1 / CSA B125.1
ALCANZA O EXCEDE LAS SIGIENTES NORMAS —
ASME A112.18.1 / CSA B125.1
LE ROBINET EST CONFORME OU SUPèRIEUR AUX EXIGENCES DES
NORMES SUIVANTES: ASME A112.18.1 / CSA B125.1
For easy installation of your Delta
faucet you will need:
• To READ ALL the instructions completely
before beginning.
• To READ ALL warnings, care, and maintenance
information.
Para instalación fácil de su llave Delta
usted necesitará:
• LEER TODAS las instrucciones completamente
antes de empezar.
• LEER TODOS los avisos, cuidados, e
información de mantenimiento.
Pour installer votre robinet Delta
facilement, vous devez:
• LIRE TOUTES les instructions avant de débuter;
• LIRE TOUS les avertissements ainsi que toutes
les instructions de nettoyage et d'entretien.
SINGLE HANDLE PULLOUT KITCHEN FAUCETS
60960
LLAVES EXTRAÍBLES DE AGUA PARA COCINAS
ROBINETS À UNE MANETTE À BEC-DOUCHETTE
RÉTRACTABLE POUR ÉVIERS DE CUISINE
60960
1
You may need/Usted puede necesitar/
Articles dont vous pouvez avoir besoin:
T E FLO N
1/8"
3/15/10
Rev. C
Advertisement
Table of Contents

Related Manuals for Delta Linden 4353-DST


Summary of Contents for Delta Linden 4353-DST
- Page 1 ASME A112.18.1 / CSA B125.1 Model/Modelo/Modèle 4353-DST Series/Series/Seria Write purchased model number here. Escriba aquí el número del modelo comprado. Inscrivez le numéro de modèle ici. WARNING: THIS FAUCET IS NOT TO BE USED WITH PORTABLE DISHWASHERS! / ADVERTENCIA: ¡SESTA LLAVE NO SE DEBE UTILIZAR CON MAQUINAS LAVAPLATOS PORTATILES! / AVERTISSEMENT: ON NE DOIT PAS BRANCHER UN LAVE-VAISSELE PORTATIF SUR CE ROBINET! MEETS OR EXCEEDS —...
- Page 2 ® original, de estar libres de defectos de material y fabricación, por el tiempo que el consumidor comprador original sea dueño de su casa. Delta Faucet Company recomienda que use un plomero profesional para todas las instalaciones y reparaciones. Delta reemplazará, LIBRE DE CARGO, durante el período de garantía, cualquier pieza o acabado que pruebe tener defectos de material y/o fabricación bajo instalación normal, uso y...
-
Page 3: Faucet Installation
Faucet Installation DECK MOUNT STYLE Place baseplate shanks (1) through mounting holes in deck. Option: If sink is uneven, use silicone sealant under the baseplate. Place escutcheon (1) over baseplate. Insert faucet (2) down into escutcheon assembly. Instalación de la Llave de Agua INSTALACIÓN CON UNA CHAPA Coloque las espigas de la chapa de soporte (1) a través de los orificios en la... -
Page 4: Hose Installation
Hose Installation Pass hose (1) through faucet (2). Thread wand assembly (3) onto hose (1) to prevent it from becoming lodged in faucet when installing weight (4). Slide hose weight (4) over other end of hose. Instalación de la Manguera Pase la manguera (1) por la llave de agua (2). -
Page 5: Water Line/Custom Fit Connections
Water Line Connections Ensure all fittings and end connections are free of debris. Faucet fittings (1) are 3/8" compression, with ends colored red for hot and blue for cold. Loop tubing (2) if it is too long. Note: Recommended tubing minimum bend diameter is 8". -
Page 6: Plastic Sleeve Installation
Correct method Método Correcto Bonne méthode Custom Fit Connections - Plastic Sleeve Installation Instructions 1. Identify desired length of tube (1). Leave 1" - 2" of extra length to allow for easier installation and cut tube. Ensure cut is straight and burr free. 2. -
Page 7: Soap Dispenser Installation
Soap Dispenser Installation Remove nut (1). Separate head (2) from body (3). Insert body (3) and gasket (4) through selected hole in sink. Make sure gasket (4) is properly seated in the base. Secure body to sink with nut (1). From under the sink screw the bottle (5) onto the body assembly shank. -
Page 8: Setting The Handle Limit Stop
Setting The Handle Limit Stop (Optional) This faucet includes an integrated handle limit stop that has two positions. Position 1, to the left, allows full handle motion (the full range between “all cold” to “all hot”). The faucet is set in position 1 in the factory. Position 2, to the right, allows half of the normal handle motion (“all cold”... -
Page 9: Maintenance
1/8" Maintenance If faucet leaks from under handle: Remove handle and unthread trim cap (1). Using a wrench, ensure bonnet nut (2) is tight. If leak persists–SHUT OFF WATER SUPPLIES. Replace valve cartridge (3). When reinstalling parts, make sure bonnet nut (2) is tightened securely with a wrench.* If faucet leaks from spout outlet–SHUT OFF WATER SUPPLIES. -
Page 10: Parts Layout
RP40650 Set Screw Tornillo de Presión Vis de calage RP60966▲ Button / Botón / Bouton RP60963▲ Wand Assembly Ensamble de la Cabeza del Rociador Bec-douchette RP44645▲ Escutcheon Chapetón Boîtier RP60962▲ Escutcheon & Gasket Chapetón y Empaque Boîtier et joint plat RP51243 Gaskets Empaques... - Page 11 Notes / Notas / Notes...
- Page 12 Notes / Notas / Notes...