Table of Contents
Advertisement
Quick Links
Owner's Manual
40" PLUG AERATOR
Model No. 486.24326
CAUTION:
Before using this product, read
this manual and follow all Safety
Rules and Operating Instructions.
Sears, Roebuck and Co., Hoffman Estates, IL 60179 U.S.A.
www.sears.com/craftsman
PRINTED IN U.S.A.
®
STOP
DO NOT RETURN TO STORE
For Missing Parts or Assembly
Questions Call 1-866-576-8388
• Safety
• Assembly
• Operation
• Maintenance
• Parts
FORM NO. 40016 (REV. 05/15/08)
Advertisement
Table of Contents

Related Manuals for Craftsman 486.24326


Summary of Contents for Craftsman 486.24326
- Page 1 Owner's Manual 40" PLUG AERATOR Model No. 486.24326 CAUTION: Before using this product, read this manual and follow all Safety Rules and Operating Instructions. Sears, Roebuck and Co., Hoffman Estates, IL 60179 U.S.A. www.sears.com/craftsman PRINTED IN U.S.A. ® DO NOT RETURN TO STORE...
- Page 2 Do not drive too close to a creek or a ditch. • Do not tow this equipment on a highway or any other public thoroughfare. • Follow the maintenance instructions as outlined in this owners manual. 486.24326 __________________ __________________...
- Page 3 HARDWARE PACKAGE CONTENTS Qty. Hex Bolt, 1/2" x 3-1/2" Lg. Hex Bolt, 1/4" x 1-3/4" Lg. Hex Bolt, 1/2" x 1-1/4" Lg. Hex Bolt, 3/8" x 1" Lg. Hex Bolt, 5/16" x 3/4" Lg. Hair Cotter Pin, Large Hitch Pin Nylock Jam Nut, 1/2"...
- Page 4 CARTON CONTENTS 1. Tray 2. Wheel Brackets (2) 3. Middle Brace 4. Hitch Bracket TOOLS REQUIRED FOR ASSEMBLY (2) 7/16" wrenches (2) 1/2" wrenches (2) 9/16" wrenches (2) 3/4" wrenches or adjustable wrenches • Attach the lift lever assembly to the two holes in the middle of the shaft using two 1/4"...
- Page 5 • Identify the short end of the shaft. Assemble a 1" long spacer (S), a single spool assembly, a 1.33" long spacer (T), a double spool assembly, another 1.33" long spacer (T) and a 3/4" flat washer (N) onto the short end of the shaft.
- Page 6 • Assemble the hitch bracket to the tongue using two 3/8" x 1" hex bolts (D), and two 3/8" nylock nuts (I). Tighten. See figure 7. • Assemble the hitch pin (G) through the hitch bracket and the tongue. Secure the hitch pin with the large hairpin cotter (F).
- Page 7 • Turn the lift handle as shown in figure 11 and attach it to the side of the lift lever that is indicated. Use a 1/2" x 1-1/4" hex bolt (C) and 1/2" nylock nut (M) in the bottom hole and the clevis pin and small hairpin cotter in the top hole.
-
Page 8: Before Starting
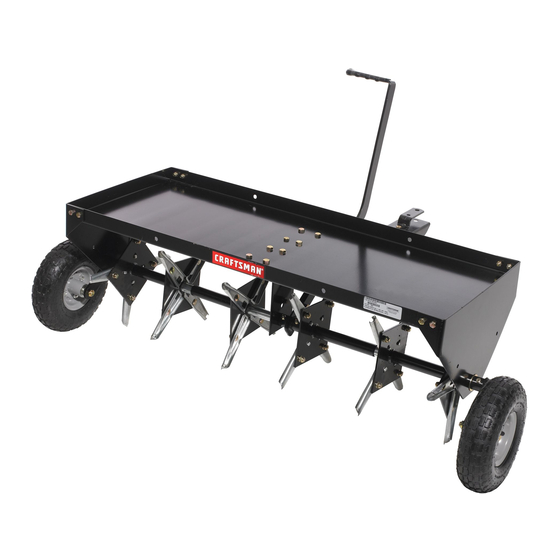
KNOW YOUR PLUG AERATOR Read this owner's manual and safety rules before operating your plug aerator. Compare the illustration below with your aerator to familiarize yourself with the various controls and their locations. LIFT HANDLE Raises the aerator to the transport position and lowers it to the operating position. STOP BRACKETS Locks the lift handle in the transport position (upper bracket) or operating position (lower bracket). - Page 9 DO NOT attempt to aerate if ground is too wet, or • muddy. • Due to possible small rocks and gravel which can be present in aerated soil plugs, it is recommended that the plugs be raked; otherwise damage to the lawn mower blades may arise, especially when reel type mowers are used.
- Page 10 REPAIR PARTS FOR PLUG AERATOR MODEL 486.24326 PARTS...
- Page 11 REPAIR PARTS FOR 40" PLUG AERATOR MODEL 486.24326 REF. PART QTY. DESCRIPTION 25853 Tray 24623 Middle Brace 24619 End Plate 25664 Lift Handle 25800 Tongue 25801 Shaft 23687 Hitch Bracket 46503 Wheel 63931 Wheel Bracket Assembly 63929 Spool Assembly (Double)
- Page 12 Get it fixed, at your home or ours! For repair – in your home – of all major brand appliances, lawn and garden equipment, or heating and cooling systems, no matter who made it, no matter who sold it! For the replacement parts, accessories and owner’s manuals that you need to do-it-yourself.