Advertisement
Quick Links
Advertisement

Related Manuals for Fisher-Price Y0895


Summary of Contents for Fisher-Price Y0895
- Page 1 Y0895 Please keep this instruction sheet for future reference, as it contains important information. Adult assembly is required. Tool needed for assembly: Phillips Screwdriver (not included). Requires four “D” (LR20) alkaline batteries (not included) for operation. fisher-price.com...
-
Page 2: Consumer Assistance
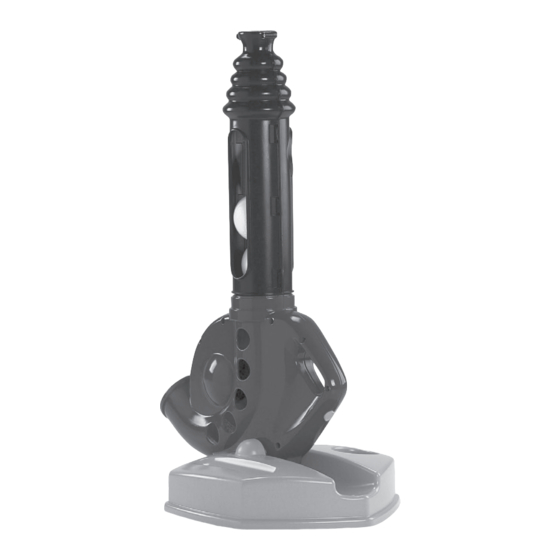
US Instructions CONSUMER ASSISTANCE 1-800-432-5437 (US & Canada) 1300 135 312 (Australia) Fisher-Price, Inc., 636 Girard Avenue, East Aurora, NY 14052. Hearing-impaired consumers: 1-800-382-7470. Outside the United States: Canada: Mattel Canada Inc., 6155 Freemont Blvd., Mississauga, Ontario L5R 3W2; www.service.mattel.com. - Page 3 Assembled Parts Assembly Ball Chute (2 Pieces) Slots Tabs Cover • Insert and snap the tabs into the slots in the ball chute pieces. Base Motor #6 x " (1,3 cm) Screws - 4 • Insert two screws into the pegs at SHOWN ACTUAL SIZE the top of the ball chute and tighten. Note: Tighten and loosen all screws with a Phillips Screwdriver. Do not over-tighten the screws.
- Page 4 Assembly Ball Chute Groove Socket Motor Plug • Lower the motor so that the open peg fits into the groove in the base. • I nsert the battery plug into the socket in the motor, as shown. • Align the tabs at the bottom of the Hint: If there isn’t a socket inside the ball chute with the grooves in the peg, you positioned the motor/chute opening of the motor. assembly backwards in the base. • Turn the ball chute clockwise to lock Remove the motor/chute assembly and it into position.
-
Page 5: Battery Installation
Battery Battery Safety Installation Information In exceptional circumstances, batteries may leak fluids that can cause 1,5V x 4 a chemical burn injury or ruin your "D" (LR20) product. To avoid battery leakage: • Do not mix old and new batteries or batteries of different types: alkaline, standard (carbon-zinc) or rechargeable (nickel-cadmium). • Insert batteries as indicated inside the battery compartment. • Remove batteries during long periods of non-use. - Page 6 Batting Beginner Practice Tips • We recommend using this toy outdoors, on a non-paved surface, such as grass or sand. Do not use outdoors when it is raining or there is wet grass. The balls will not launch properly. • When your child is batting, be sure there are no other children in or around the batting area, including directly in front of the unit. Hit from the tee! • This toy is designed for use with • Position the ball chute com- foam balls and plastic bat (both pletely upright.
- Page 7 Rookie Balls pop up automatically to hit. Hit the pitched ball from up to 10 feet (three meters) away! • Push the ball chute all the way back. • Position the ball chute com- • Load the balls into the side of the pletely upright. ball chute. • Load the balls into the side of the • Locate the power switch on the top ball chute. of the motor. Slide the power switch • Locate the power switch on the top of the motor. Slide the power switch • Press the automatic ball button and get ready.
-
Page 8: Consumer Information
Consumer Information FCC Statement (United States Only) Storage • Load the balls into the side of the ball chute. This equipment has been tested and found to comply with the limits for • Fit the bat in the circular opening in a Class B digital device, pursuant to the base. Part 15 of the FCC Rules. These limits Care are designed to provide reasonable • Do not leave this product outdoors. Store protection against harmful interference in this product indoors when not in use. a residential installation.