Advertisement
Quick Links
HDMI over Cat6 Extender Kits,
Repeater and Receivers, 4K/60 Hz
Extender Kit Models: B127A-1A1-BHBH, B127A-1A1-BHPH,
B127A-2A1-BHBH, B127A-111-BHTH, B127A-111-BDTH
Este manual está disponible en español en la página de Tripp Lite:
Ce manuel est disponible en français sur le site Web de Tripp Lite :
Русскоязычная версия настоящего руководства представлена на
Dieses Handbuch ist in deutscher Sprache auf der Tripp Lite-Website
1111 W. 35th Street, Chicago, IL 60609 USA • tripplite.com/support
-03-127-933CC9-EN.indd 1
-03-127-933CC9-EN.indd 1
Owner's Manual
Receivers: B127A-1A0-BH, B127A-2A0-BH,
B127A-1P0-PH, B127A-110-BH
Repeater: B127A-010-H
веб-сайте компании Tripp Lite по адресу: tripplite.com
verfügbar: tripplite.com
WARRANTY REGISTRATION
Register your product today and be automatically entered to
win an ISOBAR
surge protector in our monthly drawing!
®
tripplite.com/warranty
Copyright © 2021 Tripp Lite. All rights reserved.
tripplite.com
tripplite.com
1
3/24/2021 9:38:13 AM
3/24/2021 9:38:13 AM
Advertisement

Related Manuals for Tripp Lite B127A-1A1-BHBH


Summary of Contents for Tripp Lite B127A-1A1-BHBH
- Page 1 Repeater: B127A-010-H Este manual está disponible en español en la página de Tripp Lite: tripplite.com Ce manuel est disponible en français sur le site Web de Tripp Lite : tripplite.com Русскоязычная версия настоящего руководства представлена на веб-сайте компании Tripp Lite по адресу: tripplite.com Dieses Handbuch ist in deutscher Sprache auf der Tripp Lite-Website verfügbar: tripplite.com...
-
Page 2: Package Contents
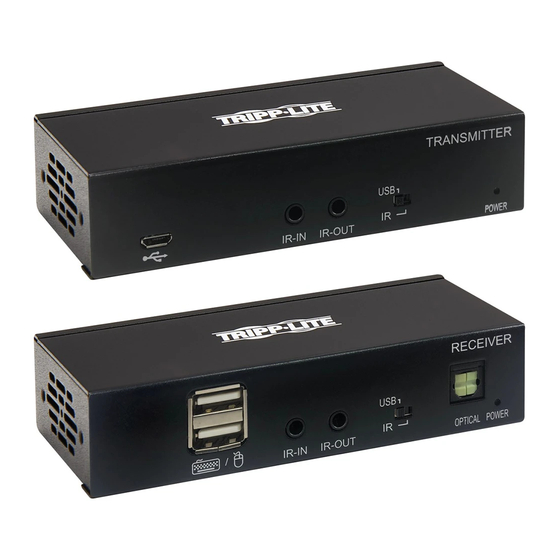
Mounting Hardware Product Features B127A-1A1-BHBH • HDMI over Cat6 Power over Cable (PoC) Extender Kit • Extends a 4K x 2K (3840 x 2160) @ 60 Hz signal, as specified in HDMI 2.0, up to 230 ft. (70 m) from the source •... - Page 3 Product Features • Real-time video compression and decompression technology • Receiver features built-in Toslink port for audio extraction function • Compatible with HDCP 2.2, High Dynamic Range (HDR) and 36-bit color depth • Plug and play—no software or drivers required •...
- Page 4 Product Features • Receiver features built-in Toslink port for audio extraction function • Compatible with HDCP 2.2, High Dynamic Range (HDR) and 36-bit color depth • Plug and play—no software or drivers required • Includes mounting hardware that enables both the local transmitter and remote receiver units to be wall-mounted, rack-mounted or pole-mounted •...
- Page 5 Product Features • Power over Cable (PoC) function allows external power supply to be plugged into transmitter and provide power to both units B127A-111-BHTH • HDMI over Cat6 Power over Cable (PoC) daisy-chainable Extender Kit • Remote transceiver unit features built-in equalization (EQ) control, auto EDID image adjustment and RJ45 expanding port to be able to connect to next B127A-110-BH •...
- Page 6 Product Features • Supports up to 7.1-channel surround sound audio • Transceiver features built-in Toslink port for audio extraction function • Compatible with HDCP 2.2, High Dynamic Range (HDR) and 36-bit color depth • Plug and play—no software or drivers required •...
- Page 7 Product Features • Real-time video compression and decompression technology • Add a B127A-010-H signal booster for increased maximum transmission distance. See B127A-111-BHTH for details. B127A-111-BDTH • DisplayPort to HDMI over Cat6 with Power over Cable (PoC) daisy-chainable Extender Kit • Extends audio/video signal from a DisplayPort source to an HDMI display •...
- Page 8 Product Features • Increase the maximum transmission distance to 1,090 ft. by adding a B127A-010-H signal booster to the first link of a daisy-chain installation Note: The signal booster will only work when used in the first link of the daisy-chain installation. •...
- Page 9 Product Features • Features built-in Toslink port for audio extraction function • Supports up to 7.1-channel surround sound audio • Compatible with HDCP 2.2, High Dynamic Range (HDR) and 36-bit color depth • Plug and play—no software or drivers required •...
- Page 10 Product Features • Includes mounting hardware that enables the local transmitter to be wall-mounted, rack-mounted or pole-mounted • Power over Cable (PoC) function allows receiver unit to be powered by a connected transmitter, switch or splitter unit B127A-1P0-PH • HDMI over Cat6 Power over Cable (PoC)-Compatible Pigtail Receiver •...
-
Page 11: Optional Accessories
Product Features B127A-010-H • Over Cat6 signal repeater for B127A extenders • Repeater unit extends the transmission of a 4K x 2K (3840 x 2160) @ 60 Hz signal, as specified in HDMI 2.0, up to a total of 400 ft. (120 m) •... - Page 12 HDMI ports support UHD Deep Color. Note: Check USB/IR DIP switch, as the default setting is set to IR. This only applies to the B127A-1A1-BHBH. Note: To connect a local monitor to your installation, the UHD Deep Color setting may need to be disabled on your local TV/monitor (depending make/mode) to achieve 4K @ 60 Hz resolution.
- Page 13 Mounting Instructions (sel ect models only) The B127A-1A1-BHBH, B127A-2A1-BHBH, B127A-1A1-BHPH, B127A-111-BHTH, B127A-111-BDTH, B127A-1A0-BH, B127A-2A0-BH and B127A-110-BH include mounting hardware that allows for a variety of mounting methods. The following images illustrate how the included mounting brackets can be attached for different installations.
- Page 14 (AWG) size higher than 24 AWG will result in shorter extension distance. Higher-gauge cabling, such as 26 AWG, has a more limited transmission capability than lower-gauge cabling. All Tripp Lite N202-Series Cat6 cables are made with 24 AWG solid wire cabling.
- Page 15 Make sure all equipment in the installation—such as TVs, Blu-ray™ players and the transmitter—is powered OFF. Using an HDMI 2.0 cable (such as Tripp Lite P569-XXX-CERT or P568-XXX-2A Series cables), connect the HDMI source to the INPUT port on the local transmitter unit.
- Page 16 Connect the external power supply to either the transmitter or receiver unit. Plug it into an available wall outlet or a Tripp Lite surge protector, power distribution unit (PDU) or uninterruptible power supply (UPS). The POWER (green) LED on the local transmitter unit will illuminate to indicate the unit is receiving power from the external power supply.
- Page 17 (AWG) size higher than 24 AWG will result in shorter extension distance. Higher-gauge cabling, such as 26 AWG, has a more limited transmission capability than lower-gauge cabling. All Tripp Lite N202- Series Cat6 cables are made with 24 AWG solid wire cabling.
- Page 18 Make sure all equipment in the installation—such as TVs, Blu-ray players and the transmitter—is powered OFF. Using an HDMI 2.0 cable (such as Tripp Lite P569-XXX-CERT or P568-XXX-2A Series cables), connect the HDMI source to the INPUT port on the local transmitter unit.
- Page 19 Connect the external power supply to either the transmitter or receiver unit. Plug it into an available wall outlet or a Tripp Lite surge protector, power distribution unit (PDU) or uninterruptible power supply (UPS). The POWER (green) LED on the local transmitter unit will illuminate to indicate the unit is receiving power from the external power supply.
- Page 20 (AWG) size higher than 24 AWG will result in shorter extension distance. Higher-gauge cabling, such as 26 AWG, has a more limited transmission capability than lower-gauge cabling. All Tripp Lite N202-Series Cat6 cables are made with 24 AWG solid wire cabling.
- Page 21 Make sure all equipment in the installation—such as TVs, Blu-ray players and the transmitter—is powered OFF. Using an HDMI 2.0 cable (such as Tripp Lite P569-XXX-CERT or P568-XXX-2A Series cables), connect the HDMI source to the INPUT port on the local transmitter unit.
- Page 22 Connect the external power supply to either the transmitter or receiver unit. Plug it into an available wall outlet or a Tripp Lite surge protector, power distribution unit (PDU) or uninterruptible power supply (UPS). The POWER (green) LED on the local transmitter unit will illuminate to indicate the unit is receiving power from the external power supply.
- Page 23 (AWG) size higher than 24 AWG will result in shorter extension distance. Higher-gauge cabling, such as 26 AWG, has a more limited transmission capability than lower-gauge cabling. All Tripp Lite N202-Series Cat6 cables are made with 24 AWG solid wire cabling.
- Page 24 Make sure all equipment in the installation—such as TVs, Blu-ray players and the transmitter—is powered OFF. Using an HDMI 2.0 cable (such as Tripp Lite P569-XXX-CERT or P568-XXX-2A Series cables), connect the HDMI source to the INPUT port on the local transmitter unit.
- Page 25 Standard Extender Kit Installation Connect the external power supply to the transmitter unit. Plug it into an available wall outlet or a Tripp Lite surge protector, power distribution unit or uninterruptible power supply (UPS). The POWER (green) LED on the local transmitter/splitter unit will illuminate to indicate the unit is receiving power from the external power supply.
- Page 26 (AWG) size higher than 24 AWG, will result in shorter extension distance. Higher-gauge cabling, such as 26 AWG, has a more limited transmission capability than lower-gauge cabling. All Tripp Lite N202-Series Cat6 cables are made with 24 AWG solid wire cabling.
- Page 27 Make sure all equipment in the installation—such as TVs, Blu-ray players and the transmitter—is powered OFF. Using an HDMI 2.0 cable (such as Tripp Lite P569-XXX-CERT or P568-XXX-2A Series cables), connect the HDMI source to the INPUT port on the local transmitter unit.
- Page 28 Turn on the power to your connected TVs/monitors. Connect the external power supply to the transmitter. Plug it into an available wall outlet or a Tripp Lite surge protector, power distribution or uninterruptible power supply (UPS). The POWER (green) LED on the local transmitter unit will illuminate to indicate the unit is receiving power from the external power supply.
- Page 29 (AWG) size higher than 24 AWG, will result in shorter extension distance. Higher-gauge cabling, such as 26 AWG, has a more limited transmission capability than lower-gauge cabling. All Tripp Lite N202- Series Cat6 cables are made with 24 AWG solid wire cabling.
- Page 30 Using Cat6 cable, connect the RJ45 port on the local transmitter unit to the RJ45 port on the remote receiver unit. Using an HDMI 2.0 cable (such as Tripp Lite P569-XXX- CERT or P568-XXX-2A Series cables), connect the remote transceiver unit’s HDMI port to a monitor.
- Page 31 Standard Extender Kit Installation Connect the external power supply to the transmitter. Plug it into an available wall outlet or a Tripp Lite surge protector, power distribution or uninterruptible power supply (UPS). The POWER (green) LED on the local transmitter unit will illuminate to indicate the unit is receiving power from the external power supply.
- Page 32 Transceiver Daisy-Chain Installation (B127A-110-BH only) B127A-110-BH Up to 230 ft. Cat6 solid cable at 4K/60 Hz Up to 15 ft. HDMI 2.0 cable at 4K/60 Hz transceiver Toslink cable IR Control IR Control IR Sensor IR Sensor Level 1 Monitor IR Control IR Sensor HDR Player...
- Page 33 HDMI Cable. Connect the external power supply to the local unit and plug it into a Tripp Lite surge protector, power distribution unit (PDU) or uninterruptible power supply (UPS). The green RJ45 LEDs will illuminate to indicate power is being received from the external power supply.
- Page 34 P569-XXX-CERT or P568-XXX-2A Series HDMI Cable 10. Connect the external power supply to the B127A-110-BH and plug it into a Tripp Lite surge protector, power distribution unit (PDU) or uninterruptible power supply (UPS). The green power LED and the green RJ45 LEDs will illuminate to indicate the unit is receiving power.
- Page 35 Transceiver Daisy-Chain Installation (B127A-110-BH only) 16. If necessary, use the Equalization control on the remote/ repeater unit(s) and remote receiver unit to adjust the video image. 17. The maximum number of daisy-chain layers is four for a total distance of 920 ft., but the distance can be extended to 1,090 ft.
- Page 36 (e.g. Blu-ray player, etc.). (Optional for B127A-1A1-BHBH only) With a user-supplied USB Micro-B cable (such as Tripp Lite U050-XXX Series USB cable), connect to the transmitter’s Micro-B port. Then connect a keyboard and mouse to the available USB-A ports on the receiver unit.
-
Page 37: Warranty And Product Registration
OF THE USE OF THIS PRODUCT, EVEN IF ADVISED OF THE POSSIBILITY OF SUCH DAMAGE. Specifically, TRIPP LITE is not liable for any costs, such as lost profits or revenue, loss of equipment, loss of use of equipment, loss of software, loss of data, costs of substitutes, claims by third parties, or otherwise. - Page 38 Tripp Lite has a policy of continuous improvement. Specifications are subject to change without notice. Photos and illustrations may differ slightly from actual products.
- Page 39 -03-127-933CC9-EN.indd 39 -03-127-933CC9-EN.indd 39 3/24/2021 9:38:16 AM 3/24/2021 9:38:16 AM...
- Page 40 1111 W. 35th Street, Chicago, IL 60609 USA • tripplite.com/support 21-03-127 93-3CC9_RevC -03-127-933CC9-EN.indd 40 -03-127-933CC9-EN.indd 40 3/24/2021 9:38:16 AM 3/24/2021 9:38:16 AM...