Advertisement
Quick Links
Owner's Manual
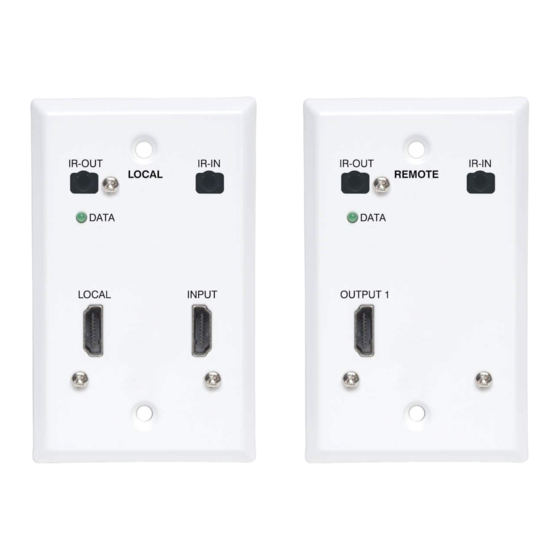
4K A/V over Cat6 Wall-Plate
Extender Kits and Receivers
HDMI Extender Kit Models:
B127A-1A1-FHFH, B127A-2A1-FHFH, B127A-1A1-BHFH
DisplayPort to HDMI Extender Kit Models:
B127A-1A1-FDFH, B127A-1A1-BDFH
HDMI Receiver Models: B127A-1A0-FH, B127A-2A0-FH
Este manual está disponible en español en la página de Tripp Lite:
Ce manuel est disponible en français sur le site Web de Tripp Lite :
Русскоязычная версия настоящего руководства представлена на
веб-сайте компании Tripp Lite по адресу: tripplite.com
Dieses Handbuch ist in deutscher Sprache auf der Tripp Lite-Website
WARRANTY REGISTRATION
Register your product today and be automatically entered to
win an ISOBAR
1111 W. 35th Street, Chicago, IL 60609 USA • tripplite.com/support
Copyright © 2021 Tripp Lite. All rights reserved.
tripplite.com
tripplite.com
verfügbar: tripplite.com
surge protector in our monthly drawing!
®
tripplite.com/warranty
1
Advertisement

Related Manuals for Tripp Lite B127A-1A1-FHFH


Summary of Contents for Tripp Lite B127A-1A1-FHFH
- Page 1 HDMI Receiver Models: B127A-1A0-FH, B127A-2A0-FH Este manual está disponible en español en la página de Tripp Lite: tripplite.com Ce manuel est disponible en français sur le site Web de Tripp Lite : tripplite.com Русскоязычная версия настоящего руководства представлена на веб-сайте компании Tripp Lite по адресу: tripplite.com Dieses Handbuch ist in deutscher Sprache auf der Tripp Lite-Website verfügbar: tripplite.com...
-
Page 2: Package Contents
Package Contents B127A-1A1-FHFH • Wall-Plate Transmitter and Receiver • External Power Supply (Input: 100-240V, 50/60 Hz, 0.6A; Output: 24V/1A) • Plug Adapters (AS/NZS 3112 Australia; BS 1363 U.K.; CEE 7/16 Schuko; NEMA 1-15P North America) • IR-In and IR-Out Cables •... - Page 3 Package Contents B127A-1A1-FDFH • Wall-Plate DisplayPort Transmitter and HDMI Receiver • External Power Supply (Input: 100-240V, 50/60 Hz, 0.6A; Output: 24V/1A) • Plug Adapters (AS/NZS 3112 Australia; BS 1363 U.K.; CEE 7/16 Schuko; NEMA 1-15P North America) • IR-In and IR-Out Cables •...
- Page 4 Package Contents B127A-1A1-BDFH • Box-Style DisplayPort Transmitter and Wall-Plate HDMI Receiver • External Power Supply (Input: 100-240V, 50/60 Hz, 0.6A; Output: 24V/1A) • Plug Adapters (AS/NZS 3112 Australia; BS 1363 U.K.; CEE 7/16 Schuko; NEMA 1-15P North America) • Mounting Hardware •...
-
Page 5: Optional Accessories
Optional Accessories • N202-Series Cat6 24 AWG Solid-Wire Patch Cables • P569-XXX-CERT or P568-XXX-2A Series High-Speed HDMI 2.0 Cables • P580-Series DisplayPort 1.2 Cables • B127A-010-H Signal Booster... -
Page 6: Product Features
Product Features B127A-1A1-FHFH • Extends video resolutions up to 4K x 2K (3840 x 2160) @ 60 Hz (as specified in HDMI 2.0) to an HDMI monitor up to 230 ft. (70 m) • HDCP 2.2, High Dynamic Range (HDR) and 4:4:4 color space compatible •... - Page 7 Product Features • Single-gang metal wall-plate design with included mounting screws • HDCP 2.2, High Dynamic Range (HDR) and 4:4:4 color space compatible • Local HDMI port included on transmitter unit supports 4K/60 Hz • Plug and play—no software or drivers required •...
- Page 8 Product Features • Local HDMI port included on transmitter unit supports 4K/60 Hz • Plug and play—no software or drivers required • Bi-directional Power over Cable (PoC) function allows external power supply to be plugged in at either transmitter or receiver side •...
- Page 9 Product Features • Plug and play—no software or drivers required • Power over Cable (PoC) function allows external power supply to be plugged in at the transmitter side and provides power to receiver unit • Remote receiver unit includes built-in equalization (EQ) control •...
- Page 10 • Extends video resolutions up to 4K x 2K (3840 x 2160) @ 60 Hz (as specified in HDMI 2.0) to an HDMI monitor up to 230 ft. (70 m) • Single-gang metal wall-plate receiver works with Tripp Lite B127A-Series transmitter, splitter and switch products (sold separately) •...
- Page 11 60 Hz (as specified in HDMI 2.0) to an HDMI monitor up to 230 ft. (70 m) • Dual-output single-gang metal wall-plate receiver works with Tripp Lite B127A-Series transmitter, splitter and switch products (sold separately) • HDCP 2.2, High Dynamic Range (HDR) and 4:4:4 color space compatible •...
- Page 12 Disclaimer Before installation, please check the following settings of your source(s) and TV/monitor(s): 1. Set display to 60 Hz. Double-check factory settings, as default can be set to a lower frequency (Hz) than advertised. 2. Ensure the input setting of your monitor is set at HDMI 2.0. Some displays may have default setting at HDMI 1.4.
- Page 13 (AWG) size higher than 24 AWG, will result in shorter extension distance. Higher gauge cabling, such as 26 AWG, has a more limited transmission capability than lower gauge cabling. All Tripp Lite N202-Series Cat6 cables are made with 24 AWG solid-wire cabling.
- Page 14 1. Using an HDMI cable, connect the HDMI source to the INPUT port on the local transmitter unit. 2. Optional: Using an HDMI 2.0 cable (such as Tripp Lite P569-XXX-CERT or P568-XXX-2A Series cables), connect a local monitor to the LOCALOUT port on the B127A-1A1-FHFH local transmitter unit.
- Page 15 Installation Optional: Connect the included IR-OUT cable to the transmitter unit’s IR-OUT port. Place the sensor on the IR-OUT cable in an unobstructed area within clear view of the device being controlled. Then connect the included IR-IN cable to the receiver unit’s IR-IN port.
- Page 16 (AWG) size higher than 24 AWG, will result in shorter extension distance. Higher gauge cabling, such as 26 AWG, has a more limited transmission capability than lower gauge cabling. All Tripp Lite N202-Series Cat6 cables are made with 24 AWG solid-wire cabling.
- Page 17 1. Using an HDMI cable, connect the HDMI source to the INPUT port on the local transmitter unit. 2. Optional: Using an HDMI 2.0 cable (such as Tripp Lite P569-XXX-CERT or P568-XXX-2A Series cables), connect a local monitor to the LOCALOUT port on the local transmitter unit.
- Page 18 Installation Optional: Connect the included IR-OUT cable to the transmitter unit’s IR-OUT port. Place the sensor on the IR-OUT cable in an unobstructed area within clear view of the device being controlled. Then connect the included IR-IN cable to the receiver unit’s IR-IN port.
- Page 19 (AWG) size higher than 24 AWG, will result in shorter extension distance. Higher gauge cabling, such as 26 AWG, has a more limited transmission capability than lower gauge cabling. All Tripp Lite N202-Series Cat6 cables are made with 24 AWG solid-wire cabling.
- Page 20 Installation 1. Using a DisplayPort 1.2 cable (such as Tripp Lite P580-Series 4K/60 Hz DisplayPort cables), connect the DisplayPort source to the INPUT port on the local transmitter unit. 2. Optional: Using an HDMI 2.0 cable (such as Tripp Lite...
- Page 21 Installation 7. Turn on the power to the DisplayPort source. The DATA (green) LED on the local receiver unit will blink to indicate a signal is being received from the source.
- Page 22 (AWG) size higher than 24 AWG, will result in shorter extension distance. Higher gauge cabling, such as 26 AWG, has a more limited transmission capability than lower gauge cabling. All Tripp Lite N202-Series Cat6 cables are made with 24 AWG solid-wire cabling.
- Page 23 1. Using an HDMI 2.0 cable, connect the HDMI source to the INPUT port on the local transmitter unit. 2. Optional: Using an HDMI 2.0 cable (such as Tripp Lite P569-XXX-CERT or P568-XXX-2A Series cables), connect a local monitor to the LOCALOUT port on the B127A-1A1-BHFH local transmitter unit.
- Page 24 Installation 4. Using an HDMI 2.0 cable (such as Tripp Lite P569-XXX-CERT or P568-XXX-2A Series cables), connect the remote receiver unit’s HDMI port to a monitor. 5. Turn the power on to your connected TVs/monitors. 6. Connect the external power supply to the local transmitter...
- Page 25 (AWG) size higher than 24 AWG, will result in shorter extension distance. Higher gauge cabling, such as 26 AWG, has a more limited transmission capability than lower gauge cabling. All Tripp Lite N202-Series Cat6 cables are made with 24 AWG solid-wire cabling.
- Page 26 Installation 1. Using a DisplayPort 1.2 cable (such as Tripp Lite P580-Series cables), connect the DisplayPort source to the INPUT port on the local transmitter unit. 2. Optional: Using an HDMI 2.0 cable (such as Tripp Lite P569-XXX-CERT or P568-XXX-2A Series cables), connect a local monitor to the LOCALOUT port on the B127A-1A1-BDFH local transmitter unit.
- Page 27 Installation 7. Turn on the power to the DisplayPort source. 8. The RJ45 (orange) LED will illuminate on the local transmitter unit and the DATA (green) LED on the remote receiver unit will blink to indicate a signal is being received from source to display.
- Page 28 (AWG) size higher than 24 AWG, will result in shorter extension distance. Higher gauge cabling, such as 26 AWG, has a more limited transmission capability than lower gauge cabling. All Tripp Lite N202-Series Cat6 cables are made with 24 AWG solid-wire cabling.
- Page 29 Installation B127A-004-BH Receiver Up to 230 ft. (70 m) Cat6 cable at 4K / 60 Hz. Up to 15 ft. (4.5 m) HDMI 2.0 cable at 4K / 60 Hz. B127A-1P0-PH B127A-1A0-BH OUTPUT INPUT REMOTE DATA B127A-1A0-FH OUTPUT 1 ...
-
Page 30: Warranty And Product Registration
Warranty and Product Registration 1-Year Limited Warranty TRIPP LITE warrants its products to be free from defects in materials and workmanship for a period of one (1) year from the date of initial purchase. TRIPP LITE’s obligation under this warranty is limited to repairing or replacing (at its sole option) any such defective products. - Page 31 Warranty and Product Registration PRODUCT REGISTRATION Visit tripplite.com/warranty today to register your new Tripp Lite product. You’ll be automatically entered into a drawing for a chance to win a FREE Tripp Lite product!* * No purchase necessary. Void where prohibited. Some restrictions apply.
- Page 32 1111 W. 35th Street, Chicago, IL 60609 USA • tripplite.com/support 21-02-252 93-3D24_RevB...