Garmin Nuvi 200W Quick Start Manual
Personal travel assistant
Hide thumbs
Also See for Nuvi 200W:
- Краткое руководство по эксплуатации (17 pages) ,
- Owner's manual (50 pages) ,
- Safety and product information (32 pages)
Table of Contents
Advertisement
Advertisement
Table of Contents

Related Manuals for Garmin Nuvi 200W


Summary of Contents for Garmin Nuvi 200W
- Page 1 quick start manual nüvi 200W Series ® personal travel assistant...
-
Page 2: What Is In The Box
What Is in the Box? • nüvi unit • Suction cup mount to mount the nüvi to your windshield. • Vehicle power cable to charge/power your nüvi using a vehicle power outlet. • Dashboard disk to mount the suction cup mount on your dashboard instead. Power key: Slide to the left to turn the unit on/off; slide to the... -
Page 3: Step 1: Mount The Nüvi
Check your state and local traffic laws before mounting. Currently, state laws in California and Minnesota prohibit drivers from using suction mounts on their windshields while operating motor vehicles. Other Garmin dashboard or friction mounting options should be used. See Step 1: Mount the nüvi Select a suitable location to mount the nüvi on your windshield. -
Page 4: Step 2: Configure The Nüvi
Step 2: Configure the nüvi To turn on your nüvi, slide the Power key to the left. Follow the on-screen instructions. To turn off your nüvi, slide the Power key to the left. Step 3: Acquire Satellites Before the nüvi can find your current location and navigate a route, you must do the following: 1. -
Page 5: Finding A Restaurant
Finding a Restaurant 1. Touch Where Interest > Food. 2. Select a category. Touch to see more choices. 3. Select a destination, and touch Go. Finding an Address 1. Touch Where to > 2. Select a country and state/province, if necessary. 3. Touch Spell City. Enter the city/ postal code, touch Done, and select the city/postal code in the list. 4. Enter the number of the address, and touch Done. 5. Enter the street name, touch Done, and select the street in the list. -
Page 6: Adding A Stop To The Route
Spelling the Name You can spell the name or part of the name of the location you are looking for using the on-screen keyboard. 1. Touch Where to > Points of Interest. 2. Touch Spell Name. 3. Using the on-screen keyboard, enter letters in the name. Touch Done. 4. Touch the place you are looking for, and touch Go. -
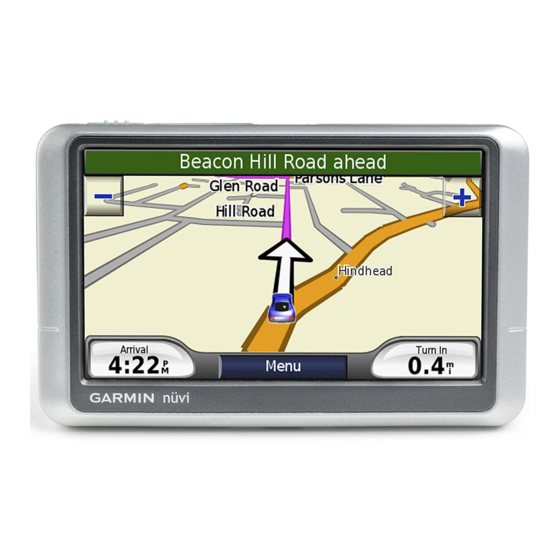
Page 7: Next Turn Page
View map Touch current location. Touch to view different parts of the map. Touch any object on the map; an arrow appears pointing at the object. After you touch Go, the Map page opens with your route marked with a magenta line. -
Page 8: Y Our Nüvi
NOTE: If you forget your PIN and your security location, you must send your nüvi to Garmin to get it unlocked. You must also send a valid product registration or proof of purchase. -
Page 9: Resetting Your Nüvi
2. Press the Reset button on the bottom of the nüvi. 3. Connect the nüvi to a power source. Contact Garmin In the USA, contact Garmin Product Support by phone: (913) 397-8200 or (800) 800-1020, Monday–Friday, 8 AM–5 PM Central Time; or go to www.garmin.com/support. In Europe, contact Garmin (Europe) Ltd. -
Page 10: Mounting On Your Dashboard
Mounting on Your Dashboard Use the enclosed mounting disk to mount your unit to the dashboard and to comply with certain state regulations. iMPOrTaNT: The permanent mounting adhesive is extremely difficult to remove after it is installed. 1. Clean and dry the dashboard where you are placing the disk. -
Page 11: Battery Warnings
If these guidelines are not followed, the internal, non-user-replaceable, rechargeable lithium-ion battery may experience a shortened life span or may present a risk of damage to the GPS unit, fire, chemical burn, electrolyte leak, and/or injury. • Do not incinerate. -
Page 12: Declaration Of Conformity
Important Information MaP DaTa iNFOrMaTiON: One of the goals of Garmin is to provide customers with the most complete and accurate cartography that is available to us at a reasonable cost. We use a combination of governmental and private data sources, which we identify in product literature and copyright messages displayed to the consumer. -
Page 13: Industry Canada Compliance
Part 15 regulations. Limited Warranty This Garmin product is warranted to be free from defects in materials or workmanship for one year from the date of purchase. Within this period, Garmin will, at its sole option, repair or replace any components that fail in normal use. -
Page 14: Cleaning The Unit
Distributor warranties are only valid in the area of intended distribution. Units purchased in the United States or Canada must be returned to the Garmin service center in the United Kingdom, the United States, Canada, or Taiwan for service. -
Page 15: Specifications
OF THE FOLLOWING SOFTWARE LICENSE AGREEMENT. PLEASE READ THIS AGREEMENT CAREFULLY. Garmin grants you a limited license to use the software embedded in this device (the “Software”) in binary executable form in the normal operation of the product. Title, ownership rights, and intellectual property rights in and to the Software remain in Garmin. - Page 16 Garmin and nüvi are trademarks of Garmin Ltd. or its subsidiaries, registered in the USA and other ® ® countries. Garmin Lock and myGarmin are trademarks of Garmin Ltd. or its subsidiaries and may not ™ ™ be used without the express permission of Garmin.