
Related Manuals for Raymarine M81135


Summary of Contents for Raymarine M81135
- Page 1 All manuals and user guides at all-guides.com Distributed by Any reference to Raytheon or RTN in this manual should be interpreted as Raymarine. The names Raytheon and RTN are owned by the Raytheon Company.
-
Page 2: Rotary Drive
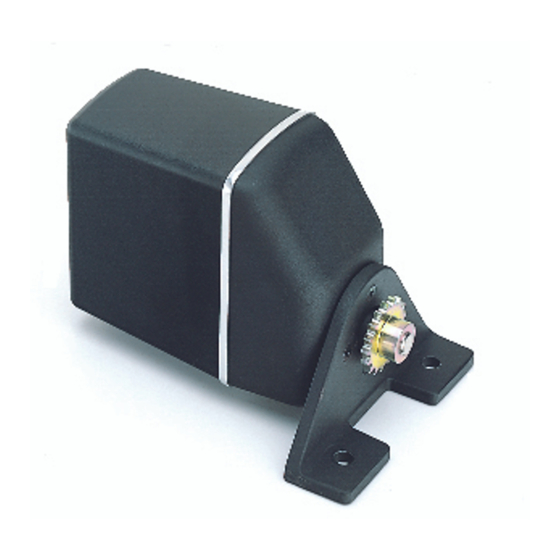
All manuals and user guides at all-guides.com Rotary Drive Installation Guide Drives covered: M81135 Type 1 Rotary Drive 12 V M81136 Type 2 Rotary Drive 12 V M81137 Type 2 Rotary Drive 24 V Document number: 81174-3 March 2001... -
Page 3: Safety Notices
EMC conformance All Raymarine equipment and accessories are designed to the best industry standards for use in the recreational marine environment. The design and manufacture of Raymarine equipment and... - Page 4 Welcome to the installation guide for the Raymarine rotary drive. This product is intended to operate the boat’s steering mechanism as part of a Raymarine autopilot system. It is designed for steering systems that can be driven from the helm position through a chain and sprocket (for example: cable and rod steering systems).
-
Page 5: Drive Dimensions
D5087-1 Figure 2: Drive dimensions Drive specifications Table 1: Drive specifications Performance Type 1 (T1) Type 2 (T2) (at nominal voltage) M81135 (12 V) M81136 (12 V) M81137 (24 V) Maximum boat 10,000 kg 20,000 kg displacement (22,000 lb) (44,000 lb) -
Page 6: Installation Instructions
All manuals and user guides at all-guides.com Rotary Drive - Installation Guide Table 1: Drive specifications (contd) Other information (applies to Types 1 and 2) protected for use in engine compartments CE approvals - conforms to: 89/336/EC (EMC), EN60945:1997 94/25/EC (RCD), EN28846:1993 Installation instructions Parts required To install this drive you will need:... -
Page 7: Installation Steps
Complete the post-installation check. page 15 1. EMC installation guidelines All Raymarine equipment and accessories are designed to the best industry standards for use in the recreational marine environment. Their design and manufacture conforms to the appropriate Electromagnetic Compatibility (EMC) standards, but correct installation is required to ensure that performance is not compromised. -
Page 8: Suppression Ferrites
Figure 3: Typical suppression ferrites Connections to other equipment If your Raymarine equipment is to be connected to other equipment using a cable not supplied by Raymarine, a suppression ferrite MUST always be attached to the cable near to the Raymarine unit. -
Page 9: Mounting The Drive
All manuals and user guides at all-guides.com Rotary Drive - Installation Guide 2. Mounting the drive Mounting the drive involves four main steps: • securing the drive to the boat • connecting the drive to the steering system • ensuring correct sprocket alignment and chain tension •... -
Page 10: Mounting Bolts
All manuals and user guides at all-guides.com Rotary Drive - Installation Guide • Environment: • This drive is not waterproof, so you should mount it in a dry location, clear of any bilge water. Mounting bolts Attach the mounting foot with two stainless steel M12 ( inch) bolts and lock nuts/lock washers. - Page 11 Figure 4: Rotary drive sprocket sizes Note: The sprocket sizes in Figure 4 provide good steering performance for most boats. If you think your boat may have unusual steering characteristics, contact Raymarine’s Technical Services Call Center or an Authorized Service Representative for advice.
- Page 12 Obtaining the steering sprocket Obtain the appropriate sized steering sprocket from the steering system manufacturer. Obtaining the drive sprocket Your Raymarine dealer can supply the following drive sprockets (suitable for a inch pitch chain): • 13 tooth: part number M81182 •...
- Page 13 All manuals and user guides at all-guides.com Rotary Drive - Installation Guide Attaching drive and steering sprockets Note: Each sprocket must be keyed and then screwed to the shaft with a grub screw secured with thread-locking compound. Checking sprocket alignment and chain tension Aligning drive and steering sprockets Both sprockets must be accurately aligned to run in the same plane when viewed from the side.
-
Page 14: Steering Check
All manuals and user guides at all-guides.com Rotary Drive - Installation Guide D5086-1 Figure 7: Adjusting chain tension Steering check When you have tensioned the chain correctly, turn the steering wheel from hardover to hardover to check that the chain and sprockets move freely and are correctly aligned. - Page 15 All manuals and user guides at all-guides.com Rotary Drive - Installation Guide Follow these steps to connect the rotary drive to the course computer: 1. Measure the total distance of cable run from the drive unit to the course computer: •...
-
Page 16: Post Installation Checks
• check chain and sprockets are correctly aligned and tensioned • lightly grease sprockets and chain • check cables for signs of wear or damage Note: If this drive is used heavily, we recommend that it is serviced every two years by a Raymarine Authorized Service Representative. -
Page 17: Emc Servicing And Safety Guidelines
Raymarine service technicians. They will ensure that service procedures/replacement parts used will not affect performance. There are no user serviceable parts in any Raymarine product. • Some products generate high voltages, so never handle cables or connectors when power is being supplied to the equipment.