Table of Contents
Advertisement
Advertisement
Table of Contents

Related Manuals for Alesis NanoVerb Stereo Amplifier


Summary of Contents for Alesis NanoVerb Stereo Amplifier
- Page 1 ALESIS NanoVerb Reference Manual...
-
Page 2: How To Use This Manual
Introduction Thank you for purchasing the Alesis NanoVerb Effects Processor. To take full advantage of the NanoVerb’s functions, and to enjoy long and trouble-free use, please read this user’s manual carefully. How To Use This Manual This manual is divided into the following sections describing the various modes of the NanoVerb. - Page 3 NanoVerb Reference Manual...
-
Page 4: Table Of Contents
Your First Session with the NanoVerb... 7 Unpacking and Inspection ... 7 Basic Connections ... 7 Powering Up ... 8 Setting Levels ... 8 What’s on the Front Panel? ... 8 Auditioning Programs ... 10 Adjusting Effects Mix Levels ... 10 Editing Programs ... - Page 5 Troubleshooting... 27 Trouble-Shooting Index ... 27 Maintenance/Service ... 27 Cleaning... 27 Refer All Servicing To Alesis ... 27 Obtaining Repair Service... 28 Customers in the USA and Canada... 28 Customers outside the USA and Canada ... 28 Specifications ... 29...
- Page 6 Contents NanoVerb Reference Manual...
-
Page 7: Your First Session With The Nanoverb
Alesis warranty card It is important to register your purchase; if you have not already filled out your warranty card and mailed it back to Alesis, please take the time to do so now. Basic Connections The NanoVerb will work in many different applications, whether you are connecting an instrument directly into it, or connecting it with a mixing console. -
Page 8: Setting Levels
Chapter 1 – Your First Session with the NanoVerb ¿ Before turning on the NanoVerb’s power, check the following items: • Have all connections been made correctly? • Are the volume controls of the amplifier or mixer turned down? ¡ Insert the Power jack into the [POWER] input on the rear panel of the NanoVerb and plug the power adapter into an AC outlet. -
Page 9: Auditioning Programs
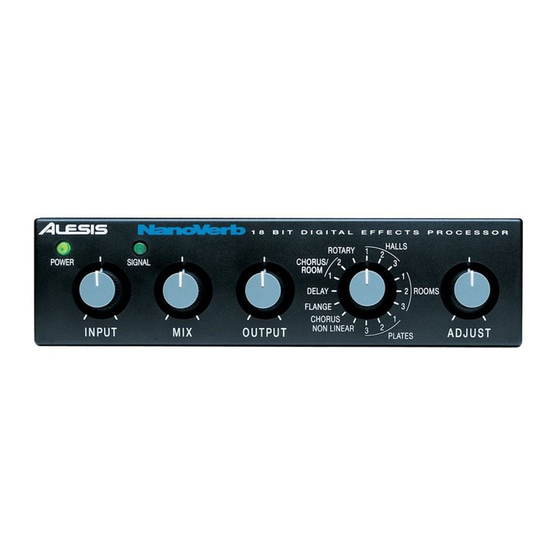
• Signal LED. The Signal LED displays the signal level coming into the Input. During normal operation, this LED should turn green whenever there is signal coming into the inputs. If the signal level is at the maximum, this LED will turn red and you will begin to hear the signal distort. -
Page 10: Placement And Installation
Chapter 1 – Your First Session with the NanoVerb Placement and Installation The NanoVerb may be mounted almost anywhere it's needed: on a table, on top of an amp, next to a mixing console. In any case, make sure to place it safely where it will not fall or be damaged. -
Page 11: Connections
NanoVerb’s [POWER] socket and the male (plug) end into a source of AC power. It’s good practice to not plug in the NanoVerb until all other cables are hooked up. Alesis cannot be responsible for problems caused by using the NanoVerb or any associated equipment with improper AC wiring. -
Page 12: Typical Applications
Chapter 2 – Connections Typical Applications The audio inputs and outputs are typically used in one of three ways: • from one or two effect/aux send outputs of a mixer, and out to the effect return inputs of the mixer; or, •... - Page 13 • Mono. Connect a 1/4" phone cord to the [LEFT] INPUT of the NanoVerb from a mono source, and another 1/4" phone cord from the [LEFT] output of the NanoVerb to an amplification system or mixer input. FROM INSTRUMENT OR EFFECTS SEND •...
-
Page 14: Interfacing To A Mixing Console
Chapter 2 – Connections Interfacing to a Mixing Console The NanoVerb handles mono or stereo sends at all system levels. The input circuitry of the NanoVerb can easily handle professional +4 dBu levels (+20 dBu peaks), while having enough input and output gain to interface with the low -10 dBV signal levels of home recording systems. - Page 15 Mono In - Stereo Out. If you only want to feed the NanoVerb a mono input, but wish to connect both of its outputs back to the mixer, you will need three 1/4" audio cables. Connect a 1/4" phone cord from an effect send to the [LEFT] input of the NanoVerb, another 1/4"...
-
Page 16: Using Inserts
Chapter 2 – Connections In the above hookups, you must set correct levels on the mixer's individual Aux Sends, Aux Masters, and Aux Return masters (as well as the NanoVerb's own controls) to get good, clean, quiet results. Improper level setting is the most common cause of noise and distortion problems. By having the correct level at every point in the send/return chain, you avoid distortion by overloading and avoid noise. -
Page 17: Using Main Outputs
Outputs of the mixing console to the [LEFT/MONO] and [RIGHT] inputs of the NanoVerb. The [LEFT] and [RIGHT] outputs of the NanoVerb are then connected to a stereo amplifier, or two input channels of another mixing console (for sub-mixing applications). - Page 18 Chapter 2 – Connections LEFT MASTER Using the NanoVerb with a Powered Mixer You can dramatically improve the sound quality of a powered mixer by connecting a digital effects units such as the NanoVerb to it in the same way you would connect it to a regular mixer, with one important note: Never connect an output intended for a loudspeaker (the power amplifier output) to the input of the NanoVerb.
-
Page 19: Avoiding Ground Loops
Avoiding Ground Loops In today’s studio, where it seems every piece of equipment has complex routing and computer logic, there are many opportunities for ground loop problems to occur. These show up as hums, buzzes or sometimes radio reception and can occur if a piece of equipment “sees”... -
Page 20: Footswitch
Chapter 2 – Connections Footswitch On the rear panel you will find a footswitch jack labeled [BYPASS]. This is a mono jack with connections for a normal momentary footswitch. The footswitch must be plugged in before the NanoVerb has its power turned on. You should not use the footswitch supplied with a guitar amplifier, as these are typically latching type footswitches. -
Page 21: Overview Of Programs
VERVIEW OF Reverb Effects Reverb is made up of a large number of distinct echoes, called reflections. In a natural acoustic space, each reflection’s amplitude and brightness decays over time. This decaying action is influenced by the room size, the location of the sound source in the room, the hardness of the walls, and many other factors. -
Page 22: Nonlinear
Chapter 3 – Overview of Programs Nonlinear (1 Program) In the mid '80s, a certain British producer/engineer (who shall remain anonymous) discovered a clever way of creating a huge drum sound. He would place the drum set in a large, reverberant room, mic the room and chop off the end of the reverb tail with a noise gate. -
Page 23: Flange
LEFT SIGNAL RIGHT SIGNAL Flange- First used in the 1960s, “flanging” was achieved by the use of two tape recorders that would record and play back the same program in synchronization. By slowing down one tape machine, and then letting it catch up with the other, different phase cancellations would occur at different frequencies. -
Page 24: Chorus/Room 1
Chapter 3 – Overview of Programs Chorus/Room 1- The first multieffects program is a layered true stereo chorus and large room reverb. It works great on guitars, synths and electric pianos. Chorus/Room 2- The other multieffects program adds a delay to the chorus/room sound for a different flavor. -
Page 25: Description Of Controls
ESCRIPTION OF Front Panel Input Level The [INPUT] Level controls the level of the signal being fed into the NanoVerb. The NanoVerb can operate with signal levels anywhere from +4dBu pro audio gear to -20 dBV guitar level signals. To set the input level, watch the [SIGNAL] LED while adjusting the [INPUT] level (see below). -
Page 26: Power
Chapter 4 – Description of Controls This is a plug for connecting the Alesis Model P3 9VAC power supply (supplied). The power supply included with the NanoVerb is compatible with the electrical requirements of the country of purchase, and should be connected to the proper electrical outlet. -
Page 27: Troubleshooting
Service on this product should be performed only by qualified technicians. NO USER - SERVICEABLE PARTS INSIDE. Obtaining Repair Service Before contacting Alesis, check over all your connections, and make sure you’ve read the manual. NanoVerb Reference Manual Troubleshooting – Chapter 5... -
Page 28: Obtaining Repair Service
Chapter 5 – Troubleshooting Customers in the USA and Canada: If the problem persists, call Alesis USA at 1- 310-841-2272 and request the Product Support department. Talk the problem over with one of our technicians; if necessary, you will be given a return order (RO) number and instructions on how to return the unit. -
Page 29: Specifications
ADJUST Power LED, Signal Present dual-color LED 1/4" 2-conductor 1/4" 2-conductor 1/4" 2-conductor (accepts normally open/closed momentary footswitches, such as Alesis PD) 9 Volt Power Transformer (Alesis P3) 3 MIPs (million instructions per second) 24 bit accumulator 1270 milliseconds Concert Hall, Real Room, Plate Reverb,...