
Related Manuals for CONTINENTAL EDISON CEHPT60B


Summary of Contents for CONTINENTAL EDISON CEHPT60B
- Page 1 CEHPT60B & CEHPT90B Hotte Plan De Travail En Verre - Downdraft Range Hood Guide d’utilisation - User manual...
-
Page 2: Table Of Contents
Lisez ce guide attentivement avant d’installer et d’utiliser ce produit et conservez-le pour consultation ultérieure. Merci d'avoir choisi Continental Edison. Ce Guide d’Utilisation et d’Entretien est conçu pour vous fournir toutes les informations nécessaires concernant l’installation, l’utilisation et l’entretien de l’appareil. -
Page 3: Instructions De Sécurité Importantes
IMPORTANT: Conservez ce guide pour l'agence de contrôle électrique. Lorsque vous utilisez les appareils électriques, précautions sécurité essentielles doivent toujours être suivies, notamment les suivantes: Ces instructions sont fournies dans l’intérêt votre sécurité, lisez-les soigneusement avant d’installer ou d’utiliser cet appareil. - Page 4 Il est fortement recommandé que cet appareil soit tenu à l’écart des bébés et des jeunes enfants. Cet appareil peut être utilisé par des enfants âgés d'au moins 8 ans et par des personnes ayant des capacités physiques, sensorielles ou mentales réduites...
- Page 5 Ne pas laisser le câble d'alimentation toucher les parties chaudes de l’appareil. Afin d’éviter d’endommager le câble d’alimentation, assurez-vous qu’il n’est pas coincé en dessous de l’appareil ou dans l’appareil. Ne pas utiliser d’aérosols à proximité immédiate de l’appareil. ...
- Page 6 MISE EN GARDE : Lors d'une utilisation en extraction, référez-vous aux réglementations nationales sur les systèmes de ventilation des bâtiments. Ne reliez pas le tuyau d'évacuation à un système de ventilation de type VMC, à un conduit de fumée (cheminée, chaudière,...). Vérifiez également l'absence de perturbation avec la ventilation de la pièce lors de la présence d'appareils fonctionnant au gaz...
- Page 7 MISE EN GARDE : L’appareil peut s’arrêter fonctionner lors d’une décharge électrostatique (par exemple, la foudre.) Cela ne comporte aucun risque de dommages. Eteignez l’appareil et débranchez-le de la prise de courant. Branchez l’appareil de nouveau après une minute. ...
- Page 8 MISE EN GARDE : Il y des risques de choc électrique et d’incendie, si le nettoyage n’est pas effectué conformément aux instructions. MISE EN GARDE : Pour raison de sécurité, utilisez seulement des vis de même dimensions que celles indiquées. ...
-
Page 9: Lampe
Pour le modèle CHPT60B: les lampes les codes des plafonds D correspondants et les images des lampes: utiliser la lampe type (ou utiliser dans une lampe de type alternatif)DBL-3-S-350(code ILCOS D selon la norme CEI 61231). -LED modules-lampe linéaire - puissance maximale :3W - gamme de tension :≤25V - dimensions: diamètre longueur 350mm - photos:... - Page 10 Pour le modèle CEHPT90B: les lampes disponibles et les codes des plafonds D correspondants et les images des lampes: utiliser la lampe type (ou utiliser dans une lampe de type alternatif)DBL-4-S-650(code ILCOS D selon la norme CEI 61231). - LED modules-lampe linéaire - puissance maximale :4W - gamme de tension :≤25V —...
-
Page 11: Description Du Produit
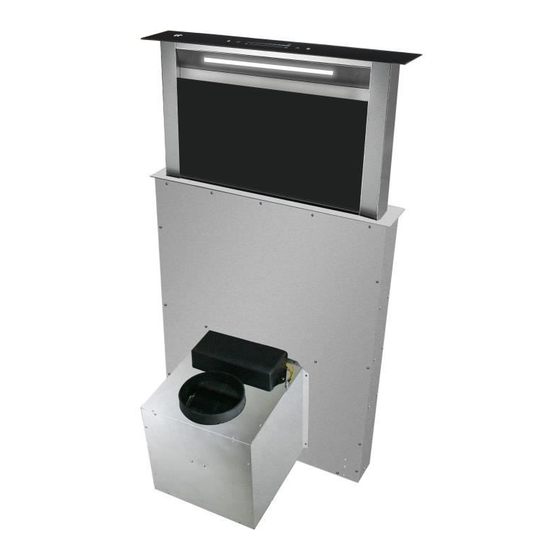
1 Panneau de verre 2 Carter. 3 Moteur... -
Page 12: Description Des Pièces
indice Description quantité Carter PL-1 Moteur PL-2 Panneau de verre PL-3 PL-4 Vis(M4 x 8 mm) PL-5 Vis (ST4 x 30mm) Vis(M5 x 12 mm) PL-6 PL-7 Jambes de maintien PL-8 Chevilles φ8×φ6 (Non incluses) PL-9 Filtre à charbon actif PL-10 Tuyau d’évacuation (Φ... -
Page 13: Installation De La Hotte
Préparation avant installation Retirez précautionneusement le carton. Portez des gants pour protéger mains arêtes coupantes Retirez le film de protection du produit avant de le mettre en service. Installation (Mode extraction) Si le mur comporte une ouverture donnant sur l’extérieur, votre hotte peut être au moyen d'un tuyau d’évacuation ou de n’importe quel conduit d’extraction approprié,... -
Page 14: Données/Dimensions De L'installation
1.Données/dimensions de l’installation Note: avant l’installation, vérifier que les dimensions indiquées correspondent aux dimensions du produit. Pendant et après la mise en place de l’appareil, utiliser un plan incliné pour assurer le niveau de la hotte de cuisson. Sinon, de la graisse et/ou de la condensation peuvent s’accumuler dans les coins de l’appareil. -
Page 15: Informations Importantes Pour L'installation De L'appareil
2. Informations importantes pour l’installation de l’appareil • Nettoyer soigneusement avant et après l’installation, de manière à ce que les poussières ou les débris de construction ne puissent pas être aspirés pendant l’opération initiale. • Vérifiez l’état et la portance. Capacité des câbles électriques. -
Page 16: Utilisation De La Hotte D'aspiration Comme Hotte
3. Utilisation de la hotte en mode extraction vers l’extérieur Si la hotte a été équipée à l’usine d’un filtre à charbon, celui-ci doit être enlevé dans ce cas. Il n’est possible de l’utiliser que lorsque votre hotte fonctionne en mode recyclage d’air. -
Page 17: Connexion Électrique
6. Connexion électrique Raccorder l’appareil à l’alimentation électrique une fois correctement installé. Ne jamais installer l’appareil si les données sur la plaque signalétique ne correspondent pas à votre tension d’alimentation. Vous trouverez la plaque à l’intérieur de l’appareil, derrière le filtre à graisse. Si la hotte d’aspiration est munie d’une prise standard, raccorder celle-ci à... -
Page 18: Monter Le Capot
• Pour le CEHPT90B, assurez-vous que votre espace d’ installation n’est pas inférieur à 900mm(L)x600(W)x735(H); pour le CEHPT60B, assurez-vous que votre espace d’ installation n’est pas inférieur à 600mm(L)x600(W)x735(H). • Avant le montage, toutes les évacuations appropriées pour l’installation du tuyau d’évacuation doivent être présentes... - Page 19 • Modèle CEHPT60B: Découper une ouverture rectangulaire dans le plan de travail (600 x 95 mm) du meuble . • Modèle CEHPT90B: Découper une ouverture rectangulaire dans le plan de travail (855 x 95 mm). Note: avant la découpe, vérifier que les dimensions indiquées correspondent aux dimensions du...
- Page 20 • Introduire le carter et les raccorder par des rails de retenue sous le contre-toit et sur le corps. • La plaque de verre est utilisée pour l’impression visuelle et est accrochée devant les filtres à graisse. Cela n’affecte pas la fonction de votre hotte d’extraction. •...
- Page 21 Régler la hauteur appropriée des jambes de la • caisse pour donner à l’appareil une stabilité supplémentaire. • Vous avez la possibilité de raccorder l’unité motrice en fonction de l’emplacement de l’ouverture prévue à cet effet sur le boîtier de ventilation.
- Page 22 • Raccorder les contacts de la prise et vérifier le fonctionnement de l’appareil. • Vissez le moteur avec le support sur le boîtier. Fixer le conduit d’échappement à la sortie de ventilation du moteur et le raccorder à l’ouverture de l’air d’échappement prévue au moyen des pinces de flexible.
- Page 23 Note: Les Images n’ont qu’un but d’illustration et peuvent varier. Fig. 1: Aspiration d’air à l’air libre Fig. 2: Aspiration de l’air par la cheminée • La ligne d’air d’échappement doit être aussi courte et droite que possible. • Pour éviter un bruit excessif ou une réduction Capacité...
- Page 24 Fig. 3: Angle d’inclinaison de la conduite d’échappement • Si l’air d’échappement est dirigé vers une conduite d’air d’échappement, l’extrémité du raccord d’entrée doit être dirigée dans la direction du flux. • Si la conduite de gaz d’échappement est acheminée Bien que les chambres froides, les lofts, etc., il peut y avoir une chute de température importante dans les différentes parties de la conduite, entraînant une production d’eau de...
-
Page 25: Des Notes Sur Le Choix De Votre Choix
• Le hob doit avoir une largeur maximale de 92 cm. • Les zones de cuisson doivent être organisées de la façon suivante:... -
Page 26: Nettoyage
Concernant les instructions de nettoyage et d’entretien de l’appareil, veuillez vous reporter aux paragraphes ci- dessous de ce manuel. Attention! Avant le nettoyage, éteignez l’appareil et débranchez-le. Nettoyage régulier Utilisez un chiffon doux imbibé d'eau tiède savonneuse tiède ou de détergent ménager. N'utilisez jamais de tampons métalliques, produits... -
Page 27: Fonctions Du Panneau De Contrôle
Fonctionnement du capot Réglage du Fonction niveau de de rappel Contrôle de minuteur Réglage de la puissance/ On / Off puissance l’éclairage Contrôle du curseur Marche/arrêt Fonction de rappel • • Le dixième niveau de vitesse est le Si on appuie sur la touchependant 3 secondes, le capot est allongé.En appuyant à... -
Page 28: Informations Techniques
Symbole Valeur Unité Identification : Réf : CEHPT60B & CEHPT90B Modèles : BX2-5C-D1J6L01 &BX2-5C-D1I9L01 Consommation d'énergie 20.3 kWh/a hotte annuelle Classe d'efficacité énergétique Facteur d'accroissement dans le temps 40.0 Efficacité fluidodynamique hotte Classe d'efficacité fluidodynamique 37.7 hotte énergétique 262.9 de rendement maximal Pression d'air mesurée au point de... - Page 29 Puissance nominale du système d'éclairage Eclairement moyen 4W:189 système d'éclairage sur la moyen surface de cuisson Efficacité lumineuse lux/W hotte 4W:47.3 Classe d'efficacité lumineuse Efficacité de filtration des graisses 63.9 hotte Classe d'efficacité de filtration des graisses Consommation d'électricité mesuré en 0.43 mode "arrêt"...
-
Page 30: Informations Complémentaires
CONTINENTAL EDISON 120-126 quai de Bacalan CS11584 33000 Bordeaux Importé par A.M.C. 123 quai Jules Guesde 94400 Vitry sur Seine... - Page 31 Remarque : Les recommandations suivantes précisent comment réduire l'impact environnemental global du processus de cuisson. (1) Installer la hotte de cuisson à un endroit approprié disposant d'une bonne ventilation. (2) Nettoyer la hotte de cuisson régulièrement afin que rien ne bloque l'air. (3) Ne pas oublier d'éteindre la lampe de la hotte de cuisine une fois la cuisson terminée.
-
Page 32: Find Some Informations
Read this guide carefully before installing and using this product and keep it for future reference. Thank you for choosing Oceanic. This Use and Maintenance Guide is designed provide you with all necessary information regarding the installation, use and maintenance of the appliance. In order to operate the unit properly and securely, read this user guidecarefully before installing and using the product. -
Page 33: Important Safety Instructions
IMPORTANT: Keep this guide for the electrical control agency. When using electrical appliances, basic safety precaution should always be followed, including the following: These instructions your safety. Please read through them thoroughly prior to installation. This appliance has been designed for use as an exhausting (air evacuation to the outside) or filtering (indoor air re-cycling) hood. - Page 34 The Manufacturer highly recommends that this appliance be kept out of the reach of babies and small children. This appliance can be used by children aged from 8 years and above and persons with reduced physical, sensory mental capabilities lack experience...
- Page 35 Make sure that the power cord is not caught under or in the appliance and avoid damage to the power cable. Do not use flammable sprays in close vicinity to the appliance. Please dispose of the packing material carefully.
- Page 36 Warning: When using for extraction, refer to the national regulations for building ventilation systems. Do not connect the exhaust pipe to a VMC type ventilation system, to a flue (chimney, boiler, ...). Also check the absence of disturbance with the ventilation of the room when there are gas appliances (water heater, gas stove, ...).
- Page 37 Warning: The hood may stop working during an electrostatic discharge (e.g.lightning). This involves no risk of damage. Switch off the electricity supply to the hood and reconnect after one minute. To avoid the risk of fire, clean the metal filter regularly and closely watch and regulate pans containing hot oil.
- Page 38 Warning:There is a risk of electric shock and fireif cleaning is not carried out in accordance with the instructions. Warning: For safety reason, please use only the same size of fixing or mounting screw which are recommended in this instruction manual.
-
Page 39: Lamp
For model CEHPT60B:The available lamps correspondenceILCOS D codes and lamp pictures:Use type lamp(or use in alternative type lamp)DBL-3-S-350(ILCOS D code in according to standard IEC 61231). -LED modules-linear lamp -Max wattage:3W -Voltage range:≤25V -Dimensions:diameter length 350mm -Pictures: Note :If the supply LED bulb is damaged, it must... - Page 40 For model CEHPT90B:The available lamps correspondenceILCOS D codes and lamp pictures:Use type lamp(or use in alternative type lamp)DBL-4-S-650(ILCOS D code in according to standard IEC 61231). - LED modules-linear lamp - Max wattage:4W -Voltage range:≤25V -Dimensions:diameter length 650mm -Pictures: Note :If the supply LED bulb is damaged, it must be replaced by the manufacturer, its service agent or similarly qualified persons in order to...
-
Page 41: Description Of The Pieces
1.Glass panel 2 Hood body. 3.Motor assembly... -
Page 42: Installing The Hood
Index Description Quantity Hood body PL-1 Motor assembly PL-2 PL-3 Glass panel Screw PL-4 (M4 x 8 mm) Screw PL-5 (ST4 x 30 mm) Screw PL-6 (M5 x 12 mm) Case leg PL-7 φ8×φ6 PL-8 (Not include) PL-9 Carbon filter Aluminum pipe(Φ... -
Page 43: Preparation Before Installation
Preparation before installation Carefully remove the carton. Wear gloves to protect your hands from sharp edges. Remove the protective film from the product before putting it into service. Installation (Mode extraction) If the wall has an opening to the outside, your hood may be connected as shown in the diagram below using the suitable exhaust pipe (not supplied),... -
Page 44: Installation Data / Dimensions
1 Installation data / dimensions Note: Before installation, check that the dimensions indicated correspond to the dimensions of the product. During and after installation of the ap- pliance, use a spirit level to ensure that the cooker hood is level. Otherwise, grease and/or condensation may accumulate in the corners of the appliance. -
Page 45: Important Information Befo-Re Installing The Appliance
Important information befo-re installing the appliance: • Clean the environment thoroughly before and after installation so that no dust or construction debris can be sucked in during initial operation. • Check the condition and load-bearing capacity of the electrical cables. The installation of the appliance by a specialist is recommended. -
Page 46: Using The Extractor Hood As An Exhaust Air Hood (With Air Extracted To Outdoors)
3 .Using the extractor hood as an exhaust air hood (with air extracted to outdoors) If the extractor hood has been fitted at the factory with a carbon filter, this must be removed for exhaust air operation. It is only practicable to use this when operating your hood in circulation mode. -
Page 47: Electricalconnection
6.Electricalconnection Only connect the appliance to the po-wer supply once it is properly installed. Never install the appliance if the data on the rating plate (V) does not agree with your supply voltage. You will find the rating plate inside the appliance, behind the grease filter. -
Page 48: Mounting The Hood
CEHPT90B than 900mm(L)x600(W)x735(H);For ake sure CEHPT60B your installation space is not less than 600mm(L)x600(W)x735(H). • Before mounting, all appropriate core holes for the installation of the ex-haust hose must be present or made. - Page 49 • Model CEHPT60B : Provide the worktop with the mat-ching cutout (600 x 95 mm) for the ventilation system. • Model CEHPT90B : Provide the worktop with the mat-ching cutout (855 x 95 mm) for the ventilation system. Note: Before carving, check that the dimensions indicated correspond to the dimensions of the product.
- Page 50 • Insert the ventilation system into the cut-out and connect them by means of the holding rails under the counter-top and on the body. • The glass plate is used for visual impression and is hung in front of the grease filters. The function of your extractor hood is not affected by this.
- Page 51 Adjust the appropriate height of the case legs • to give the appliance additi-onal stability. • You have the option to connect the motor unit depending on the location of the opening provided for this pur-pose on the ventilation housing. Turn the ventilation outlet in the appropri-ate direction and screw the motor to the bracket.
- Page 52 • Join the plug contacts together and check the function of the appliance. • Screw the motor unit with the bracket to the housing. Attach the exhaust duct to the ven-tilation outlet of the motor unit and connect it to the provided exhaustairopeningbymeansofthehoseclamps.
-
Page 53: Informations On Air Flow
Note: Images are for illustration purpo-ses only and may vary. Fig. 1: Exhaust air into the open air Fig. 2: Exhaust air via air shaft/fireplace • The exhaust air line should be as short and straight as possible. • To avoid excessive noise or a reduced extraction capacitythe diameterof the exhaustair pipeline should not be less than 150 mm. - Page 54 Fig. 3: inclination angle of the exhaust air pipeline • If the exhaust air is directed into an exhaust air duct, the end of the entry fitting must be directed in the direc-tion of flow. • If the exhaust air pipeline is routed though cool rooms, lofts etc.
- Page 55 • The hob should have a maximum width of 92 cm. • The cooking zones should be arranged side by side and not one behind the other, as shown in the following illus-tration (top view):...
-
Page 56: Cleaning
Regarding instructions cleaning maintenance of the appliance, please refer to below paragraphs of this manual. Attention! Before cleaning switch the unit off and pull out the plug. Regular Cleaning Use a soft cloth moistened with hand-warm mildly soapy water or household cleaning detergent. Never use metal pads, chemical, abrasive material or stiff brush to clean the unit. -
Page 57: Control Panel Functions
Operating the hood Power level Booster Lighting Timer Power setting/ function setting On / Off control Slidercontrol On / Off Booster function • If you keep the on/off key pressed • The 10th speed level is the booster / for 3 seconds, the hood is extended. high performance level. -
Page 58: Technical Informations
Symbol Value Unit Model identification Ref.:CEHPT60B & CEHPT90B Models:BX2-5C-D1J6L01 &BX2-5C-D1I9L01 Annual Energy kWh/a 20.3 hotte Consumption Energy Efficiency class Time increase factor Fluid Dynamic 40.0 hotte Efficiency Fluid Dynamic Efficiency class Energy Efficiency 37.7 hotte Index Measured air flow rate 262.9... - Page 59 Nominal power of the lighting system Average illumination of the lighting system 3W:65 on the cooking moyen 4W:189 surface Lighting Efficiency hotte lux/W 3W:21.7 4W:47.3 Lighting efficiency class Grease Filtering hotte 63.9 Efficiency Grease Filtering Efficiency class Measured power 0.43 consumption off mode Sound power level Boost setting:72...
-
Page 60: Further Information
CONTINENTALEDISON 120-126 quai de Bacalan CS11584 33000 Bordeaux Importé par A.M.C. 123 quai Jules Guesde 94400 Vitry sur Seine... - Page 61 Note : The following recommendations specify how to reduce the overall environmental impact of the cooking process. (1) Install the range hood in a suitable location with good ventilation. (2) Clean the cooker hood regularly so that nothing blocks the air. (3) Do not forget to turn off the hood lamp once cooking is complete.
- Page 62 www.continentaledison.fr...