
Related Manuals for CONTINENTAL EDISON CEH60477B


Summary of Contents for CONTINENTAL EDISON CEH60477B
- Page 1 CEH60477B & CEH90477B CEH60BSS & CEH90BSS CEH60CFC & CEH90CFC Hotte Décorative - Wall Mounted Hood & Hotte-Vertical Range Hood Guide d’utilisation - User manual...
-
Page 2: Table Of Contents
Lisez ce guide attentivement avant d’installer et d’utiliser ce produit et conservez-le pour consultation ultérieure. Merci d'avoir choisi Continental Edison. Ce Guide d’Utilisation et d’Entretien est conçu pour vous fournir toutes les informations nécessaires concernant l’installation, l’utilisation et l’entretien de l’appareil. -
Page 3: Instructions De Sécurité Importantes
IMPORTANT: Conservez ce guide pour l'agence de contrôle électrique. Lorsque vous utilisez les appareils électriques, précautions sécurité essentielles doivent toujours être suivies, notamment les suivantes: instructions sont fournies dans l’intérêt votre sécurité, lisez-les soigneusement avant d’installer ou d’utiliser cet appareil. - Page 4 Il est fortement recommandé que cet appareil soit tenu à l’écart des bébés et des jeunes enfants. Cet appareil peut être utilisé par des enfants âgés d'au moins 8 ans et par des personnes ayant des capacités physiques, sensorielles ou mentales réduites ou dénuées d’expérience ou connaissance, s'ils...
- Page 5 Ne pas laisser le câble d'alimentation toucher les parties chaudes de l’appareil. Afin d’éviter d’endommager le câble d’alimentation, assurez-vous qu’il n’est pas coincé en dessous de l’appareil ou dans l’appareil. Ne pas utiliser d’aérosols à proximité immédiate de l’appareil. ...
- Page 6 MISE EN GARDE : Lors d'une utilisation en extraction, référez-vous aux réglementations nationales sur les systèmes de ventilation des bâtiments. Ne reliez pas le tuyau d'évacuation à un système de ventilation de type VMC, à un conduit de fumée (cheminée, chaudière,...). Vérifiez également l'absence de perturbation avec la ventilation de la pièce lors de la présence d'appareils fonctionnant au gaz...
- Page 7 MISE EN GARDE : L’appareil peut s’arrêter fonctionner lors d’une décharge électrostatique (par exemple, la foudre.) Cela ne comporte aucun risque de dommages. Eteignez l’appareil et débranchez-le de la prise de courant. Branchez l’appareil de nouveau après une minute. ...
- Page 8 MISE EN GARDE : Il y des risques de choc électrique et d’incendie, si le nettoyage n’est pas effectué conformément aux instructions. MISE EN GARDE : Pour raison de sécurité, utilisez seulement des vis de même dimensions que celles indiquées. ...
-
Page 9: Lampe
Les ampoules disponibles, et les codes ILCOS D correspondants et les images de ces lampes : Utilisation dans une lampe de type (ou utilisation dans une lampe de type alternatif) DSR-1.5-S-68 (code ILCOS D respectant la norme IEC 61231). – Lampe à LED non remplaçable –... -
Page 10: Description Du Produit
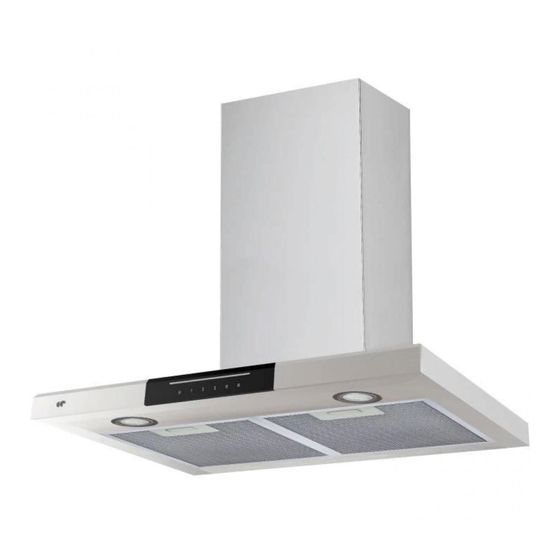
Description du produit 1.Corps de la hotte 2.Cheminée supérieure 3.Cheminée inférieure 10... -
Page 11: Description Des Pièces
Index Description Illustration Quantité PL-1 Corps de la hotte Cheminée PL-2 supérieure (300mm) PL-3 Cheminée inférieure (300mm) Support de la PL-4 cheminée supérieure PL-5 Support de la cheminée inférieure PL-6 Support de la hotte de cuisine PL-7 Vis (ST4 x 8 mm) PL-8 Vis (ST4 x 30 mm) Chevilles φ8×φ6... -
Page 12: Installation De La Hotte
Préparation avant installation Retirez précautionneusement le carton. Portez des gants pour protéger mains arêtes coupantes Retirez le film de protection du produit avant de le mettre en service. Installation (Mode extraction) Si le mur comporte une ouverture donnant sur l’extérieur, votre hotte peut être raccordée comme indiqué... -
Page 13: Recommandations Pour La Fixation Murale
Recommandations pour fixation murale N'apportez aucune modification à l’appareil ou à son support de fixation sur le mur ! Avant d'installer l’appareil, vérifiez l’état du mur sur lequel il sera fixé : le mur doit être en bon état, il ne doit pas présenter de dommages (fissures, affaissement, humidité, …). -
Page 14: Installation
INSTALLATION Avant de procéder à l’installation, assurez-vous que l’appareil n'est branché prise électrique. La hotte doit être placée à 70cm minimum au-dessus de la table de cuisson. Étape 1. Percez 3 trous (Φ8mm à adapter en fonction de vos chevilles) pour fixer le support. Vissez et serrez le support d e l a h o t t e sur le mur avec les vis 3 Vis (ST4x30mm) et 3 chevilles (non fournies) - Page 15 Étape 2. Positionnez la hotte de cuisine, puis accrochez-la l’aide des deux encoches du support mural. Étape 3. (Si le mode d'installation d'extraction est choisi) Placez le tuyau d'évacuation Ø150- Ø153mm (fourni) sur la sortie d'air, comme indiqué ci-dessous. Si la taille de votre tuyau d'évacuation est de Ø120 - Ø123mm, vous devez d’abord monter l’adaptateur fourni sur la sortie d’air, comme indiqué...
- Page 16 Étape 4. Insérer le support de la cheminée inférieure dans la cheminée inférieure comme illustré ci-dessous. Étape 5. Installez la cheminée inférieure dans l’appareil, puis marquez la position des trous sur le mur. Étape 6. Désinstallez la cheminée inférieure, puis percez des trous dans le mur : trou pour chevilles avec des vis de diamètre Φ4 mm 16...
- Page 17 Étape 7. Installez à nouveau la cheminée inférieure sur l'appareil, puis vissez-la au mur à l’aide de 2 vis de diamètre Φ 4 mm et les chevilles (non fournies) correspondantes. Vissez également la cheminée et le capot avec 2 vis (ST4x8mm) Étape Fixer...
- Page 18 Étape 10. Retirez la cheminée supérieure puis percer des trous dans le mur. Étape 11. Replacez la cheminée supérieure à nouveau, puis fixez-la au mur à l'aide de 2 vis ST4x30mm. 18...
-
Page 19: Installation Du Filtre À Charbon
Mode recyclage: Si vous n'avez pas de sortie vers l'extérieur, aucun tuyau en plastique n'est requis et l'installation est similaire à celle décrite ci- dessus. Et vous devez assembler les filtres à charbon qui sont utilisés pour piéger les odeurs. Placer filtre à... -
Page 20: Nettoyage
Concernant les instructions de nettoyage et d’entretien de l’appareil, veuillez vous reporter aux paragraphes ci- dessous de ce manuel. Attention! Avant le nettoyage, éteignez l’appareil et débranchez-le. Nettoyage régulier Utilisez un chiffon doux imbibé d'eau tiède savonneuse tiède ou de détergent ménager. N'utilisez jamais de tampons métalliques, produits... -
Page 21: Fonctions Du Panneau De Contrôle
Attention! La lampe ne doit pas être recouverte d’isolation thermique ou d’autres matériaux. Avis! Allumez uniquement les lumières pendant le fonctionnement de l’appareil. N’allumez pas les lumières pour éclairer la cuisine. 1.Pour le modèle No:CEH60BSS&CEH90BSS Ne jamais appuyer sur plus d’une touche en même temps. Marche/Arrêt Lumière Marche/Arrêt Vitesse du moteur faible, adaptée à... - Page 22 2. Pour le modèle No.:CEH60CFC&CEH90CFC Marche/Arrêt Pour allumer ou éteindre également la ventilation.Pour éteindre la ventilation, appuyer brièvement sur cette touche.Un appui long sur la touchepermet d’éteindre toutes les fonctions de la hotte simultanément. Réglage de la puissance d’aspiration Pour augmenter et diminuer la vitesse de ventilation, de la 1ère à...
- Page 23 3. En mode automatique, le détecteur mesure la présence de fumée en temps réel. Lorsqu’il y a détection de fumée, le moteur tourne à basse vitesse. L'écran affiche "1" et le voyant reste allumé. 4.Après être entré en mode automatique, appuyez brièvement sur pour revenir en mode veille ;...
- Page 24 3. Pour le modèle No.:CEH60477B&CEH90477B Marche/Arrêt Il est utilisé pour allumer/éteindre le ventilateur. Faible vitesse du moteur, adapté à la cuisson qui produit peu de vapeur de cuisson. Vitesse moyenne du moteur, adaptée à la cuisson standard/ journalière. Vitesse de rotation élevée, adaptée à la cuisson qui produit beaucoup de vapeur de cuisson.
-
Page 25: Informations Techniques
Symbole Valeur Unité Identification : Réf : Ref.:CEH60477B & CEH90477B CEH60BSS & CEH90BSS CEH60CFC & CEH90CFC Models:BX2-E-C6E6D01 & BX2-E-C6E9D01 BX2-E-C3E6D01 & BX2-E-C3E9D01&BX2- E- D6E9D01&BX2-E-D6E6D01 Consommation d'énergie kWh/a hotte annuelle Classe d'efficacité énergétique Facteur d'accroissement dans le temps Efficacité fluidodynamique 10,3 hotte Classe d'efficacité... - Page 26 Puissance électrique à l'entrée mesurée au point 63.1 de rendement maximal Puissance nominale du système d'éclairage Eclairement moyen 600mm:103 système d'éclairage sur la moyen >600mm:102 surface de cuisson 600mm:34.3 lux/W Efficacité lumineuse hotte >600mm:34 Classe d'efficacité 600mm:A lumineuse >600mm:A Efficacité de filtration des 73,1(Pour 2 filtres) hotte 72,4(Pour 3 filtres)
-
Page 27: Informations Complémentaires
27... - Page 28 28...
- Page 29 CONTINENTAL EDISON 120-126 quai de Bacalan CS11584 33000 Bordeaux Importé par A.M.C. 123 quai Jules Guesde 94400 Vitry sur Seine 29...
- Page 30 Remarque : Les recommandations suivantes précisent comment réduire l'impact environnemental global du processus de cuisson. (1) Installer la hotte de cuisson à un endroit approprié disposant d'une bonne ventilation. (2) Nettoyer la hotte de cuisson régulièrement afin que rien ne bloque l'air. (3) Ne pas oublier d'éteindre la lampe de la hotte de cuisine une fois la cuisson terminée.
-
Page 31: Find Some Informations
Read this guide carefully before installing and using this product and keep it for future reference. Thank you for choosing Oceanic. This Use and Maintenance Guide is designed to provide you with all the necessary information regarding the installation, use and maintenance of the appliance. In order to operate the unit properly and securely, read this user guidecarefully before installing and using the product. -
Page 32: Important Safety Instructions
IMPORTANT: Keep this guide for the electrical control agency. When using electrical appliances, basic safety precaution should always be followed, including the following: These instructions your safety. Please read through them thoroughly prior to installation. This appliance has been designed for use as an exhausting (air evacuation to the outside) or filtering (indoor air re-cycling) hood. - Page 33 The Manufacturer highly recommends that this appliance be kept out of the reach of babies and small children. This appliance can be used by children aged from 8 years and above and persons with reduced physical, sensory mental capabilities lack experience...
- Page 34 Make sure that the power cord is not caught under or in the appliance and avoid damage to the power cable. Do not use flammable sprays in close vicinity to the appliance. Please dispose of the packing material carefully.
- Page 35 Warning: When using for extraction, refer to the national regulations for building ventilation systems. Do not connect the exhaust pipe to a VMC type ventilation system, to a flue (chimney, boiler, ...). Also check the absence of disturbance with the ventilation of the room when there are gas appliances (water heater, gas stove, ...).
- Page 36 Warning: The hood may stop working during an electrostatic discharge (e.g.lightning). This involves no risk of damage. Switch off the electricity supply to the hood and reconnect after one minute. To avoid the risk of fire, clean the metal filter regularly and closely watch and regulate pans containing hot oil.
- Page 37 Warning:There is a risk of electric shock and fireif cleaning is not carried out in accordance with the instructions. Warning: For safety reason, please use only the same size of fixing or mounting screw which are recommended in this instruction manual.
-
Page 38: Lamp
available lamps correspondenceILCOS D codes and lamp pictures:Use type lamp (or use in alternative type lamp)DSR-1.5-S-68 (ILCOS D code in according to standardIEC 61231). – Non-replaceable LED lamp – Max wattage: 1.5 W – Voltage range: 12V – Dimensions: Note :If the supply LED bulb is damaged, it must be replaced by the manufacturer, its service agent or similarly qualified persons in order to... -
Page 39: Description Of The Pieces
Hood body 2.Upper chimney 3.Lower chimney 39... - Page 40 Index Description Illustration Quantity PL-1 Hood body Upper chimney PL-2 (300mm) Lower chimney PL-3 (300mm) Upper chimney PL-4 bracket Lower chimney PL-5 bracket Cooker hood PL-6 bracket Screw PL-7 (ST4 x 8 mm) Screw PL-8 (ST4 x 30 mm) PL-9 φ8×φ6 (Not include) PL-10...
-
Page 41: Installing The Hood
Preparation before installation Carefully remove the carton. Wear gloves to protect your hands from sharp edges. Remove the protective film from the product before putting it into service. Installation (Mode extraction) If the wall has an opening to the outside, your hood may be connected as shown in the diagram below using the suitable exhaust pipe (not supplied),... -
Page 42: Recommendations For Mounting
Recommendations for wall mounting Do not make any changes to the unit or its mounting bracket on the wall! Before installing the device, check the condition of the wall on which it will be fixed: the wall must be in good condition, it must not show any damage (cracks, sagging, humidity, ...). -
Page 43: Installation
INSTALLATION Before installing, make sure the unit is not plugged into an electrical outlet. The hood must be placed at least 70 cm above the hob. Step1.Drill 3 holes (Φ8mm to adapt your wall plugs) to place the bracket. Screw and tighten the bracket to the wall with the screws 3 Screws (ST4x30mm) and 3 wall plugs (not supplied). - Page 44 Step2.Place the range hood and hook it by using the two notches on the wall bracket. Step 3. (If the extraction installation mode is chosen) Place the Ø150-Ø153mm plastic pipe (supplied) on the air outlet as shown below. If the size of your plastic pipe is Ø120 - Ø123mm , you must firstly assemble the adapter to the air outlet, as shown below.
- Page 45 Step 4.Insert the lower chimney bracket into to lower chimney as below image. Step 5.Install the lower chimney on the appliance, and mark the holes position on the wall. Step 6.Remove the lower chimney, then drill holes in the wall: hole with diameter Φ4 mm screw. 45...
- Page 46 Step7.Install the lower chimney on appliance again, then screw it to the wall with 2 screws of diameter Φ 4 mm and the corresponding wall plugs (not supplied).Also screw the chimney and the hood with 2 screws(ST4x8mm) Step 8.Fix the upper chimney bracket on the upper chimney by 2 screws .
- Page 47 Step 10.Release the upper chimney and then drill holes on the wall. Step 11.Pull out the upper chimney again, then fix it to the wall with 2 screws ST4x30mm. 47...
-
Page 48: Carbon Filter Installation
Recycling Mode: If you do not have an outlet to the outside, plastic pipe is not required and the installation is similar to above. And you need to assemble the carbon filters which are used to trap odors. Place the carbon filter into the unit and turn it clockwise. -
Page 49: Cleaning
Regarding instructions for cleaning and maintenance of the appliance, please refer to below paragraphs of this manual. Attention! Before cleaning switch the unit off and pull out the plug. Regular Cleaning Use a soft cloth moistened with hand-warm mildly soapy water or household cleaning detergent. - Page 50 CAUTION! The lamp must not be covered by thermal insulation or other materials. NOTICE! Only switch on the lights while the appliance is operating. Do not switch on the lights to lighten the room. Do not touch the illuminant within 30 minutes after using the appliance.
-
Page 51: Control Panel Functions
2. For model No.:CEH60CFC&CEH90CFC On/Off key For turning on/off the fan ,In working mode,short press this key to turn off the fan, long press this key to turn off all functions including light function. Speed plus&decrease key For increasing and decreasing the speed of the fan,from 1st-3rd speed,and from 3rd-1st speed. - Page 52 3.Automatic state, smoke and heat sense real-time monitoring, monitoring to start the state, only start the motor in low speed, the display display "1" , the light to maintain the current state. 4.After entering the automatic mode, press the key to return to standby state;'Light' button works normally;...
- Page 53 3.For model No.:CEH60477B&CEH90477B On/Off key It’s used for turning on/off the fan. Low motor speed, suitable for cooking which produces little cooking steam. Medium motor speed, suitable for standard/ daily cooking. High motor speed, suitable for cooking which produces much cooking steam.
-
Page 54: Technical Informations
Symbol Value Unit Model identification Ref.:CEH60477B & CEH90477B CEH60BSS & CEH90BSS CEH60CFC & CEH90CFC Models:BX2-E-C6E6D01 & BX2-E-C6E9D01 BX2-E-C3E6D01 & BX2-E-C3E9D01&BX2-E- D6E9D01&BX2-E-D6E6D01 Annual Energy kWh/a 39.0 hotte Consumption Energy Efficiency class Time increase factor Fluid Dynamic 10.3 hotte Efficiency Fluid Dynamic... - Page 55 Measured electric power input at best 63.1 efficiency point Nominal power of the lighting system Average illumination 600mm:103 of the lighting system >600mm:102 on the cooking middle surface 600mm:34.3 Lighting Efficiency lux/W >600mm:34.0 hood Lighting efficiency 600mm:A >600mm:A class 73.1(for 2 filters) Grease Filtering hood 72.4(for 3 filters)
-
Page 56: Further Information
56... - Page 57 57...
- Page 58 CONTINENTALEDISON 120-126 quai de Bacalan CS11584 33000 Bordeaux Importé par A.M.C. 123 quai Jules Guesde 94400 Vitry sur Seine 58...
- Page 59 Note : The following recommendations specify how to reduce the overall environmental impact of the cooking process. (1) Install the range hood in a suitable location with good ventilation. (2) Clean the cooker hood regularly so that nothing blocks the air. (3) Do not forget to turn off the hood lamp once cooking is complete.
- Page 60 www.continentaledison.fr...