Advertisement
Table of Contents
- 1 Package Contents
- 2 General Precautions
- 3 Installation
- 4 Mounting Locations
- 5 Operating Method
- 6 Select the Language
- 7 External Input Setting
- 8 Restore Default Setting
- 9 Entrance Monitoring
- 10 Room-To-Room Communication
- 11 Pan/Tilt Operation
- 12 Night Illumination
- 13 Automatic Recording
- 14 Manual Recording
- 15 Warranty
- 16 Garantie
- Download this manual
FK1462 Ⓑ P0109YI
JK-1MED
HANDS FREE COLOR VIDEO INTERCOM MASTER MONITOR STATION
INTERPHONE VIDEO COULEUR MAINS LIBRES MONITEUR MAÎTRE
HANDENVRIJE KLEURENVIDEOFONIE MONITOR-HOOFDPOST
JK-1MED
Master monitor station
Moniteur maître
Monitor-hoofdpost
INSTALLATION & OPERATION MANUAL
MANUEL D'INSTALLATION ET D'UTILISATION
INSTALLATIE- EN GEBRUIKSHANDLEIDING
Advertisement
Table of Contents

Related Manuals for Aiphone JK-1MED


Summary of Contents for Aiphone JK-1MED
- Page 1 FK1462 Ⓑ P0109YI JK-1MED HANDS FREE COLOR VIDEO INTERCOM MASTER MONITOR STATION INTERPHONE VIDEO COULEUR MAINS LIBRES MONITEUR MAÎTRE HANDENVRIJE KLEURENVIDEOFONIE MONITOR-HOOFDPOST JK-1MED Master monitor station Moniteur maître Monitor-hoofdpost INSTALLATION & OPERATION MANUAL MANUEL D’INSTALLATION ET D’UTILISATION INSTALLATIE- EN GEBRUIKSHANDLEIDING...
-
Page 2: Package Contents
3. When mounting the unit on a wall, install the unit in a convenient location, but not where it could be jarred or bumped. Injury could result. 4. For power supply, use Aiphone power supply model or model specified for use with system. If non-specified product is used, fire or malfunction could result. -
Page 3: Installation
Install the master monitor station in a place where the screen is not exposed to direct sunlight. 2-2 Wiring method, wiring distance Wire the units from station-to-station (daisy-chained). JK-DA JK-DV JK-DVF JK-1MED PS-1820 PS18 PS-1810DIN PS-1820DIN 2-3 Cable Use PVC jacket with PE (polyethylene) insulated cable (x2) Never use individual conductors, twisted pair cable or coaxial cable. - Page 4 Run separate cables for audio/video and door release. Door release contact: AC/DC 24 V, 0.5 A (Minimum Contact : 100 mV DC, 0.1 mA) (N/O dry closure contact L, L). EL-12S JK-1MED Master monitor station OPTION CONNECTOR DC 18 V...
- Page 5 A video signal is only output during calling from a door station to the JK- 1MED/during communication between a door station and the JK-1MED/during monitoring from the JK-1MED (screen playing recorded pictures is not output). [2] Options output (AC/DC 24 V, 1.6 A N/O dry closure contact) (Minimum Contact : 100 mV DC, 0.1 mA)
- Page 6 MOUNTING Back wiring Mounting screws x 2 JK-1MED 1. Press RELEASE button (to insert or remove the wire). 2. Insert the cable into the terminal. Surface wiring * When a 1-gang box is not mounted, the cable can be routed as surface wiring to the top or bottom of the unit.
-
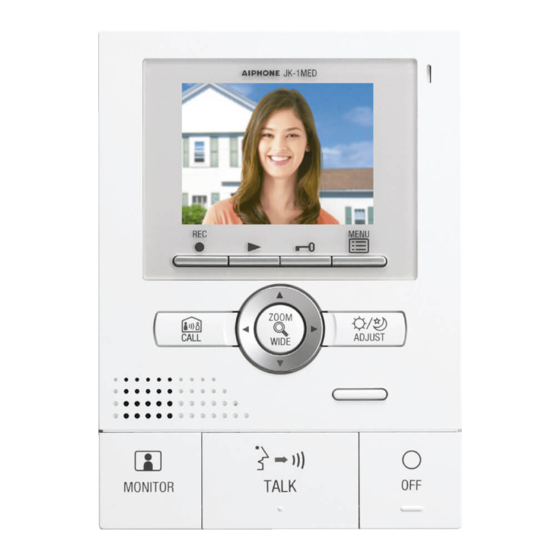
Page 7: Operating Method
OPERATING METHOD To operate this unit, check the symbol and then press the appropriate operation button This is not a touch-panel operation. To operate a symbol, press the operation button that is below the symbol. Example: To activate manual recording, press RECORD button below the symbol * In the manual, an explanation is given using REC button (... -
Page 8: Select The Language
7-2 SELECT THE LANGUAGE After performing steps 1 and 2 in section 7-1, select "LANGUAGE" in the "INITIAL SETTING" screen and press 7-3 SET THE DATE/TIME After performing steps 1 and 2 in section 7-1, select "DATE/TIME" and press MENU button ( In the "ADJUST DATE/TIME"... -
Page 9: External Input Setting
7-5 EXTERNAL INPUT SETTING When optional units operate (for example, when a sensor is activated or call button is pressed), the master monitor station and sub master station will receive an alert sound. Also, when notification at door is enabled, the door station also receives an alert sound. -
Page 10: Restore Default Setting
7-7 Automatic night volume adjustment This automatically lowers the communication volume at the door station only at night.Initial setting: "Disabled" After performing step 1 in section 7-1, select "COMMUNICATION" and press MENU button ( In the "COMMUNICATION SETTING" screen, press button or ... - Page 11 7-9 Press-to-talk setting This disables the press-to-talk setting during communication with a door station (section 8-1). Initial setting: (press-to-talk enabled) After performing step 1 in section 7-1, select "COMMUNICATION" and press MENU button ( In the "COMMUNICATION SETTING" screen, press button or button to select "ALLOW PTT"...
- Page 12 OPERATIONS 8-1 Answering a door call (HANDS-FREE mode, PTT mode) Press CALL button. Chime tone sounds, caller is seen on video monitor, and outside sound is heard. • Audio and video turns off after approximately 45 seconds if not answered. Press TALK button momentarily, and after the beep, communicate hands free.
-
Page 13: Entrance Monitoring
8-3 Entrance monitoring Press MONITOR button in the standby mode. The video monitor displays the image from the door station and the incoming audio is heard. If you do not press TALK button, the caller will not hear sounds from the inside station. 8-4 Room-to-room communication Press CALL button to talk with the other person. -
Page 14: Pan/Tilt Operation
8-6 Pan/tilt operation When a zoom picture is displayed, press , , , or button. • []: Up • []: Down • []: Left • []: Right • Moving diagonally is also possible. 8-7 Zoom Picture Pre-set The picture can be set to display using a set zoom picture position for when a call is received from the door station. -
Page 15: Automatic Recording
8-9 Backlight adjustment, Night sensitivity adjustment To perform adjustment Press ADJUST button when the image is difficult to see. • Automatic adjustment to a more visible screen is performed. The adjust icon displays at this time. :Adjust icon (day) :Adjust icon (night) <Day>... - Page 16 8-12 Play recorded picture If there are automatically recorded pictures, such as those taken while you were out, the play LED (red) flashes. Press PLAY button in standby mode to display the picture with the most recent date. * displays on the screen when there are no recorded pictures. The operation status displays.
-
Page 17: Warranty
Aiphone warrants thats its products have no material or workmanship defects under normal use conditions for two years after delivery to the end user. Aiphone will perform repair or replacement free of charge if the product is defective and the warranty applies to the defect. Aiphone reserves unto itself the sole right to make the final decision whether there is a defect in materials and/or workmanship and whether or not the product is under warranty.