Table of Contents
Advertisement
Quick Links
Advertisement
Table of Contents

Related Manuals for Electrolux EIV85443


Summary of Contents for Electrolux EIV85443
- Page 1 EIV85443 User Manual...
-
Page 2: Table Of Contents
11. ENERGY EFFICIENCY.................. 25 WE’RE THINKING OF YOU Thank you for purchasing an Electrolux appliance. You’ve chosen a product that brings with it decades of professional experience and innovation. Ingenious and stylish, it has been designed with you in mind. So whenever you use it, you can be safe in the knowledge that you’ll get great results every time. - Page 3 ENGLISH result of incorrect installation or usage. Always keep the instructions in a safe and accessible location for future reference. 1.1 Children and vulnerable people safety This appliance can be used by children aged from 8 • years and above and persons with reduced physical, sensory or mental capabilities or lack of experience and knowledge if they have been given supervision or instruction concerning the use of the appliance in a...
-
Page 4: Safety Instructions
NEVER try to extinguish a fire with water, but switch • off the appliance and then cover flame e.g. with a lid or a fire blanket. CAUTION: The cooking process has to be supervised. • A short term cooking process has to be supervised continuously. - Page 5 ENGLISH • Do not install or use a damaged • Use the correct electricity mains appliance. cable. • Follow the installation instructions • Do not let the electricity mains cable supplied with the appliance. tangle. • Keep the minimum distance from •...
- Page 6 • Do not change the specification of this • Do not activate the cooking zones appliance. with empty cookware or without • Make sure that the ventilation cookware. openings are not blocked. • Do not put aluminium foil on the •...
-
Page 7: Installation
ENGLISH 3. INSTALLATION WARNING! WARNING! Refer to Safety chapters. All electrical connections must be made by a qualified electrician. 3.1 Before the installation Before you install the hob, write down the CAUTION! information bellow from the rating plate. Do not drill or solder the wire The rating plate is on the bottom of the ends. - Page 8 3.4 Assembly If the appliance is installed above a drawer, the hob ventilation can warm up the items stored in the drawer during the cooking process. min. 500mm min. 50mm...
-
Page 9: Product Description
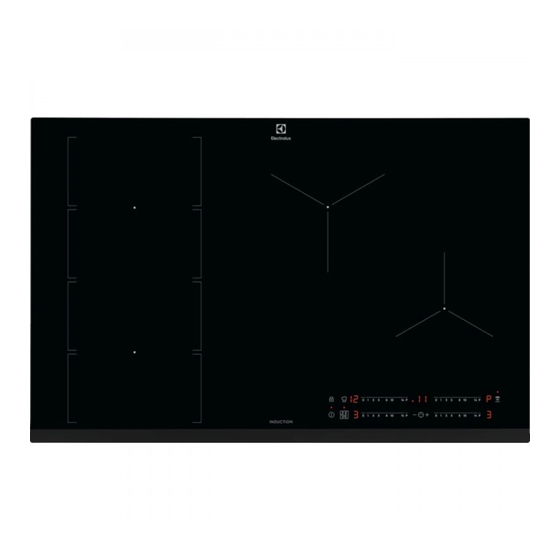
ENGLISH 4. PRODUCT DESCRIPTION 4.1 Cooking surface layout Induction cooking zone Control panel Flexible induction cooking area consisting of four sections 4.2 Control panel layout Use the sensor fields to operate the appliance. The displays, indicators and sounds tell which functions operate. Sen‐... - Page 10 Sen‐ Function Comment field PowerBoost To activate and deactivate the function. Control bar To set a heat setting. To select the cooking zone. To increase or decrease the time. Control bar To set the heat setting for flexible induc‐...
-
Page 11: Daily Use
ENGLISH 4.4 OptiHeat Control (3 step The induction cooking zones produce the heat necessary for the cooking process Residual heat indicator) directly in the bottom of the cookware. The glass ceramic is heated by the heat WARNING! of the cookware. There is a risk of burns from residual heat. - Page 12 The display shows the remaining time. setting. To change the time: set the cooking To activate the function the zone with .
- Page 13 ENGLISH comes on. Touch of the timer to The function has no effect choose one of the following: on the operation of the cooking zones. • - the sounds are off • - the sounds are on 5.8 Lock To confirm your selection wait until the hob deactivates automatically.
- Page 14 5.12 Power management 5.13 Hob²Hood function It is an advanced automatic function which connects the hob to a special • Cooking zones are grouped according hood. Both the hob and the hood have to the location and number of the an infrared signal communicator.
-
Page 15: Flexible Induction Cooking Area
ENGLISH Operating the fan speed manually You can also operate the function Auto‐ Boil‐ Frying matic manually. To do that touch when the light hob is active. This deactivates automatic operation of the function and allows you Mode to change the fan speed manually. When speed 2 speed 3 you press... - Page 16 To set the heat setting use two left side control bars. Switching between the modes To switch between the modes use sensor field: > 160 mm 6.2 FlexiBridge Standard mode This mode is active when you activate When you switch between the hob.
- Page 17 ENGLISH Incorrect cookware position: 6.4 FlexiBridge Max Bridge mode 6.3 FlexiBridge Big Bridge To activate the mode touch until you mode see the correct mode indicator . This mode connects all sections into one To activate the mode touch until you cooking zone.
- Page 18 • Heat setting display for the left front control bar shows the heat setting. To change the heat setting use left PowerSlide function front control bar. • When you activate the function for the This function allows you to adjust the...
-
Page 19: Hints And Tips
ENGLISH 7. HINTS AND TIPS WARNING! Refer to "Technical data". Refer to Safety chapters. 7.1 Cookware 7.2 The noises during operation If you can hear: For induction cooking zones a strong electro-magnetic • crack noise: cookware is made of field creates the heat in the different materials (a sandwich cookware very quickly. - Page 20 Heat setting Use to: Time Hints (min) Keep cooked food warm. as nec‐ Put a lid on the cookware. essary 1 - 3 Hollandaise sauce, melt: but‐ 5 - 25 Mix from time to time. ter, chocolate, gelatine. 1 - 3...
-
Page 21: Care And Cleaning
To find the full range of cooker hoods Other remotely controlled which work with this function refer to our appliances may block the consumer website. The Electrolux cooker signal. Do not use any such hoods that work with this function must appliances near to the hob have the symbol while Hob²Hood is on. - Page 22 Problem Possible cause Remedy You do not set the heat Activate the hob again and setting for 10 seconds. set the heat setting in less than 10 seconds. You touched 2 or more Touch only one sensor sensor fields at the same field.
- Page 23 ENGLISH Problem Possible cause Remedy The flexible induction The cookware is in a Place the cookware in the cooking area does not heat wrong position on the flexi‐ correct position on the flex‐ up the cookware. ble induction cooking area. ible induction cooking area.
-
Page 24: Technical Data
(it is in the corner of the glass 10. TECHNICAL DATA 10.1 Rating plate Model EIV85443 PNC 949 596 964 00 Typ 62 D4A 05 AD 220 - 240 V / 400 V 2N 50 - 60 Hz Induction 7.2 kW... -
Page 25: Energy Efficiency
11. ENERGY EFFICIENCY 11.1 Product information according to EU 66/2014 valid for EU market only Model identification EIV85443 Type of hob Built-In Hob Number of cooking zones Number of cooking areas Heating technology Induction Diameter of circular cook‐... - Page 26 www.electrolux.com...
- Page 27 ENGLISH...
- Page 28 www.electrolux.com/shop...