Table of Contents
Advertisement
Quick Links
Advertisement
Table of Contents

Related Manuals for Icom IC-455


Summary of Contents for Icom IC-455
- Page 1 INSTRUCTION MANUAL UHF CB TRANSCEIVER |455...
-
Page 2: Features
Thank you for choosing this Icom product. This product was designed and built with Icom’s state of the art technology and craftsmanship. With proper care, this product should provide you with years of trouble-free operation. ■ Important ■ Explicit definitions... -
Page 3: Operational Notes
■ Operational notes The use of the citizen band radio service is licenced in Australia by the ACMA Radiocommunications (Citizens Band Radio Stations) Class Licence and in New Zealand by the Ministry of Economic Development (MED) General User Radio Licence for Citizen Band Radio and operation is subject to conditions contained within these licences. -
Page 4: Precautions
This could cause an sound, or smoke. Immediately turn OFF the electrical shock or burn. power and/or remove the DC power cable. Contact your Icom dealer or distributor for R DANGER! NEVER operate the advice. transceiver near unshielded electrical... - Page 5 CAUTION: DO NOT use the non-specified microphone. Other microphones have different pin assignments and may damage the transceiver. CAUTION: Confirm that all connectors and jacks are dry and clean before attachment. Exposing them to dust or water will result in serious damage to the transceiver.
-
Page 6: Table Of Contents
■ Table of contents ■ Important ........i SET MODE ��������������������������������������26 ■ Features ......... i ■ Set mode ........26 ■ Explicit definitions......i ■ Set mode items description ..27 ■ Operational notes ......ii CONNECTIONS AND ■ Precautions ........iii INSTALLATION ������������������������������31 PANEL DESCRIPTION ���������������������... -
Page 7: Panel Description
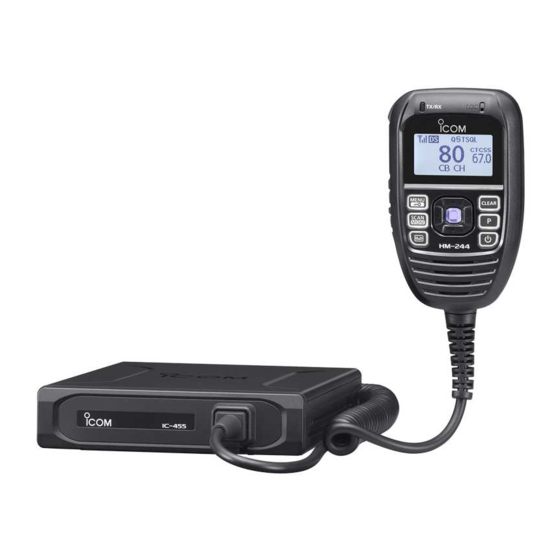
PANEL DESCRIPTION ■ Main unit D Front and rear panels NOTE: See page 32 for the Connections. 1 MICROPHONE CONNECTOR Connects to the supplied microphone or the optional programming cable. 2 EXTERNAL SPEAKER JACK Connects to a 4 Ω external speaker. 3 DC POWER CONNECTOR Connects to a 12 or 24 V DC power source. 4 GROUND TERMINAL C onnects to a vehicle’s ground to prevent electrical shocks and interference from other equipment occurring. -
Page 8: Microphone
PANEL DESCRIPTION ■ Microphone D Front panel L You can disable or change the function assigned to any key except [PTT], [+]/[–], and ] using the optional CS-455 programming software. (p. 25) Microphone Speaker 1 CLEAR KEY [CLEAR] 6 REC DATA/REC PAUSE KEY [ P ush to cancel a setting, or to return to (p. 8) the previous screen. • Push to display the “Rec Data” menu. • Hold down for 2 seconds to start or 2 PROGRAMMABLE KEY [P] stop recording. - Page 9 PANEL DESCRIPTION D Function display 2 3 4 56 1 SIGNAL STRENGTH ICON 8 BELL ICON Displays the relative receive signal • Displayed when the Pocket Beep strength level. function is turned ON. (p. 17) L “ ” blinks when the ATS function is • Blinks when the specified Selcall or turned ON. (p. 22) Smart Ring call is received. (pp. 20, 22) 2 SCAN ICON Displayed when a scan mode is 9 VOICE RECORDER ICON (p.
-
Page 10: Basic Operations
BASIC OPERATIONS ■ Turning ON the transceiver Hold down [ ] for 2 seconds to turn ON the transceiver. If the transceiver is programmed with a start-up password, enter the password. TIP: • Push [▲] and [▼] to select a number. •... -
Page 11: Adjusting The Volume Level
BASIC OPERATIONS ■ Adjusting the volume level z Push [+] or [–] to set the audio volume level to between 0 and 32. • “ ” is displayed when the audio level is set to 0 (Mute mode). ■ Adjusting the squelch level Squelch enables the audio to be heard only while receiving a signal that is stronger than the set level. -
Page 12: Receiving And Transmitting
BASIC OPERATIONS ■ Receiving and transmitting CAUTION: DO NOT transmit without an antenna. NOTE: Turn OFF the Tone Squelch or Pocket Beep function. (pp. 16, 17) If “TSQL” is displayed, you can only receive calls from others with the same tone squelch code. ([MENU] >... -
Page 13: Priority Channel
BASIC OPERATIONS D Setting the output power level Push [▲] or [▼] to select a channel. Open the “RF Power” screen. [MENU] > RF Power Push [▲] or [▼] to select “High” or “Low,” and then push [ENT] to set it. •... -
Page 14: Monitor Function
BASIC OPERATIONS ■ Monitor function The Monitor function temporarily cancels the Squelch function to check for weak signals. z Hold down [MONI] for 2 seconds to turn the Monitor function ON or OFF. • The TX/RX indicator blinks green while the function is turned ON. -
Page 15: Repeater Operation
REPEATER OPERATION ■ Repeater operation Repeaters extend the operational range of the transceiver by retransmitting the received signals. They are usually located on the top of a building or a mountain, as the elevation increases their effectiveness, allowing the user to transmit and receive over greater distances. -
Page 16: Scan
SCAN ■ Scan types The transceiver has 5 scan types, a Tag function and 4 Resume options, for scanning versatility. The transceiver can scan a maximum of 80 Tag channels in approximately 1 second. Open Scan Repeatedly scans all Tag channels in sequence. ch 1 ch 2 ch 3... -
Page 17: Scanning Preparation
SCAN ■ Scanning preparation The transceiver scans all Tag channels when a scan other than the Dynamic Group Scan is activated. In the Dynamic Group Scan, the transceiver scans only Tag channels in the zone that you select. (p. 4) When the transceiver finds a busy channel, it can be set to pause or to resume after a pause. -
Page 18: Open Scan
SCAN ■ Scanning preparation D Scan Resume function Open the “Scan Resume” screen. [MENU] > Settings > Scan Resume Push [▲] or [▼] to select a Scan Resume option, and then push [ENT] to set it. • 5sec: Scan pauses for 5 seconds when a signal is detected, and then resumes. -
Page 19: Group Scan And Priority Scan
SCAN ■ Group Scan and Priority Scan The Group and Priority scans repeatedly look for a signal on the Priority channel while scanning the specified channels. You can use these scan modes when waiting for a call on the Priority channel or several specified channels. The Group and Priority scans are performed differently when transmitting. -
Page 20: Dynamic Group Scan
SCAN ■ Dynamic Group Scan The Dynamic Group Scan can instantly detect a signal that a group member transmitted by scanning the Tag channels in the Dynamic Group Scan. The transceiver transmits on the last channel that a group member used. If the transceiver detects a signal on the channel with no code, or a code that is different from the code set in the transceiver, the transceiver searches for another channel that is not being used, and start communicating. -
Page 21: Repeater Scan
SCAN ■ Repeater Scan The Repeater Scan is used not only to search for a signal on the repeater channels, but also to access a repeater by automatically transmitting in sequence. The Repeater Scan detects repeaters that can be accessed in the area, even if the repeater is not used. NOTE: The Repeater Scan detects signals only on repeater channels 1 to 8 and 41 to 48. -
Page 22: Tone Squelch And Pocket
TONE SQUELCH AND POCKET BEEP NOTE: CB channels 5 and 35 are for only emergency use. The Tone Squelch or Pocket Beep function is not selectable on these channels. ■ Tone Squelch The transceiver is equipped with 51 CTCSS tone frequencies and 104 DTCS codes. The CTCSS/DTCS operation enables you to communicate in the silent standby mode because you will only receive calls from group members using the same CTCSS tone frequency or DTCS code. -
Page 23: Pocket Beep
TONE SQUELCH AND POCKET BEEP Selectable CTCSS tone frequency list (Hz): Freq. Freq. Freq. Freq. Freq. 67.0 94.8 136.5 177.3 218.1 69.3 97.4 141.3 179.9 225.7 71.0 100.0 146.2 183.5 229.1 71.9 103.5 151.4 186.2 233.6 74.4 107.2 156.7 189.9 241.8 77.0 110.9... -
Page 24: Selcall (Selective Calling)
SELCALL (Selective Calling) In addition to the Tone Squelch function for silent standby, you can use the Selcall (Selective Calling) function. For the Tone Squelch function (Group mode), there are 51 tone or 104 code options when making a call. The Selcall has 100,000 options when using 5 tone. - Page 25 SELCALL (Selective Calling) D Editing the TX code You can change the TX code contents within the allowed digits. The Group call function enables you to edit a special ‘Group code’ of the Selcall ID code. Select a CB channel other than channels 5 and 35. Open the “Code List”...
-
Page 26: Receiving
SELCALL (Selective Calling) ■ Receiving D Receiving an individual call When receiving an RX code (default setting): • Beeps sound and “ë” blinks. • The channel name is displayed. L The channel number is displayed when the channel name is not entered. •... -
Page 27: Quiet Mode
SELCALL (Selective Calling) ■ Quiet mode When the Quiet mode is turned ON, the Selcall Mute function is activated and allows silent operation until receiving a Selcall. Open the “Quiet Mode” screen. [MENU] > Quiet Mode Select “On,” and then push [ENT] to turn ON the Quiet mode. -
Page 28: Other Functions
OTHER FUNCTIONS ■ Smart Ring and ATS (Automatic Transponder System) These functions have an answer back feature and confirmation function for when a call has reached the called station, even if the user is temporarily away from the transceiver. Smart Ring is a manual confirmation, and ATS is automatic. D Smart Ring Set the same CTCSS tone frequency to all Group transceivers, and then turn ON the Tone Squelch function. -
Page 29: Rx Frequency (For Receive Channels)
OTHER FUNCTIONS ■ RX frequency (For receive channels) The receive channel frequencies can be set to between 400 and 520 MHz. D RX channel setting The receive channels are set to “Disabled,” and are not displayed on the screen as the default setting. -
Page 30: Scrambler Function
OTHER FUNCTIONS ■ Scrambler function The Scrambler function supports encrypting the communication data. You can select a subcarrier using this function. Open the “Scrambler” screen. [MENU] > Settings > Scrambler Push [▲] or [▼] to select a subcarrier between 1 and 3 to turn ON the function, and then push [ENT] to set it. -
Page 31: Data Programming
Data programming can be done to or from a PC, using the CS-455 programming software and the optional OPC-1122U (USB type) programming cable. L Refer to the CS-455 programming software’s Help file for details. IC-455 to a USB port to the Microphone connector... -
Page 32: Set Mode
SET MODE ■ Set mode You can change various common settings for the transceiver or individual settings for the operating channel in the Set mode. Essentially, you can customise the transceiver to suit your preference and operating style. The functions you can use may differ, depending on the presetting set with the optional CS-455 programming software. -
Page 33: Set Mode Items Description
SET MODE ■ Set mode items description CTCSS/DTCS Scan Resume You can select a CTCSS tone frequency You can select the Scan Resume option. or DTCS code. L When the signal disappears, the scan resumes after the set period of time. L The selected CTCSS tone frequency or L Except for the Dynamic Group Scan and DTCS code is displayed on the operating... - Page 34 SET MODE ■ Set mode items description Internal SP PTT Hold You can select the internal speaker The PTT Hold function enables you to (HM-244) option. communicate without holding down the The audio from the internal speaker [PTT] button while speaking. is heard even when an external On: Push [PTT] to transmit and push speaker is connected.
- Page 35 SET MODE Clear Rec Data Scrambler You can clear the recorded audio by Turns the Scrambler function ON or OFF. selecting “Yes.” You can also select a subcarrier using this function. Select 1, 2, 3, or Off. L “ ” is displayed on the operating screen when the function is ON.
- Page 36 SET MODE ■ Set mode items description Color Voice Changer You can individually select the backlight You can select whether or not to lower or colour of the function display to indicate raise the voice pitch that is input from the the transceiver is in the states listed below.
-
Page 37: Installation
CONNECTIONS AND INSTALLATION ■ Supplied accessories DC power cable Mounting brackets For the mounting brackets (approximately 3 m) Self-tapping screws Screws (5 × 20 mm) (5 × 12 mm) Screws (3 × 6 mm) Nuts (M5) Fuse (FGB 5 A) Spring washers (M5) Flat washers (M5) Microphone (HM-244) Microphone hanger set... -
Page 38: Connections
CONNECTIONS AND INSTALLATION ■ Connections Optional Antenna speaker Microphone hanger cable R WARNING! NEVER remove the fuse holder from the DC power cable. Black NOTE: Use the terminals as shown below for the cable connections. Crimp 12 or 24 V Solder Battery 1 MICROPHONE HANGER... - Page 39 CONNECTIONS AND INSTALLATION 5 IGNITION LEAD Connects to an ignition line. To turn the transceiver ON or OFF when you turn the car key or push the ignition switch, connect the transceiver’s ignition lead to where the 12 V or 24 V is output from the ACC terminal, and 0 V on the OFF/LOCK terminal.
-
Page 40: Fuse Replacement
Select a location that can support the weight of the transceiver and does not interfere with driving. Contact your car dealer or Icom dealer for advice for installing in a vehicle. R DANGER! NEVER place the transceiver where air bag deployment may be obstructed during mobile operations. - Page 41 CONNECTIONS AND INSTALLATION D Antenna To obtain the transceiver’s maximum performance, select a high-quality antenna and mount it in a good location. A non-radial antenna should be used when using a magnetic mount. Installation example: Trunk-mount Roof-mount antenna antenna (Drill a hole or use a magnetic mount.) Gutter-mount antenna Antenna connector: Use the antenna with a PL-259 connector.
-
Page 42: Mounting The Transceiver
CONNECTIONS AND INSTALLATION ■ Mounting the transceiver D Using the supplied mounting brackets You can mount the transceiver on a flat surface using the mounting brackets supplied with your transceiver. Drill 4 holes on a flat surface where you want to install the mounting brackets. L When using the supplied nuts: approximately 5.5 ~ 6 mm (d) When using the supplied self-tapping screws: approximately 2 ~ 3 mm (d) Attach the mounting brackets to the transceiver using the supplied screws (3 ×... -
Page 43: Specifications And Options �37
SPECIFICATIONS AND OPTIONS ■ Specifications L All stated specifications are subject to change without notice or obligation. General 476.4250 ~ 477.4125 MHz Frequency coverage 400.0000 ~ 520.0000 MHz (RX only) Number of channels Maximum 256ch/8 banks Mode 8K50F3E Antenna impedance 50 Ω... -
Page 44: Options
SPECIFICATIONS AND OPTIONS ■ Specifications (400.0000 ~ 520.0000 MHz) Receiver (476.4250 ~ 477.4125 MHz) (Except CB (476.4250 ~ 477.4125 MHz)) Hum and noise 48 dB typical 45 dB typical Squelch sensitivity (Threshold) 0.2 μV typical – Less than –57 dBm (9 kHz ~ 1.0 GHz) Conducted spurious radiation Less than –47 dBm (1.0 GHz ~ 4.0 GHz) +2 dB ~ −8 dB of 6 dB octave from 300 Hz ~ 2550 Hz... -
Page 45: Troubleshooting
The following points are designed to help you correct problems that are not equipment malfunctions. If you cannot locate the cause of a problem, or solve it through these points, contact your nearest Icom Dealer or Service Center. The transceiver does not turn ON. -
Page 46: Uhf Cb Channel List
UHF CB CHANNEL LIST Frequency Frequency Frequency Channel Channel Channel (MHz) (MHz) (MHz) Number Number Number 476.4250 477.3000 477.1875 476.4500 477.3250 477.2125 476.4750 477.3500 477.2375 476.5000 477.3750 477.2625 476.5250 477.4000 477.2875 476.5500 476.4375 477.3125 476.5750 476.4625 477.3375 476.6000 476.4875 477.3625 476.6250 476.5125 477.3875... -
Page 47: Index
INDEX Scan Accessories ....31 Main unit ......1 Mic Gain ...... 27 ATS ......22 Dynamic Group Scan .. 14 Auto Volume Microphone Group Scan ..... 13 Set mode ....29 Connecting ....31 Open Scan ....12 Setting ..... 24 Front panel .... - Page 48 A7643H-1AU 1-1-32 Kamiminami, Hirano-ku, Printed in Japan Osaka 547-0003, Japan © 2021 Icom Inc. May 2021...