Table of Contents
Advertisement
Dear customer
Thank you for purchasing this product.
Before connecting, operating or adjusting this
product, please read the instructions completely.
Please keep this manual for future reference.
If you have any questions contact 1-800-211-PANA (7262)
The warranty can be found on page 23.
A s a n E N E R G Y S T A R
Panasonic has determined that this
product meets the ENERGY STAR
guidelines for energy efficiency.
P
Home Theater Audio System
P a r t n e r ,
Operating Instructions
SC-HT56
Model No.
RQTX0175-2P
Advertisement
Table of Contents
Troubleshooting

Related Manuals for Panasonic SC-HT56


Summary of Contents for Panasonic SC-HT56
-
Page 1: Operating Instructions
If you have any questions contact 1-800-211-PANA (7262) The warranty can be found on page 23. A s a n E N E R G Y S T A R Panasonic has determined that this product meets the ENERGY STAR guidelines for energy efficiency. -
Page 2: Important Safety Instructions
(2) this device must accept any interference received, including interference that may cause undesired operation. Responsible Party: Panasonic Corporation of North America One Panasonic Way Secaucus, NJ 07094 Support Contact: Panasonic Consumer Electronics Company Telephone No.: 1-800-211-PANA (7262) -
Page 3: Table Of Contents
Changing the remote control code ... 21 Reference Specifications ... 21 Troubleshooting guide ... 22 Maintenance ... 22 Limited Warranty ... 23 Product Service ...Back cover Supplied accessories SC-HT56 SA-HT56 SB-HF56 SB-HS760 SB-HC760 1 AC power supply cord (K2CB2CB00021) 1 FM indoor... -
Page 4: The Remote Control
The remote control g Batteries • Insert so the poles (+ and –) match those in the remote control. • Do not use rechargeable type batteries. • Do not heat or expose to flame. • Do not leave the batteries in an automobile exposed to direct sunlight for a long period of time with doors and windows closed. -
Page 5: Main Unit/Display
Control guide Main unit Standby indicator [^] When the unit is connected to the AC power supply, this indicator lights up in standby mode and goes out when the unit is turned on. [8, POWER] Press to switch the unit from on to standby mode or vice versa. -
Page 6: Step 1 Speaker Setup
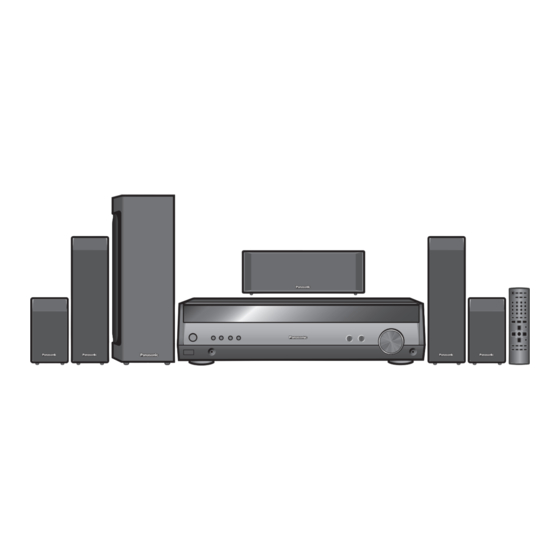
Speaker setup Supplied accessories Placement of speakers. Placement of speakers Center speaker Front Front speaker speaker Subwoofer Positioning for best effect How you set up your speakers can affect the bass and the sound field. Note the following points. • Place speakers on flat secure bases. -
Page 7: Other Speaker Setup Options
Wireless system connection Set your sound free with Panasonic’s wireless receiver and speaker systems Attach the SH-FX67 digital transmitter for wireless surround sound. You can also connect your portable audio equipment to the wireless system. -
Page 8: Step 2 Home Theater Connections
EZ Sync VIERA Link “HDAVI Control” is a convenient function that offers linked operations of this system, and a Panasonic TV (VIERA) or DVD recorder (DIGA) under “HDAVI Control”. You can use this function by connecting the equipment with the HDMI cable. -
Page 9: Tv, Bd Player/Dvd Recorder And Dvd Player
Stereo connection cable Other Left accessories Right Notes on digital input This unit can decode the following signals: • Dolby Digital, DTS • PCM, including PCM with sampling frequencies of 96 kHz or 88.2 kHz It cannot decode: • Other digital signals, such as MPEG •... -
Page 10: Step 3 Antenna And Ac Power Supply Connections
Antenna and AC power supply connections 1 AC power supply cord Supplied accessories FM indoor antenna Adhesive tape Fix the end of the antenna where reception is best. 1 FM indoor antenna For best reception FM outdoor antenna • Disconnect the FM indoor antenna. -
Page 11: Step 4 Auto Speaker Setup
Auto speaker setup Auto speaker setup allows you to achieve a satisfactory listening environment easily with the use of the supplied calibration microphone as a detector of sound signals. The unit will first perform automatic speaker detection, then checks and adjusts the following settings. DETECTION DISTANCE FREQUENCY... -
Page 12: Troubleshooting For Auto Speaker Setup
Auto speaker setup Start performing auto speaker setup. Auto speaker setup finishes. To cancel during setup Press any button on the main unit or remote control. “CANCELED” appears on the display. Note • Perform auto speaker setup again if you have changed the speakers, speaker positions, or the layout of your listening environment. -
Page 13: Settings
Settings Change the settings to suit your equipment to the environment in which you are using it. Before making any changes, read the descriptions of the settings, note the factory settings and ranges, and refer to the equipment's instructions. Enter the Select the item you want to change. -
Page 14: Adjusting Speaker Output Level
Settings • To reduce standby power consumption. HDMI settings • Choice for turning off the VIERA Link “HDAVI Control (➡ page 8). Standby selection OFF: Standby power consumption reduced (approximately 0.3 W). • Signals from DVD equipment cannot pass through HDMI connection to the television when the unit is in standby (➡... -
Page 15: Basic Operations
Basic operations Select input. Switch on. TUNER FM TUNER AM DVD-P Adding surround effects to stereo sources Using Dolby Pro Logic ΙΙ Dolby Pro Logic ΙΙ processor works not only on sources recorded with Dolby Surround, but also on any stereo source. Press to select a mode from the table at right. -
Page 16: Menu Operation
MENU operation This is an outline of the operations you can perform with the MENU. Press [ MENU] once. Main menu TUNER The radio ➡ page 17 BASS Adjust the bass ➡ page 18 TREBLE 0 Adjust the treble ➡ page 18 BALANCE You can adjust the balance of the front speakers ➡... -
Page 17: The Radio
The radio Direct tuning Input the frequency of the station. Remote control 1. Press [TUNER, ―BAND] to select “TUNER”. 2. Press and hold [TUNER, ―BAND] to select “TUNER FM” or “TUNER AM”. 3. Press [TUNER DIRECT TUNING]. 4. Press the numbered buttons to enter the frequency. -
Page 18: Sound Field
Sound field Adjusting the tone You can adjust the level of the bass and treble. Main unit 1. Use the menus to select “BASS” or “TREBLE”. ➡ MENU operation on page 16. 2. Press [TUNE 2 / - or 1 / +] to adjust the tone. Input signals must be either analog or PCM, and Dolby Pro Logic ΙΙ... -
Page 19: Other Functions
Other functions Sleep timer The SLEEP timer can turn the unit off after a set time. It does not control any other components. Main unit 1. Use the menus to select “SLEEP”. ➡ MENU operation on page 16. 2. Press [TUNE 2 / - or 1 / +] to select the time (in minutes). -
Page 20: Remote Control Operation Guide
Remote control operation guide This remote control can operate Panasonic DVD recorders, DVD players, and televisions. Note that this remote control cannot operate some equipment and that it may not be able to perform some operations. Before using a Panasonic DVD recorder or player DVD recorder Change the remote control code to match the remote control mode of the DVD recorder. -
Page 21: Changing The Remote Control Code
Remote control operation guide Changing the remote control code Change the code if you find the remote control unintentionally also controls other Panasonic equipment. Do the following to set the remote control code and this unit’s remote control mode to the same one. -
Page 22: Troubleshooting Guide
Troubleshooting guide Before requesting service, make the following checks. If you are in doubt about any of the check points, or if the remedies indicated in the chart do not solve the problem, refer to “Customer Services Directory” on page 23. ■... -
Page 23: Limited Warranty
Monday-Friday 9 am-9 pm; Saturday-Sunday 10 am-7 pm, EST. For hearing or speech impaired TTY users, TTY: 1-877-833-8855 Accessory Purchases Purchase Parts, Accessories and Instruction Books online for all Panasonic Products by visiting our Web Site at: h�p://www.pstc.panasonic.com or, send your request by E-mail to: npcparts@us.panasonic.com... -
Page 24: Product Service
HDMI, the HDMI logo and High-Definition Multimedia Interface are trademarks or registered trademarks of HDMI Licensing LLC. EZ Sync™ is a trademark of Panasonic Corporation. VIERA LINK™ is a trademark of Panasonic Corporation. HDAVI Control™ is a trademark of Panasonic Corporation.