
Related Manuals for Motorola MBP41S-2


Summary of Contents for Motorola MBP41S-2
- Page 1 User’s Guide Digital Video Baby Monitor Models: MBP41S, MBP41S-2, MBP41S-3, MBP41S-4 The features described in this User’s Guide are subject to modifications without prior notice.
- Page 2 Please retain your original dated sales receipt for your records. For warranty service of your Motorola product, you will need to provide a copy of your dated sales receipt to confirm warranty status. Registration is not required for warranty coverage.
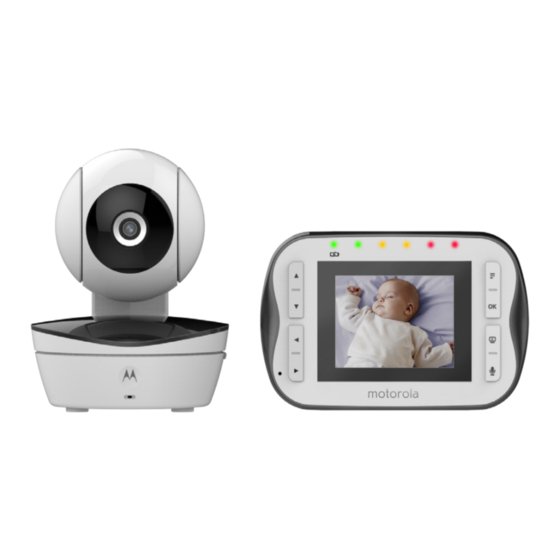
- Page 3 Overview of the Parent Unit 10 11 Talk Key T LCD display Up Key + Press and hold to speak to your baby Normal Mode: Tilt Up 10. Power Adapter / Battery LED Menu Mode: Up BLUE when the adapter is powered on. Down Key - RED when battery low.
- Page 4 Parent unit menu icons (cont’d) Alarm Setting (6h, 4h, 2h, Off) Temperature Reading (HH ºC / ºF or LL ºC / ºF) Icon & readings turn RED > 29ºC / 84ºF, and flashing when reading > 36ºC / 97ºF) Icon & readings turn RED < 14ºC / 57ºF, and flashing when reading <...
-
Page 5: Table Of Contents
Table of contents 1. Safety Instructions ..................6 2. Getting Started..................9 Baby Unit Power Supply ................9 Parent Unit Battery Installation ..............9 Parent Unit Power Supply .................10 Registration (Pairing)................. 11 3. Using the Digital Video Baby Monitor ............ 12 Setting up.................... -
Page 6: Safety Instructions
1. Safety Instructions WARNING: Strangulation Hazard. Children have STRANGLED in cords. Keep this cord out of the reach of children (more than 3ft (1m) away). Never use extension cords with AC Adapters. Only use the AC Adapters provided. Safety Instructions... - Page 7 CAMERA SET UP & USE: • Determine a location for the Baby Unit that will provide the best view of your baby in his/her crib. • Place the Baby Unit on a flat surface, such as a dresser, bureau or shelf, or mount the Unit on a wall securely using the keyhole slots under the stand.
- Page 8 • Do not touch the plug contacts with sharp or metal objects. • Connect the power adapters to easily accessible electrical outlets. CAUTION There is a risk of explosion if the battery is replaced by an incorrect type. Only use a Ni-MH rechargeable battery pack with rating: 3.6V, 900mAh. Dispose of used batteries according to the instructions.
-
Page 9: Getting Started
2. Getting Started Baby Unit Power Supply DC Jack DC JACK DC PLUG DC Plug 1. Connect the DC plug of the power adapter to the DC jack at the bottom of the Baby Unit and the other end to the electrical outlet. NOTE Only use the supplied power adapter (5V DC / 1000mA). -
Page 10: Parent Unit Power Supply
2. Place the battery compartment cover over the battery, making sure that the battery wires are carefully pushed down and the cover fits properly. 3. Gently tighten the screw in a clockwise direction using a small cross head or flat end screwdriver. Parent Unit Power Supply Micro USB Socket Micro USB Plug... -
Page 11: Registration (Pairing)
5. Press and hold the POWER ON/OFF button until the progress bar finishes scrolling, to turn OFF the Parent Unit. NOTE The battery icon turns RED to indicate that the battery is low, and it emits a beep every 16 seconds. The battery needs to be recharged. The battery pack takes about 12 hours to charge fully. -
Page 12: Using The Digital Video Baby Monitor
3. Using the Digital Video Baby Monitor Setting up • Place the Baby Unit in a convenient location (e.g. on a table) and point the camera lens towards the area you want to monitor. • Adjust the Baby Unit's camera angle by rotating the camera up, down, left and right until you are satisfied with the image in the Parent Unit. -
Page 13: Parent Unit Menu Options
4. Parent Unit Menu Options Volume 1. Press the button, The menu bar will pop up and is highlighted. 2. Press the UP button or DOWN button to select the desired volume level from Level 1~8. (The default Volume level setting is Level 4.) Zoom 1. -
Page 14: Temperature
If an alarm time is selected, the Parent Unit will beep for about 45 seconds after every 6, 4 or 2 hour period. Temperature 1. Press the button and the menu bar will pop up. < > 2. Press the LEFT button or RIGHT button until is highlighted. - Page 15 Quick Method to View Cameras. Directly press O repeatedly to select instead of entering the menu bar. 4.7.3 Delete a camera 1. Press the button and the menu bar will pop up. < > 2. Press the LEFT button or RIGHT button until is highlighted menu will pop up.
-
Page 16: Power Saving Mode
< 4. When the Picture in Picture function is ON, you can press the LEFT > button/ RIGHT button/ UP button / DOWN button to switch between cameras. Power Saving Mode 1. Press the button and the menu bar will pop up. <... -
Page 17: Disposal Of The Device (Environment)
5. Disposal of the Device (environment) At the end of the product life cycle, you should not dispose of this product with normal household waste. Take this product to a collection point for the recycling of electrical and electronic equipment. The symbol on the product, user's guide and/or box indicates this. -
Page 18: Cleaning
6. Cleaning Clean your Digital Video Baby Monitor with a slightly damp cloth or with an anti- static cloth. Never use cleaning agents or abrasive solvents. Cleaning and care • Do not clean any part of the Digital Video Baby Monitor with thinners or other solvents and chemicals - this may cause permanent damage to the product which is not covered by the warranty. -
Page 19: Troubleshooting
7. Troubleshooting Display No display • Try recharging or replacing the battery pack. • Reset the units. Disconnect the battery pack of the Parent Unit and unplug the power supply of both the units, then plug them back in. • Is the unit turned on? Press and hold the POWER ON/OFF button on the Parent Unit to turn it ON. - Page 20 Interference Noise interference on your Parent Unit • Your Baby and Parent Units may be too close. Move them farther apart. • Make sure that there is at least 3 to 6 feet between the 2 units to avoid audio feedback.
-
Page 21: General Information
To order a replacement battery pack for Parent Unit, contact customer service. Consumer Products and Accessories Limited Warranty ("Warranty") Thank you for purchasing this Motorola branded product manufactured under license by Binatone Electronics International LTD ("BINATONE") What Does this Warranty Cover? Subject to the exclusions contained below, BINATONE warrants that this Motorola branded product ("Product") or certified accessory ("Accessory") sold... - Page 22 PROVIDED UNDER THIS EXPRESS LIMITED WARRANTY IS THE EXCLUSIVE REMEDY OF THE CONSUMER, AND IS PROVIDED IN LIEU OF ALL OTHER WARRANTIES, EXPRESS OR IMPLIED. IN NO EVENT SHALL MOTOROLA OR BINATONE BE LIABLE, WHETHER IN CONTRACT OR TORT (INCLUDING...
- Page 23 (c) use of the Products or Accessories for commercial purposes or subjecting the Product or Accessory to abnormal usage or conditions; or (d) other acts which are not the fault of MOTOROLA or BINATONE., are excluded from coverage.
- Page 24 (b) broken seals or that show evidence of tampering; (c) mismatched board serial numbers; or (d) nonconforming or non-Motorola branded housings, or parts, are excluded from coverage. Communication Services. Defects, damages, or the failure of Products or Accessories due to any communication service or signal you may subscribe to or use with the Products or Accessories is excluded from coverage.
- Page 25 FCC, ACTA and Industry Canada (IC) Regulations FCC Part 15 NOTE: This equipment has been tested and found to comply with the limits for a Class B digital device, pursuant to Part 15 of the Federal Communications Commission (FCC) rules. These limits are designed to provide reasonable protection against harmful interference in a residential installation.
- Page 26 3(B)/NMB-3(B) WARNING Changes or modifications, to this equipment not expressively approved by the party responsible for compliance could void the user’s authority to operate the equipment. The socket-outlet shall be installed near the equipment and shall be easily accessible. Industry Canada This device complies with Industry Canada licence-exempt RSS standard(s): Operation is subject to the following Two conditions:(1) this device may not cause interference, and (2) this device must accept any interference, including...
-
Page 27: Technical Specifications
9. Technical Specifications Baby Unit Frequency 2.4 GHz to 2.48 GHz Image sensor Color CMOS 0.3M Pixels Lens f 2.5mm, F 2.8 IR LED 8 pcs Power Adapter: Ten Pao International Ltd. S006MU0500100; Input: AC100-240V, 50/60HZ 300mA; Output: DC5.0V, 1000mA Adapter: Kuantech Incorporated Company KSAS0050500100VUD;... - Page 28 Parent Unit Frequency 2.4 GHz to 2.48 GHz Display 2.8" diagonal TFT LCD Display color 16.7M color LCD Brightness control 8 steps Volume control 8 steps Power Adapter: Ten Pao International Ltd. S003IU0500060; Input: AC100-240V, 50/60Hz 150mA; Output: DC5V, 600mA Adapter: ShenZhen Frecom Electronic Co., LTD F05W-050060SPAU Input: AC100-240V, 50/60Hz 150mA;...
- Page 29 Manufactured, distributed or sold by Binatone Electronics International LTD., official licensee for this product. MOTOROLA and the Stylized M Logo, are trademarks or registered trademarks of Motorola Trademark Holdings, LLC. and are used under license. All other trademarks are the property of their respective owners.