Table of Contents
Advertisement
Available languages
Available languages
Quick Links
ENGLISH
Before using this product, be sure to read "Read this first!" (pages 3 to 6).
Bitte lesen Sie sorgfältig die „Bitte lesen Sie zuerst diesen Hinweis!" vor der Nutzung dieses
Produkts. (Seiten 7 bis 8).
DEUTSCH
Weitere Informationen finden Sie auf der Panasonic-Webseite (https://pro-av.panasonic.net/
manual/en/index.html) und in der Bedienungsanleitung.
Avant d'utiliser cet appareil, assurez-vous de lire la section « Lire ces informations en premier ! »
(pages 9 à 11).
FRANÇAIS
Pour de plus amples informations, visiter le site Web de Panasonic (https://pro-av.panasonic.
net/manual/en/index.html) et consulter le mode d'emploi.
Prima di utilizzare il prodotto, assicurarsi di leggere "Leggere prima quanto segue!" (pagine 12 a
13).
ITALIANO
Per maggiori informazioni, per favore visitare il sito web Panasonic (https://pro-av.panasonic.net/
manual/en/index.html), e fare riferimento alle istruzioni per l'uso.
Antes de usar este producto, asegúrese de leer "Lea esto primero" (páginas 14 a 16).
ESPAÑOL
Si desea obtener más información, visite el sitio web de Panasonic (https://pro-av.panasonic.
net/manual/en/index.html) y consulte las instrucciones de funcionamiento.
Before operating this product, please read the instructions carefully and save this manual for future use.
GJ
SS0919HO0 -YI
Printed in Japan
Operating Instructions
AK-HVF75G
Model No.
LCD View Finder
ENGLISH
DVQX1969ZA
Advertisement
Table of Contents

Related Manuals for Panasonic AK-HVF75G


Summary of Contents for Panasonic AK-HVF75G
- Page 1 Avant d’utiliser cet appareil, assurez-vous de lire la section « Lire ces informations en premier ! » (pages 9 à 11). FRANÇAIS Pour de plus amples informations, visiter le site Web de Panasonic (https://pro-av.panasonic. net/manual/en/index.html) et consulter le mode d’emploi. Prima di utilizzare il prodotto, assicurarsi di leggere “Leggere prima quanto segue!” (pagine 12 a 13).
- Page 2 Pre bezpečnostné informácie a dôležité oznámenia súvisiace s produktom navštívte Slovensky túto webovú stránku. Za varnostne informacije in pomembna obvestila v zvezi z izdelkom obiščite Slovenščina naslednje spletno mesto. Besök följande webbplats för säkerhetsinformation och viktiga meddelanden om Svenska produkten. https://pro-av.panasonic.net/manual/en/index.html...
-
Page 3: Read This First
Supplier’s Declaration of Conformity Trade Name: Panasonic Model Number: AK-HVF75G Responsible Party: Panasonic Corporation of North America Two Riverfront Plaza Newark NJ07102 Support contact: 1-800-524-1448 This device complies with Part 15 of the FCC Rules. Operation is subject to the following two conditions: (1) This device may not cause harmful interference, and (2) this device must accept any interference received, including interference that may cause undesired operation. - Page 4 Read this first! IMPORTANT SAFETY INSTRUCTIONS 1) Read these instructions. 2) Keep these instructions. 3) Heed all warnings. 4) Follow all instructions. 5) Do not use this apparatus near water. 6) Clean only with dry cloth. 7) Do not block any ventilation openings. Install in accordance with the manufacturer’s instructions. 8) Do not install near any heat sources such as radiators, heat registers, stoves, or other apparatus (including amplifiers) that produce heat.
- Page 5 3. Change the connection method used for the apparatus. 4. Connect the apparatus to another power outlet where the power is not shared by any other appliances. Manufactured by: Panasonic Corporation, Osaka, Japan Importer’s name and address of pursuant to EU rules:...
- Page 6 Read this first! AEEE Yönetmeliğine Uygundur. AEEE Complies with Directive of Turkey. ІНФОРМАЦІЯ ПРО ПІДТВЕРДЖЕННЯ ВІДПОВІДНОСТІ ПРОДУКТУ Виробник: Panasonic Corporation Панасонік Корпорейшн Адреса виробника: Kadoma, Osaka, Japan Кадома, Осака, Японія Країна походження: Japan Японія Уповноважений Представник: ТОВ “ПАНАСОНІК УКРАЇНА ЛТД”...
-
Page 7: Bitte Lesen Sie Zuerst Diesen Hinweis
Gehäuse nicht durch Vorhänge oder andere Funkstörungen verursachen. Materialien blockiert werden; anderenfalls besteht die Gefahr von Bränden aufgrund von Überhitzung. Hergestellt von: Panasonic Corporation, Osaka, Japan Name und Adresse des Importeurs gemäß EU-Bestimmungen: Panasonic Marketing Europe GmbH Panasonic Testing Centre Winsbergring 15, 22525 Hamburg, Deutschland Entsorgung von Altgeräten... - Page 8 DEUTSCH Bitte lesen Sie zuerst diesen Hinweis! EMV-HINWEIS FÜR DEN KÄUFER/ANWENDER DES GERÄTS 1. Erforderliche Bedingungen zur Einhaltung der oben genannten Standards <1> An das Gerät angeschlossene Geräte und spezielle Verbindungskabel • Der Käufer/Anwender sollte nur Geräte verwenden, die von uns als Zusatzgeräte für den Anschluss an das Gerät empfohlen wurden.
-
Page 9: Lire Ces Informations En Premier
FRANÇAIS Lire ces informations en premier ! Lire ces informations en premier ! Informations concernant la sécurité. AVERTISSEMENT: ATTENTION: • Pour réduire les risques d’incendie, évitez Ne pas dévisser le couvercle. d’exposer cet appareil à la pluie ou à l’humidité. Il ne se trouve à... - Page 10 3. Changez la méthode de connexion utilisée pour l’appareil. 4. Connectez l’appareil à une autre prise électrique sur laquelle l’alimentation n’est partagée par aucun autre appareil. Fabriqué par : Panasonic Corporation, Osaka, Japon Nom et adresse de l’importateur en accord avec les règlements de l’Union Européenne :...
- Page 11 FRANÇAIS Lire ces informations en premier ! Affichage a cristaux liquides En raison des caractéristiques des moniteurs LCD, l’affichage prolongé d’images fixes lumineuses ou le fonctionnement prolongé dans des environnements à température élevée ou à humidité élevée peut provoquer des images résiduelles, une réduction de la luminance, une surexposition, des effets de bandes ou des défauts et la détérioration du panneau, qui causeront l’apparition de zones à...
-
Page 12: Leggere Prima Quanto Segue
Fabbricato da: Panasonic Corporation, Osaka, Giappone Nome e indirizzo dell'importatore in conformità con le normative UE: Panasonic Marketing Europe GmbH Panasonic Testing Centre... - Page 13 ITALIANO Leggere prima quanto segue! AVVISO EMC PER L’ACQUIRENTE/UTENTE DELL’APPARATO 1. Prerequisiti essenziali per la conformità agli standard sopra menzionati <1> Periferiche da collegare all’apparato e cavi di collegamento speciali • Si raccomanda all’acquirente/utente di collegare l’apparato esclusivamente con periferiche da noi approvate. •...
-
Page 14: Lea Esto Primero
ESPAÑOL Lea esto primero Lea esto primero indica información de seguridad. ADVERTENCIA: PRECAUCIÓN: • Para reducir el riesgo de producir un incendio, No quite la cubierta desatornillándola. no exponga este equipo a la lluvia ni a la Las piezas del interior no requieren mantenimiento humedad. - Page 15 3. Cambiar el método de conexión utilizado para el aparato. 4. Conectar el aparato a otra toma de corriente que no comparta su energía con otros dispositivos. Fabricado por: Panasonic Corporation, Osaka, Japón Nombre y dirección del importador conforme a las normas de la UE:...
- Page 16 ESPAÑOL Lea esto primero Pantalla de cristal liquido Debido a las características de los monitores LCD, la visualización prolongada de imágenes fijas brillantes o el funcionamiento prolongado en entornos con una temperatura o humedad altas pueden producir imágenes residuales, reducción de la luminancia, quemaduras y franjas, o defectos y degradación en el panel que den lugar a áreas con el brillo cambiado permanentemente.
-
Page 17: Table Of Contents
Contents Contents Read this first! Bitte lesen Sie zuerst diesen Hinweis! Lire ces informations en premier ! Leggere prima quanto segue! Lea esto primero Before using the camera Features Accessories Description of parts Front Rear Preparation Mounting to the camera Dismounting from the camera Tilting operation Panning operation... -
Page 18: Before Using The Camera
Before using the camera Before using the camera r LCD f The LCD monitor is manufactured with high-precision technology and has an effective pixel count of over 99.99%, but there are 0.01% of the pixels either missing or constantly lit (red, blue, green). This is normal and not a cause for concern. f The LCD protective panel is specially treated. -
Page 19: Description Of Parts
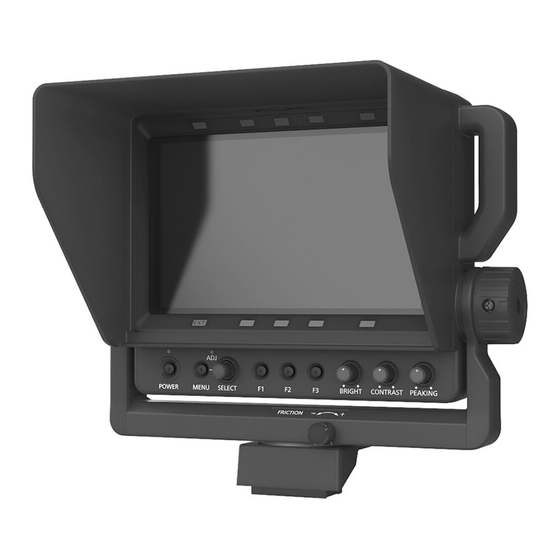
Description of parts Description of parts Front 12 13 1 Assignable tally lamp This is illuminated with the condition set in [MAIN MENU] → [SYSTEM CONFIG] → [TALLY ASSIGN]. The brightness can be switched with [MAIN MENU] → [TALLY BRIGHT] → [FRONT TALLY] → [HIGH]/[MID]/[LOW]. 2 Red tally lamp This is illuminated when the red tally signal is input. -
Page 20: Rear
Description of parts NOTE t The brightness for assignable tally lamp/<EXT> lamp/red tally lamp/green tally lamp/yellow tally lamp are switched simultaneously when the setting of [FRONT TALLY] is changed. Rear 1 Up tally lamp This is illuminated with the control signal from the camera. The brightness can be switched with [MAIN MENU] →... -
Page 21: Preparation
Preparation Preparation Mounting to the camera Lock release button Connector cover V-shaped groove Viewfinder V-shaped projection Fig. 1 Fig. 2 Turn off the power of the camera and this unit. Press the lock release button on the camera and remove the connector cover. (Fig. 1) Align the V-shaped projection of this unit to the V-shaped groove on the camera, and slide and push in until it is locked. -
Page 22: Tilting Operation
Preparation Tilting operation Tilt angle 90 degrees Grip to the top Tilt angle Grip 60 degrees to the bottom <TILT LOCK> knob The operation torque is increased when the <TILT LOCK> knob is turned toward the direction of the arrow. Adjust the torque adequately and hold the grip when operating the tilting. -
Page 23: On-Screen Display
On-screen display On-screen display The operation status, functions, image adjustment condition, menus and other information are displayed in the viewfinder screen. Operation status display P-P FILM 1 PIXEL TO PIXEL mode Displayed when image display is in the PIXEL TO PIXEL mode. 2 Film mode Displayed when set to [MAIN MENU] →... -
Page 24: Function Display
On-screen display Function display Function display Function button Press one of the <F1> to <F3> buttons. Assigned function and its condition are displayed when operating one of the <F1> to <F3> buttons. f This display disappears after approximately two seconds of inaction. f Display condition can be changed with [MAIN MENU] →... -
Page 25: Camera Menu Display
On-screen display Camera menu display The menu of the camera (only AK-UC4000G/AK-UC4000GS, AK-UC3000G/AK-UC3000GS, AK-HC5000G/AK-HC5000GS) can be operated from this unit. F1 : CAM MENU F2 : PIXEL TO PIXEL F3 : FOCUS-IN-RED <F1> to <F3> buttons <MENU> button <SELECT> dial button Set [CAM MENU] to one of the <F1>... -
Page 26: Menu Operations
Menu operations Menu operations The menu operation method, structure of the setting menu, and details of the setting menu are described. Basic operations [ MAIN MENU ] MARKER FUNCTION VIDEO CONFIG SYSTEM CONFIG HOURS METER TALLY BRIGHT FOCUS ASSIST Fig. 1 [ MARKER ] EXIT MARKER... -
Page 27: Menu Structure
Menu operations [ASSIGN] setting ([ASSIGN] condition display) [ FOCUS-IN-R ] <MENU> button <SELECT> dial button Select the function to be assigned to the <SELECT> dial button with [MAIN MENU] → [FUNCTION] → [ASSIGN]. Press the <SELECT> dial button. Press the <MENU> button to close the menu. Turn the <SELECT>... -
Page 28: Menu List
Menu operations Menu list [MARKER] Item Setting content [EXIT] Returns to the upper level. [MARKER] — Sets if the marker is displayed in the screen or not. [ON], [OFF] f Factory setting: [OFF] [BOX MARKER] is set to [OFF] when [BOX MARKER] is [ON1]/[ON2] and [MARKER] is set to [ON]. [ZONE] Selects the type of marker. - Page 29 Menu operations [FUNCTION] Item Setting content [EXIT] Returns to the upper level. [FUNCTION1] Selects the function assigned to the <F1> button. [SCAN]: Switches between the underscan and normal display. [WFM]: Displays the waveform display screen. [MARKER]: Displays the marker. [PIXEL TO PIXEL]: Switches the enable/disable of the PIXEL TO PIXEL function * [FOCUS-IN-RED]: Switches the enable/disable of the function to enhance the focused part of the image (disabled when [WFM] is displayed, disabled when there is no input signal, setting is cleared when the power is turned off, and the detection sensitivity can be changed with the <SELECT>...
- Page 30 Menu operations Item Setting content [ASSIGN] Selects the function assigned to the <SELECT> dial button when the menu is not displayed. [FOCUS-IN-RED]: Changes the detection sensitivity of the function to enhance the part that is focused in the image. [IN-RED-COLOR]: Switches the display color of the function to enhance the part that is focused in the image.
- Page 31 Menu operations Item Setting content [SCAN] Sets the underscan or normal display of the screen. [NORMAL]: Normal display. [UNDER]: Underscan. f Factory setting: [NORMAL] * Correct image is not displayed when the gamma setting is different from the setting of the camera. [SYSTEM CONFIG] Item Setting content...
- Page 32 Menu operations [TALLY BRIGHT] Item Setting content [EXIT] Returns to the upper level. [UP TALLY] Sets the brightness of the up tally lamp. [HIGH]: Turns on (bright). [LOW]: Turns on (dark). [OFF]: Turns off. f Factory setting: [LOW] [FRONT TALLY] Sets the brightness of the front tally lamp.
-
Page 33: Maintenance And Inspection
Maintenance and Inspection Maintenance and Inspection Maintenance and inspection are performed with periodic and appropriate maintenance to maintain the function of the unit in constantly good condition so the customers can use the unit safely. Make sure to execute the maintenance and inspection for the function of the unit to last long in good condition. r Periodic maintenance service The LCD panel is equipped with a backlight. -
Page 34: Specification
Specification Specification Dimensions 243.5 (9-19/32) Unit: mm (inch) 172 (6-25/32) 90 (3-17/32) 85 (3-11/32) Specifications General Power DC e 12 V (supplied from camera) Power consumption 11 W indicates safety information. Ambient operating temperature 0 °C – 45 °C (32 °F – 113 °F) Storage temperature −20 °C –... -
Page 35: Connector Pin Assignment Table
Specification Display panel Dimensions 7.0 inches Number of pixels 1280×800 (WXGA) Display color Approx. 16.77 million colors Switch function/connector Operation <POWER> switch <MENU> button <SELECT> dial button <F1>/<F2>/<F3> buttons <BRIGHT> knob <CONTRAST> knob <PEAKING> knob Connector Camera I/F connector (D-sub 29 pins × 1) Supported signal format 1080/59.94i, 1080/50i Connector pin assignment table... - Page 36 Web Site: https://www.panasonic.com © Panasonic Corporation 2019...