Advertisement
Quick Links
50in, 54in, or 60in Recycler
Zero-Turn-Radius Riding Mowers
Model No. 139-3235
Model No. 139-3240
Model No. 139-3290
Installation
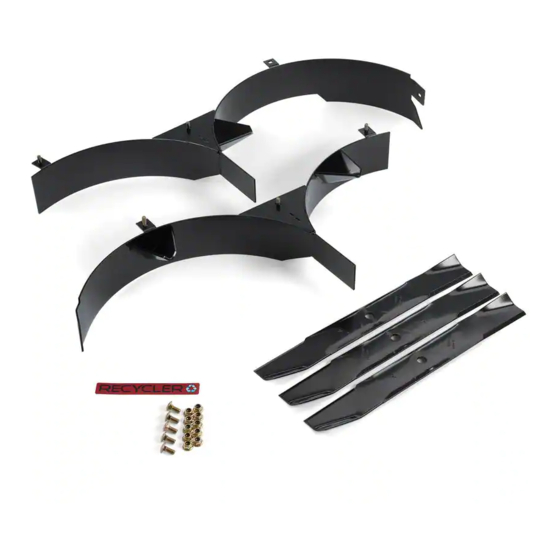
Loose Parts
Use the chart below to verify that all parts have been shipped.
Procedure
1
3
4
5
1
Preparing the Machine
No Parts Required
Procedure
1.
Park the machine on a level surface.
2.
Disengage the PTO, engage the parking brake,
and move the motion-control levers outward to
the N
-L
EUTRAL
OCK
3.
Shut off the engine and remove the key.
© 2020—The Toro® Company
8111 Lyndale Avenue South
Bloomington, MN 55420
Description
No parts required
Right baffle
Bolt (5/16 x 3/4 inch)
Nut (5/16 inch)
Left baffle
Bolt (5/16 x 3/4 inch)
Nut (5/16 inch)
Decal
Mulching blade
position.
Register at www.Toro.com.
®
Kit
Qty.
–
Prepare the machine.
1
1
Install the right baffle.
4
1
1
Install the left baffle.
3
1
Install the decal and mulching blades.
3
2
Preparing the Mower Deck
No Parts Required
Procedure
1.
Remove the mower deck from the machine;
refer to the Operator's Manual for the machine.
2.
Turn the mower deck upside-down.
3.
Remove the existing mower blades; refer to the
Operator's Manual for the machine.
4.
Remove the nut securing the cutoff baffle to the
deck and remove the cutoff baffle
Note:
Retain the baffle for converting back to
side discharge.
Original Instructions (EN)
All Rights Reserved *3438-195* A
Printed in the USA
Form No. 3438-195 Rev A
Installation Instructions
Use
(Figure
1).
Advertisement

Summary of Contents for Toro 139-3235
- Page 1 Form No. 3438-195 Rev A 50in, 54in, or 60in Recycler ® Zero-Turn-Radius Riding Mowers Model No. 139-3235 Model No. 139-3240 Model No. 139-3290 Installation Instructions Installation Loose Parts Use the chart below to verify that all parts have been shipped.
- Page 2 Secure the rear wall of the right baffle to the mower deck using 1 carriage bolt (5/16 x 3/4 inch) and nut (5/16 inch) as shown in Figure g314446 g314447 Figure 3 Figure 1 1. Nut (5/16 inch) 2. Bolt (5/16 x 3/4 inch) Install the nut on the discharge rod, where it was originally removed (Figure...
- Page 3 g314446 Figure 5 1. Nut (5/16 inch) 2. Bolt (5/16 x 3/4 inch) g307325 Install the nut on the discharge rod, where it was Figure 7 originally removed (Figure 1. Bolt (5/16 x 3/4 inch) g314450 g307326 Figure 6 Figure 8 1.
- Page 4 If a blade is Cutting a Third of the Grass Blade damaged or worn, replace it immediately with a genuine Toro replacement blade. Cut only about a third of the grass blade. Cutting more than that is not recommended unless grass is sparse,...


