Samsung DW60M6050 Series User Manual
Hide thumbs
Also See for DW60M6050 Series:
- User manual (224 pages) ,
- Repair manual (37 pages) ,
- User manual (112 pages)
Table of Contents
Advertisement
DD81-02437G-00
DW5500M_DD81-02437G-00_EN.indd 1
DW5500M_DD81-02437G-00_EN.indd 1
Dishwasher
user manual
imagine
the possibilities
Thank you for purchasing this Samsung product.
DW60M6050**
DW60M6051**
DW60M6040**
D159STS
D159W
D157STS
D157W
2017-06-22
2017-06-22
2:31:05
2:31:05
Advertisement
Table of Contents

Related Manuals for Samsung DW60M6050 Series


Summary of Contents for Samsung DW60M6050 Series
- Page 1 DW60M6050** DW60M6051** DW60M6040** D159STS D159W D157STS D157W Dishwasher user manual imagine the possibilities Thank you for purchasing this Samsung product. DD81-02437G-00 DW5500M_DD81-02437G-00_EN.indd 1 DW5500M_DD81-02437G-00_EN.indd 1 2017-06-22 2017-06-22 2:31:05 2:31:05...
- Page 2 Safety instructions Congratulations on your new Samsung dishwasher. This manual contains important information on the installation, use and care of your appliance. Please take time to read this manual to take full advantage of your dishwasher’s many benefits and features.
- Page 3 To reduce the risk of fire, electric shock, or injury to persons when using your appliance, follow basic precautions, including the following: WARNING 1. This appliance is not to be used by persons (including children) with reduced physical, sensory or mental capabilities, or lack of experience and knowledge, unless they have been given supervision or instruction concerning use of the appliance by a person responsible...
- Page 4 Safety instructions 8. CAUTION: In order to avoid a hazard due to inadvertent resetting of the thermal cut-out, this appliance must not be supplied through an external switching device, such as a timer, or connected to a circuit that is regularly switched on and off by the utility.
- Page 5 INSTRUCTIONS WHEN USING YOUR DISHWASHER This dishwasher is not designed for commercial use. It is intended for use in domestic households and in similar working and residential environments such as: • Shops • Offices and showrooms and by residents in establishments such as: •...
- Page 6 Safety instructions Knives and other utensils with sharp points must be loaded in the basket with their points down or placed in a horizontal position. WARNING INSTRUCTIONS FOR PROTECTING YOUR CHILDREN This appliance is not a toy! To avoid the risk of injury, keep children well away and do not allow them to play in or around the dishwasher or to use the controls.
- Page 7 INSTRUCTIONS FOR INSTALLING YOUR DISHWASHER Before setting up the appliance, check it for any externally visible damage. Under no circumstances should you use a damaged appliance. A damaged appliance could be dangerous. WARNING The dishwasher must only be plugged into the electricity supply via a suitable switched socket. The electrical socket must be easily accessible after the dishwasher is installed so that it can be CAUTION disconnected from the electricity supply at any time.
- Page 8 Safety instructions The integrated waterproof system offers protection from water damage, provided the following conditions are met: CAUTION • The dishwasher is correctly installed and plumbed in. • The dishwasher is properly maintained and parts are replaced where it can be seen that this is necessary.
- Page 9 Make sure that your dishwasher’s hardness level setting is correct as your area. (Refer to the “Water softener mode (Water hardness level setting)” section on page 19.) For information on Samsung’s environmental commitments and product specific regulatory obligations e.g. REACH visit: samsung.com/uk/aboutsamsung/samsungelectronics/corporatecitizenship/data_corner.html Safety instructions _9 DW5500M_DD81-02437G-00_EN.indd 9...
-
Page 10: Table Of Contents
Contents PARTS AND FEATURES Dishwasher features Control panel Displays USING THE DETERGENT AND WATER Water softener mode (Water hardness level setting) SOFTENER Loading the salt into the softener Using detergent Using rinse aid How to use the Multi tap option LOADING THE DISHWASHER RACKS Loading the upper basket Loading the lower basket... -
Page 11: Parts And Features
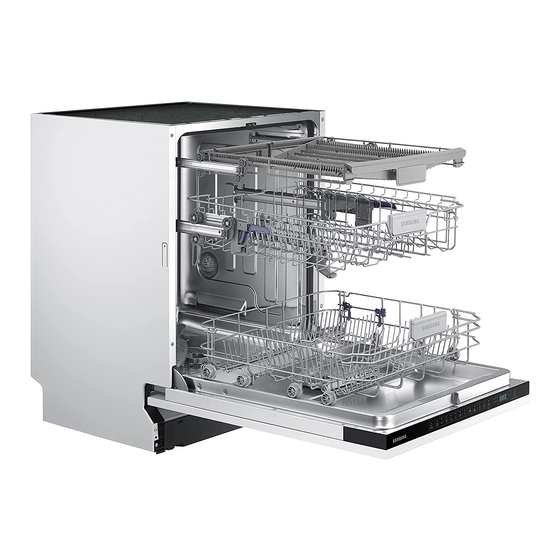
Parts and features DISHWASHER FEATURES Front & Rear view (D159STS/D159W/DW60M6050**) 3rd Rack Upper Basket Lower Basket Duct Nozzle Salt Container Dispenser Cup Shelf Spray arms Filter assembly Inlet hose Drain hose Accessory parts - User manual, Salt funnel, cutlery basket. Part and features _11 DW5500M_DD81-02437G-00_EN.indd 11 DW5500M_DD81-02437G-00_EN.indd 11... - Page 12 Parts and features Front & Rear view (DW60M6051**) 3rd Rack Upper Basket Lower Basket Duct Nozzle Salt Container Dispenser Cup Shelf Spray arms Filter assembly Inlet hose Drain hose Accessory parts - User manual, Salt funnel, cutlery basket. 12_ Part and features DW5500M_DD81-02437G-00_EN.indd 12 DW5500M_DD81-02437G-00_EN.indd 12 2017-06-22...
- Page 13 Front & Rear view (D157STS/D157W/DW60M6040**) Upper Basket Lower Basket Duct Nozzle Salt Container Dispenser Cup Shelf Spray arms Filter assembly Drain hose Inlet hose Accessory parts - User manual, Salt funnel, cutlery basket. Part and features _13 DW5500M_DD81-02437G-00_EN.indd 13 DW5500M_DD81-02437G-00_EN.indd 13 2017-06-22 2017-06-22 2:31:20...
- Page 14 Parts and features CONTROL PANEL D159STS/D159W/DW60M6050U*/DW60M6050S* DW60M6051F*/DW60M6051U*/DW60M6051S* D157STS/D157W/DW60M6040U*/DW60M6040S* D159 DW60M6050 DW60M6051 D157 DW60M6040 POWER Press this button to turn on your dishwasher: the screen lights up. Program To select washing program press this button. For small amount of loading items, use either the upper or lower basket only to save energy.
- Page 15 • When the door is open only the POWER button will operate. • You can select options (Multi tap, Delay start and/or Half load) before starting a cycle. IMPORTANT: To get the best performance from your dishwasher, read all the operating instructions before using it for the first time.
- Page 16 Parts and features This option allows you to lock the buttons on the control panel so children cannot accidentally start the dishwasher by pressing the buttons on the panel. Control lock To lock and unlock the buttons on the control panel, hold down both the Control lock buttons for three (3) seconds.
- Page 17 DISPLAYS D159STS/D159W/DW60M6050U*/DW60M6050S* DW60M6051F*/DW60M6051U*/DW60M6051S* D157STS/D157W/DW60M6040U*/DW60M6040S* D159/DW60M6050/DW60M6051 D157/DW60M6040 Program icons Press the Program button to select each program. Intensive Heavily soiled items include pots and pans Lightly to heavily soiled daily using items, automatic detection of the Auto wash amount of soils. Normally soiled daily using items, with reduced energy and water consumptions.
- Page 18 Parts and features DW60M6050BB/DW60M6040BB DW60M6050 DW60M6040 Program icons Press the Program button to select each program. Lightly to heavily soiled daily using items, automatic detection of the Auto wash amount of soils. Normally soiled daily using items, with reduced energy and water consumptions.
-
Page 19: Using The Detergent And Water Softener
Using the detergent and water softener WATER SOFTENER MODE (WATER HARDNESS LEVEL SETTING) The dishwasher is designed to allow for adjusting the amount of salt consumed based on the hardness of the water used. This is intended to optimise the level of salt consumption. To set the salt consumption, proceed as below: 1. - Page 20 Using the detergent and water softener LOADING THE SALT INTO THE SOFTENER Always use salt intended for use with dishwasher. The salt container is located beneath the lower rack and should be filled as follows: ATTENTION • Only use salt specifically designed for use in dishwashers. All other types of salt not specifically designed for use in a dishwasher, especially table salt, will damage the water softener.
- Page 21 USING DETERGENT All dishwasher cycles require detergent in the detergent compartment. Add the correct amount of detergent for the selected cycle to ensure the best performance. CAUTION: Use dishwasher detergent only. Regular detergent produces too much foam, which may decrease the dishwasher’s performance or cause it to malfunction. WARNING: Do not swallow dishwasher detergent.
- Page 22 Using the detergent and water softener USING RINSE AID Filling the rinse aid reservoir When the Rinse Refill indicator lights up on the control panel, refill with rinse aid. Your dishwasher has been designed to use liquid rinse aid only. Using a powdered rinse aid will clog the reservoir opening and cause the dishwasher to malfunction.
- Page 23 HOW TO USE THE MULTI TAP OPTION Your dishwasher has a Multi tap option which does not need salt and rinse aid but a 3 In1 tablet. This option can select on Intensive, Eco program only. The Multi tap setting is only for use with Multi tap tablets. If using Multi tap tablet without this option, the appliance will not get its best performance.
-
Page 24: Loading The Dishwasher Racks
Loading the dishwasher racks For best performance of the dishwasher, follow these loading guidelines. Features and appearance of racks and silverware baskets may vary from your model. Attention before or after loading the dishwasher racks Scrape off any large amounts of leftover food. It is not necessary to rinse the dishes under running water. - Page 25 Adjusting the Upper Basket The height of the upper basket can be adjusted in order to create more space for large utensils both for the upper/lower basket. 1. To lower the upper rack, press the “A” levers located at the left and right sides of the upper basket and push the upper basket downwards slightly at the same time.
- Page 26 Loading the dishwasher racks LOADING THE LOWER BASKET We recommend that you place large items which are most difficult to clean in to the lower rack: pots, pans, lids, serving dishes and bowls, as shown in the figure to the right. It is preferable to place serving dishes and lids on the side of the racks in order to avoid blocking the rotation of the top spray arm.
- Page 27 CUTLERY(SILVERWARE) TRAY Silverware should be placed in the cutlery tray with handles at the bottom: The spoon should be loaded individually into the appropriate slots, especially long utensils should be placed in the horizontal position at the front of the upper basket. D159/DW60M6050/DW60M6051 Soup spoons Dessert spoons...
- Page 28 Loading the dishwasher racks D157/DW60M6040 Soup spoons Dessert spoons Forks Serving spoons Knives Serving forks Teaspoons Gravy ladles WARNING • Do not let any item extend through the bottom. • Always load sharp utensils with the sharp point down! 28_ Loading the dishwasher racks DW5500M_DD81-02437G-00_EN.indd 28 DW5500M_DD81-02437G-00_EN.indd 28 2017-06-22...
- Page 29 FOR WASHING IN THE DISHWASHER THE FOLLOWING CUTLERY/ DISHES Are not suitable Are of limited suitability Plastic items that are not heat resistant. Some types of glasses can become dull after a large number of washes. Older cutlery with glued parts that is not temperature resistant.
-
Page 30: Washing Programmes
Washing programmes TURNING ON THE APPLIANCE Starting a cycle wash 1. Draw out the lower and upper basket, load the dishes and push them back.. It is recommended to load the lower basket fi rst, then the upper one (see the section entitled “Loading the dishwasher racks”). - Page 31 AT THE END OF THE WASH CYCLE When the working cycle has finished, the buzzer of dishwasher will beep shortly, then stop. In the digital display appears “0”, only in this case the programme has ended. 1. Switch off the dishwasher by pressing the POWER button. 2.
- Page 32 Washing programmes Detergent Running Energy Program Description of Cycle Water (ℓ) (Prewash/Main wash) (g) time (min) (kWh) Pre Wash (50 °C) Wash (60 °C) Express 5/30 1.15 Rinse (60 °C) Drying Pre Wash (50 °C) Wash (60 °C) Express + Hygiene 5/30 1.25 Rinse (65 °C)
-
Page 33: Cleaning And Care
Cleaning and care CLEANING THE FILTERS Filtering system For your convenience, we have placed the drain pump and filtering system within easy reach inside the tub. There are three components of the filtering system: the main filter, the coarse filter, and the fine filter. - Page 34 Cleaning and care CLEANING THE SPRAY ARMS It is necessary to clean the spray arms regularly as hard water chemicals may clog the spray arm jets and bearings. To remove the middle spray arm, hold the nut, rotate the arm clockwise to remove it. To remove the lower spray arm, pull out the spray arm upward.
- Page 35 HOW TO MAINTAIN YOUR DISHWASHER • After Every Wash After every wash, turn off the water supply to the appliance and leave the door slightly ajar so that moisture and odours not trapped inside. • Remove the Plug Before cleaning or performing maintenance, always remove the plug from the socket. •...
-
Page 36: Setting Up Your Dishwasher
Setting up your dishwasher WARNING : Electrical shock hazard Disconnect electrical power before installing dishwasher. Failure to do so could result in death or electrical shock. ATTENTION: The installation of the pipes and electrical equipments should be done by professionals. About electricity connecting CAUTION, for personal safety: DO NOT USE AN EXTENSION CORD OR AN ADAPTER PLUG WITH THIS APPLIANCE. - Page 37 Hot water connection The water supply to the appliance can also be connected to the house hot water line (centralized system, heating system), as long as it does not exceed a temperature of 60 °C. In this case, the wash cycle time will be shortened by about 15 minutes and the wash efficiency slightly reduced. The connection must be made to the hot water line following the same procedures as those for the connection to the cold water line.
- Page 38 Setting up your dishwasher CONNECTION OF DRAIN HOSES Insert the drain hose into a drain pipe with a minimum diameter of 4 cm, or let it run into the sink, making sure to avoid bending or crimping it. The top of the hose must be at a height between 40 and 100 cm. The free end of the hose must not be immersed in water to avoid the back flow of it.
-
Page 39: Installing Your Dishwasher
Installing your dishwasher BUILT UNDER, SEMI BUILT IN, FULLY BUILT IN DISHWASHER Be sure that you or your installer follow these instructions closely so that your new dishwasher works properly and that you’re not at risk of injury when washing dishes. New installation If the dishwasher is a new installation, most of the installation work must be done before the dishwasher is moved into place. - Page 40 Installing your dishwasher STEP 2. CHECKING WATER SUPPLY AND ELECTRICAL REQUIREMENTS • The water supply line pressure must be between 0.04-1.0 MPa. • Supply cold water only. Make sure that the water temperature does not exceed 60 ˚C. CAUTION • Do not supply hot water.
- Page 41 Fully built in 1. Install the hook on the custom wooden panel and put the hook into the slot of the outer door of dishwasher. 2. After positioning of the panel, fi x the panel onto the outer door by screws and bolts. CAUTION: Use a custom panel between 3~8 kg.
- Page 42 Installing your dishwasher STEP 4. TENSION ADJUSTMENT OF THE DOOR SPRING (FOR FULLY BUILT IN AND SEMI BUILT IN DISHWASHER) 1. The door springs are set at the factory to the proper tension for the outer door. If custom wooden panel are installed, you will have to adjust the door spring tension.
- Page 43 STEP 5. DISHWASHER INSTALLATION 1. Install the furniture door to the outer door of the dishwasher using the brackets provided. Refer to the template for positioning of the brackets. (For Fully built in and Semi built in dishwasher) 2. Adjust the tension of the door springs by using an Allen key turning in a clockwise motion to tight en the left and right door springs.
- Page 44 Installing your dishwasher STEP 6. LEVELLING THE DISHWASHER Check level front to back Check level side to side Dishwasher must be level for proper dish rack operation and wash performance. 1. Place a spirit level on door and rack track inside the tub as shown to check that the dishwasher is level. 2.
-
Page 45: Troubleshooting
Troubleshooting The manufacturer, following a policy of constant development and up-dating of the product, may make modifications without giving prior notice. BEFORE CALLING FOR SERVICE PROBLEM POSSIBLE CAUSE WHAT TO DO Dishwasher doesn’t • Fuse blown or the circuit • Replace fuse or reset circuit breaker. - Page 46 Troubleshooting PROBLEM POSSIBLE CAUSE WHAT TO DO Spots and filming on 1. Extremely hard water. To remove spots from glassware: glasses and flatware 2. Low inlet temperature. 1. Take out all metal utensils out of the dishwasher. 3. Overloading the dishwasher.
- Page 47 PROBLEM POSSIBLE CAUSE WHAT TO DO Dishwasher leaks • Overfill dispenser or rinse • Be careful not to overfill the rinse aid aid spills. dispenser. Spilled rinse aid could cause overusing and lead to overflowing. Wipe away any spills with a damp cloth. •...
-
Page 48: Error Codes
Troubleshooting ERROR CODES If an error occurs an error code may be displayed to inform you: Codes Meanings Possible Causes Faucets is not opened, or water intake is Water supply check restricted,or water pressure is too low Leakage Some element of dishwasher leaks. Not reaching required temperature Malfunction of heating element Divider valve failed... - Page 49 Appendix SPECIFICATIONS DW60M6050US D159STS/D159W DW60M6050UW D157STS/D157W DW60M6051US DW60M6050BB DW60M6050FS Model DW60M6050SS DW60M6051UW DW60M6040BB DW60M6050FW DW60M6040FS DW60M6040US DW60M6040FW DW60M6040UW Type Freestanding Built Under Semi Built in Fully Built in Power 220-240 V~, 50 Hz Water pressure 0.04 - 1.0 Mpa Rated power usage 1760-2100 W Hot water connection Max 60 °C...
- Page 50 Appendix PRODUCT DIMENSION 1150 1175 D159STS/D159W DW60M6050US/DW60M6050UW D157STS/D157W DW60M6051US/DW60M6051UW DW60M6050FS/DW60M6050FW DW60M6040US/DW60M6040UW DW60M6040FS/DW60M6040FW DW60M6050SS 1150 DW60M6050BB/DW60M6040BB 50_ Appendix DW5500M_DD81-02437G-00_EN.indd 50 DW5500M_DD81-02437G-00_EN.indd 50 2017-06-22 2017-06-22 2:31:36 2:31:36...
- Page 51 For standard test D159/DW60M6050/DW60M6051 The information for comparability test in accordance with EN 50242, as follows: The diagrams below show the proper way to load the baskets based on the European Standards (EN50242). • Washing capacity: 14 place settings • Test standard: EN50242/ IEC60436 •...
- Page 52 For standard test D157/DW60M6040 The information for comparability test in accordance with EN 50242, as follows: The diagrams below show the proper way to load the baskets based on the European Standards (EN50242). • Washing capacity: 13 place settings • Test standard: EN50242/ IEC60436 •...
- Page 53 Product fiche REGULATION (EU) NO 1059/2010 Supplier SAMSUNG D159 D157 Model name DW60M6050 DW60M6040 DW60M6051 Rated Capacity (place setting) Energy efficiency class Annual energy consumption, (AE c) (kWh/year) Standard cycle energy consumption, (E t) (kWh) 0.92 0.93 Power consumption in off mode, P o (W) 0.45...
- Page 54 Terminology for dishwasher A motor that sucks the water remaining on the floor of the dishwater and 1. Circulation Motor infects water using high pressure through the internal water passages to the top Middle and lower nozzles. The pump that drains the polluted water from the dishwater generated 2.
- Page 55 Note DW5500M_DD81-02437G-00_EN.indd 55 DW5500M_DD81-02437G-00_EN.indd 55 2017-06-22 2017-06-22 2:31:42 2:31:42...
- Page 56 QUESTIONS OR COMMENTS? COUNTRY CALL OR VISIT US ONLINE AT 021-8255 [CE] IRAN www.samsung.com/iran/support 021-42132 [HHP] DW5500M_DD81-02437G-00_EN.indd 56 DW5500M_DD81-02437G-00_EN.indd 56 2017-06-22 2017-06-22 2:31:42 2:31:42...
- Page 57 DW60M6050** DW60M6051** DW60M6040** D159STS D159W D157STS D157W ﻣﺎﺷﯿﻦ ﻇﺮﻓﺸﻮﺋﯽ دﻓﺘﺮﭼﻪ راﻫﻨﻤﺎی ﮐﺎرﺑﺮ را ﺗﺼﻮر ﮐﻨﯿﺪ اﻣﮑﺎﻧﺎت .ﺑﺎﺑﺖ ﺧﺮﯾﺪ اﯾﻦ ﻣﺤﺼﻮل ﺳﺎﻣﺴﻮﻧﮓ از ﺷﻤﺎ ﺗﺸﮑﺮ ﻣﯽ ﮐﻨﯿﻢ DD81-02437G-00 DW5500M_DD81-02437G-00_FA.indd 1 DW5500M_DD81-02437G-00_FA.indd 1 2017-06-26 2017-06-26 6:38:50 6:38:50...
- Page 58 راﻫﻨﻤﺎ ﻣﺘﻔﺎوت ﺑﻮده و ﲤﺎم ﻋﻼﺋﻢ ﻫﺸﺪاردﻫﻨﺪه در ﻣﻮرد آن ﺻﺪق ﻧﮑﻨﻨﺪ. اﮔﺮ ﺳﺆال ﯾﺎ ﻣﺸﮑﻠﯽ دارﯾﺪ، ﺑﺎ ﻧﺰدﯾﮏ ﺗﺮﯾﻦ ﻣﺮﮐﺰ ﺧﺪﻣﺎﺗﯽ ﲤﺎس ﮔﺮﻓﺘﻪ و ﯾﺎ ﺑﺮای . ﻣﺮاﺟﻌﻪ ﮐﻨﯿﺪwww.samsung.com درﯾﺎﻓﺖ ﮐﻤﮏ و اﻃﻼﻋﺎت در اﯾﻨﺘﺮﻧﺖ ﺑﻪ ﻧﺸﺎﻧﯽ ﻋﻼﺋﻢ اﯾﻤﻨﯽ و ﻧﮑﺎت اﺣﺘﯿﺎﻃﯽ ﻣﻬﻢ...
- Page 59 ،ﺑﻪ ﻣﻨﻈﻮر ﮐﺎﻫﺶ اﺣﺘﻤﺎل ﺧﻄﺮ آﺗﺶ ﺳﻮزی، ﺑﺮق ﮔﺮﻓﺘﮕﯽ، ﯾﺎ ﺟﺮاﺣﺖ ﺑﻪ اﻓﺮاد در ﻫﻨﮕﺎم اﺳﺘﻔﺎده از دﺳﺘﮕﺎه ﺧﻮد، ﻧﮑﺎت اﺳﺎﺳﯽ اﺣﺘﯿﺎﻃﯽ و اﯾﻤﻨﯽ :ﺷﺎﻣﻞ ﻣﻮارد زﯾﺮ را ﻣﺮاﻋﺎت ﮐﻨﯿﺪ ﻫﺸﺪﺍﺭ ١ . ،اﯾﻦ دﺳﺘﮕﺎه ﻧﺒﺎﯾﺪ ﺗﻮﺳﻂ اﻓﺮادی )ﺷﺎﻣﻞ ﮐﻮدﮐﺎن( ﮐﻪ ﺗﻮاﻧﺎﯾﯽ ﻫﺎی ﺟﺴﻤﺎﻧﯽ ﺣﺴﯽ...
- Page 60 دﺳﺘﻮراﻟﻌﻤﻞ ﻫﺎی اﯾﻤﻨﯽ ٨ . اﺣﺘﯿﺎط: ﺑﻪ ﻣﻨﻈﻮر ﺟﻠﻮﮔﯿﺮی از ﺧﻄﺮات ﻧﺎﺷﯽ از رﯾﺴﺖ ﺷﺪن ﻧﺎﺧﻮاﺳﺘﻪ ﻗﻄﻊ ﮐﻨﻨﺪه ﺣﺮارﺗﯽ، ﺑﺮق اﯾﻦ دﺳﺘﮕﺎه ﻧﺒﺎﯾﺪ از ﻃﺮﯾﻖ ﯾﮏ وﺳﯿﻠﻪ ﻗﻄﻊ و وﺻﻞ ﮐﻨﻨﺪه ﺑﯿﺮوﻧﯽ ﻣﺎﻧﻨﺪ ﯾﮏ ﺗﺎﯾﻤﺮ ﺗﻐﺬﯾﻪ ﺷﻮد، ﯾﺎ ﺑﻪ ﻣﺪاری ﻣﺘﺼﻞ ﮔﺮدد ﮐﻪ ﻣﺮﺗﺒ ﺎ ﹰ ﺗﻮﺳﻂ .ﺷﺒﮑﻪ...
- Page 61 دﺳﺘﻮراﻟﻌﻤﻞ ﻫﺎی اﺳﺘﻔﺎده از ﻣﺎﺷﯿﻦ ﻇﺮﻓﺸﻮﺋﯽ اﯾﻦ ﻣﺎﺷﯿﻦ ﻇﺮﻓﺸﻮﯾﯽ ﺑﺮای اﺳﺘﻔﺎده در ﻣﺤﯿﻂ ﲡﺎری ﻃﺮاﺣﯽ ﻧﺸﺪه اﺳﺖ. ﮐﺎرﺑﺮد ﻣﻮرد ﻧﻈﺮ آن در ﻣﻨﺎزل و در ﺷﺮاﯾﻂ ﮐﺎری و ﻣﺴﮑﻮﻧﯽ ﻣﺸﺎﺑﻪ ﻣﯽ :ﺑﺎﺷﺪ از ﻗﺒﯿﻞ ﻓﺮوﺷﮕﺎه ﻫﺎ • دﻓﺎﺗﺮ و ﳕﺎﯾﺸﮕﺎه ﻫﺎ •...
- Page 62 دﺳﺘﻮراﻟﻌﻤﻞ ﻫﺎی اﯾﻤﻨﯽ دﺳﺘﻮراﻟﻌﻤﻞ ﻫﺎی ﻣﺤﺎﻓﻈﺖ از ﮐﻮدﮐﺎن اﯾﻦ ﻣﺎﺷﯿﻦ اﺳﺒﺎب ﺑﺎزی ﻧﯿﺴﺖ! ﺑﺮای ﺟﻠﻮﮔﯿﺮی از ﺧﻄﺮ ﺟﺮاﺣﺖ، اﺟﺎزه ﻧﺪﻫﯿﺪ ﮐﻮدﮐﺎن ﺑﻪ دﺳﺘﮕﺎه ﻧﺰدﯾﮏ ﺷﺪه و ﻧﮕﺬارﯾﺪ ﺑﺎ ﻣﺎﺷﯿﻦ ﻇﺮﻓﺸﻮﺋﯽ ﯾﺎ داﺧﻞ آن ﺑﺎزی ﮐﻨﻨﺪ و ﯾﺎ ﺑﻪ ﮐﻨﺘﺮل ﻫﺎ دﺳﺖ ﺑﺰﻧﻨﺪ. آﻧﻬﺎ ﻣﺘﻮﺟﻪ ﺧﻄﺮات اﺣﺘﻤﺎﻟﯽ اﯾﻦ ﮐﺎرﻫﺎ ﻧﯿﺴﺘﻨﺪ. آﻧﻬﺎ ﺑﺎﯾﺪ ﻫﺮ وﻗﺖ ﮐﻪ در آﺷﭙﺰﺧﺎﻧﻪ ﮐﺎر ﻣﯽ ﻫﺸﺪﺍﺭ...
- Page 63 دﺳﺘﻮراﻟﻌﻤﻞ ﻫﺎی ﻧﺼﺐ ﻣﺎﺷﯿﻦ ﻇﺮﻓﺸﻮﺋﯽ ﻗﺒﻞ از راه اﻧﺪازی اﯾﻦ ﻣﺎﺷﯿﻦ، ﺑﺮای ﻫﺮﮔﻮﻧﻪ آﺳﯿﺐ ﻣﺸﻬﻮد ﺑﺮ روی ﺑﺪﻧﻪ ﮐﻨﺘﺮل ﮐﻨﯿﺪ. ﲢﺖ ﻫﯿﭻ ﺷﺮاﯾﻄﯽ ﻧﺒﺎﯾﺪ از ﯾﮏ دﺳﺘﮕﺎه آﺳﯿﺐ دﯾﺪه اﺳﺘﻔﺎده .ﮐﺮد. ﯾﮏ دﺳﺘﮕﺎه آﺳﯿﺐ دﯾﺪه ﻣﯽ ﺗﻮاﻧﺪ ﺧﻄﺮﻧﺎک ﺑﺎﺷﺪ ﻫﺸﺪﺍﺭ ﻣﺎﺷﯿﻦ...
- Page 64 دﺳﺘﻮراﻟﻌﻤﻞ ﻫﺎی اﯾﻤﻨﯽ :ﺳﯿﺴﺘﻢ ﺿﺪ آب ﺟﺎﻣﻊ ﻣﺤﺎﻓﻈﺖ در ﻣﻘﺎﺑﻞ آﺳﯿﺐ ﺑﺎ آب را ﻋﺮﺿﻪ ﻣﯽ ﮐﻨﺪ در ﺻﻮرﺗﯿﮑﻪ ﺷﺮاﯾﻂ زﯾﺮ ﺑﺮآورده ﺷﻮﻧﺪ ﺍﺣﺘﯿﺎﻁ .ﻧﺼﺐ و ﻟﻮﻟﻪ ﮐﺸﯽ ﻣﺎﺷﯿﻦ ﻇﺮﻓﺸﻮﺋﯽ ﺑﻄﻮر ﺻﺤﯿﺢ و اﺻﻮﻟﯽ اﳒﺎم ﺷﺪه ﺑﺎﺷﺪ • .ﻣﺎﺷﯿﻦ ﻇﺮﻓﺸﻮﺋﯽ ﺑﺨﻮﺑﯽ ﻧﮕﻬﺪاری ﺷﺪه و اﺟﺰا و ﻗﻄﻌﺎت آن در ﺻﻮرت ﻧﯿﺎز ﺗﻌﻮﯾﺾ ﮔﺮدﻧﺪ •...
- Page 65 (.)ﺑﻪ ﺑﺨﺶ ”ﺣﺎﻟﺖ ﻧﺮم ﮐﻨﻨﺪه آب )ﺗﻨﻈﯿﻢ ﻣﯿﺰان ﺳﺨﺘﯽ آب(“ در ﺻﻔﺤﻪ ٩١ ﻣﺮاﺟﻌﻪ ﮐﻨﯿﺪ :، از اﯾﻦ ﺗﺎرﳕﺎ ﺑﺎزدﯾﺪ ﮐﻨﯿﺪREACH ﺑﺮای ﮐﺴﺐ اﻃﻼﻋﺎت در ﻣﻮرد ﺗﻌﻬﺪات ﺳﺎﻣﺴﻮﻧﮓ در ﻣﻮرد ﻣﺤﯿﻂ زﯾﺴﺖ و وﻇﺎﯾﻒ ﺗﻨﻈﯿﻤﯽ ﺧﺎص ﻣﺤﺼﻮل، ﻣﻨﺠﻤﻠﻪ samsung.com/uk/aboutsamsung/samsungelectronics/corporatecitizenship/data_corner.html ٩_ دﺳﺘﻮراﻟﻌﻤﻞ ﻫﺎی اﯾﻤﻨﯽ...
- Page 66 ﻓﻬﺮﺳﺖ ﻣﻄﺎﻟﺐ ﻗﻄﻌﺎت و وﯾﮋﮔﯽ ﻫﺎ وﯾﮋﮔﯽ ﻫﺎی ﻣﺎﺷﯿﻦ ﻇﺮﻓﺸﻮﯾﯽ ١١ ١١ ﺻﻔﺤﻪ ﮐﻨﺘﺮل ١۴ ﳕﺎﯾﺸﮕﺮﻫﺎ ١٧ اﺳﺘﻔﺎده از ﺷﻮﯾﻨﺪه و ﻧﺮم ﮐﻨﻨﺪه آب (ﺣﺎﻟﺖ ﻧﺮم ﮐﻨﻨﺪه آب )ﺗﻨﻈﯿﻢ ﻣﯿﺰان ﺳﺨﺘﯽ آب ١٩ ١٩ ﭘﺮ ﮐﺮدن ﳕﮏ در ﻧﺮم ﮐﻨﻨﺪه ٢٠...
- Page 67 ﻗﻄﻌﺎت و وﯾﮋﮔﯽ ﻫﺎ وﯾﮋﮔﯽ ﻫﺎی ﻣﺎﺷﯿﻦ ﻇﺮﻓﺸﻮﯾﯽ (D159STS/D159W/DW60M6050**) ﳕﺎی ﺟﻠﻮ و ﻋﻘﺐ ١ ٧ ٢ ۴ ١ ﻗﻔﺴﻪ ﺳﻮم ٢ ٣ ﺳﺒﺪ ﻓﻮﻗﺎﻧﯽ ٨ ٣ ﺳﺒﺪ ﲢﺘﺎﻧﯽ ٩ ۵ ۴ ﻧﺎزل ﻣﺠﺮا ۵ ﻣﺤﻔﻈﻪ ﳕﮏ ۶ ۶ ﭘﺨﺸﮕﺮ ٧ ﻗﻔﺴﻪ...
- Page 68 ﻗﻄﻌﺎت و وﯾﮋﮔﯽ ﻫﺎ (DW60M6051**) ﳕﺎی ﺟﻠﻮ و ﻋﻘﺐ ١ ٧ ٢ ۴ ١ ٨ ﻗﻔﺴﻪ ﺳﻮم ٣ ٢ ﺳﺒﺪ ﻓﻮﻗﺎﻧﯽ ٩ ۵ ٣ ﺳﺒﺪ ﲢﺘﺎﻧﯽ ۴ ﻧﺎزل ﻣﺠﺮا ۵ ﻣﺤﻔﻈﻪ ﳕﮏ ۶ ۶ ﭘﺨﺸﮕﺮ ٧ ﻗﻔﺴﻪ ﻓﻨﺠﺎن ٨ ﺑﺎزوﻫﺎی اﺳﭙﺮی ۴...
- Page 69 (D157STS/D157W/DW60M6040**) ﳕﺎی ﺟﻠﻮ و ﻋﻘﺐ ۶ ١ ٣ ١ ﺳﺒﺪ ﻓﻮﻗﺎﻧﯽ ٢ ٢ ﺳﺒﺪ ﲢﺘﺎﻧﯽ ٧ ٣ ٨ ﻧﺎزل ﻣﺠﺮا ۴ ۴ ﻣﺤﻔﻈﻪ ﳕﮏ ۵ ﭘﺨﺸﮕﺮ ۵ ۶ ﻗﻔﺴﻪ ﻓﻨﺠﺎن ٧ ﺑﺎزوﻫﺎی اﺳﭙﺮی ٣ ٨ ﻣﺠﻤﻮﻋﻪ ﻓﯿﻠﺘﺮ ٩ ﺷﯿﻠﻨﮓ ﺗﺨﻠﯿﻪ ٧...
- Page 70 ﻗﻄﻌﺎت و وﯾﮋﮔﯽ ﻫﺎ ﺻﻔﺤﻪ ﮐﻨﺘﺮل D159STS/D159W/DW60M6050U*/DW60M6050S* DW60M6051F*/DW60M6051U*/DW60M6051S* D157STS/D157W/DW60M6040U*/DW60M6040S* ٧ ٢ D159 ١ ۶ DW60M6050 DW60M6051 ۴ ٩ ۵ ٣ ٨ ٢ ٧ D157 ١ ۶ DW60M6040 ۴ ٩ ( )ﻧﯿﺮوPOWER ١ .اﯾﻦ دﮐﻤﻪ را ﺑﺮای روﺷﻦ ﮐﺮدن ﻣﺎﺷﯿﻦ ﻇﺮﻓﺸﻮﯾﯽ ﻓﺸﺎر دﻫﯿﺪ: ﳕﺎﯾﺸﮕﺮ روﺷﻦ ﻣﯽ ﺷﻮد ﺑﺮﻧﺎﻣﻪ...
- Page 71 . )ﻧﯿﺮو( ﮐﺎر ﺧﻮاﻫﺪ ﮐﺮدPOWER ﻫﻨﮕﺎﻣﯿﮑﻪ درﯾﭽﻪ ﺑﺎز اﺳﺖ، ﺗﻨﻬﺎ دﮐﻤﻪ • .ﻣﯽ ﺗﻮاﻧﯿﺪ ﮔﺰﯾﻨﻪ ﻫﺎ )ﻗﺮص ﭼﻨﺪﮐﺎره, ﺷﺮوع ﺗﺎﺧﯿﺮی و/ﯾﺎ ﻧﯿﻤﻪ ﭘﺮ( را ﻗﺒﻞ از ﺷﺮوع ﺳﯿﮑﻞ اﻧﺘﺨﺎب ﮐﻨﯿﺪ • ﻧﮑﺘﻪ ﻣﻬﻢ: ﺑﺮای دﺳﺘﯿﺎﺑﯽ ﺑﻪ ﺑﻬﺘﺮﯾﻦ ﻋﻤﻠﮑﺮد ﻣﺎﺷﯿﻦ ﻇﺮﻓﺸﻮﯾﯽ، ﻫﻤﻪ دﺳﺘﻮراﻟﻌﻤﻞ ﻫﺎی اﺳﺘﻔﺎده را ﻗﺒﻞ از اﺳﺘﻔﺎده ﺑﺮای اوﻟﯿﻦ ﺑﺎر ﻣﻄﺎﻟﻌﻪ .ﮐﻨﯿﺪ...
- Page 72 ﻗﻄﻌﺎت و وﯾﮋﮔﯽ ﻫﺎ اﮔﺮ ﻧﺸﺎﻧﮕﺮ ﭘﺮ ﮐﺮدن ﻣﺎده آﺑﮑﺸﯽ ﯾﺎ ﭘﺮ ﮐﺮدن ﳕﮏ روﺷﻦ ﺑﺎﺷﺪ، ﺑﺪﯾﻦ ﻣﻌﻨﯽ اﺳﺖ ﮐﻪ ﻻزم اﺳﺖ آﺑﮑﺸﯽ ﯾﺎ ﳕﮏ .را ﻣﺠﺪد ا ﹰ ﭘﺮ ﮐﺮد ﻧﺸﺎﻧﮕﺮ ﺷﺮوع ﺗﺎﺧﯿﺮی اﮔﺮ ﻧﺸﺎﻧﮕﺮ "ﺷﺮوع ﺗﺎﺧﯿﺮی" روﺷﻦ اﺳﺖ، ﺑﺪﯾﻦ ﻣﻌﻨﯽ اﺳﺖ ﮐﻪ ﮔﺰﯾﻨﻪ "ﺷﺮوع ﺗﺎﺧﯿﺮی" را اﻧﺘﺨﺎب •...
- Page 73 ﳕﺎﯾﺸﮕﺮﻫﺎ D159STS/D159W/DW60M6050U*/DW60M6050S* DW60M6051F*/DW60M6051U*/DW60M6051S* D157STS/D157W/DW60M6040U*/DW60M6040S* D159/DW60M6050/DW60M6051 D157/DW60M6040 ٢ ٣ ١ ٢ ٣ .دﮐﻤﻪ ﺑﺮﻧﺎﻣﻪ را ﺑﺮای اﻧﺘﺨﺎب ﻫﺮ ﺑﺮﻧﺎﻣﻪ ﻓﺸﺎر دﻫﯿﺪ ﳕﺎدﻫﺎی ﺑﺮﻧﺎﻣﻪ ١ ﺷﺪﯾﺪ اﻗﻼم ﺧﯿﻠﯽ ﮐﺜﯿﻒ ﺷﺎﻣﻞ ﻗﺎﺑﻠﻤﻪ و ﻣﺎﻫﯽ ﺗﺎﺑﻪ ﻫﺎ ﺷﺴﺘﺸﻮی ﺧﻮدﮐﺎر .اﻗﻼم ﻋﺎدی ﺑﺮای ﻣﺼﺮف روزاﻧﻪ ﺑﺎ ﮐﺜﯿﻔﯽ ﮐﻢ ﺗﺎ زﯾﺎد، ﺗﺸﺨﯿﺺ ﺧﻮدﮐﺎر ﻣﯿﺰان ﮐﺜﯿﻔﯽ ﻣﻘﺮون...
- Page 74 ﻗﻄﻌﺎت و وﯾﮋﮔﯽ ﻫﺎ DW60M6050BB/DW60M6040BB DW60M6050 ١ ٢ ٣ DW60M6040 .دﮐﻤﻪ ﺑﺮﻧﺎﻣﻪ را ﺑﺮای اﻧﺘﺨﺎب ﻫﺮ ﺑﺮﻧﺎﻣﻪ ﻓﺸﺎر دﻫﯿﺪ ﳕﺎدﻫﺎی ﺑﺮﻧﺎﻣﻪ ١ ﺷﺴﺘﺸﻮی ﺧﻮدﮐﺎر .اﻗﻼم ﻋﺎدی ﺑﺮای ﻣﺼﺮف روزاﻧﻪ ﺑﺎ ﮐﺜﯿﻔﯽ ﮐﻢ ﺗﺎ زﯾﺎد، ﺗﺸﺨﯿﺺ ﺧﻮدﮐﺎر ﻣﯿﺰان ﮐﺜﯿﻔﯽ ﻣﻘﺮون ﺑﻪ ﺻﺮﻓﻪ اﻗﻼم...
- Page 75 اﺳﺘﻔﺎده از ﺷﻮﯾﻨﺪه و ﻧﺮم ﮐﻨﻨﺪه آب (ﺣﺎﻟﺖ ﻧﺮم ﮐﻨﻨﺪه آب )ﺗﻨﻈﯿﻢ ﻣﯿﺰان ﺳﺨﺘﯽ آب اﯾﻦ ﻣﺎﺷﯿﻦ ﻇﺮﻓﺸﻮﯾﯽ ﻃﻮری ﻃﺮاﺣﯽ ﺷﺪه ﺗﺎ ﻣﻘﺪار ﳕﮏ ﻣﺼﺮف ﺷﺪه را ﺑﺮاﺳﺎس ﺳﺨﺘﯽ آب اﺳﺘﻔﺎده ﺷﺪه ﺗﻨﻈﯿﻢ ﮐﻨﺪ. ﻣﻨﻈﻮر ﺑﻬﯿﻨﻪ ﺳﺎزی ﻣﯿﺰان :ﻣﺼﺮف ﳕﮏ اﺳﺖ. ﺑﺮای ﺗﻨﻈﯿﻢ ﻣﺼﺮف ﳕﮏ، ﻣﺮاﺣﻞ زﯾﺮ را اﳒﺎم دﻫﯿﺪ ١...
- Page 76 اﺳﺘﻔﺎده از ﺷﻮﯾﻨﺪه و ﻧﺮم ﮐﻨﻨﺪه آب ﭘﺮ ﮐﺮدن ﳕﮏ در ﻧﺮم ﮐﻨﻨﺪه .ﻫﻤﯿﺸﻪ از ﳕﮑﯽ اﺳﺘﻔﺎده ﮐﻨﯿﺪ ﮐﻪ ﺑﻪ ﻣﻨﻈﻮر اﺳﺘﻔﺎده ﺑﺎ ﻣﺎﺷﯿﻦ ﻇﺮﻓﺸﻮﯾﯽ ﺑﺎﺷﺪ :ﻣﺤﻔﻈﻪ ﳕﮏ در زﯾﺮ ﻗﻔﺴﻪ ﲢﺘﺎﻧﯽ ﻗﺮار دارد و ﺑﺎﯾﺴﺘﯽ ﺑﻪ ﺗﺮﺗﯿﺐ زﯾﺮ ﭘﺮ ﺷﻮد ﺗﻮﺟﻪ...
- Page 77 اﺳﺘﻔﺎده از ﺷﻮﯾﻨﺪه .ﺑﺮای ﻫﻤﻪ ﺳﯿﮑﻞ ﻫﺎی ﻣﺎﺷﯿﻦ ﻇﺮﻓﺸﻮﺋﯽ ﺑﺎﯾﺪ ﺷﻮﯾﻨﺪه در ﻣﺨﺰن ﺷﻮﯾﻨﺪه ﺑﺮﯾﺰﯾﺪ .ﺑﺮای ﺗﻀﻤﯿﻦ ﺑﻬﺘﺮﯾﻦ ﻋﻤﻠﮑﺮد، ﻣﻘﺪار ﺻﺤﯿﺢ ﺷﻮﯾﻨﺪه را ﺑﺮ اﺳﺎس ﺳﯿﮑﻞ اﻧﺘﺨﺎب ﺷﺪه اﺿﺎﻓﻪ ﮐﻨﯿﺪ اﺣﺘﯿﺎط: ﺗﻨﻬﺎ از ﺷﻮﯾﻨﺪه ﻣﺎﺷﯿﻦ ﻇﺮﻓﺸﻮﯾﯽ اﺳﺘﻔﺎده ﮐﻨﯿﺪ. ﺷﻮﯾﻨﺪه ﻣﻌﻤﻮﻟﯽ ﮐﻒ ﺧﯿﻠﯽ زﯾﺎدی ﺗﻮﻟﯿﺪ ﻣﯽ ﮐﻨﺪ و ﺑﺎﻋﺚ اﻓﺖ ﻋﻤﻠﮑﺮد ﻣﺎﺷﯿﻦ .ﻇﺮﻓﺸﻮﺋﯽ...
- Page 78 اﺳﺘﻔﺎده از ﺷﻮﯾﻨﺪه و ﻧﺮم ﮐﻨﻨﺪه آب اﺳﺘﻔﺎده از ﻣﺎده ﮐﻤﮏ آﺑﮑﺸﯽ ﻣﺨﺰن ﻣﺎده ﮐﻤﮏ آﺑﮑﺸﯽ را ﭘﺮ ﮐﻨﯿﺪ .ﻫﻨﮕﺎﻣﯿﮑﻪ ﻧﺸﺎﻧﮕﺮ ﭘﺮ ﮐﺮدن ﻣﺎده آﺑﮑﺸﯽ در ﺻﻔﺤﻪ ﮐﻨﺘﺮل روﺷﻦ ﺷﺪ، ﻣﺎده ﮐﻤﮏ آﺑﮑﺸﯽ را دوﺑﺎره ﭘﺮ ﮐﻨﯿﺪ .ﻣﺎﺷﯿﻦ ﻇﺮﻓﺸﻮﯾﯽ ﺷﻤﺎ ﻃﻮری ﻃﺮاﺣﯽ ﺷﺪه ﮐﻪ ﺗﻨﻬﺎ از ﻣﺎده آﺑﮑﺸﯽ ﻣﺎﯾﻊ اﺳﺘﻔﺎده ﻣﯽ ﮐﻨﺪ .اﺳﺘﻔﺎده...
- Page 79 ﻧﺤﻮه اﺳﺘﻔﺎده از ﮔﺰﯾﻨﻪ ﻗﺮص ﭼﻨﺪﮐﺎره ﻣﺎﺷﯿﻦ ﻇﺮﻓﺸﻮﯾﯽ ﺷﻤﺎ ﯾﮏ ﮔﺰﯾﻨﻪ ﻗﺮص ﭼﻨﺪﮐﺎره دارد ﮐﻪ ﺑﻪ ﳕﮏ و ﻣﺎده آﺑﮑﺸﯽ ﻧﯿﺎزی ﻧﺪاﺷﺘﻪ ﺑﻠﮑﻪ ﺑﻪ ﻗﺮص ٣ در ١ ﻧﯿﺎز دارد. از اﯾﻦ ﮔﺰﯾﻨﻪ ﺗﻨﻬﺎ ﻣﯽ ﺗﻮان .در ﺑﺮﻧﺎﻣﻪ ﺷﺪﯾﺪ ﯾﺎ ﺻﺮﻓﻪ ﺟﻮﯾﯽ در اﻧﺮژی اﺳﺘﻔﺎده ﮐﺮد ﺗﻨﻈﯿﻢ...
- Page 80 ﭘﺮ ﮐﺮدن ﻗﻔﺴﻪ ﻫﺎی ﻣﺎﺷﯿﻦ ﻇﺮﻓﺸﻮﯾﯽ ﺑﺮای ﺑﻬﺘﺮﯾﻦ ﻋﻤﻠﮑﺮد ﻣﺎﺷﯿﻦ ﻇﺮﻓﺸﻮﯾﯽ، از اﯾﻦ رﻫﻨﻤﻮدﻫﺎی ﻗﺮار دادن ﻇﺮوف ﭘﯿﺮوی ﮐﻨﯿﺪ. وﯾﮋﮔﯽ ﻫﺎ و ﻇﺎﻫﺮ ﻗﻔﺴﻪ .ﻫﺎ و ﺳﺒﺪﻫﺎی ﻗﺎﺷﻖ و ﭼﻨﮕﺎل ﳑﮑﻦ اﺳﺖ ﺑﺎ ﻣﺪل ﺷﻤﺎ ﺗﻔﺎوت داﺷﺘﻪ ﺑﺎﺷﻨﺪ ﺗﻮﺟﻪ ﻗﺒﻞ ﯾﺎ ﺑﻌﺪ از ﭘﺮ ﮐﺮدن ﻗﻔﺴﻪ ﻫﺎی ﻣﺎﺷﯿﻦ ﻇﺮﻓﺸﻮﯾﯽ ﻫﺮﮔﻮﻧﻪ...
- Page 81 ﺗﻨﻈﯿﻢ ﺳﺒﺪ ﻓﻮﻗﺎﻧﯽ .ارﺗﻔﺎع ﺳﺒﺪ ﻓﻮﻗﺎﻧﯽ را ﻣﯽ ﺗﻮان ﻃﻮری ﺗﻨﻈﯿﻢ ﮐﺮد ﮐﻪ ﻓﻀﺎی ﺑﯿﺸﺘﺮی ﺑﺮای ﻟﻮازم آﺷﭙﺰی ﺑﺰرگ ﺑﺮای ﺳﺒﺪ ﻓﻮﻗﺎﻧﯽ/ ﲢﺘﺎﻧﯽ اﯾﺠﺎد ﺷﻮد ١ . “ را ﮐﻪ درA” ﺑﺮای ﭘﺎﯾﯿﻦ آوردن ﻗﻔﺴﻪ ﻓﻮﻗﺎﻧﯽ، اﻫﺮم ﻫﺎی ﺳﻤﺖ ﭼﭗ و راﺳﺖ ﺳﺒﺪ ﻓﻮﻗﺎﻧﯽ ﻗﺮار دارﻧﺪ ﻓﺸﺮده و ﺳﺒﺪ .ﻓﻮﻗﺎﻧﯽ...
- Page 82 ﭘﺮ ﮐﺮدن ﻗﻔﺴﻪ ﻫﺎی ﻣﺎﺷﯿﻦ ﻇﺮﻓﺸﻮﯾﯽ ﭘﺮ ﮐﺮدن ﺳﺒﺪ ﲢﺘﺎﻧﯽ ﺗﻮﺻﯿﻪ ﻣﯽ ﮐﻨﯿﻢ اﻗﻼم ﺑﺰرگ ﮐﻪ ﲤﯿﺰ ﮐﺮدن آﻧﻬﺎ ﻣﺸﮑﻞ ﺗﺮ اﺳﺖ را در ﺳﺒﺪ ﲢﺘﺎﻧﯽ ﻗﺮار دﻫﯿﺪ: ﻗﺎﺑﻠﻤﻪ، ﻣﺎﻫﯽ ﺗﺎﺑﻪ، ﻇﺮوف و ﮐﺎﺳﻪ ﻫﺎ، ﺑﻪ ﺻﻮرﺗﯿﮑﻪ در ﳕﻮدار .ﺳﻤﺖ راﺳﺖ ﻧﺸﺎن داده ﺷﺪه اﺳﺖ ﺑﻬﺘﺮ...
- Page 83 ﺳﯿﻨﯽ ﻗﺎﺷﻖ و ﭼﻨﮕﺎل ﻗﺎﺷﻖ و ﭼﻨﮕﺎل ﻫﺎ را ﺑﺎﯾﺪ ﺑﺎ دﺳﺘﻪ ﻫﺎی ﺑﻪ ﺳﻤﺖ ﭘﺎﯾﯿﻦ در ﺳﯿﻨﯽ ﻗﺎﺷﻖ و ﭼﻨﮕﺎل ﻗﺮار داد. ﻗﺎﺷﻖ ﺑﺎﯾﺪ ﺑﻪ ﻃﻮر ﺟﺪاﮔﺎﻧﻪ در ﺷﮑﺎف ﻫﺎی ﻣﻨﺎﺳﺐ ﻗﺮار داده .ﺷﻮد، ﻣﺨﺼﻮﺻ ﺂ ﹼ اﺑﺰار ﺑﻠﻨﺪ ﺑﺎﯾﺪ ﺑﻪ ﺻﻮرت اﻓﻘﯽ در ﺟﻠﻮی ﺳﺒﺪ ﻓﻮﻗﺎﻧﯽ ﻗﺮار داده ﺷﻮد D159/DW60M6050/DW60M6051 ٧...
- Page 84 ﭘﺮ ﮐﺮدن ﻗﻔﺴﻪ ﻫﺎی ﻣﺎﺷﯿﻦ ﻇﺮﻓﺸﻮﯾﯽ D157/DW60M6040 ٨ ٢ ٣ ۵ ۴ ١ ١ ٢ ۵ ۴ ١ ۵ ۴ ۴ ٣ ١ ١ ۴ ١ ۵ ۴ ١ ۵ ۵ ۵ ۴ ١ ۴ ١ ۵ ١ ۴ ١ ۵...
- Page 85 ﻗﺎﺷﻖ و ﭼﻨﮕﺎل/ﻇﺮوف زﯾﺮ ﺑﺮای ﺷﺴﺘﺸﻮ در ﻣﺎﺷﯿﻦ ﻇﺮﻓﺸﻮﯾﯽ ﻣﻨﺎﺳﺒﺖ ﻣﺤﺪود دارﻧﺪ ﻣﻨﺎﺳﺐ ﻧﯿﺴﺘﻨﺪ ﺑﺮﺧﯽ اﻧﻮاع ﻟﯿﻮان و ﺷﯿﺸﻪ آﻻت ﭘﺲ از ﭼﻨﺪﯾﻦ ﺑﺎر ﺷﺴﺘﺸﻮ ﳑﮑﻦ اﺳﺖ .اﻗﻠﻼم ﭘﻼﺳﺘﯿﮑﯽ ﮐﻪ در ﻣﻘﺎﺑﻞ ﮔﺮﻣﺎ ﻣﻘﺎوم ﻧﯿﺴﺘﻨﺪ .ﮐﺪر ﺷﻮﻧﺪ ﮐﺎرد و ﭼﻨﮕﺎل ﻗﺪﯾﻤﯽ ﺗﺮ ﺑﺎ ﺑﺨﺶ ﻫﺎی ﭼﺴﺒﯿﺪه ﺷﺪه ﮐﻪ در ﻣﻘﺎﺑﻞ ﮔﺮﻣﺎ ﻗﻄﻌﺎت...
- Page 86 ﺑﺮﻧﺎﻣﻪ ﻫﺎی ﺷﺴﺘﺸﻮ روﺷﻦ ﮐﺮدن دﺳﺘﮕﺎه ﺷﺮوع ﺳﯿﮑﻞ ﺷﺴﺘﺸﻮ ١ . .ﺳﺒﺪ ﲢﺘﺎﻧﯽ و ﻓﻮﻗﺎﻧﯽ را ﺑﯿﺮون ﺑﮑﺸﯿﺪ، ﻇﺮوف را ﻗﺮار داده و آﻧﻬﺎ را ﺑﻪ داﺧﻞ ﻓﺸﺎر دﻫﯿﺪ ﺗﻮﺻﯿﻪ ﻣﯽ ﺷﻮد ﮐﻪ اﺑﺘﺪا ﺳﺒﺪ ﲢﺘﺎﻧﯽ و ﺳﭙﺲ ﺳﺒﺪ ﻓﻮﻗﺎﻧﯽ را ﭘﺮ ﮐﻨﯿﺪ )ﺑﻪ ﺑﺨﺶ ﲢﺖ ﻋﻨﻮان "ﭘﺮ ﮐﺮدن ﻗﻔﺴﻪ ﻫﺎی ﻣﺎﺷﯿﻦ ﻇﺮﻓﺸﻮﯾﯽ" ﻣﺮاﺟﻌﻪ .(ﮐﻨﯿﺪ...
- Page 87 در ﺧﺎﲤﻪ ﺳﯿﮑﻞ ﺷﺴﺘﺸﻮ ﻫﻨﮕﺎﻣﯿﮑﻪ ﺳﯿﮑﻞ در ﺣﺎل اﺟﺮا ﺧﺎﲤﻪ ﭘﯿﺪا ﮐﺮد، زﻧﮓ ﻣﺎﺷﯿﻦ ﻇﺮﻓﺸﻮﯾﯽ ﺑﻪ ﻣﺪت ﮐﻮﺗﺎه ﺑﯿﭗ ﮐﺮده و ﺳﭙﺲ ﻣﺘﻮﻗﻒ ﺧﻮاﻫﺪ ﺷﺪ. "٠" ﺗﻨﻬﺎ در ﺻﻮرﺗﯽ در .ﳕﺎﯾﺸﮕﺮ دﯾﺠﯿﺘﺎل ﻇﺎﻫﺮ ﻣﯽ ﺷﻮد ﮐﻪ ﺑﺮﻧﺎﻣﻪ ﺧﺎﲤﻪ ﭘﯿﺪا ﮐﺮده ﺑﺎﺷﺪ ....
- Page 88 ﺑﺮﻧﺎﻣﻪ ﻫﺎی ﺷﺴﺘﺸﻮ ﻣﺪت اﳒﺎم ﺷﻮﯾﻨﺪه اﻧﺮژی )ﮐﯿﻠﻮوات (آب )ﻟﯿﺘﺮ ﺷﺴﺘﺸﻮ )ﭘﯿﺶ ﺷﺴﺘﺸﻮ/ﺷﺴﺘﺸﻮی ﺗﻮﺻﯿﻒ ﺳﯿﮑﻞ ﺑﺮﻧﺎﻣﻪ (در ﺳﺎﻋﺖ ()دﻗﯿﻘﻪ (اﺻﻠﯽ( )ﮔﺮم ﭘﯿﺶ ﺷﺴﺘﺸﻮ (ﺷﺴﺘﺸﻮ )٠۴ درﺟﻪ ﺳﺎﻧﺘﯽ ﮔﺮاد ١٣ ١/٠ ١۴٠ ۵ آﺑﮑﺸﯽ ﻇﺮﯾﻒ + ﺑﻬﺪاﺷﺘﯽ ٣٠ (آﺑﮑﺸﯽ )۵۶ درﺟﻪ ﺳﺎﻧﺘﯽ ﮔﺮاد ﺧﺸﮏ...
- Page 89 ﲤﯿﺰی و ﻣﺮاﻗﺒﺖ ﲤﯿﺰ ﮐﺮدن ﻓﯿﻠﺘﺮﻫﺎ ﺳﯿﺴﺘﻢ ﻓﯿﻠﺘﺮ ﺑﺮای آﺳﺎﯾﺶ ﺷﻤﺎ، ﭘﻤﭗ ﺗﺨﻠﯿﻪ و ﺳﯿﺴﺘﻢ ﻓﯿﻠﺘﺮ را ﺑﺮای دﺳﺘﺮﺳﯽ آﺳﺎن در داﺧﻞ ﺗﺸﺖ ﻗﺮار داده اﯾﻢ. ﺳﯿﺴﺘﻢ ﻓﯿﻠﺘﺮﯾﻨﮓ ﺳﻪ ﮐﺎﻣﭙﻮﻧﻨﺖ .دارد: ﻓﯿﻠﺘﺮ اﺻﻠﯽ، ﻓﯿﻠﺘﺮ درﺷﺖ و ﻓﯿﻠﺘﺮ ﻇﺮﯾﻒ ﻓﯿﻠﺘﺮ اﺻﻠﯽ: ذرات ﻏﺬا و ﮐﺜﺎﻓﺎﺗﯽ ﮐﻪ ﺗﻮﺳﻂ اﯾﻦ ﻓﯿﻠﺘﺮ ﺟﻤﻊ ﻣﯽ ﺷﻮﻧﺪ ﺗﻮﺳﻂ ﯾﮏ اﻓﺸﺎﻧﻪ وﯾﮋه در ١...
- Page 90 ﲤﯿﺰی و ﻣﺮاﻗﺒﺖ ﲤﯿﺰ ﮐﺮدن ﺑﺎزوﻫﺎی اﺳﭙﺮی ﻻزم اﺳﺖ ﮐﻪ ﺑﺎزوﻫﺎی اﺳﭙﺮی ﺑﻪ ﻃﻮر ﻣﺮﺗﺐ ﲤﯿﺰ ﺷﻮﻧﺪ ﭼﻮن ﻣﻮاد ﺷﯿﻤﯿﺎﯾﯽ آب ﳑﮑﻦ اﺳﺖ اﻓﺸﺎﻧﻪ ﻫﺎ و ﻣﻮﻗﻌﯿﺖ ﺑﺎزوﻫﺎی اﺳﭙﺮی را ﻣﺴﺪود ﮐﻨﺪ. ﺑﺮای ﺟﺪا ﮐﺮدن ﺑﺎزوی اﺳﭙﺮی ﻣﯿﺎﻧﯽ، ﻣﻬﺮه را ﻧﮕﻪ داﺷﺘﻪ، ﺑﺎزو را ﺑﺮای ﺑﺮداﺷﱳ آن .در...
- Page 91 ﻧﺤﻮه ﺣﻔﻆ و ﻧﮕﻬﺪاری ﻣﺎﺷﯿﻦ ﻇﺮﻓﺸﻮﯾﯽ ﺑﻌﺪ از ﻫﺮ ﺷﺴﺘﺸﻮ • .ﺑﻌﺪ از ﻫﺮ ﺷﺴﺘﺸﻮ، ﺗﻐﺬﯾﻪ آب دﺳﺘﮕﺎه را ﻗﻄﻊ ﮐﺮده و درﯾﭽﻪ را ﻗﺪری ﺑﺎز ﺑﮕﺬارﯾﺪ ﺗﺎ رﻃﻮﺑﺖ و ﺑﻮ در داﺧﻞ آن ﺣﺒﺲ ﻧﺸﻮد دوﺷﺎﺧﻪ را ﺑﮑﺸﯿﺪ • .ﻗﺒﻞ...
- Page 92 راه اﻧﺪازی ﻣﺎﺷﯿﻦ ﻇﺮﻓﺸﻮﺋﯽ ﻫﺸﺪار: ﺧﻄﺮ ﺑﺮق ﮔﺮﻓﺘﮕﯽ .ﺟﺮﯾﺎن ﺑﺮق را ﻗﺒﻞ از ﻧﺼﺐ ﻣﺎﺷﯿﻦ ﻇﺮﻓﺸﻮﯾﯽ ﻗﻄﻊ ﮐﻨﯿﺪ .ﻗﺼﻮر در اﳒﺎم اﯾﻨﮑﺎر ﳑﮑﻦ اﺳﺖ ﻣﻨﺠﺮ ﺑﻪ ﻣﺮگ ﯾﺎ ﺑﺮق ﮔﺮﻓﺘﮕﯽ ﺷﻮد .ﺗﻮﺟﻪ: ﻧﺼﺐ ﻟﻮﻟﻪ ﻫﺎ و وﺳﺎﺋﻞ ﺑﺮﻗﯽ ﺑﺎﯾﺪ ﺗﻮﺳﻂ اﺷﺨﺎص ﻣﺘﺨﺼﺺ اﳒﺎم ﺷﻮد درﺑﺎره...
- Page 93 اﺗﺼﺎل آب ﮔﺮم ۶٠ ﺗﻐﺬﯾﻪ آب ﺑﻪ دﺳﺘﮕﺎه را ﻧﯿﺰ ﻣﯽ ﺗﻮان ﺑﻪ ﻟﻮﻟﻪ آب ﮔﺮم ﺧﺎﻧﮕﯽ )ﺳﯿﺴﺘﻢ ﻣﺮﮐﺰی، ﺳﯿﺴﺘﻢ ﮔﺮم ﮐﻨﻨﺪه( وﺻﻞ ﮐﺮد، ﺗﺎ زﻣﺎﻧﯿﮑﻪ از دﻣﺎی درﺟﻪ ﺳﺎﻧﺘﯽ ﮔﺮاد ﲡﺎوز ﻧﮑﻨﺪ. در اﯾﻦ ﺻﻮرت زﻣﺎن ﺳﯿﮑﻞ ﺷﺴﺘﺸﻮ ﺗﺎ ﺣﺪود ۵١ دﻗﯿﻘﻪ ﮐﺎﻫﺶ ﯾﺎﻓﺘﻪ و ﮐﺎرآﯾﯽ ﺷﺴﺘﺸﻮ ﻗﺪری اﻓﺖ ﻣﯽ .ﮐﻨﺪ.
- Page 94 راه اﻧﺪازی ﻣﺎﺷﯿﻦ ﻇﺮﻓﺸﻮﺋﯽ اﺗﺼﺎل ﺷﯿﻠﻨﮓ ﻫﺎی ﺗﺨﻠﯿﻪ ﺷﯿﻠﻨﮓ ﺗﺨﻠﯿﻪ را ﺑﻪ ﻟﻮﻟﻪ ﺗﺨﻠﯿﻪ ﺑﺎ ﺣﺪاﮐﺜﺮ ﻗﻄﺮ ۴ ﺳﺎﻧﺘﯽ ﻣﺘﺮ وارد ﮐﻨﯿﺪ ﯾﺎ آﻧﺮا در ﺳﯿﻨﮏ ﻗﺮار داده ﻣﻄﻤﺌﻦ ﺷﻮﯾﺪ ﮐﻪ ﺗﺎ ﻧﺨﻮرد ﯾﺎ ﭼﯿﻦ دار ﻧﺸﻮد. ﺑﺎﻻی .ﺷﯿﻨﻠﮓ ﺑﺎﯾﺪ در ارﺗﻔﺎع ﺑﯿﻦ ٠۴ و ٠٠١ ﺳﺎﻧﺘﯽ ﻣﺘﺮ ﻗﺮار ﮔﯿﺮد. اﻧﺘﻬﺎی آزاد ﺷﯿﻠﻨﮓ ﻧﺒﺎﯾﺪ در آب وارد ﺷﻮد ﺗﺎ از اﯾﺠﺎد ﺟﺮﯾﺎن ﻣﻌﮑﻮس در آن ﺟﻠﻮﮔﯿﺮی ﺷﻮد ﭘﯿﺸﺨﻮان...
- Page 95 ﻧﺼﺐ ﻣﺎﺷﯿﻦ ﻇﺮﻓﺸﻮﯾﯽ ﻣﺎﺷﯿﻦ ﻇﺮﻓﺸﻮﯾﯽ، ﻣﺎﺷﯿﻦ ﻇﺮﻓﺸﻮﯾﯽ ﺗﻮﮐﺎر و ﻧﯿﻤﻪ ﺗﻮﮐﺎر ﻣﻄﻤﺌﻦ ﺷﻮﯾﺪ ﮐﻪ ﺷﻤﺎ ﯾﺎ ﻧﺼﺎب ﺷﻤﺎ اﯾﻦ دﺳﺘﻮراﻟﻌﻤﻞ ﻫﺎ را ﺑﻪ دﻗﺖ ﻣﺮاﻋﺎت ﮐﻨﯿﺪ ﺗﺎ ﻣﺎﺷﯿﻦ ﻇﺮﻓﺸﻮﺋﯽ ﺟﺪﯾﺪ ﺑﻪ ﺧﻮﺑﯽ ﮐﺎر ﮐﺮده و در ﺣﯿﻦ ﺷﺴﺘﺸﻮی .ﻇﺮوف در ﻣﻌﺮض ﺧﻄﺮ ﻣﺼﺪوﻣﯿﺖ ﻗﺮار ﻧﮕﯿﺮﯾﺪ ﻧﺼﺐ...
- Page 96 ﻧﺼﺐ ﻣﺎﺷﯿﻦ ﻇﺮﻓﺸﻮﯾﯽ ﮐﻨﺘﺮل ﺟﺮﯾﺎن آب و ﻟﺰوﻣﺎت ﺑﺮﻗﯽ .٢ ﻣﺮﺣﻠﻪ .ﻓﺸﺎر ﺗﻐﺬﯾﻪ آب ﺑﺎﯾﺪ ﺑﯿﻦ ۴٠/٠ ﺗﺎ ٠/١ ﻣﮕﺎﭘﺎﺳﮑﺎل ﺑﺎﺷﺪ • .ﻓﻘﻂ آب ﺳﺮد را ﺗﺄﻣﯿﻦ ﮐﻨﯿﺪ. ﻣﻄﻤﺌﻦ ﺷﻮﯾﺪ ﮐﻪ دﻣﺎی آب از ٠۶ درﺟﻪ ﺳﺎﻧﺘﯽ ﮔﺮاد ﲡﺎوز ﻧﮑﻨﺪ •...
- Page 97 ﮐﺎﻣ ﻼ ﹰ ﺗﻮﮐﺎر ١ . .ﻗﻼب روی ﭘﺎﻧﻞ ﭼﻮﺑﯽ ﻣﺨﺼﻮص را ﻧﺼﺐ ﮐﺮده و ﻗﻼب را در ﺷﮑﺎف درﯾﭽﻪ ﺧﺎرﺟﯽ ﻣﺎﺷﯿﻦ ﻇﺮﻓﺸﻮﯾﯽ ﻗﺮار دﻫﯿﺪ ٢ . .ﭘﺲ از ﻗﺮار دادن ﭘﺎﻧﻞ، آﻧﺮا ﺑﺎ ﭘﯿﭻ و ﻣﻬﺮه ﻫﺎ روی درﯾﭽﻪ ﺧﺎرﺟﯽ ﻣﺤﮑﻢ ﮐﻨﯿﺪ .اﺣﺘﯿﺎط: از...
- Page 98 ﻧﺼﺐ ﻣﺎﺷﯿﻦ ﻇﺮﻓﺸﻮﯾﯽ ﺗﻨﻈﯿﻢ ﻣﯿﺰان ﮐﺸﺶ ﻓﻨﺮ درﯾﭽﻪ .۴ ﻣﺮﺣﻠﻪ ()ﺑﺮای ﻣﺎﺷﯿﻦ ﻇﺮﻓﺸﻮﯾﯽ ﮐﺎﻣ ﻼ ﹰ ﺗﻮﮐﺎر و ﻧﯿﻤﻪ ﺗﻮﮐﺎر ١ . ﻓﻨﺮﻫﺎی درﯾﭽﻪ در ﮐﺎرﺧﺎﻧﻪ ﺗﻨﻈﯿﻢ ﺷﺪه اﻧﺪ ﺗﺎ ﮐﺸﺶ ﻣﻨﺎﺳﺐ درﯾﭽﻪ ﺧﺎرﺟﯽ ﺣﻔﻆ ﺷﻮد. اﮔﺮ ﭘﺎﻧﻞ ﭼﻮﺑﯽ ﻣﺨﺼﻮص ﻧﺼﺐ ﺷﺪه ﺑﺎﺷﺪ، ﻻزم ﺧﻮاﻫﺪ .ﺑﻮد...
- Page 99 ﻧﺼﺐ ﻣﺎﺷﯿﻦ ﻇﺮﻓﺸﻮﯾﯽ .۵ ﻣﺮﺣﻠﻪ ١ . درب دﮐﻮر را ﺑﺎ اﺳﺘﻔﺎده از ﺑﺴﺖ ﻫﺎی اراﺋﻪ ﺷﺪه روی درﯾﭽﻪ ﺧﺎرﺟﯽ ﻧﺼﺐ ﮐﻨﯿﺪ. ﺑﺮای ﻣﺤﻞ ﻗﺮار دادن ﺑﺴﺖ ﻫﺎ ﺑﻪ اﻟﮕﻮ ﻣﺮاﺟﻌﻪ ﮐﻨﯿﺪ. )ﺑﺮای ﻣﺎﺷﯿﻦ (ﻇﺮﻓﺸﻮﯾﯽ ﮐﺎﻣ ﻼ ﹰ ﺗﻮﺳﺎزی ﺷﺪه و ﻧﯿﻤﻪ ﺗﻮﺳﺎزی ﺷﺪه ٢...
- Page 100 ﻧﺼﺐ ﻣﺎﺷﯿﻦ ﻇﺮﻓﺸﻮﯾﯽ ﺗﺮاز ﮐﺮدن ﻣﺎﺷﯿﻦ ﻇﺮﻓﺸﻮﯾﯽ .۶ ﻣﺮﺣﻠﻪ ﺗﺮاز ﺑﻮدن را از ﺟﻠﻮ ﺗﺎ ﻋﻘﺐ ﮐﻨﺘﺮل ﮐﻨﯿﺪ ﺗﺮاز ﺑﻮدن را از ﮐﻨﺎر ﺗﺎ ﮐﻨﺎر ﮐﻨﺘﺮل .ﮐﻨﯿﺪ .ﻣﺎﺷﯿﻦ ﻇﺮﻓﺸﻮﯾﯽ ﺑﺮای ﻋﻤﻠﮑﺮد ﺻﺤﯿﺢ ﻗﻔﺴﻪ ﻇﺮف و ﮐﺎرآﯾﯽ ﺷﺴﺘﺸﻮ ﺑﺎﯾﺪ ﺗﺮاز ﺑﺎﺷﺪ ١...
- Page 101 رﻓﻊ ﻣﺸﮑﻼت .ﺳﺎزﻧﺪه در ﭘﯿﺮوی از ﺳﯿﺎﺳﺖ ﺑﻬﺒﻮد و ﺑﺮوزآوری داﺋﻢ ﻣﺤﺼﻮل، ﳑﮑﻦ اﺳﺖ ﺗﻐﯿﯿﺮاﺗﯽ را ﺑﺪون اﻃﻼع ﻗﺒﻠﯽ اﯾﺠﺎد ﮐﻨﺪ ﻗﺒﻞ از ﲤﺎس ﺑﺮای ﺗﻌﻤﯿﺮات ﭼﻪ ﺑﺎﯾﺪ ﮐﺮد دﻟﯿﻞ اﺣﺘﻤﺎﻟﯽ ﻣﺸﮑﻞ ﻣﺎﺷﯿﻦ ﻇﺮﻓﺸﻮﯾﯽ ﮐﺎر ﳕﯽ ﮐﻨﺪ .ﻓﯿﻮز را ﺗﻌﻮﯾﺾ ﮐﻨﯿﺪ ﯾﺎ ﻣﺪار ﺷﮑﻦ را ﻣﺠﺪد ا ﹰ ﺗﻨﻈﯿﻢ ﮐﻨﯿﺪ •...
- Page 102 رﻓﻊ ﻣﺸﮑﻼت ﭼﻪ ﺑﺎﯾﺪ ﮐﺮد دﻟﯿﻞ اﺣﺘﻤﺎﻟﯽ ﻣﺸﮑﻞ ١ . ﻟﮑﻪ و ﻗﺸﺮ ﺑﺮ روی ﻟﯿﻮان ﻫﺎ و آب ﺷﺪﯾﺪ ا ﹰ ﺳﺨﺖ :ﺑﺮای ﺑﺮﻃﺮف ﮐﺮدن ﻟﮑﻪ از ﺷﯿﺸﻪ آﻻت ﺑﺸﻘﺎب ﻫﺎ ١ . ٢ . ﻫﻤﻪ ﻗﺎﺷﻖ و ﭼﻨﮕﺎل ﻫﺎی ﻓﻠﺰی را از ﻣﺎﺷﯿﻦ ﻇﺮﻓﺸﻮﯾﯽ دﻣﺎی...
- Page 103 ﭼﻪ ﺑﺎﯾﺪ ﮐﺮد دﻟﯿﻞ اﺣﺘﻤﺎﻟﯽ ﻣﺸﮑﻞ دﮐﻤﻪ ﻫﺎ ﻫﻨﮕﺎﻣﯿﮑﻪ ﻣﺎﺷﯿﻦ ﻫﻨﮕﺎﻣﯿﮑﻪ درﯾﭽﻪ ﺑﺎز اﺳﺖ، دﮐﻤﻪ ﻫﺎ ﺑﻪ ﻏﯿﺮ از دﮐﻤﻪ • .درﯾﭽﻪ ﺑﺎز اﺳﺖ • )ﻧﯿﺮو( ﮐﺎر ﳕﯽ ﮐﻨﻨﺪ. درﯾﭽﻪ را ﺑﺴﺘﻪ و دﮐﻤﻪ راPOWER روﺷﻦ اﺳﺖ ﮐﺎر ﳕﯽ ﮐﻨﻨﺪ .ﻓﺸﺎر...
- Page 104 رﻓﻊ ﻣﺸﮑﻼت ﮐﺪﻫﺎی ﺧﻄﺎ :اﮔﺮ ﺧﻄﺎﯾﯽ ﭘﯿﺶ ﺑﯿﺎﯾﺪ، ﳑﮑﻦ اﺳﺖ ﮐﺪ ﺧﻄﺎ ﺑﺮای آﮔﺎﻫﯽ دادن ﺑﻪ ﺷﻤﺎ ﳕﺎﯾﺶ داده ﺷﻮد دﻻﯾﻞ اﺣﺘﻤﺎﻟﯽ ﻣﻌﺎﻧﯽ رﻣﺰﻫﺎ ﺷﯿﺮ آب ﺑﺎز ﻧﯿﺴﺖ ﯾﺎ ﻣﺼﺮف آب ﻣﺤﺪود ﺷﺪه ﯾﺎ ﻓﺸﺎر آب ﮐﻨﺘﺮل ﺗﻐﺬﯾﻪ آب .زﯾﺎدی ﮐﻢ اﺳﺖ .ﺑﺮﺧﯽ...
- Page 105 ﺿﻤﯿﻤﻪ ﻣﺸﺨﺼﺎت ﻓﻨﯽ DW60M6050US D159STS/D159W DW60M6050UW D157STS/D157W DW60M6050BB DW60M6051US DW60M6050FS DW60M6050SS ﻣﺪل DW60M6040BB DW60M6051UW DW60M6050FW DW60M6040US DW60M6040FS DW60M6040UW DW60M6040FW ﻧﻮع ﮐﺎﻣ ﻼ ﹰ ﺗﻮﺳﺎزی ﺷﺪه ﻧﯿﻤﻪ ﺗﻮﺳﺎزی ﺷﺪه زﯾﺮ ﺳﺎزی ﺷﺪه ﺧﻮد اﯾﺴﺘﺎ روﺷﻦ/ﺧﺎﻣﻮش ٠٢٢-٠۴٢ وﻟﺖ - ٠۵ ﻫﺮﺗﺰ ﻓﺸﺎر آب ۴٠/٠...
- Page 106 ﺿﻤﯿﻤﻪ اﺑﻌﺎد ﻣﺤﺼﻮل ۵٩٨ ۶٠٠ ۵٩٨ ۵٧٠ ٨۴۵ ٨١۵ ١١۵٠ ١١٧۵ DW60M6050US/DW60M6050UW D159STS/D159W DW60M6051US/DW60M6051UW D157STS/D157W DW60M6040US/DW60M6040UW DW60M6050FS/DW60M6050FW DW60M6050SS DW60M6040FS/DW60M6040FW ۵٩٨ ۵۵٠ ٨١۵ ١١۵٠ DW60M6050BB/DW60M6040BB ٠۵_ ﺿﻤﯿﻤﻪ DW5500M_DD81-02437G-00_FA.indd 50 DW5500M_DD81-02437G-00_FA.indd 50 2017-06-26 2017-06-26 6:39:18 6:39:18...
- Page 107 ﺑﺮای آزﻣﺎﯾﺶ ﻣﺘﻌﺎرف D159/DW60M6050/DW60M6051 : ﺑﺪﯾﻦ ﺗﺮﺗﯿﺐ اﺳﺖEN 50242 اﻃﻼﻋﺎت ﺑﺮای آزﻣﺎﯾﺶ ﻣﻘﺎﯾﺴﻪ ﭘﺬﯾﺮی ﺑﺮ اﺳﺎس .( در ﺗﺼﺎوﯾﺮ زﯾﺮ ﻧﺸﺎن داده ﺷﺪه اﺳﺖEN50242) ﺷﯿﻮه ﺻﺤﯿﺢ ﭘﺮ ﮐﺮدن ﺳﺒﺪﻫﺎ ﺑﺮ اﺳﺎس اﺳﺘﺎﻧﺪاردﻫﺎی اروﭘﺎﯾﯽ ﻇﺮﻓﯿﺖ ﺷﺴﺘﺸﻮ: ﺳﺮوﯾﺲ ۴١ ﻧﻔﺮه • EN50242/ IEC60436 :اﺳﺘﺎﻧﺪارد آزﻣﺎﯾﺶ •...
- Page 108 ﺑﺮای آزﻣﺎﯾﺶ ﻣﺘﻌﺎرف D157/DW60M6040 : ﺑﺪﯾﻦ ﺗﺮﺗﯿﺐ اﺳﺖEN 50242 اﻃﻼﻋﺎت ﺑﺮای آزﻣﺎﯾﺶ ﻣﻘﺎﯾﺴﻪ ﭘﺬﯾﺮی ﺑﺮ اﺳﺎس .( در ﺗﺼﺎوﯾﺮ زﯾﺮ ﻧﺸﺎن داده ﺷﺪه اﺳﺖEN50242) ﺷﯿﻮه ﺻﺤﯿﺢ ﭘﺮ ﮐﺮدن ﺳﺒﺪﻫﺎ ﺑﺮ اﺳﺎس اﺳﺘﺎﻧﺪاردﻫﺎی اروﭘﺎﯾﯽ ﻇﺮﻓﯿﺖ ﺷﺴﺘﺸﻮ: ﺳﺮوﯾﺲ ٣١ ﻧﻔﺮه • EN50242/ IEC60436 :اﺳﺘﺎﻧﺪارد آزﻣﺎﯾﺶ •...
- Page 109 ﻣﺸﺨﺼﺎت ﻣﺤﺼﻮل (EU) 1059/2010 ﻣﻘﺮرات ﺷﻤﺎره ﺳﺎﻣﺴﻮﻧﮓ ﺗﻮزﯾﻊ ﮐﻨﻨﺪه D159 D157 ﻧﺎم ﻣﺪل DW60M6050 DW60M6040 DW60M6051 (ﻇﺮﻓﯿﺖ اﺳﻤﯽ )ﻣﺤﻞ ﻗﺮاردادن ﻇﺮوف ١۴ ١٣ ﮔﺮوه ﺑﻨﺪی راﻧﺪﻣﺎن اﻧﺮژی (( )ﮐﯿﻠﻮوات در ﺳﺎﻋﺖ/ﺳﺎلAE c) ،ﻣﺼﺮف ﺳﺎﻟﯿﺎﻧﻪ اﻧﺮژی (١ ٢۶۶ ٢۶٢ (( )ﮐﯿﻠﻮوات در ﺳﺎﻋﺖE t) ،ﻣﺼﺮف اﻧﺮژی ﺳﯿﮑﻞ اﺳﺘﺎﻧﺪارد ٠/٩٣...
- Page 110 اﺻﻄﻼﺣﺎت ﺑﺮای ﻣﺎﺷﯿﻦ ﻇﺮﻓﺸﻮﯾﯽ ﻣﻮﺗﻮری ﮐﻪ آب ﺑﺎﻗﯿﻤﺎﻧﺪه در ﭘﺎﯾﯿﻦ ﻣﺎﺷﯿﻦ ﻇﺮﻓﺸﻮﯾﯽ را ﻣﮑﺶ ﮐﺮده و آب را ﺑﺎ اﺳﺘﻔﺎده از ﻓﺸﺎر زﯾﺎد از ﻃﺮﯾﻖ ﮔﺬرﮔﺎه ١ . ﻣﻮﺗﻮر ﮔﺮدﻧﺪه .ﻫﺎی آب داﺧﻠﯽ ﺑﻪ ﻧﺎزل ﻫﺎی ﺑﺎﻻ در ﻣﯿﺎن و ﲢﺘﺎﻧﯽ ﺳﺮاﯾﺖ ﻣﯽ دﻫﺪ ٢...
- Page 111 ﯾﺎدداﺷﺖ DW5500M_DD81-02437G-00_FA.indd 55 DW5500M_DD81-02437G-00_FA.indd 55 2017-06-26 2017-06-26 6:39:26 6:39:26...
- Page 112 ﺳﻮال ﯾﺎ ﻧﻈﺮی دارﯾﺪ؟ ﻧﺸﺎﻧﯽ اﯾﻨﺘﺮﻧﺘﯽ ﺷﻤﺎره ﲤﺎس ﮐﺸﻮر 021-8255 [CE] www.samsung.com/iran/support IRAN 021-42132 [HHP] DW5500M_DD81-02437G-00_FA.indd 56 DW5500M_DD81-02437G-00_FA.indd 56 2017-06-26 2017-06-26 6:39:26 6:39:26...