Table of Contents
Advertisement
Quick Links
Advertisement
Table of Contents

Related Manuals for Gigaset E295


Summary of Contents for Gigaset E295
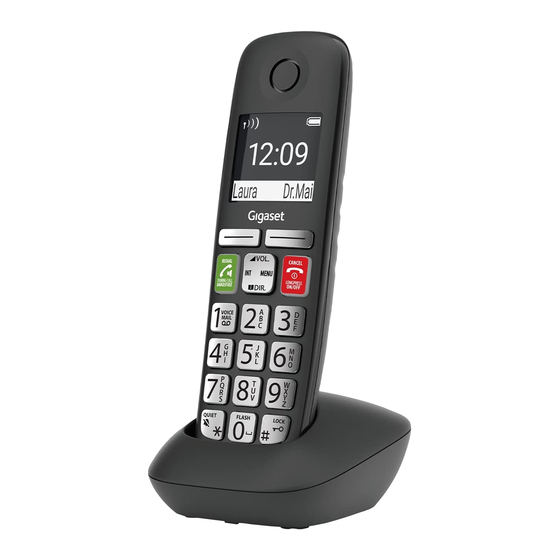
- Page 1 E295 You can find the most up-to-date user guide at www.gigaset.com/manuals...
-
Page 3: Table Of Contents
Contents Contents Overview ............5 Safety precautions . - Page 4 Contents Additional functions ..........32 Quick access .
-
Page 5: Overview
Overview Overview 10:30 Setting the display language ( p. 15) - Page 6 Overview 1 Status bar ( p. 19) Icons display current settings and the status of the phone 2 Time ( p. 41) number of missed calls 4 Display keys Quick dial ( p. 20); various functions ( p. 18) 5 Talk key / Handsfree key ¤...
- Page 7 Overview Base Registration/paging key Locate a handset (paging): ¤ Press briefly Registering handsets: ¤ Press and hold Symbols used in the user guide Icons Warnings, the non-adherence to which can result in damage to devices or personal injury. Important information regarding function and appropriate handling or functions that could generate costs.
- Page 8 Overview Buttons Icon Meaning Icon Meaning Talk/Handsfree End call key Control key left, top, right, Hash key bottom Messages/Star Digit/Letter keys Display keys, dependent on situation p. 18 Procedures Example: Enabling/disabling Auto Answer: ¤ Settings Handset Auto Answer = enabled) Step Meaning ¤...
-
Page 9: Safety Precautions
Use only rechargeable batteries that correspond to the specifica- tion (see list of permitted batteries www.gigaset.com/service). Never use a conventional (non-rechargeable) battery or other battery types as this could result in significant health risks and personal injury. Rechargeable batteries, which are noticeably damaged, must be replaced. - Page 10 If you use a medical device (e.g. a pacemaker), please contact the device manufacturer. They will be able to advise you regarding the susceptibility of the device to external sources of high frequency energy (for the specifications of your Gigaset product see "Technical data").
-
Page 11: Getting Started
Getting started Getting started Package contents • One base, one power adapter, one phone cable • One handset, two batteries, one battery cover • One user guide Models with multiple handsets, per handset: • One handset, one charging cradle with power adapter, two batteries and one battery cover The base and charging cradle are designed for use in closed, dry rooms within a temperature range of +5°C to +45°C. -
Page 12: Base
Getting started Base Connecting the base to power supply and telephone network ¤ Connecting the phone jack ¤ Connect the power adapter and insert the cables into the cable ducts. The power adapter must always be connected as the phone does not work without a power supply. -
Page 13: Handset
Getting started Handset Connect the charging cradle (if included) ¤ Connect the flat plug of the power adapter Plug the power adapter into the power socket To remove the plug from the charging cradle again: ¤ Press the release button Pull out the plug... - Page 14 Getting started Setting up the handset for use The display is protected by a plastic film. Please remove the protective film. Inserting the batteries Only use rechargeable batteries, as this could otherwise result in significant health risks and personal injury. For example, the outer casing of the batteries could be damaged beyond repair or the batteries could explode.
- Page 15 Getting started Changing the display language You can change the display language, if the phone has been set to an incom- prehensible language. ¤ Press the keys slowly in succession . . . the language set (e.g.English) is displayed ¤ Select a different language: Press the control key until the language...
-
Page 16: Operating The Handset
Operating the handset Operating the handset Switch the handset on and off ¤ Switching on: When the handset is switched off, press and hold the End call key ¤ Switching off: When the handset is in idle mode, press and hold the End call key When you place a switched off handset into the base or charging cradle, it switches itself on automatically. -
Page 17: Control Key
Operating the handset This setting can result in harm to health for those with normal hearing ability and is only intended for those with a hearing impair- ment or reduced hearing. Disruptive noises on the phone line can be increased. Control key The control key enables you to navigate the menus and input fields, and also to call up certain functions depending on the... -
Page 18: Display
Operating the handset Display Display keys / Quick access function The keys under the display perform a range of functions depending on the situation. In idle mode Peter Current assignment of display keys A and B for quick access Display keys with quick access function ¤... -
Page 19: Menu Navigation
Operating the handset Status bar Icons display current settings and the status of the phone. Keypad lock activated Ringtone deactivated Radio contact between the base and handset Good to poor No reception ECO DECT mode No Radiation enabled Battery charge level 0 - 10% 11 - 33% 34 - 66%... -
Page 20: Making Calls
Making calls Making calls Making a call ¤ Enter the number Press the Talk key . . . The number is dialled ¤ Press and hold the Talk key . . . The dial tone can be heard Enter the number To change the receiver volume during a call: to set the volume... - Page 21 Making calls Dialling from the redial list The list contains the 10 numbers last dialled with the handset. ¤ Press briefly Select entry Managing entries in the redial list ¤ Press briefly Select Menu Select function Possible functions: Use Number / Copy to Directory / Delete Entry / Delete List Dialling from the call list Open the call list:...
-
Page 22: Accepting A Call
Making calls Accepting a call The handset indicates an incoming call by ringing and by a display on the screen. ¤ Press the Talk key Function Auto Answer enabled: Simply take the handset out of the charging slot Enabling function Auto Answer: ¤... -
Page 23: Making Internal Calls
Making calls Making internal calls Making internal calls Internal calls are free calls to other handsets registered to the same base. Calling a specific internal subscriber: ¤ when more than two handsets are registered: Use to select the internal subscriber OK oder . - Page 24 Making calls Listening in to an external call You are holding an external call. An internal subscriber can listen in to this call and take part in the conversation (conference). The Listening-In function is enabled. Enabling/disabling internal listening in ¤ Settings Base Listening-In OK...
-
Page 25: Calling Line Identification
Making calls Calling Line Identification During a call, the caller's number is transferred (CLI = Calling Line Identifica- tion) and can be displayed on the recipient's display (CLIP = CLI Presentation). When the caller's number is withheld, it is not show on the called party’s display. - Page 26 Making calls Entering a preselection number ¤ Settings Base Preselection Presel. Number Enter the number or use number from directory Create list of prefix numbers with preselection ¤ Settings Base Preselection With Preselect Select the list entry (1 – 11) Enter (the initial digits of ) the prefix number for which the preselection number is to be used...
-
Page 27: Call/Message Lists
Call/message lists Call/message lists The phone saves information about various events in lists: • Call list: Numbers of all incoming and missed calls • Network mailbox list: Messages on the network mailbox An advisory tone sounds as soon as a new entry appears on one of the lists. The default setting is the message key flashing and the following shown on the display:... -
Page 28: Call List
Call/message lists Call list Prerequisite: CLIP Depending on the type of list set, all numbers for the last 25 incoming calls are saved, or only the missed calls are saved. Setting the list type ¤ Settings Base Call list type Missed Calls / All Calls OK ( = selected) -
Page 29: Directory
Directory Directory The local directory is unique to a handset. Entries can be sent to other hand- sets however ( p. 30). Up to 150 phone numbers (max. 22 digits) with associated names (max. 16 characters) can be stored. Open the directory: Press down the control key Creating a directory entry First entry:... - Page 30 Directory Deleting a directory (entry) Deleting a directory entry ¤ Select entry Menu Delete Entry Deleting a directory ¤ Menu Delete List Confirm deletion with OK Transferring a directory (entry) to another handset The sending and receiving handsets must both be registered with the same base.
-
Page 31: Network Mailbox
Network mailbox Network mailbox The network mailbox is registered with the network provider. Entering a number ¤ Answering Machine Net Mailbox Enter the number OK . . . The network mailbox is enabled To enable and disable the network mailbox, use the number and a function code from your network provider. -
Page 32: Additional Functions
Additional functions Additional functions Quick access Call numbers can be assigned to display keys A and B. As soon as a key is pressed, the number specified is dialled. When the keys are not assigned, A is shown on the left and B on the right of the display. Assigning a key ¤... -
Page 33: Alarm Clock
Additional functions Alarm clock Date and time have been set. Turning the alarm clock on and off ¤ Alarm Clock Activation OK ( = turned on) ¤ Enter the wake-up time in minutes and second Alarm clock turned on: Instead of the date, the display shows the wake-up time and left of it the alarm clock symbol. -
Page 34: Baby Monitor (Room Monitoring)
Additional functions Baby monitor (Room monitoring) When the baby monitor is switched on, the stored external phone numbers or all handsets registered to the phone (internal) are called as soon as a defined noise level is exceeded in the vicinity of the handset. The alarm to an external number is cancelled after about 90 seconds. - Page 35 Additional functions Activating and setting the baby monitor ¤ Baby Monitor Enable/disable: ¤ Activation OK ( = enabled) . . . if a phone number to call is already entered, the baby monitor is enabled immediately Entering/changing call number: ¤ Call Target Select Internal or External Call External Call, enter phone number...
-
Page 36: Eco Dect
Additional functions ECO DECT The device range is set to maximum by default. This guarantees the best connection between handset and base. In idle mode, the handset does not transmit (it is radiation-free). Only the base maintains contact with the handset, using weak wireless signals. -
Page 37: Protection From Undesired Calls
Additional functions Protection from undesired calls Black list You can enter up to 32 numbers in a black list. When the black list is enabled, calls from black list numbers are not signalled acoustically. These settings apply to all registered handsets. Enabling/disabling the black list ¤... -
Page 38: Extending The Functionality Of The Phone
Extending the functionality of the phone Extending the functionality of the phone Multiple handsets Up to four handsets can be registered with the base. Every device is assigned an internal name and internal number (INT 1 – INT 4). The assignment can be changed. All internal numbers are already assigned: de-register any devices no longer needed... -
Page 39: Repeater Support
Extending the functionality of the phone De-registering a handset You can de-register any other registered handset from any registered Gigaset handset. ¤ Settings Handset Deregister Handset ¤ Select the internal user to be de-registered. (The handset you are currently using is marked with <.) -
Page 40: Operating The Base On A Router/Pabx
Extending the functionality of the phone Operating the base on a router/PABX Operation with a router When operating on the analogue connection of a router, any echoes occur- ring can be reduced by enabling XES Mode (XES = eXtended Echo Suppres- sion). -
Page 41: Phone Settings
Phone settings Phone settings Date and time Setting Set the date/time so that the correct date and time can be assigned to incoming calls and to enable the alarm to be used. ¤ Settings Date and Time Enter the date (day, month and year) in 8-digit format Enter the time (hours and minutes) in 4-digit format... -
Page 42: Display
Phone settings Display Screensaver The screensaver is enabled when the phone is not used over a longer period of time. The time is shown as the screensaver. ¤ Settings Handset Display Screensaver OK ( = enabled) Large dial keys Show large dial keys when dialling ¤... -
Page 43: Tones And Signals
Phone settings Tones and signals Call volume Adjust the receiver volume or handsfree function on 5 levels. ¤ Settings Handset Audio Settings Call Volume Earpiece / Handsfree OK . . . The current setting is displayed Select the volume OK ( = selected) Changing the volume during a call During a call, set the volume of the receiver on 5 levels, or to extra loud. - Page 44 Phone settings Enabling/disabling advisory and warning tones The handset provides acoustic notification of different activities and statuses. Advisory tone: e.g. keypress tones, error tone, a new message Battery warning tone: The battery charge falls below a certain level during a call. Range warning tone: The handset moves outside the range of the base.
-
Page 45: System
Phone settings Off for anonymous calls You can set your handset so that it does not ring for calls where Calling Line Identification has been withheld. The call is only signalled on the display. ¤ Call Manager Mute Anonym. Calls = enabled) System Changing the system PIN... - Page 46 Phone settings Resetting the base A reset disables mode No Radiation, resets individual settings and deletes all lists. The system PIN is reset to the original code 0000. The time and date are not affected. Resetting the base from the menu The handsets remain registered.
-
Page 47: Service (Customer Care)
(local call cost charge) Please have your proof of purchase ready when calling. Please note that if the Gigaset product is not sold by authorised dealers in the national territory the product may not be fully compatible with the national tele- phone network. -
Page 48: Questions And Answers
Service (Customer Care) Questions and answers If you have any questions about the use of your telephone, please go to www.gigaset.com/service where help is available at any time. The table below contains a list of common problems and possible solutions. Problem Nothing on the display. -
Page 49: Guarantee Certificate - Belgium
Guarantee. Claims under the Guarantee must be submitted within two months of the Guarantee default becoming evident. • Ownership of devices or components replaced by and returned to Gigaset Communications shall vest in Gigaset Communications. •... -
Page 50: Manufacturer's Advice
Therefore please check all of these files. Data protection We at Gigaset take the protection of our customers’ data very seriously. It is precisely for this reason that we are ensuring all our products feature "Privacy by Design" as standard. All information we collect is used to make our products as good as possible. -
Page 51: Environment
Environment Our environmental statement We at Gigaset Communications GmbH are aware of our social responsibility. That is why we actively take steps to create a better world. In all areas of our business – from product planning and production to sales and waste of disposal – following our envi- ronmental conscience in everything we do is of utmost importance to us. -
Page 52: Care
Manufacturer's advice Care Wipe the device with a damp cloth or an antistatic cloth. Do not use solvents or microfibre cloths. Never use a dry cloth; this can cause static. In rare cases, contact with chemical substances can cause changes to the device’s exterior. -
Page 53: Technical Data
Capacity: 400 - 1000 mAh Handset operating times/charging times The operating time of your Gigaset depends on the capacity of the battery, its age and the way it is used. (All times are maximums). Standby time (hours) 200 / 100* Talktime (hours) Operating time for 1.5 h of calls per day (hours) - Page 54 Technical data General technical specifications DECT standard supported GAP standard supported Radio frequency range 1880 - 1900 MHz Range up to 300 m outdoors, up to 50 m indoors Power supply for base 230 V ~/50 Hz Transmission power 10 mW average power per channel, 250 mW pulse power Ambient conditions for operation +5°C to +45°C, 20% to 75% relative humidity...
- Page 55 Technical data Character set tables The character set used on the handset is dependent on the language set. Entering letters/characters ¤ Press the relevant key several times. ¤ Briefly press the Hash key to switch from mode “Abc” to “123”, from “123” to “abc”...
-
Page 56: Menu Tree
Menu tree Menu tree Not all functions described in the user guide are available in all countries or from all network providers. Opening the main menu: Press the control key when the handset is in idle mode. Answering Machine Play Messages . - Page 57 Menu tree Settings Date and Time ..........p.
-
Page 58: Index
Index Index Calls making an external call ... . . Accepting a call ......transferring (connecting) . - Page 59 Index Display transferring a call ....adjust contrast use as a baby monitor ..... . .
- Page 60 Index Listening to a message Package contents ..... (network mailbox) Paging ....
- Page 61 Index Ringtone enable/disable time control ..Talk key ......Ringtone (handset) Telephone jack, pin connections .
- Page 62 Issued by Gigaset Communications GmbH Frankenstr. 2a, D-46395 Bocholt © Gigaset Communications GmbH 2020 Subject to availability. All rights reserved. Rights of modification reserved. www.gigaset.com...