Table of Contents
Advertisement
Quick Links
Advertisement
Table of Contents

Related Manuals for Gigaset E550A


Summary of Contents for Gigaset E550A
- Page 1 E550 - E550 You can find the most up-to-date user guide at www.gigaset.com...
- Page 3 It is also impressively robust and has first-class sound quality in handsfree mode as well as a long operating time. In Eco Mode your Gigaset is radiation-free while in idle status. Direct dialling keys ¢ Dial frequently used numbers quickly and easily using special keys ( page 28).
-
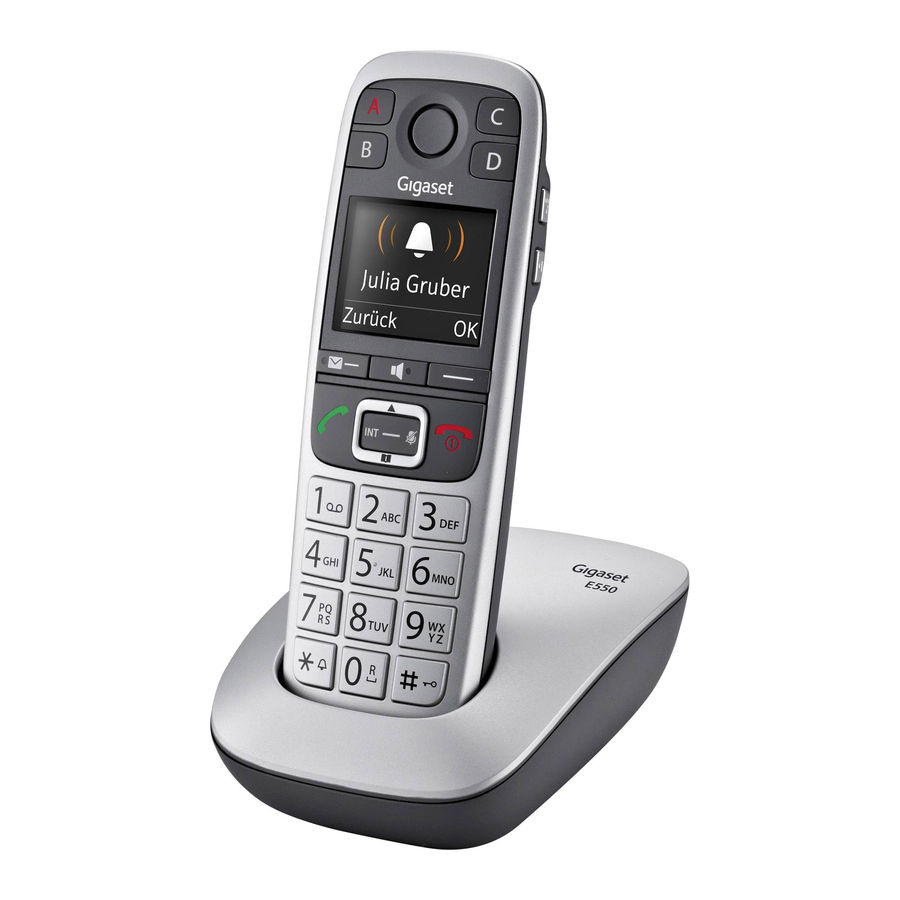
Page 4: Overview
5 Talk key Flashes: Accepting a call ¢ 6 Control key ( page 22) 7 Key 1 Answer machine (E550A only)/Call the ¢ network mailbox ( page 43) 8 Star key Ringers on/off (press and hold) 9 Torch and signal light (LED) - Page 5 50. Overview of Gigaset E550A base You can use the keys on the base to operate the integrated answer machine ¢ (Gigaset E550A only), search for handsets ("paging" page 51) and register handsets ¢ to the base page 50.
- Page 6 Overview Answer machine keys ó Playback/Stop key: play back messages from the answer machine or cancel playback. ô Forward key: skip to next message. ò Back key: skip to beginning of the current or the previous message. õ Delete key: delete the current message during message playback or all old messages in idle status.
-
Page 7: Using The User Guide Effectively
Using the user guide effectively Using the user guide effectively Icons Warnings, the non-adherence to which can lead to injury to persons or damage to devices or generate costs. Prerequisite for carrying out the following action. Important information regarding function and appropriate handling. Keys Talk key c/ End call key a Number/letter keys Q to O... -
Page 8: Understanding The Operating Steps
Using the user guide effectively Understanding the operating steps An example of a procedure is as follows: ¤ ¤ ¤ ¤ ¤ ¤ ¤ q Settings q System q Eco Mode+ §OK§ §OK§ §OK§ (³ = on) This means you should proceed as follows: Scroll upwards if you wish to select one of the last entries in a menu level with numerous entries. - Page 9 Using the user guide effectively System: ... the menu entry System appears on the screen. System ¤ §OK§: Back §OK§ Press the key below on the display screen to open the submenu. ¤ Press up or down on the control key until ... Eco Mode+: ...
-
Page 10: Table Of Contents
Contents Contents Overview ............3 Using the user guide effectively . -
Page 11: Safety Precautions
If you give your Gigaset to a third party, make sure you also give them the user guide. Remove faulty devices from use or have them repaired by our Service team, as these could interfere with other wireless services. -
Page 12: First Steps
First steps First steps Checking package contents 1. One Gigaset E550/E550A base 2. One Gigaset handset 3. Two batteries 4. One battery cover 5. One power adapter for the base 6. One phone cord 7. One user guide 8. One plastic cover for the tab... - Page 13 Set up the base at a central point in the building on a level, non-slip surface or mount the base (Gigaset E550 only) or charger on the wall ( page 70). Pay attention to the range of the base. This is up to 300 m in unobstructed out- door areas and up to 50 m inside buildings.
-
Page 14: Connecting The Base
(pin connections page 69). • The answer machine is ready for use approx. 15 seconds after the base has been connected or reset (Gigaset E550A only). Tabs You can also download tabs from the Internet in the form of a PDF file:... -
Page 15: Setting Up The Handset For Use
Inserting the battery and closing the battery cover ¢ Use only rechargeable batteries ( page 68) recommended by Gigaset Com- munications GmbH, as this could otherwise result in significant health risks and personal injury. For example, the outer casing of the batteries could be destroyed or the batteries could explode. - Page 16 Place the handset in the base with its display facing forward for 9 hours. The handset must only be placed in the designated E550/E550A base or the corre- sponding charger. • The handset is already registered with the base. If you have purchased a model with multiple handsets, all handsets will already be registered with the base.
-
Page 17: Changing The Display Language
First steps Changing the display language Change the display language if you do not understand the language currently set. ¤ Press the control key in the middle ¤ Press keys 5 and 4 slowly one after the other. English The display for setting languages appears. The current language (e.g., English) is selected. -
Page 18: Setting The Date And Time
First steps Setting the date and time Set the date and time so that the correct date and time can be assigned to incoming calls, and so that the alarm clock can be used. Ë Time ¤ §Time§ Press the display key below on the display. - Page 19 First steps ¤ Enter the hours and minutes as four-digit num- bers via the keypad e.g., QM15 for 7.15 a.m. Time: If necessary, use the control key to swap 07:15 between fields. Back ¤ §OK§ Press the key below on the display screen to confirm your entry.
- Page 20 First steps What would you like to do next? Now that you have successfully set up your Gigaset, you can immediately start calling – or you can adapt it to your personal requirements. Use the following guide to quickly locate the most important functions.
-
Page 21: Using The Phone
Using the phone Using the phone Activating/deactivating the handset Press and hold the end call key (confirmation tone). Menu guidance Your telephone's functions are accessed via a menu consisting of several levels. Main menu (first menu level) ¤ §Menu§ When the handset is in idle status, press the display key to open the main menu. -
Page 22: Display Keys
Using the phone Reverting to idle status From any point in the menu: ¤ Press and hold the end call key a or Ð ± ¤ 07:15 Do not press any key: after 2 minutes, the display will automatically revert to idle status. 01.04.2015 Ë... -
Page 23: Control Key
Open redial list. Open main menu/menu for further functions. Menu Confirm selection or save entry. Û Missed calls or messages on the answer machine (E550A only)/network ¢ mailbox ( page 33). Delete Delete key: delete character by character/word by word from right to left. -
Page 24: Writing And Editing Names
Using the phone Writing and editing names The following rules apply when writing names: • Each key between Q and O is assigned several letters and characters. • Control the cursor with • Characters are inserted at the cursor position. §Delete§... -
Page 25: Making Calls
Making calls Making calls When the display backlight is switched off, pressing any key will activate the back- light. The relevant key function is performed. Making external calls and ending calls External calls are calls using the public telephone network. ~ (Enter phone number) and press ¤... -
Page 26: Handsfree Operation
Switching between earpiece and handsfree mode Press the handsfree key. During a call and when listening to the answer machine (Gigaset E550A only), activate or deactivate handsfree mode. If you wish to place the handset in the charger during a call: ¤... - Page 27 Making calls Turning up the volume during a call (extra volume key): You can turn up the volume for the current mode by pressing the lower side key (handsfree mode, earpiece). ¢ å Press the side key ( page 3). The setting only applies for the duration of the call.
- Page 28 Making calls Order of directory entries The directory entries are sorted in alphabetical order. Spaces and digits take first pri- ority. The sort order is as follows: 1. Space 2. Digits (0–9) 3. Letters (alphabetical) 4. Other characters To get round the alphabetical order of the entries, insert a space or a digit in front of the name.
- Page 29 You can assign an external phone number to each direct dialling key. To dial these saved numbers, press the relevant direct dialling key ; to > on the handset or on the base (Gigaset E550A only). ¢ You can also assign the emergency function to direct dialling key ; ( page 34).
-
Page 30: Making Internal Calls
Label the key with a number from the directory. The directory is opened. Select a number and press §OK§. The labelling of the direct dialling keys applies to the handset and the base (Gigaset E550A only). Changing the function of the direct dialling keys ¤... -
Page 31: Using The Redial List
Making calls Transferring a call to another handset/internal consultation Transferring an external call: You have two options to transfer the call: ¤ Wait until the participant called answers, then hang up: Press the End call key a. ¤ Hang up before the participant answers: Press the End call key a. If the participant called does not answer or does not transfer the call, end the consultation call with Back. -
Page 32: Network Mailbox List
Making calls Answer machine list (Gigaset E550A only) The answer machine list contains all the calls recorded by the answer machine. You ¢ can use the list to listen to messages on the answer machine ( page 39). Network mailbox list ¢... - Page 33 Making calls List entry Example of a list entry: • Status of entry New Call New Call: New missed call. Old Call: Entry already read. 123456 • Number of caller Back Menu You can add the number of the caller to the direc- tory ( page 28).
- Page 34 Icon New message... Ì ... in answer machine list (Gigaset E550A only) or on the network mail- ™ ... in the list of Missed Calls The number of new entries is displayed beside the Ð...
-
Page 35: Sos-Function
SOS-Function Emergency function – direct dialling key Your Gigaset E550A is equipped with four additional keys (;- >) on the base and handset. Only the direct dialling key ; can be labelled with a special emergency function ("SOS key"). You can use this to ask friends or neighbours for help in an emer- gency. -
Page 36: Setting Up The Emergency Function
SOS-Function • During the entire procedure, all SOS keys flash on all registered handsets and on the base. The message "Sending emergency call" is output on the handset that triggered the emergency call. ¢ • If an internal call is also programmed ( page 29), the emergency call can also be answered by an internal party. - Page 37 SOS-Function You have the option of entering a further three numbers and also directing the emer- gency call to one or all internal numbers: ¤ Further number? §Yes§ Press to enter further emergency numbers. ¤ Activate internal call? §Yes§ Press if, in addition to the saved numbers, you wish to call all registered hand- sets when you press the SOS key.
- Page 38 37). Press the direct dialling key ; on the handset or base; the device dials immediately. • The saved emergency numbers apply to both the Gigaset E550H handsets and the base. • The SOS key still works even if the keypad lock is activated.
-
Page 39: Answer Machine
Answer machine Answer machine Operating the answer machine You can operate the (integrated) answer machine • Via the handset or • Via the keys on the base. You will find information on operating the answer machine via the keys on the base on page 4 and page 5. - Page 40 Answer machine Playing back an announcement ¤ ¤ ¤ ¤ ¤ ¤ q Answer Machine q Announcements q Play §Menu§ §OK§ §OK§ ¤ §OK§ Announce. You will hear the default announcement if you have not recorded one of your own. Deleting your personal announcement ¤...
- Page 41 Answer machine Stopping and controlling playback During message playback: Pause playback. Press 2 again to resume. Go to the start of the current message. 2 x t Go to previous message. Go to next message. 2 x s Go to next-but-one message. If playback is interrupted for over a minute, the answer machine returns to idle status.
-
Page 42: Setting Up The Answer Machine
Answer machine Accepting a call from the answer machine You can accept a call while the answer machine is recording it. Press the talk key. If the handset is in the base/charger and the Auto Answer function is activated ( page 52), the handset automatically answers the call when you remove it from the base/charger. - Page 43 Answer machine Setting the message length You can set a maximum message length. The options are: 1 Minute, 2 Minutes, 3 Minutes or Unlimited. ¤ ¤ ¤ ¤ ¤ q Answer Machine q Message Length §Menu§ §OK§ §OK§ ¤ ¤ §OK§...
-
Page 44: Using The Network Mailbox
Answer machine Calling the answer machine and playing messages Dial your own number. When you hear your announcement, press 9 and enter the system PIN. You are informed whether any new messages have been recorded. The messages are now played back. You can now operate the answer machine with the keypad. The connection is terminated: •... - Page 45 1 key – you do not have to select it via the menu. Gigaset E550: The network mailbox is preconfigured for fast access. Gigaset E550A: The integrated answer machine is preconfigured for fast access. You can switch to the network mailbox.
-
Page 46: Further Functions
Further functions Further functions ECO DECT You are helping to protect the environment with your Gigaset. Reduced energy consumption Your telephone has a power-saving adapter plug and uses <0.5 W when in idle status and when the batteries are not being charged. - Page 47 Further functions Status displays Display icon Reception strength: Ð i Ñ ¦ – Good to poor ¥ (red) – No reception ¼ Eco Mode+ enabled (displays instead of the reception strength icon when in idle status) • When using Eco Mode+ you can ensure that the range of the base is suffi- cient by long pressing the talk key c.
-
Page 48: Using The Handset As An Alarm Clock
Further functions Using the handset as an alarm clock Activating/deactivating the alarm clock Requirement: The time is set ( page 17). ¤ ¤ ¤ ¤ ¤ q Alarm Clock q Activation §Menu§ §OK§ §OK§ (³= on) After you activate the alarm clock, the menu for setting the wakeup time opens auto- matically. -
Page 49: Baby Monitor
Further functions Baby monitor When the baby monitor is activated, a call to all internal handsets is activated as soon as a defined noise level is exceeded in the vicinity of the handset. In baby monitor mode, incoming calls are only signalled on the display (without ringtone). -
Page 50: One Touch Call
Further functions One touch call You can set up your phone so that you can dial a specific number when you press any key on the keyboard. This allows children, who are unable to enter a number, to call a certain number, for example. -
Page 51: Using Multiple Handsets
Within 60 seconds, press and hold the registration/paging key ù on the base ( page 4) for approx. 3 seconds. Registering other handsets You can register other Gigaset handsets and handsets for other devices with GAP functionality as follows. 1) On the handset ¤... -
Page 52: Changing The Name Of A Handset
Using multiple handsets Locating a handset ("Paging") You can locate your handset using the base. ¤ Briefly press the registration/paging key ù on the base ( page 4). ¤ All handsets will ring at the same time ("paging"), even if the ringers are switched off. -
Page 53: Adjusting The Telephone
Adjusting the telephone Adjusting the telephone Handset settings You can change the settings on your handset to suit your individual requirements. Changing the display language You can view the display texts in different languages. ¤ ¤ ¤ ¤ ¤ ¤ ¤... - Page 54 Adjusting the telephone Changing the call volume You can set the handsfree volume and the earpiece volume to five different levels (1– 5; e.g., volume 3 = ˆ). ¤ ¤ ¤ ¤ ¤ q Settings q Audio / Visual Signals §Menu§...
- Page 55 Adjusting the telephone For external calls: ¤ ¤ ¤ ¤ ¤ ¤ ¤ q Settings q Audio / Visual Signals §§Menu§ §OK§ §OK§ ¤ ¤ ¤ ¤ ¤ ¤ q External Calls §OK§ §OK§ §OK§ Ringtones (Handset) Melody ¤ §OK§ (Select melody) (³= selected) Time Control...
-
Page 56: Protection Against Unwanted Calls
Adjusting the telephone Protection against unwanted calls Protection from anonymous callers You can set your phone so that it doesn't ring for anonymous calls (callers who have withheld Calling Line Identification). The call is only signalled on the display. The setting only applies to handsets for which the setting is configured. -
Page 57: Base Settings
Adjusting the telephone Activating/deactivating advisory tones ¤ ¤ ¤ ¤ ¤ q Settings q Audio / Visual Signals §§Menu§ §OK§ §OK§ ¤ ¤ q Advisory Tones §OK§ (³= on) Activating/deactivating battery low beep ¤ ¤ ¤ ¤ ¤ ¤ q Settings q Audio / Visual Signals q Battery §§Menu§... -
Page 58: Protecting Against Unauthorised Access
Changing the system PIN You can change the base's 4-digit default system PIN ("0000") to a 4-digit PIN known only to yourself. Gigaset E550A: Setting a system PIN enables remote operation of the answer machine ¢ page 42). ¤... -
Page 59: Operating The Base On The Pabx
Adjusting the telephone Changing ringers • Volume: Five volume levels (1–5; e.g., volume 3 = ˆ) and "Off" (volume 0 = ‡). • Melody: List of pre-loaded ringer melodies. The first three melodies are the "classic" ring- tones. • Time control: You can specify a time period when you do not want the telephone to signal exter- nal calls e.g., during the night. -
Page 60: Operating The Telephone On A Router
Adjusting the telephone Switching temporarily to tone dialling (DTMF) If your PABX still operates with pulse dialling (PD), but you need tone dialling for a connection (e.g., to listen to the network mailbox), you must switch to tone dialling for the call. Prerequisite: You are conducting a call or have already dialled an external number. -
Page 61: Appendix
Service Hotline: 0818 200 033 (6.6561 Ct./Call) Please have your proof of purchase ready when calling. Please note that if the Gigaset product is not sold by authorised dealers in the national territory the product may not be fully compatible with the national telephone net- work. -
Page 62: Questions And Answers
Appendix Questions and answers Possible solutions are available online at www.gigaset.com/service In addition, the following overview provides troubleshooting assistance. The display is blank ¤ Press and hold the End call key a. • The handset is not switched on: ¤... - Page 63 Appendix Time has changed • The time was changed on another handset and thus transferred to the other ¤ devices Do not copy the date/time automatically Time is reset to the default setting ¤ • Base and handset were deactivated at the same time Reset the time ¢...
- Page 64 • The emergency function is not activated Activate the emergency function ¢ page 35) • The base does not support the emergency function: www.gigaset.com/ compatibility • The emergency function only works when the device is directly connected to the ¤...
-
Page 65: Guarantee Certificate United Kingdom
Gigaset Communications. This Guarantee shall apply to new devices purchased in the European Union. For Products sold in the United Kingdom the Guarantee is issued by: Gigaset Commu- nications UK Limited, 2 White Friars, Chester, CH1 1NZ. -
Page 66: Guarantee Certificate Ireland
Guarantee cannot be made if: The device is opened (this is classed as third party intervention) Repairs or other work done by persons not authorised by Gigaset Communica- tions. Components on the printed circuit board are manipulated The software is manipulated Defects or damage caused by dropping, breaking, lightning or ingress of moisture. -
Page 67: Manufacturer's Advice
Appendix This Guarantee shall apply to new devices purchased in the European Union. For Products sold in the Republic of Ireland the Guarantee is issued by Gigaset Com- munications UK Limited, 2 White Friars, Chester, CH1 1NZ. Any other claims resulting out of or in connection with the device shall be excluded from this Guarantee. -
Page 68: Contact With Liquid
Appendix Ecological energy consumption ¢ The use of ECO DECT ( page 45) saves energy and makes an active contribution towards protecting the environment. Disposal Batteries should not be disposed of in general household waste. Observe the local waste disposal regulations, details of which can be obtained from your local authority. All electrical and electronic products should be disposed of separately from the municipal waste stream via designated collection facilities appointed by the govern- ment or the local authorities. -
Page 69: Specifications
Charging time in charging cradle (hours) *Eco Mode deactivated, without display backlight in idle status **Eco Mode activated, without display backlight in idle status Base power consumption E550 E550A In standby mode ca. 0,60 W ca. 0,70 W • Handset in charging cradle ca. - Page 70 Appendix Bit rate 1152 kbit/s Modulation GFSK Language code 32 kbit/s Transmission power 10 mW average power per channel, 250 mW pulse power Range Up to 300 m outdoors, up to 50 m indoors Base power supply 230 V ~/50 Hz Environmental conditions for +5°C to +45°C, 20% to 75% relative humidity operation...
- Page 71 Appendix Mounting the E550 base on the wall 32 mm Approx. 4 mm Mounting the charger on the wall 21 mm Approx. 3.5 mm...
-
Page 72: Index
Index Index ....Access protection Call ......Activating accepting . - Page 73 Index ....Dialling answer machine ......directory .
- Page 74 Index Key 1 (fast access to answer Making calls ......... machine) accepting a call .
- Page 75 Index ........Power adapter Setting melody (ringer) .
- Page 80 Issued by Gigaset Communications GmbH Frankenstr. 2a, D-46395 Bocholt © Gigaset Communications GmbH 2015 Subject to availability. All rights reserved. Rights of modification reserved. www.gigaset.com Version: 01.05.2015 *A31008-M2504-L101-1-7619* A31008-M2504-L101-1-7619...