
Related Manuals for Gigaset E290HX


Summary of Contents for Gigaset E290HX
- Page 1 E290 You can find the most up-to-date user guide at www.gigaset.com/manuals You will also find here the user guide for your Gigaset phone. Other phone system or router: Documentation for your base/router...
- Page 3 You can use your handset with several different DECT bases. On a Gigaset base Connect your HX handset to a Gigaset base and use the many features with the quality you would expect from Gigaset. In this guide, all functions that are available for your HX handset are detailed/ described.
-
Page 4: Table Of Contents
Contents Contents Overview ............6 Safety precautions . - Page 5 Contents Additional functions ..........32 Quick access .
-
Page 6: Overview
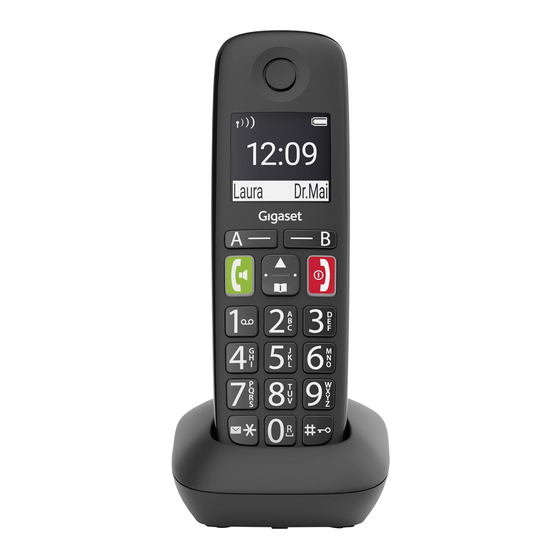
Overview Overview 10:30 Setting the display language ( p. 14) Availability and operation of the functions may differ on your telephone. - Page 7 Overview 1 Status bar ( p. 19) Icons display current settings and the status of the phone 2 Time ( p. 37) 3 Number of new messages on the answer machine, number of missed calls 4 Display keys Quick dial ( p. 20); various functions ( p. 18) 5 Talk key / Handsfree key ¤...
- Page 8 Overview Symbols used in the user guide Icons Warnings, the non-adherence to which can result in damage to devices or personal injury. Important information regarding function and appropriate handling or functions that could generate costs. Prerequisite for carrying out the following action. Additional helpful information.
- Page 9 Overview Procedures Example: Enabling/disabling Auto Answer: ¤ Settings Handset Auto Answer = enabled) Step Meaning ¤ Press right on the control key. The menu is opened. ¤ Settings Use the control key to navigate to entry Settings. ¤ Press OK to confirm. The Settings submenu is opened. ¤...
-
Page 10: Safety Precautions
Use only rechargeable batteries that correspond to the specifica- tion (see list of permitted batteries www.gigaset.com/service). Never use a conventional (non-rechargeable) battery or other battery types as this could result in significant health risks and personal injury. Rechargeable batteries, which are noticeably damaged, must be replaced. - Page 11 They will be able to advise you regarding the susceptibility of the device to external sources of high frequency energy (for the specifications of your Gigaset product see "Technical data"). Availability and operation of the functions...
-
Page 12: Getting Started
Getting started Getting started Package contents • One handset, two batteries, one battery cover, one user guide The charging cradle is designed for use in closed, dry rooms within a temperature range of +5°C to +45°C. The device's feet do not usually leave any marks on surfaces. However, due to the multitude of different varnishes and polishes used on furniture, contact marks on the surfaces cannot be completely ruled out. - Page 13 Getting started Setting up the handset for use The display is protected by a plastic film. Please remove the protective film. Inserting the batteries Only use rechargeable batteries, as this could otherwise result in significant health risks and personal injury. For example, the outer casing of the batteries could be damaged beyond repair or the batteries could explode.
- Page 14 Data protection If the product is connected to the Internet via an IP base station or router, it will automatically connect to the Gigaset support server sending regular product specific information. This information will for example be used for firmware updates or to provide internet services.
- Page 15 Getting started Setting date and time Set the date/time so that the correct date and time can be assigned to incoming calls and to enable the alarm to be used. ¤ Settings Date and Time Enter the date (day, month and year) in 8-digit format Enter the time (hours and minutes) in 4-digit format OK (Display: Saved)
-
Page 16: Operating The Handset
Operating the handset Operating the handset Switch the handset on and off ¤ Switching on: When the handset is switched off, press and hold the End call key ¤ Switching off: When the handset is in idle mode, press and hold the End call key When you place a switched off handset into the base or charging cradle, it switches itself on automatically. -
Page 17: Control Key
Operating the handset At its highest level, the handset exceeds the defined maximum volume in CAT-iq2.0 for a person with "normal hearing". Neverthe- less, even at the extra loud setting, the call can be continued with the best quality. This setting can result in harm to health for those with normal hearing ability and is only intended for those with a hearing impair- ment or reduced hearing. -
Page 18: Display
Operating the handset Display Display keys / Quick access function The keys under the display perform a range of functions depending on the situation. In idle mode Peter Current assignment of display keys A and B for quick access Display keys with quick access function ¤... -
Page 19: Menu Navigation
Operating the handset Status bar Icons display current settings and the status of the phone. Keypad lock activated Ringtone deactivated Local answer machine switched on (if available) Radio contact between the base and handset Good to poor No reception ECO DECT mode No Radiation enabled Battery charge level 0 - 10% 11 - 33%... -
Page 20: Making Calls
Ending a call / cancelling dialling: Press the End call key On a base with several phone connections (such as an IP-capable Gigaset base or a router) The number is selected via the send connection (line) set for the handset. - Page 21 Making calls Dialling from the redial list The list contains the 10 numbers last dialled with the handset. ¤ Press briefly Select entry Managing entries in the redial list ¤ Press briefly Select Menu Select function Possible functions: Use Number / Copy to Directory / Delete Entry / Delete List Dialling from the call list Open the call list:...
-
Page 22: Accepting A Call
Making calls Accepting a call The handset indicates an incoming call by ringing and by a display on the screen. ¤ Press the Talk key Function Auto Answer enabled: Simple take the handset out of the charging cradle Enabling function Auto Answer: ¤... -
Page 23: Call With Three Subscribers
Making calls Call with three subscribers (only on a CAT-iq router) Accepting/rejecting Call Waiting Another subscriber calls during a conversation. The call is indicated by Call waiting and shown on the display: ¤ Reject the call: Reject ¤ Accept the call: Accept . -
Page 24: Calling Line Identification
Making calls Calling Line Identification During a call, the caller's number is transferred (CLI = Calling Line Identifica- tion) and can be displayed on the recipient's display (CLIP = CLI Presentation). When the caller's number is withheld, it is not show on the called party’s display. - Page 25 Making calls Example: Number Selected number Presel. Number 0999 ¥ 07112345 07112345 With Preselect ¥ 08912345 0999 08912345 Without Presel. ¥ 08412345 08412345 All numbers beginning with 08, with the exception of 081 and 084, are dialled using preselection number 0999. Entering a preselection number ¤...
-
Page 26: Call/Message Lists
Call/message lists Call/message lists Information on events stored in lists on the base can be displayed on the handset. Which events are collected depends on the base, such as: • Call list: Numbers of all incoming, outgoing and missed calls •... -
Page 27: Message List
Directory Message list You can listen to messages on the answer machine (if available) or the network mailbox from the answer machine list network mailbox list. Open the answer machine list: ¤ Press and hold the Messages key . . . The list selection is opened Voice Mail Open the network mailbox list: ¤... - Page 28 Directory Selecting/editing the directory entry ¤ Open the directory ¤ to scroll to the entry until the required name is selected ¤ Enter the first character of the name scroll as required with to the entry ¤ Display number: Menu Show Number ¤...
-
Page 29: Base Directory
Directory Transferring a directory (entry) to another handset The sending and receiving handsets must both be registered with the same base. The other handset and the base are able to send and receive direc- tory entries. Transferring a directory entry to another handset ¤... -
Page 30: Transferring Directory (Entry)
Answering machine Transferring directory (entry) Transferring a phone entry from the local to the base directory ¤ Select the entry Menu Send Entry to Basesta- tion Directory Sending a local directory to the base ¤ Menu Send List to Basestation Directory Sending the base directory to the handset ¤... -
Page 31: Network Mailbox
Answering machine Network mailbox The network mailbox is registered with the network provider and enabled on the phone. To enable and disable the network mailbox, use a number and func- tion code from your network provider. Please contact the network provider if you require any further information. -
Page 32: Additional Functions
User guide for your Gigaset telephone Regarding the telephone system, if the handset is connected to another base/router: Documentation regarding your base/your router All Gigaset user guides are available from www.gigaset.com/manuals Quick access Call numbers can be assigned to display keys A and B. -
Page 33: Alarm Clock
Additional functions Disabling quick access ¤ Call Manager Function Key "A" / "B" Function OK ( = quick access key is disabled) Alarm clock Date and time have been set. Turning the alarm clock on and off ¤ Alarm Clock Activation OK ( = turned on) -
Page 34: Baby Monitor
Additional functions Baby monitor When the baby monitor is switched on, the stored external phone numbers or all handsets registered to the phone (internal) are called as soon as a defined noise level is exceeded in the vicinity of the handset. The alarm to an external number is cancelled after about 90 seconds. -
Page 35: Eco Dect
Additional functions Activate/deactivate two-way talk: ¤ Two Way Talk OK ( = enabled) Deactivate baby monitor / Cancel alarm Deactivate the baby monitor: ¤ In idle status press the display key Off ¤ Cancel the alarm: Press the End call key during an alarm Deactivate the baby monitor remotely The alarm is forwarded to an external destination number. -
Page 36: Protection From Undesired Calls
Additional functions Disabling radiation in idle mode These wireless signals are also disabled with the No Radiation setting. ¤ Settings Base ECO DECT Radiation OK ( = Radiation disabled) All handsets registered must support this feature. For speedy set-up of connections for incoming calls, the handset keeps switching to “ready to receive”... -
Page 37: Phone Settings
Phone settings Phone settings Date and time Setting Set the date/time so that the correct date and time can be assigned to incom- ing calls and to enable the alarm to be used. ¤ Settings Date and Time Enter the date (day, month and year) in 8-digit format Enter the time (hours and minutes) in 4-digit format... -
Page 38: Display
Phone settings Display Display language ¤ Settings Handset Language Select the language OK ( = enabled) If you accidentally choose a language you do not understand: ¤ Press keys one after the other Select the language Screensaver The screensaver is enabled when the phone is not used over a longer period of time. -
Page 39: Tones And Signals
Phone settings Display off during a call During a call, the display normally stays on. When the function is enabled, the display is switched off during calls. ¤ Settings Handset Display Display Off During Calls OK ( = enabled) If the function is disabled, talk time is reduced. Tones and signals Call volume Adjust the receiver volume or handsfree function on 5 levels. - Page 40 Phone settings Ringtone melody For the handset: Set the ringtone melody for external calls, internal calls and/or the alarm. ¤ Settings Handset Audio Settings Ringer Melody Select External Calls / Internal Calls / Alarm Clock Select ringtone required OK ( = selected) For a base with speaker: Adjusting the ringtone melody for external calls.
- Page 41 Phone settings Setting the time period For the handset: ¤ Call Manager Time Control Settings Off from: Enter the 4-digit time Off until: Enter the 4- digit time For a base with speaker: ¤ Settings Base Audio Settings Time Control Settings Off from: Enter the 4-digit...
-
Page 42: System
Phone settings System Changing the system PIN (depending on the base) ¤ Settings Base System PIN Enter the current 4-digit system PIN (default: 0000) Enter the new 4-digit system PIN Resetting the system PIN (depending on the base) Resetting the base to the original PIN code 0000: ¤... -
Page 43: Firmware Update
The handset supports firmware updating via the DECT radio link to the base/ router (SUOTA = Software Update Over The Air). The base/router to which the handset is registered must also support this function and be connected to the Internet www.gigaset.com/compatibility ¤ Settings Handset Update Firmware . - Page 44 Phone settings Assigning handsets to a connection (line) Multiple handsets can be assigned to a connection. Incoming calls to the number designated to a connection will be forwarded to all handsets assigned to the connection. ¤ Settings Base Connections Select connection Assigned Handsets OK .
-
Page 45: Service (Customer Care)
(6.6561 Ct./Call) Please have your proof of purchase ready when calling. Please note that if the Gigaset product is not sold by authorised dealers in the national territory the product may not be fully compatible with the national telephone network. It is clearly specified on the box near the CE mark for which country/coun- tries the equipment has been developed. - Page 46 This Guarantee shall apply to new devices purchased in the European Union. For Products sold in the United Kingdom and in the Republic of Ireland the Guarantee is issued by: Gigaset Communications UK Limited, 2 White Friars, Chester, CH1 1NZ. •...
-
Page 47: Manufacturer's Advice
Therefore please check all of these files. Data protection We at Gigaset take the protection of our customers’ data very seriously. It is precisely for this reason that we are ensuring all our products feature "Privacy by Design" as standard. All information we collect is used to make our products as good as possible. -
Page 48: Care
Manufacturer's advice Environmental management system Gigaset Communications GmbH is certified pursuant to the international standards ISO 14001 and ISO 9001. ISO 14001 (Environment): Certified since September 2007 by TÜV SÜD Management Service GmbH. ISO 9001 (Quality): Certified since 17/02/1994 by TÜV SÜD Management Service GmbH. -
Page 49: Contact With Liquid
Manufacturer's advice Contact with liquid If the device comes into contact with liquid: 1 Unplug all cables from the device. 2 Remove the batteries and leave the battery compartment open. 3 Allow the liquid to drain from the device. 4 Pat all parts dry. 5 Place the device in a dry, warm place for at least 72 hours (not in a microwave, oven etc.) with the battery compartment open and the keypad facing down (if applicable). -
Page 50: Technical Data
Capacity: 400 - 1000 mAh Handset operating times/charging times The operating time of your Gigaset depends on the capacity of the battery, its age and the way it is used. (All times are maximums). Standby time (hours) 200 / 100* Talktime (hours) Operating time for 1.5 h of calls per day (hours) - Page 51 Technical data Character set tables The character set used on the handset is dependent on the language set. Entering letters/characters ¤ Press the relevant key several times. ¤ Briefly press the Hash key to switch from mode “Abc” to “123”, from “123” to “abc”...
-
Page 52: Index
Index Index Call divert ......Call list ....... . . Accepting a call . - Page 53 Index Data protection ECO DECT ............Date and time Emergency numbers accept...
- Page 54 Index Insert a dialling pause Network mailbox ........Internal listening in listening to message .
- Page 55 Index Setting the volume ....Setting the wake-up time ... . . Radiation-free .
- Page 56 Issued by Gigaset Communications GmbH Frankenstr. 2a, D-46395 Bocholt © Gigaset Communications GmbH 2019 Subject to availability. All rights reserved. Rights of modification reserved. www.gigaset.com...