Epson Stylus Photo R340 Manual
Epson stylus photo r340: product information
Hide thumbs
Also See for Stylus Photo R340:
- Service manual (130 pages) ,
- Printer basics manual (81 pages) ,
- Basic operation manual (40 pages)
Table of Contents
Advertisement
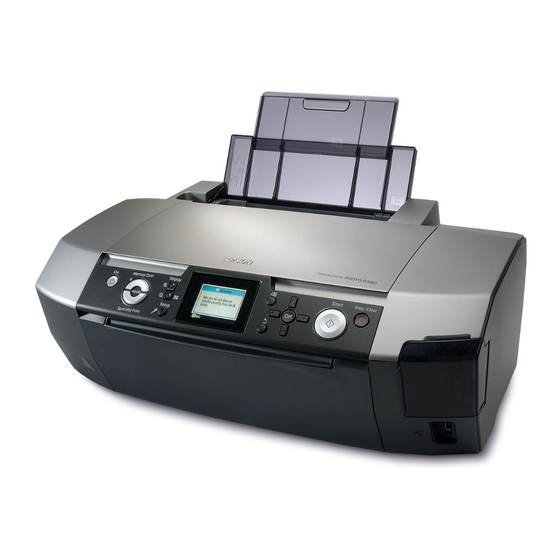
Printer Parts
Control Panel
Print photos from
memory cards and
external devices
Press and hold
for 2 sec. to turn
Print on CDs or
the printer on or
DVDs
off
Printer
Paper support
extension
Paper
support
Edge
guide
Control panel
CD/DVD tray
Press + to zoom in and crop
Press – to view 9 photos at a
time for quicker searching
Adjust printer
settings and
perform printer
maintenance
Printer cover
Preview monitor
Output tray extension
Output tray
Choose print
settings such as
layout and quality
settings
LCD screen
Return to
previous menu
or cancel menu
selection
Go to next menu
or choose menu
selection
Memory
card cover
EXT I/F
USB port
8/05
Epson Stylus Photo R340
Navigate menu options and
choose menu settings
Start printing
Cancel control
panel settings
or stop printing
and cancel
print job
USB port
Epson Stylus Photo R340
1
-
Advertisement
Table of Contents

Related Manuals for Epson Stylus Photo R340


Summary of Contents for Epson Stylus Photo R340
-
Page 1: Printer Parts
Printer cover Preview monitor Memory card cover EXT I/F USB port Output tray extension 8/05 Epson Stylus Photo R340 Navigate menu options and choose menu settings Start printing Cancel control panel settings or stop printing and cancel Go to next menu... -
Page 2: Printer Specifications
Epson Papers When printing from your computer using the Epson driver, you can choose from any of the following Epson papers. When printing without a computer, select one of the papers marked with an asterisk (*) See page 3 for information about paper settings. -
Page 3: Safety Approvals
* Ink thaws and is usable after approximately 3 hours at 77 °F (25 °C). Caution: Epson recommends the use of original Epson ink cartridges only. Products not manufactured by Epson may cause damage to your printer and will not be covered by Epson’s warranties. -
Page 4: Printable Area
Epson Photo Quality Ink Jet Paper Epson Premium Bright White Paper Media Loading Guidelines ❏ See page 2 for a list of Epson papers that can be used with this printer. ❏ Load paper short edge first, even when printing landscape- oriented pictures. -
Page 5: Loading Paper
Letter Paper name size Epson Photo Paper Epson Glossy Photo Paper Epson Premium Glossy Photo Paper Epson Premium Semigloss Photo Paper Epson Premium Luster Photo Paper Epson Matte Paper Heavyweight Epson Ultra Premium Glossy Photo... -
Page 6: Loading Cds And Dvds
8-cm CDs and that the CD and ring lie flat on the tray; otherwise the printer may be damaged. 3. Insert the tray into the printer carefully, making sure it is level, not tilted up or down. Epson Stylus Photo R340 Slide the tray under the tab and the two rollers. -
Page 7: Inserting A Memory Card
Inserting a Memory Card 1. Press the P power button to turn on your Epson Stylus Photo R340. 2. Open the memory card door. 3. Insert the memory card into one of the three slots, as shown below. CompactFlash or... -
Page 8: Printing Photos
When it’s done, your images are available for printing. Note: If you used the Stylus Photo R340 to back up your images on a Zip disk, CD, or another storage device (see Printer Basics), they’re stored in folders (001, 002, etc.). Use the u and d buttons on the printer’s control panel to highlight the folder you want to open, then... -
Page 9: Printing A Proof Sheet
Bluetooth adapter. Testing the Printer Layout You may need to run a printer check to see if a problem comes from the printer itself or some other source. 1. Make sure any memory cards are removed (page 7), then disconnect the printer cable from the printer. -
Page 10: Replacing An Ink Cartridge
To ensure good results, use genuine Epson ink cartridges and do not refill them. Other products may cause damage to your printer not covered by Epson’s warranty. -
Page 11: Cleaning The Print Head
(not over a network); see your on-screen User’s Guide for details. Caution: When you don’t turn on your printer for a long time, the print quality can decline, so turn it on at least once a month to maintain good print quality. -
Page 12: Aligning The Print Head
(not over a network); see your on- screen User’s Guide for details. Note: For the best results, load letter-size Epson Photo Quality Ink Jet Paper in the printer whenever you check the print head alignment. Follow these steps to align the print head using the control panel: 1.