Advertisement
Quick Links
Air Conditioners
Indoor unit
SLZ-M15, M25, M35, M50, M60FA
OPERATION MANUAL
BEDIENUNGSHANDBUCH
MANUEL D'UTILISATION
BEDIENINGSHANDLEIDING
MANUAL DE INSTRUCCIONES
ISTRUZIONI DI FUNZIONAMENTO
stessa.
MANUAL DE OPERAÇÃO
DRIFTSMANUAL
DRIFTSMANUAL
I LETME ELKITABI
BRUKSANVISNING
Vennligst les nøye gjennom denne bruksanvisningen, for sikkert og riktig bruk av klimaanlegget.
INS RUKC A
BS UGI
FOR USER
FÜR BENUTZER
POUR L'UTILISATEUR
VOOR DE GEBRUIKER
PARA EL USUARIO
PER L'UTENTE
PARA O UTILIZADOR
TIL BRUGER
FÖR ANVÄNDAREN
KULLANICI Ç N
FOR BRUKER
INFORMAC A DLA U TKO NIKA
English
Deutsch
Français
Nederlands
Español
Italiano
Português
Dansk
Svenska
Türkçe
Norsk
Polski
Advertisement

Related Manuals for Mitsubishi Electric Mr.Slim SLZ-M15


Summary of Contents for Mitsubishi Electric Mr.Slim SLZ-M15
- Page 1 Air Conditioners Indoor unit SLZ-M15, M25, M35, M50, M60FA OPERATION MANUAL FOR USER English BEDIENUNGSHANDBUCH FÜR BENUTZER Deutsch MANUEL D’UTILISATION POUR L’UTILISATEUR Français BEDIENINGSHANDLEIDING VOOR DE GEBRUIKER Nederlands MANUAL DE INSTRUCCIONES PARA EL USUARIO Español ISTRUZIONI DI FUNZIONAMENTO PER L’UTENTE Italiano stessa.
-
Page 2: Table Of Contents
2006/66/EC Article 20 Information for end-users and Annex II. Your MITSUBISHI ELECTRIC product is designed and manufactured with high quality materials and components which can be recycled and/or reused. This symbol means that electrical and electronic equipment, batteries and accumulators, at their end-of-life, should be disposed of separately from your household waste. -
Page 3: Parts Names
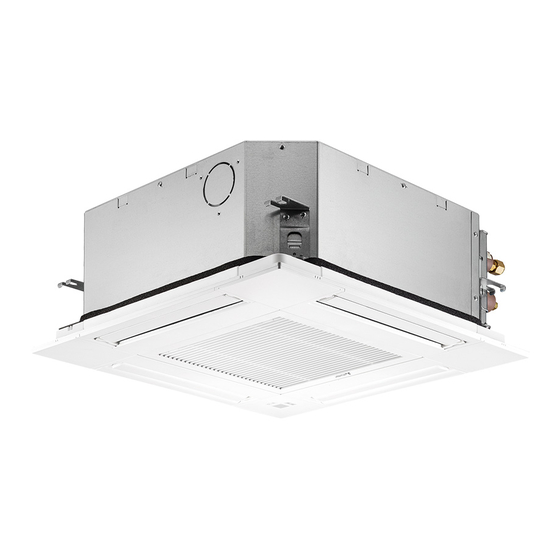
1. Safety Precautions Disposing of the unit Caution: When you need to dispose of the unit, consult your dealer. remote controller. 2. Parts Names ■ Indoor Unit ■ SLZ-M·FA 4-way Ceiling Cassette SLZ-M·FA Fan steps 3 steps Vane Auto with swing Filter Vane Louver... - Page 4 2. Parts Names Display The main display can be displayed in two different modes: “Full” and “Basic”. The factory setting is “Full”. To switch to the “Basic” mode, change the setting on the Main display setting. (Refer to operation manual included with remote controller.) <Full mode>...
- Page 5 2. Parts Names ■ Wireless Remote-Controller Transmission area Not available Remote controller display Battery replacement indicator Set Temperature buttons OFF/ON button Mode button (Changes operation mode) Fan Speed button (Changes fan speed) i-see button Timer ON button Menu button Timer OFF button SET/SEND button Weekly timer ON/OFF button CANCEL button...
-
Page 6: Operation
2. Parts Names Battery installation/replacement 1. Remove the top cover, insert two LR6 AA bat- indoor unit, the indoor unit may beep twice as the unit is performing the initial automatic check. teries, and then install the top cover. received. Signals can be received up to approximately 7 meters in a direct line from the indoor and strong light can affect the ability of the indoor unit to receive signals. - Page 7 3. Operation Operation status memory Remote controller setting Operation mode Operation mode before the power was turned off Preset temperature Preset temperature before the power was turned off Fan speed Fan speed before the power was turned off Settable preset temperature range Operation mode Preset temperature range Cool/Dry...
- Page 8 3. Operation 3.4. Fan speed setting <Navigating through the pages> page Main Main menu Vane Louver Vent. (Lossnay) High power Room Timer Press [F3] to go to the previous page. Weekly timer Cool Set temp. Press [F4] to go to the next page. OU silent mode Main display: Cursor...
- Page 9 3. Operation 3.5.2 Vane·Vent. <Accessing the menu> Notes: Select "Vane·Louver·Vent. This function cannot be set depending on the outdoor unit to be Main Main menu Vane Louver Vent. (Lossnay) connected. (Lossnay)" from the Main menu High power (refer to page 8), and press the Timer Weekly timer [SELECT] button.
- Page 10 3. Operation Vane setting 1 Select “Maintenance” from the Main Main menu Main menu (refer to page 8), and No setting Step 1 Step 2 Maintenance Initial setting press the [SELECT] button. Service Step 3 Step 4 Step 5 Main display: Cursor Page Draft...
- Page 11 3. Operation 3 Select the desired menu with the 3D i-See sensor 1 First, confirm by setting “Ref. [F1] or [F2] button, and press the Air distribution Manual vane angle Energy saving option [SELECT] button. address” to 0 and “Unit No.” to 1. Ref.
- Page 12 3. Operation 3 When Direct/Indirect is selected, 2 When No occupancy energy save Direct/Indirect setting Energy saving option set each air outlet. or Room occupancy energy save No occupancy energy save : Direct Select the air outlet with the [F1] or is selected : Indirect Cooling/Heating...
-
Page 13: Timer
3. Operation Notes: Any person at the following places cannot be detected. 1 Select the setting with the [F4] Seasonal airflow button. Seasonal airflow Cooling/Heating the air conditioner A person may not be detected in the following situations. Select: After changing the setting, press the [SELECT] button to save the setting. -
Page 14: Care And Cleaning
5. Care and Cleaning Filter information will appear on the Main display in the Full mode when it is time to The icon Room cleaning. Cool Set temp. when this sign appears. will be reset. Mode Temp. Refer to the indoor unit Instructions The icon is scheduled to appear after a certain duration of opera- Manual for details. -
Page 15: Emergency Operation For Wireless Remote-Controller
6. Emergency Operation for Wireless Remote-controller When the remote controller cannot be used When the batteries of the remote controller run out or the remote controller malfunctions, the emergency operation can be done using the emergency buttons on the grille. A DEFROST/STAND BY lamp B Operation lamp C Emergency operation cooling switch... -
Page 16: Installation, Relocation And Inspection
7. Trouble Shooting Having trouble? Here is the solution. (Unit is operating normally.) Air conditioner operates without the ON/OFF button being pressed. ■ Is the on timer set? Press the ON/OFF button to stop operation. ■ Is the air conditioner connected to a central remote controller? Consult the concerned people who control the air conditioner. - Page 17 Warning: leak. Be sure to ask the service representative whether there is refrigerant leakage or not when repairs are carried out. The refrigerant charged in the air conditioner is safe. Refrigerant normally does not leak, however, if refrigerant gas leaks indoors, and comes Electrical work Warning: may result.
- Page 18 ··················································· 179 ····················································· 180 ··········································································· 192 ··································································· 183 ···················································· 192 ············································································ 190 ························· 193 ··································································· 191 ·············································· 194 1 19 BH79A366H01_RU.indd 179 2017-11-27 16:38:41...
- Page 19 ■ – Main Main menu Vane·Louver·Vent. (Lossnay) High power Room Timer Cool Set temp. Weekly timer OU silent mode Main display Mode Temp. Cursor Page BH79A366H01_RU.indd 180 2017-11-27 16:38:42...
- Page 20 2 3 4 5 6 Cool Set temp. Room Set temp. Cool Mode Temp. Mode Temp. BH79A366H01_RU.indd 181 2017-11-27 16:38:42...
- Page 21 BH79A366H01_RU.indd 182 2017-11-27 16:38:43...
- Page 22 BH79A366H01_RU.indd 183 2017-11-27 16:38:44...
- Page 23 Room Cool Set temp. Mode Temp. Cool Auto Heat < > 28.5 Room Room Cool Set temp. Cool Set temp. 28.5 Mode Temp. Mode Temp. BH79A366H01_RU.indd 184 2017-11-27 16:38:44...
- Page 24 < > Main Main menu Vane Louver Vent. (Lossnay) High power Room Timer Weekly timer Cool Set temp. OU silent mode Main display: Cursor Page Mode Temp. < > OU silent mode Auto Tue Wed Thu Fri Sat Sun Start Stop Silent Setting display:...
- Page 25 < < > > Main Main menu Vane Louver Vent. (Lossnay) High power Timer Weekly timer OU silent mode Main display: Cursor Page < > Swing Vane Vent. Louver Swing Auto < > Main Main menu Vane Louver Vent. (Lossnay) High power Timer Weekly timer...
- Page 26 Main Main menu Maintenance Initial setting Service Main display: Cursor Page Maintenance menu Auto descending panel Manual vane angle 3D i-See sensor Main menu: Cursor Manual vane angle Ref. address Unit No. Identify unit Check button Input display: Cur. Address Check Manual vane angle Select:...
- Page 27 3D i-See sensor Air distribution Manual vane angle Energy saving option Ref. address Seasonal airflow Unit No. Setting display: Identify unit Check button Cursor Input display: Cur. Address Check Manual vane angle Ref. address Unit No. Air distribution Ref. address Function setting for unit Unit No.
- Page 28 Direct/Indirect setting Energy saving option No occupancy energy save : Direct : Indirect Cooling/Heating : Indirect : Direct Select: Select: Angle Outlet Energy saving option Room occupancy energy save Cooling/Heating Select: Energy saving option No occupancy Auto-OFF min. Select: Energy saving option Time No occupancy energy save Room occupancy energy save...
- Page 29 Seasonal airflow Seasonal airflow Cooling/Heating Select: < > < > < > BH79A366H01_RU.indd 190 2017-11-27 16:38:47...
- Page 30 Room Cool Set temp. Mode Temp. Main Main menu Restriction Energy saving Night setback Filter information Error information Main display: Cursor Page Filter information Please clean the filter. Press Reset button after filter cleaning. Main menu: Reset Filter information Reset filter sign? Cancel ■...
- Page 31 ■ ■ ■ ■ ■ - ■ ■ - ■ - ■ ■ ■ ■ ■ ■ ■ ■ ■ ■ - ■ BH79A366H01_RU.indd 192 2017-11-27 16:38:50...
- Page 32 ■ ■ ■ ■ ■ ■ ■ ■ - ■ ■ ■ ■ ■ - ■ ■ ■ ■ ■ - ■ BH79A366H01_RU.indd 193 2017-11-27 16:38:50...
- Page 33 24 - 26 - 28 25 - 28 - 31 25 - 30 - 34 27 - 34 - 39 32 - 40 - 43 BH79A366H01_RU.indd 194 2017-11-27 16:38:50...
- Page 34 MITSUBISHI ELECTRIC CONSUMER PRODUCTS (THAILAND) CO., LTD. AMATA NAKORN INDUSTRIAL ESTATE 700/406 MOO 7, TAMBON DON HUA ROH, AMPHUR MUANG, CHONBURI 20000, THAILAND MITSUBISHI ELECTRIC, SLZ-M15FA*, SLZ-M25FA*, SLZ-M35FA*, SLZ-M50FA*, SLZ-M60FA* * , , 1, 2, 3, Direktiver Direktiv Direttive Direktiver...
- Page 35 ma original. CAUTION CUIDADO burns or frostbite. Engelsk er originalen. De andre sprogversioner er oversættelser af originalen. setzt. VORSICHT FORSIGTIG forbrænding eller forfrysning. Vibration zu vermeiden. L’anglais est l’original. Les versions fournies dans d’autres langues sont des tra ginalet. PRECAUTION FÖRSIKTIGHET eller köldskador.
- Page 36 The serial number is indicated on the SPEC NAME PLATE. BH79A366H01_cover.indd 4 9/21/2017 3:25:16 PM...
- Page 37 HEAD OFFICE: TOKYO BUILDING, 2-7-3, MARUNOUCHI, CHIYODA-KU, TOKYO 100-8310, JAPAN Printed in Thailand BH79A366H01_cover.indd 5 9/21/2017 3:25:16 PM...