
Related Manuals for Datavideo TP-600


Summary of Contents for Datavideo TP-600
- Page 1 Prompter Kit for ENG Cameras TP-600 Instruction Manual WWW.DATAVIDEO.COM Rev Date: 05/11/2013 P/N: TP-600_E2...
-
Page 2: Table Of Contents
Further advice on the content of this manual or on the product can be obtained by contacting your local Datavideo Office or... -
Page 3: Warnings And Precautions
This product should only be operated from the type of power source indicated on the marking label of the AC adapter. If you are not sure of the type of power available, consult your Datavideo dealer or your local power company. -
Page 4: Warranty
Certain parts with limited lifetime expectancy such as LCD Panels, DVD Drives, Hard Drives are only covered for the first 10,000 hours, or 1 year (whichever comes first). Any second year warranty claims must be made to your local Datavideo office or one of its authorized Distributors before the extended warranty expires. -
Page 5: Packing List
1 set Retail carton with protective foam packing NOTE: Depending on your order, your TP-600 kit could have been supplied with one of the following optional remote controls: WR-100, Wired remote for Android™ or iOS™ devices with a headset jack input. -
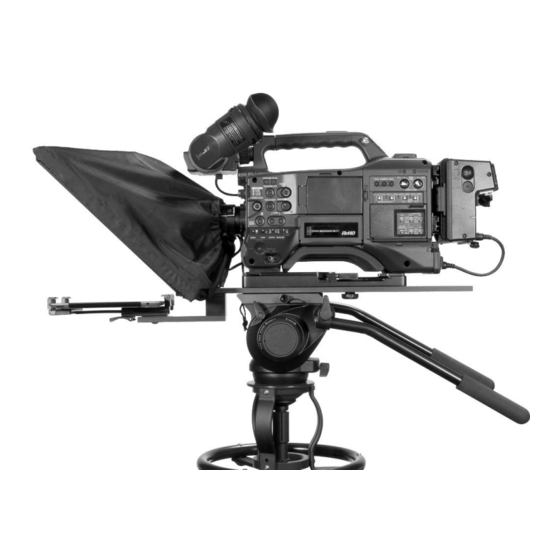
Page 6: Product Overview
(not supplied) into a low cost and effective prompter. The Datavideo Prompter Kit TP-600 can be used in either a theatre setting, or a video studio. Prepared scripts or cue sheets can be easily copied and pasted into the DV prompter app software from email and scrolled at a set automatic rate or controlled by a user with the wired/wireless remote for a more natural result. -
Page 7: Assembly
1. Attach/screw the tripod’s own quick release plate to the screw holes on the base of the TP-600 ENG Prompter rail, item A. The long slot will be to the rear of the camera position and the four holes in the rail will be towards the lens of the camera. - Page 8 8. Fit the adjustable mounting bracket with locking lever, item F, to the lower prompter rail item B. Use the mounting hooks in item B and the holes in the bottom of item F for marrying item F to B. 9. Decide if you need to use the TP-600 ENG camera riser block or not.
- Page 9 10. Secure the ENG tripod adapter plate (not supplied) and riser block item N (if required) to the prompter rail item A using two of the riser screws provided, items L or M. These screws go through the long slot on the riser block and prompter rail and into the base of the tripod adapter plate.
- Page 10 14. Pull the draw cord to secure the cloth Snood / Hood, item I, around the camera lens and to shut out light from the camera side. 15. Turn on the tablet being used, install and launch the DV Prompter software then prepare the prompting text to be used.
-
Page 11: Free Software Download From The App Store
Browse the section of the store that features apps designed specifically for these devices or tap on the Search bar at the top/bottom of the screen and type in Datavideo or DV Prompter. Then execute the search by tapping on the Search icon to the right. -
Page 12: Dv Prompter - User Interface - Ipad
DV Prompter - User Interface - iPad When the DV Prompter App opens the script on a black background is the document selected for use. To select a different script simply tap on it or choose the + button to add a new script document. App Settings Button This button opens the Settings Menu as shown on the following page. -
Page 13: Dv Prompter Application Set Up
Apple VGA/Composite adaptor cable. This cable can be purchased from the Apple store and is not supplied by Datavideo. The Border setting is used to bring the text displayed in from the edges of the display. This can be useful where the talent is not in line with the centre of the reading area or where the prompter is angled slightly up or down. - Page 14 Start Settings You can set the prompter up to automatically start scrolling text or you can delay the beginning of the text scroll process by up to 10 seconds. If a delay is set then a countdown animation will be shown before the script starts moving. Remote Settings Here you can choose to use no remote [none], an optional wired remote or an optional Bluetooth remote.
-
Page 15: How To Quickly Add Text Into A Dv Prompter Document
How to quickly add text into a DV Prompter document The prompting script, or presenters’ text, will probably exist as a text document from the planning stage of the production. By copying and pasting this script text from the original document into the text body of an email it can then be quickly sent to the email client on the smart phone or tablet. -
Page 16: Using The Optional Wired Remote Control
Using the optional Wired remote control Wired remote for Android™ or iOS™ devices with a headset jack input. The remote plugs into the headset jack on the smart phone. Ensure the remote jack has a good connection with the phone socket. How to set up the App for the wired remote control 1. -
Page 17: Using The Optional Bluetooth Remote Control
Using the optional Bluetooth remote control This remote is designed for use with Android™ and iOS/apple™ devices. How to charge the Bluetooth remote control It is always best to charge the remote for at least one hour and thirty minutes before a prompting session. -
Page 18: How To Use The Bluetooth Remote Control
How to use the Bluetooth remote control 1. First pair the remote with the device – see How to pair the Bluetooth remote section. 2. Open the DV Prompter app on the cell phone or tablet device and go in to Settings. 3. - Page 19 Bluetooth and Wired modes The Bluetooth remote can be used as a wire free Bluetooth remote and alternatively it can also be used as a wired remote too. One of the two cables supplied with the Bluetooth remote has a 3.5mm stereo headset jack connector on one end.
-
Page 20: Frequently Asked Questions
Frequently Asked Questions Q: My Bluetooth remote does not seem to be charging and the LED does not light at all when connected to my computer. Is there something I am doing wrong? The LED light on the remote should flash red whilst charging with a computer. Ensure the computer is switched on during the charging process. -
Page 21: How To Reset The Bluetooth Remote Control
Datavideo recommend cleaning the glass regularly to remove dust and finger print marks. This will ensure the best image quality is recorded when the camera is looking through the glass. -
Page 22: Optional Hc-600 Hard Case
The foam packaging of the TP-600 kit has been designed so that customers who buy the optional hard case can simply lift the foam out from the retail carton of the TP-600 and insert it directly into the optional HC-600 hard case. -
Page 23: Tp-600 Specifications
TP-600 Specifications Prompter Size (Max) Width: 415 mm (16.34 inches) Height: 290 mm (11.42 inches) Length: 750 mm (29.53 inches) Expandable Mounting Bracket Sizes: 105 mm (Minimum tablet width) 198 mm (Maximum tablet width) Nett Weight: Kit: 3.1 Kg (6.84 lbs) -
Page 24: Service And Support
It is our goal to make your products ownership a satisfying experience. Our support staff are available to assist you in setting up and operating your system. Please refer to our web site www.datavideo.com for answers to common questions, support requests or contact your local office below.