Table of Contents
Advertisement
Quick Links
Advertisement
Table of Contents

Related Manuals for Datavideo TP-150


Summary of Contents for Datavideo TP-150
- Page 1 TELEPROMPTER SYSTEM DEDICATED TO PTZ CAMERAS TP-150 Instruction manual...
-
Page 2: Table Of Contents
Contents FCC COMPLIANCE STATEMENT ........................4 WARNINGS AND PRECAUTIONS ........................4 WARRANTY ..............................5 ............................. 5 TANDARD ARRANTY ............................5 HREE ARRANTY DISPOSAL ................................. 5 PACKING LIST ..............................6 PRODUCT OVERVIEW ............................7 ................................7 EATURES ............................7 ORMAL RIPOD NORMAL TRIPOD ASSEMBLY ........................... - Page 3 Further advice on the content of this manual or on the product can be obtained by contacting your local Datavideo Office or...
-
Page 4: Fcc Compliance Statement
7. This product should only be operated from the type of power source indicated on the marking label of the AC adapter. If you are not sure of the type of power available, consult your Datavideo dealer or your local power company. -
Page 5: Warranty
The product warranty period begins on the purchase date. If the purchase date is unknown, the product warranty period begins on the thirtieth day after shipment from a Datavideo office. All non-Datavideo manufactured products (product without Datavideo logo) have only one year warranty from the date of purchase. -
Page 6: Packing List
Packing List Item Description Quantity Horizontal Plate A Secure the base of the camera to this plate using item B Screw B – 1/4” screw length 18mm Used to secure the base of the camera to item A. Metal 3/8" to 1/4" adaptor screw This item screws into one of the larger 3/8 holes on the bottom of the prompter frame to make it compatible with a standard 1/4"... -
Page 7: Product Overview
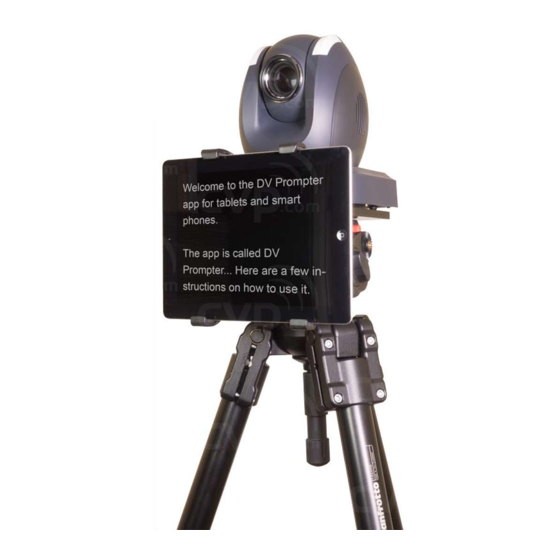
Product Overview TP-150 is the world’s first teleprompter system dedicated to PTZ cameras. It allows the presenter to read and control scripts in multiple languages. The kit includes a mount that securely holds an Android or iOS tablet device below the PTZ camera head. -
Page 8: Normal Tripod Assembly
Normal tripod assembly 1. Secure the PTZ camera to the TP-150 horizontal plate, item A, using the mounting hole(s) in item A and the long countersunk 1/4” screw, item Ensure both the cut out of item A and PTZ camera lens will be facing toward the position of the on screen talent / subject. -
Page 9: Free Software Download From The App Store
Free Software Download from the App Store™ Ensure your tablet has internet access via your cellular service provider or a secure wireless connection. Tap the App Store™ icon on the device Home Screen to download apps wherever you are. Browse the section of the store that features apps designed specifically for these devices or tap on the Search Bar at the top/bottom of the screen and type in dv Prompter Plus. -
Page 10: Optional Bluetooth Teleprompter Remote Control
Optional Bluetooth Teleprompter Remote Control This WR-500 remote control is designed to be used with Datavideo’s teleprompter products, DV Prompter and DVP-100. DV Prompter Plus app is a FREE download from the Apple app store for iOS devices and also from Google Play for Android devices. - Page 11 Select and start the required script within the DV Prompter Plus app. To switch the remote into Bluetooth pairing mode press and hold the centre Play / Pause button for 3 to 4 seconds. GREEN LED will now blink on / off repeatedly to indicate it is ready to pair with a Bluetooth device.
-
Page 12: Control Buttons
Control Buttons Whilst Whilst Button scrolling text text paused Speed up text scroll Next Break Marker Slow down text scroll Previous Break Marker Pause text Play text Reduce font size Load previous script Increase font size Load next script LED Indicators RED LED Wired Mode GREEN LED... - Page 13 CR2032 Battery A CR2032 button battery is installed inside this remote. The original battery supplied (when new) is expected to last for 3 years under average / normal use. This button battery can be replaced by the user when it dies. Please remove the back case cover carefully to avoid user damage to the PCB or case.
-
Page 14: Dvprompter Plus App Qsg-Document Screen
dvPrompter Plus App QSG-Document Screen When you first launch the app, you will see the screen below. The menu bar in the top left-hand corner provides access to the various settings menus. -
Page 15: Dvprompter Plus App Qsg-Creating And Editing Scripts
dvPrompter Plus App QSG-Creating and Editing Scripts On the device To create a new script on the device simply tap the ‘+’ button, enter a title and then enter the script body into the rich text editor. The script will be saved automatically when you close the rich text editor by taping the blue ‘X’. -
Page 16: Via The Web Interface (Requires Webui In-App Purchase)
Via the web interface (Requires webui In-app purchase) Please see the ‘Network’ section of this guide to understand how to access the remote control webui of the app. To create a new script on the device simply tap the ‘+’ button, enter a title and then enter the script body into the rich text editor. -
Page 17: Playlists (Requires Webui In-App Purchase)
Playlists (Requires webui In-app purchase) Adding a script to the playlist Checking the ‘In Playlist’ option when creating or editing a script via the webui will allow the app to automatically load the next script in the list, it also allows you to quickly jump between scripts using the hardware remote control (see the control section of this guide for more information). -
Page 18: Dvprompter Plus App Qsg-Control
dvPrompter Plus App QSG-Control Via the device (on screen) Tapping the screen when a scrip is loaded will display the menu bar shown below. A: Decrease text size when scrolling / jump to previous script in playlist when paused B: Start / Pause scrolling C: Start / Pause scrolling D: Increase text size when scrolling / jump to next script in playlist when paused E: Unload script and return to documents screen... -
Page 19: Via The Web Interface (Requires Webui In-App Purchase)
Via the web interface (Requires webui In-app purchase) Please see the ‘Network’ section of this guide to understand how to access the remote control webui of the app. The network control interface is shown below. A: Decrease text size when scrolling / jump to previous script in playlist when paused B: Start / Pause scrolling C: Start / Pause scrolling D: Increase text size when scrolling / jump to next script in playlist when paused... -
Page 20: Using The Wr-500
Using the WR-500 Wired mode When first removed from the retail package the WR-500 remote is already in wired mode. When a button is pressed a RED LED will flash. The WR-500 can be switched to Bluetooth mode if required. In wired mode, the remote needs to be physically cabled to the tablet it is controlling. -
Page 21: Dvprompter Plus App Qsg-Menu Bar
dvPrompter Plus App QSG-Menu Bar Tapping the menu bar (found in the top left-hand corner of the documents screen will display the menu shown below, you will see three options: Home – Return to the documents screen Settings – Display all app settings Network –... -
Page 22: Dvprompter Plus App Qsg-Settings
dvPrompter Plus App QSG-Settings... - Page 23 Slave Mode: When enabled the device will act as a slave screen to another dvPrompter app, please see the 'Synchronising multiple devices' section for more information. Default font: Select the default font used by the editor (this can be overridden on a per script basis using the editor).
- Page 24 Remote control: The optional Datavideo WR-500 controller can be used to control the script, please select either Bluetooth or wired mode.
-
Page 25: Dvprompter Plus App Qsg-Network(Requires Webui In-App Purchase)
dvPrompter Plus App QSG-Network(Requires webui In-app purchase) If your device is connected to a Wi-Fi or Ethernet network you can fully control the app over the network, simply enter the webui address into the web browser of another device on the same network. -
Page 27: Dvprompter Plus App Qsg- Synchronising Multiple Devices (Requires Webui In-App Purchase)
dvPrompter Plus App QSG- Synchronising Multiple Devices (Requires webui In-app purchase) The feature allows you to synchronise the scrolling text on two or more devices via a WiFi or Ethernet network. Requirements The master device must have the webui unlocked via the in-app purchase. ... - Page 28 3. Tap home on the menu bar, you will see the screen below while the slave establishes a connection to the master. 4. Once connected the screen will turn white then black, the slave will now mirror the master. To exit slave mode tap the screen then press the blue exit button, the app will close.
-
Page 29: Dvprompter Plus App Qsg-Connecting An External Display
dvPrompter Plus App QSG-Connecting an External Display You can connect an external display using HDMI (via an appropriate HDMI adapter for your device) or using wireless screen mirroring such as Airplay and Mirror-cast. External Display Setting Disabled In this mode the external display will mirror the devices screen. External Display Setting Enabled In this mode the text will only scroll on the external display leaving the device screen free for script control and editing. -
Page 30: Frequently Asked Questions
Frequently Asked Questions Q: My Bluetooth remote (WR-500) does not seem to be charging and the LED does not light at all when connected to my computer. Is there something I am doing wrong? The LED light on the remote should flash red whilst charging with a computer. Ensure the computer is switched on during the charging process. -
Page 31: Specifications
Specifications Prompter Size Width: 150 mm (5.90 inches) Height: 225 mm (8.86 inches) Depth: 200 mm (7.88 inches) Expandable Mounting Bracket Sizes: 145 mm (5.70 inches) Min tablet width 265 mm (10.43 inches) Max tablet width Nett Weight: Kit: 0.78 Kg (1.72 lbs) Packed weight: (Gross) Kit: 1.9 Kg (4.18 lbs) -
Page 32: Service And Support
Nov-09.2020 Datavideo Technologies Co., Ltd. All rights reserved 2020 Version E6...