
Related Manuals for Uniden XDECT SSE47 Series


Summary of Contents for Uniden XDECT SSE47 Series
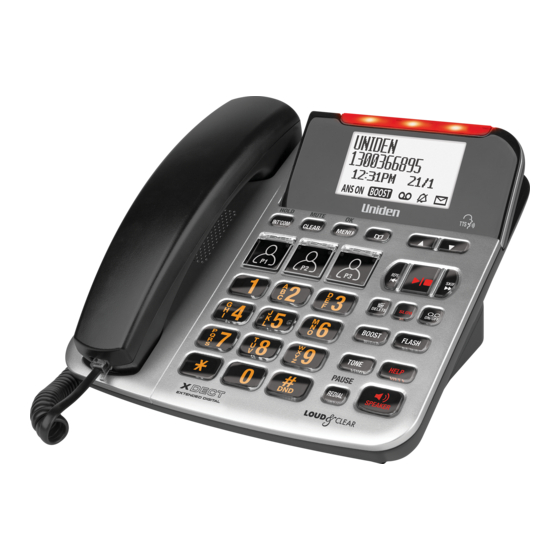
- Page 1 XDECT SSE47 Series For more exciting new products please visit our website: Australia: www.uniden.com.au...
- Page 2 IMPORTANT SAFETY INSTRUCTIONS When using your telephone equipment, basic safety precautions should always be followed to reduce the risk of fire, electric shock and injury to persons, including the following: • This unit is NOT waterproof. DO NOT expose this unit to moisture. •...
- Page 3 Rechargeable Battery Belt Clip Pack (BT-694, BT-694s or SSE07 accessory BT-694n) handset and charger • If any item is missing or damaged, contact your place of purchase immediately. Never use damaged products! • Need help? Get answers at our website: www.uniden.com.au...
-
Page 4: Table Of Contents
CONTENTS INSTALLING YOUR PHONE ................6 Power Backup (Battery Installation) ..................... 8 GETTING TO KNOW YOUR PHONE ..............10 Parts of the Base ............................10 Parts of the Handset ..........................12 USING THE MENUS ................... 1 5 Messages Menu ............................15 Recent Calls Menu ..........................16 Intercom Menu ............................16 Base Setup/Handset Menu ........................16 Date &... - Page 5 Getting Your Messages .........................34 Screening Your Calls ..........................34 Using the System While You’re Away from Home .................35 REMINDER SETUP ....................36 Reminder Messages ..........................36 IMPORTANT INFORMATION ................37 Solving Problems .............................37 Resetting Base/Handset ........................39 Registering a Handset ...........................39 Adaptor and Battery Information .......................40 INDEX ........................41 ONE-YEAR LIMITED WARRANTY ..............42...
-
Page 6: Installing Your Phone
INSTALLING YOUR PHONE Your telephone base is ready for desktop use from the factory. If you want to mount your telephone on a wall, follow the guide on page 6. For Desktop Use 1. Connect the base AC adaptor to the power jack and the telephone cord to the TEL LINE jack. - Page 7 3. Connect the base AC adaptor to the power jack and the telephone cord to the TEL LINE jack. Route the cords as shown below: AC Adaptor TEL Line 4. Plug the AC adaptor into a standard 240V AC power outlet, and connect the telephone cord to a standard telephone wall jack.
-
Page 8: Power Backup (Battery Installation)
Select the Country Select Country menu appears the first time you power on the SSE47 base. Select the country where you will use the phone. 1. Use VOL UP or DOWN to highlight Australia or New Zealand, then press MENU/OK. 2. - Page 9 Set Up the Accessory Handset(s) Install and Charge the battery 1. Unpack all handsets, battery packs, and battery covers. If you need to remove a cover, press in on the notch and slide the cover down and off. 2. Line up the battery connector with the jack inside the handset;...
-
Page 10: Getting To Know Your Phone
GETTING TO KNOW YOUR PHONE Parts of the Base Front View Handset clip Hook switch LCD Display Visual ringer PHONEBOOK MENU/OK CLEAR/ MUTE UP/DOWN INTERCOM/ HOLD Speaker Visual ringer switch (on side) PICTURE Answering KEYS system controls - REPEAT - PLAY/STOP - SKIP - DELETE - SLOW... - Page 11 • In standby: increase/decrease the ringer volume UP/DOWN • During a call or while a message is playing: increase/ decrease the volume. • In any menu or list: move the cursor up/down one line Speed Dial Keys - Picture Key 1, Picture Key 2, Picture Key 3 PICTURE KEY •...
-
Page 12: Parts Of The Handset
Parts of the Handset Visual ringer Charge LED Earpiece Display HEADSET JACK TONE BOOST PHONEBOOK SLOW SPEAKER MENU/OK END/CLEAR TALK/FLASH VOLUME Twelve-key dial pad #/DND REDIAL/PAUSE ANSWER ON/OFF MUTE/DELETE Charging Microphone contacts # Visual Ringer: Flashes to indicate an incoming call. Flashes to indicate a message in the unit’s answering system. - Page 13 Key Icon What it does During a call: adjust the audio tone (see page 37). TONE • In standby: open the menu. MENU/OK • In any menu or list: select the highlighted item. Press to display the phonebook menu options. PHONEBOOK •...
- Page 14 Reading the Display On the Handset On the Base Status icons Current call info 1300366895 Current Date and call info time 1300366895 Status Status icons Info Icon What it means ANS ON Answering system status. The volume of the earpiece is boosted (see page 28). Telephone Answering Device (TAD) or Answering System is on.
-
Page 15: Using The Menus
USING THE MENUS Your phone displays different menus depending on whether you are on-hook or off- hook. Off-hook menus are Hold/Transfer, Recent Calls, and Call Privacy. Hold/Transfer and Call Privacy are unique to off-hook menus but Recent Calls is common to both off- hook and on-hook menus To open the menu, press on the... -
Page 16: Recent Calls Menu
Recent Calls Menu The Recent Calls menu lets you view the Caller ID list (up to 50) or the Redial list, a list of the last 10 calls made from that handset. Intercom Menu The Intercom feature allows 2-way communication between BASE-HAND or HAND- HAND. -
Page 17: Date & Time Menu
Factory Reset Reset all data to factory settings. (Base Only) (All stored data will be deleted in this case.) Answering Setup Menu Refer to page 32 for details on setting up your answering system. Reminder Setup Menu Refer to page 36 for details on setting up your reminder system. Date &... -
Page 18: Entering Text On Your Phone
Call Blocking Menu See page 27 for a detailed description of the Call Blocking feature. Register Accy. Menu Register any additional accessories (See page 39 for details). Entering Text on Your Phone Use the 12-key dial pad anytime you want to enter text into your phone (a name in the phonebook, the handset banner, etc.). -
Page 19: Using Your Phone
USING YOUR PHONE To... From the base From a cordless handset Corded Speaker Earpiece Speaker Handset make a Pick up the Press Press Press SPEAKER. call, dial the handset. SPEAKER. TALK/FLASH. number, then answer a call Pick up the Press Press Press SPEAKER. -
Page 20: Using Caller Id And Call Waiting
Using Caller ID and Call Waiting Caller ID (CID) is a service available from your telephone provider that shows the phone number (and sometimes the caller’s name) of the incoming calls; if you turned on Text- To-Speech, it also announces the name. Contact your telephone provider for more information. - Page 21 Using Call Waiting If you get a Call Waiting call, the phone sounds a tone and displays any CID information received for the waiting call. For Australia Press TALK/FLASH on the handset or (FLASH on the base) and then press 2 to accept the waiting call.
-
Page 22: Using The Phonebook
Using the Phonebook The base can store up to 200 entries in its phonebook. All handsets share the same phonebook, so only one handset can access it at a time. To... Press... open/close the phonebook Press PHONEBOOK scroll through the entries Press PHONEBOOK and then select either Home or Speed Dial. -
Page 23: Speed Dial/3 Picture Keys
Speed Dial/3 Picture Keys You can assign a name from phonebook to each dial keys from 0 to 9 on the base and the cordless handset. The base and the handset shares the same speed dial keys. When you assign names to dial keys 1 to 3 on the base unit or on the handset unit, they are also assigned to the base unit picture dial keys P1, P2 and P3 respectively. -
Page 24: Help Feature
HELP FEATURE Emergency Call Use the SSE 47 HELP feature to reach out to contacts of your choice in an emergency situation. Before you make the emergency call, you need to ensure that you have recorded an emergency message and updated the SOS contacts in your phonebook. Record Emergency Message You can record an emergency message on your SSE 47 base. -
Page 25: Make An Emergency Call
Make an Emergency Call 1. Press and hold HELP for 2 seconds to activate it. And after that? 2. The base will first dial out the first emergency number (stored in the SOS1 entry). a) As soon as the first emergency number is dialled, the pre-set emergency message will play, “This is an emergency call, to accept press the # key on your telephone now.”... -
Page 26: Using Special Features
2. Pressing SLOW again to return normal playback speed. # This feature is optimised to extend normal speech of a short nature - such as; “Welcome to Uniden” or “Please press 1”. # The extension feature is not applied when the caller’s speech is already slow, or the sentence spoken is long and continuous. -
Page 27: Call Blocking
Call Blocking If you subscribe to Caller ID, you can save phone numbers to the call block list. When a call comes in, the phone compares the received phone number to the numbers on the call block list. If the phone number is on the list, the phone replaces the caller’s name with Call Blocked and blocks the call. -
Page 28: Adjusting The Base Visual Ringer
Adjusting the Base Visual Ringer Visual Ringer The visual ringer blinks for the following conditions: • Incoming call - outside line • Incoming call - intercom or intercom hold You can change the brightness of the base visual ringer. The VISUAL RINGER switch is on the right-hand side of the base. -
Page 29: Using Multi-Handset Features
Using Multi-Handset Features # To use the features in this section, you need at least 1 cordless handset. Expanding Your Phone • Your base supports a total of 6 cordless handsets, including any that came with your phone. • You must register accessory handsets to the base before using them. Handsets that aren’t registered display a “not registered”... -
Page 30: Finding A Lost Handset
Intercom • Whenever the phone is in standby, you can make an intercom call between handsets without using the phone line. • You can make an intercom call between BASE-HAND or HAND-HAND. • If an outside call comes in during an intercom page, the phone cancels the page so you can answer the incoming call. -
Page 31: Using An Optional Headset
Using an Optional Headset You can use a standard telephone headset (2.5mm diameter jack) with your handsets. To purchase headsets, visit our website; www.uniden.com.au • To install a headset, remove the headset jack cover and insert the headset plug into the jack. -
Page 32: Using The Answering System
USING THE ANSWERING SYSTEM Answering System Options (Answering Setup) You can change the answering system options from any handset. Just open the menu and select Answering Setup. Menu Options What it does Enter a 2-digit PIN so you can access your answering Security Code system from any touch-tone phone (see page 35). -
Page 33: Recording Your Personal Greeting
Recording Your Personal Greeting Your personal outgoing message or greeting can be between 2 seconds and 30 seconds long. If you don’t want to record a greeting, the system uses the pre-recorded greeting: Hello, no one is available to take your call. Please leave a message after the tone. -
Page 34: Getting Your Messages
Getting Your Messages You can play back your messages from the base or from a cordless handset. To.. From the Base From the Handset Press PLAY/STOP. Select Messages/Play Messages from the Main menu. play new messages The system announces the number of new and old messages, then plays each new message (followed by the day and time if set) in the order it was received. -
Page 35: Using The System While You're Away From Home
mute the call screen Press CLEAR/MUTE. Press END/CLEAR or return the without answering handset to the cradle. If you mute the call screen, the system continues taking the message: it just stops playing through the speaker. Using the System While You’re Away from Home You can also operate your answering system from any touch-tone phone. -
Page 36: Reminder Setup
REMINDER SETUP Reminder Messages You can record messages and set reminders to them. After you record a message, set the date and time, and the base will playback the recorded message at the set time. You can set up to three reminder messages. You can set reminders once (one-off) or on a daily/weekly basis. -
Page 37: Important Information
IMPORTANT INFORMATION Solving Problems If you have any trouble with your phone, check this section first. If you need help, visit the customer support page of our website listed on the front cover. General Problems Possible Solutions • Check the telephone cord connection. No handsets can make or receive calls. - Page 38 Caller ID Problems Possible Solutions • Let calls ring twice before answering. Caller ID information does not display. • Make sure your Caller ID service is active. • You may have to change the line mode. Caller ID displays briefly and then clears.
-
Page 39: Resetting Base/Handset
Installing a Line Filter or DSL Filter A telephone line filter or DSL filter prevents services that use the phone line from causing interference on your phone. To get a line filter, contact your service provider or look in an electronics store. Plug the filter into the telephone wall jack and plug the base into the filter. -
Page 40: Adaptor And Battery Information
• Do not charge the batteries in any charger other than the one specified in the owner’s manual. Using another charger may damage the battery or cause it to explode. Rechargeable batteries must be recycled or disposed of properly. Uniden works to reduce lead content in our products and accessories. -
Page 41: Index
INDEX Answer Machine 32 Multihandset Feature 29 Any Key Answer 16 Mute 13 Auto Talk 16 Noise 37 Banner 16 Battery 40 Boost 28 Paging Handsets 30 Personal Ring 16 Phonebook 22 Call Block 27 Privacy Mode 29 Caller ID 20 Call Transfer 29 Call Waiting 21 Register the handset 39... -
Page 42: One-Year Limited Warranty
Product first purchased either in Australia or New Zealand and will expire one (1) year from the date of the original retail sale. If a warranty claim is made, this warranty will not apply if the Product is found by Uniden to be: (A) Damaged or not maintained in a reasonable manner or as recommended in the relevant Uniden Owner’s Manual;... - Page 43 (such as a legible copy of the sales docket) to Uniden. Please refer to the Uniden website for address details. You should contact Uniden regarding any compensation that may be payable for your expenses incurred in making a warranty claim.
- Page 44 ©2017 Uniden Australia Pty Ltd Printed in Vietnam U01UN646EZZ(0)