
Related Manuals for Uniden SSE34 Series


Summary of Contents for Uniden SSE34 Series
- Page 1 SSE34 Series For more exciting new products please visit our website: Australia: www.uniden.com.au...
-
Page 2: Important Safety Instructions
IMPORTANT SAFETY INSTRUCTIONS When using your telephone equipment, basic safety precautions should always be followed to reduce the risk of fire, electric shock and injury to persons, including the following: • This unit is NOT waterproof. DO NOT expose this unit to moisture. •... - Page 3 Handset Telephone Handset Cord Line Cord SSE34 base • If any item is missing or damaged, contact your place of purchase immediately. Never use damaged products! • Need help? Get answers at our website: www.uniden.com.au for Australian model...
-
Page 4: Table Of Contents
CONTENTS INSTALLING YOUR PHONE ................5 Connect the Telephone ......................5 Wall Mounting ..........................6 BASE LAYOUT ....................7 Front View ..........................7 Back View ........................... 8 Side View ............................ 8 BASIC FUNCTIONS ................... 9 Speakerphone ..........................9 Placing a Call ..........................9 Answering A Call ........................ -
Page 5: Installing Your Phone
INSTALLING YOUR PHONE Connecting the Telephone 1. Choose an area near a telephone wall jack (RJ11C), and place your cordless telephone on a level surface, such as a desktop or tabletop, or you may mount it on the wall. 2. Plug one end of the telephone line cord into the Line jack at the back of the base and the other end into a modular jack. -
Page 6: Wall Mounting
Wall Mounting To detach the desktop pedestal: 1. Rotate the hook 180°. 2. Plug one end of the straight telephone line cord into the jack on the bottom of the base. 3. Feed the line cord through the groove and plug the end into the modular telephone jack. -
Page 7: Base Layout
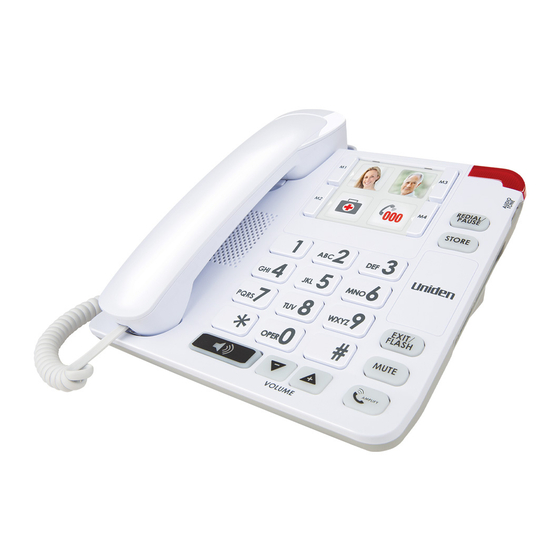
BASE LAYOUT FRONT VIEW M1/M2 M3//M4 memory buttons memory buttons AUDIO TONE CONTROL Hook REDIAL/PAUSE button STORE button # button EXIT/FLASH button * button MUTE button AMPLIFY button SPEAKER button VOLUME UP/DOWN buttons... -
Page 8: Back View
BACK VIEW LINE Jack AMPLIFY Override Switch SIDE VIEW RINGER VOL RINGER PITCH (HIGH/LOW/OFF) (HIGH/LOW) switch switch... -
Page 9: Basic Functions
BASIC FUNCTIONS Speakerphone For hands-free operation and convenience, this unit is equipped with a speakerphone. For best speakerphone performance, avoid the following: • Areas with high background noise. (The microphone might pick up these sounds and prevent the speakerphone from going into the receiving mode when you finish talking.) •... -
Page 10: Answering A Call
Answering a Call Handset 1. When the phone rings, pick up the handset. 2. When finished, hang up the handset. Speakerphone 1. When the phone rings, press the speaker button to answer a call. 2. When finished, press the speaker button to hang up. You may switch between the speakerphone and the handset during the dialing process or anytime during a conversation. -
Page 11: Audio Tone Control
Audio Tone Control The phone’s Audio Tone Control boosts the sound of the frequency range from 600Hz to 3KHz to compensate for the ear’s limited sensitivity in the range. 1. To turn on the Audio Tone Control, press the “amplify” button after you pick up the handset, or any time during the a call. -
Page 12: Memory
Memory Store as many as 4 numbers in memory for easy dialing. They can be stored the one-touch memory on the top of the Base unit. You can use the space provided to either write the name of your contacts or stick pictures for easy recognition. -
Page 13: Troubleshooting
TROUBLESHOOTING Problems Possible Solutions • No Dial Tone Check installation: Make sure the telephone line cord is connected to the base unit and the wall phone jack. • Check the hook switch. Make sure it fully extends when the handset is lifted from the cradle. •... -
Page 14: One-Year Limited Warranty
Please refer to our Uniden website for any details or warranty durations offered in addition to those contained below. Warrantor The warrantor is Uniden Australia Pty Limited ABN 58 001 865 498 (“Uniden Aust”). Terms of Warranty Uniden Aust warrants to the original retail purchaser only that the SSE34 (“the Product”), will be free from defects in materials and craftsmanship for... - Page 15 Product does not conform with this warranty, you should deliver the Product, together with satisfactory evidence of your original purchase (such as a legible copy of the sales docket) to Uniden. Please refer to the Uniden website for address details. You should contact Uniden regarding any compensation that may be payable for your expenses incurred in making a warranty claim.
- Page 16 ©2016 Uniden Australia Pty Ltd Printed in PRC...