Table of Contents
Advertisement
Quick Links
Download this manual
See also:
User Manual
Advertisement
Table of Contents

Related Manuals for Airlink101 AIC1620W


Summary of Contents for Airlink101 AIC1620W
- Page 1 Quick Installation Guide SkyIPCam1620W Wireless N MPEG4 3GPP Network Camera Model # AIC1620W Ver. 1A...
-
Page 2: Package Contents
Package Contents Wireless N MPEG4 3GPP Network Camera • AC Power Adapter • Antenna • Wall Mount Kit • GPIO & RS485 Adapter • Ethernet Cable (RJ-45 type) • Setup CD and Quick Installation Guide • System Requirement • Accessing the Camera using Web Browser - Supported Browsers: Microsoft®... -
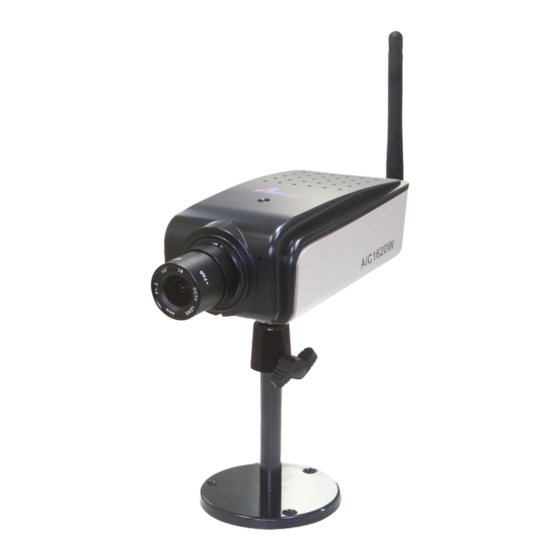
Page 3: Getting To Know Your Camera
Section 1 Getting to Know Your Camera Front and Top View Screw Hole* is used to attach the camera stand onto the camera by screwing the screw head of the camera stand into the screw hole of the camera. LED Indicators: Power (left, steady amber light) indicates the camera is powered Link (right, flashing green light) -
Page 4: Rear View
Rear View GPIO and RS485 is used to connect the external devices. Antenna Connector Ethernet Cable Connector connects the network cable, which supports the NWay protocol so that the camera can detect the network speed automatically. Audio I/O Connectors: Audio Out connects an external active speaker. -
Page 5: Hardware Installation
Section 2 Hardware Installation Step 2.1 Assemble and attach the provided wall mount kit to the camera. Step 2.2 Attach the included external antenna to the camera. Step 2.3 Connect one end of a network cable to the IP Camera and connect the other end to one of the LAN ports on your router or switch. -
Page 6: Installing Skyipcam Utility
Step 2.4 Power up the camera by connecting the supplied power adapter. Step 2.5 Please verify the LED status on the front panel and make sure the camera is on and ready to use now. Power LED: Solid Amber • Link LED: Flashing Green •... - Page 7 Step 3.2 Click on Install Utility and Software when the autorun menu pops up on the screen. Note: If you do not see the autorun menu pops up on the screen, please go to your CD-ROM drive > UltraView folder > run “Setup.exe”. Step 3.3 Click Install to install the utility.
-
Page 8: Configuring The Camera
Step 3.4 Click Finish when installation finishes. Section 4 Configuring the Camera Step 4.1 Open SkyIPCam Utility by double clicking on its icon on your desktop. Step 4.2 Click on Search to find the camera on your network. Select the Camera you wish to configure and click on Link. - Page 9 Note If the Camera you wish to configure does not show up in the utility, make sure the camera is properly connected to the same local network as your computer is, and the Green LED should be on. Click on Search to try again.
- Page 10 Step 4.4 The camera viewing window will appear. Click on Setup, then click on Smart Wizard. Step 4.5 Enter a name for your camera and a location (i.e. Room 1). Create a password and enter it to Admin Password and Confirm Password. This will change the admin password of the camera.
- Page 11 Step 4.6 You can specify a static IP address to this camera by selecting Static IP, and enter IP, Subnet Mask, Default Gateway, Primary/Secondary DNS addresses here. If you are not sure how to configure Static IP Setting, please select DHCP. Click Next.
- Page 12 Step 4.8 Enter the Network ID (SSID) of your wireless network, or click on Site Survey and select from the list. Select the Authentication and Encryption, and enter the security Key of your wireless network. This information is stored in your wireless AP/router. Click Next. Note You may contact the manufacturer of your wireless router/AP’s to find out its SSID and wireless security settings.
- Page 13 Step 4.9 Confirm your settings at this page. If everything is correct, click Apply to save the settings, then the camera will restart in 50 seconds. Step 4.10 After the camera is restarted, unplug the network cable from it. It will take around 1 or 2 minutes for the camera connecting to your wireless router/AP.
-
Page 14: Viewing Image
Section 5 Viewing Image Method A > Access Camera from SkyIPCam Utility Step 5.1A Open Airlink101 SkyIPCam Utility, select the camera you wish to connect to and click on Link button. Go to Step 5.3. Method B > Access Camera from Web Browser Step 5.1B If you assigned a static IP address for your camera (at Step 4.6), you may open the Web Browser on your computer. - Page 15 Step 5.3 Enter administrator’s username and password of the camera, then click OK. The default username and password are both “admin” if you did not make any change to it at Step 4.5. Step 5.4 Internet Explorer User: view image from the web configuration page, you will be prompted to install the ActiveX Control.
- Page 16 Step 5.5 Click on Run, then you will be able to view the image. Note If you are using Mozilla Firefox or Safari and you are not able to view any image, please make sure you have Java and Quick Time add-ons installed.
-
Page 17: Technical Support
Toll Free: 1-888-746-3238 Website: www.airlink101.com * AIC1620W supports most of the mobile devices, but compatibility with every mobile device is not guaranteed. ** Monitoring multiple cameras simultaneously demands high performance computer system. *** Theoretical maximum wireless signal rate derived from IEEE standard 802.11 specifications.