Table of Contents

Related Manuals for Stanley TIMERMAX DIGISLIM TM-262


Summary of Contents for Stanley TIMERMAX DIGISLIM TM-262
- Page 1 TIMERMAX DIGISLIM ™ QUICK START GUIDE GUÍA DE INICIO RÁPIDO GUIDE DE DÉMARRAGE RAPIDE Customer Service / Servicio al Cliente / Service à la clientèle 1-800-730-3707 • 10AM - 6PM, EST Monday to Friday / Lunes a Viernes / Lundi au vendredi Model/Modelo/Modele# TM-262...
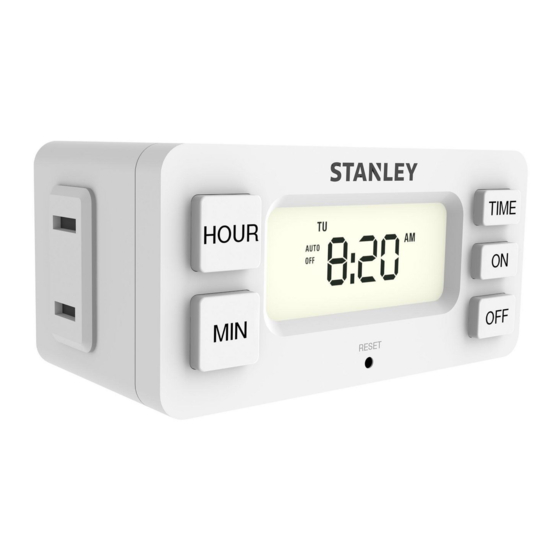
- Page 2 OPERATING INSTRUCTIONS MODO DE OPERACIÓN MODE D’OPÉRATION To set to the current time: Press and hold the TIME button, then press the HOUR button until it shows the current hour. Note the small A or P for AM and PM. Still holding the TIME button, press the MIN button to set the current minute.
- Page 3 To set the time at which your lamp will TIME HOUR turn ON: While holding the ON button down, RESET press HOUR until the desired “on” hour is displayed (noting AM or PM) To set the “on” minute, hold ON and press MINUTE until the desired “on”...
- Page 4 en marche, tenez la touche ON (en marche) enfoncée et appuyez sur la touche MINUTE jusqu’à ce que les minutes de l’heure désirée de mise en marche en cours s’affichent. l’affichage indiquera “ON (en marche) 6:30 PM”). La minuterie affichera l’heure en cours lorsque la touche ON est relâchée.
- Page 5 Pour régler l’heure à laquelle la lampe s’éteindra: En tenant la touche OFF (arrêt) enfoncée, appuyez sur la touche HOUR (heure) jusqu’à ce que l’heure désirée d’arrêt s’affiche (notez bien AM matin ou PM soir). Pour régler les minutes de l’heure d’arrêt, tenez la touche OFF enfoncée, appuyez sur la touche MINUTE jusqu’à...
-
Page 6: Manual Override
Manual Override • Press the TIME and ON buttons for continuously ON. • Press the TIME and ON buttons again to return to AUTO mode. • Press the TIME and OFF buttons for continuously OFF. • Press the TIME and OFF buttons again to return to AUTO mode. - Page 7 Set Vacation Security Press the ON and OFF buttons simultaneously for Security Mode. If SEC is displayed on the right side of the screen, the timer will turn on and off randomly throughout the day. Press the ON and OFF buttons again to disable Security Mode.
-
Page 8: Specifications
SPECIFICATIONS 1 polarized outlet Rated: 120VAC/60Hz/15A/1800W Resistive 5A/600W Tungsten 500W Electronic Ballast Battery: 1.5v LR1130 ESPECIFICACIONES 1 enchufe polárizado Clasificado: 120VAC/60Hz/15A/1800W Resistiva 5A/600W Tungsteno 500W Balasto Eléctronico Batería: 1.5v LR 1130 CARACTÉRISTIQUES 1 prise polarisée Calibré à: 120VAC/60Hz/15A/1800W Resistif 5A/600W Tungstène 500W Ballast Électronique Pile: 1.5v LR 1130... - Page 9 What this timer does: Your timer can be programmed to turn a lamp or other electric device on and off automatically, once per day.Before using the timer, make sure that the lamp works by plugging it into the wall outlet. While the lamp is on, unplug it from the wall. Plug the lamp into the timer and plug the timer into the wall.
-
Page 10: Battery Replacement
Battery Replacement • To remove drained battery, use straight head screw driver and pry out the battery holder from timer housing. Remove battery from battery holder. • Insert fresh LR1130 battery into battery holder. Make sure to correctly position the + positive side of the battery into the holder, by matching up the + plus sign on the battery to the + plus sign in a small circle on the battery holder. -
Page 11: Reemplazo De Batería
Reemplazo de Batería • Para retirar la batería drenada, utilice un destornillador cabeza recta y levante el soporte de la batería de la caja del temporizador. Extraiga la batería del compartimiento de la batería. • Inserte la nueva batería de reemplazo LR1130 en el soporte de la batería. - Page 12 WARNING THIS DEVICE COMPLIES WITH PART 15 OF THE FCC RULES. OPERATION IS SUBJECT TO THE FOLLOWING TWO CONDITIONS: (1) THIS DEVICE MAY NOT CAUSE HARMFUL INTERFERENCE, AND (2) THIS DEVICE MUST ACCEPT ANY INTER- FERENCE RECEIVED, INCLUDING INTERFERENCE THAT MAY CAUSE UNDESIRED OPERATION. ADVERTENCIA ESTE DISPOSITIVO COMPLETA CON LA PARTE 15 DE LAS NORMAS FCC.
- Page 13 THREE YEAR LIMITED WARRANTY: IF WITHIN THE FIRST YEAR FROM DATE OF PURCHASE, THIS UNIT FAILS DUE TO A DEFECT, EXCHANGE WHERE PURCHASED, OR SHIP IT PREPAID WITH PROOF OF PURCHASE TO THE NCC, 1840 MCDONALD AVENUE BROOKLYN, NY 11223. UNITS THAT FAIL TO OPERATE DURING THE SECOND OR THIRD YEAR FROM DATE OF PURCHASE MUST BE SHIPPED PREPAID WITH PROOF OF PURCHASE TO THE NCC.
- Page 14 38424 / 31250 / W31250 / 31251 / 56470 / 56471 STANLEY® and the STANLEY® logo are registered trademarks of Stanley Black & Decker, Inc., or one of its affiliates, and are used under license. STANLEY® y el STANLEY® logo son marcas registradas de Stanley Black &...