
Related Manuals for ZyXEL Communications XGS1250-12


Summary of Contents for ZyXEL Communications XGS1250-12
- Page 1 User’s Guide XGS1210-12 / XGS1250-12 Default Login Details Version 1.00 Edition 1, 10/2020 Management IP Address http://192.168.1.3 Password 1234 Copyright © 2020 Zyxel Communications Corporation...
- Page 2 Related Documentation • Quick Start Guide The Quick Start Guide shows how to connect the Switch and access the Web Configurator. • More Information Go to support.zyxel.com to find other information on the Switch XGS1210-12 / XGS1250-12 User’s Guide...
-
Page 3: Document Conventions
Syntax Conventions • The XGS1210-12 and XGS1250-12 may be referred to as the “Switch” in this guide. • Product labels, screen names, field labels and field choices are all in bold font. • A right angle bracket ( > ) within a screen name denotes a mouse click. For example, QoS > Port- Based QoS means you first click QoS in the navigation panel, then the Port-Based QoS sub menu to get to that screen. -
Page 4: Table Of Contents
Tutorials ..............................33 Technical Reference ........................37 System ..............................38 Port ................................. 41 VLAN ..............................45 Link Aggregation ..........................48 Mirroring ..............................50 QoS ................................. 52 IGMP Snooping ............................. 56 Management ............................59 Troubleshooting ............................ 65 XGS1210-12 / XGS1250-12 User’s Guide... -
Page 5: Table Of Contents
3.1 Hardware Overview ........................17 3.2 Front Panel ............................17 3.3 Rear Panel ............................17 3.3.1 Power Connector ......................... 18 3.3.2 Smart Fan (for XGS1250-12) ....................18 3.4 LEDs ..............................19 Chapter 4 Web Configurator..........................21 XGS1210-12 / XGS1250-12 User’s Guide... - Page 6 8.1 Overview ............................41 8.1.1 What You Need to Know ..................... 41 8.2 Port Settings ............................. 42 Chapter 9 VLAN..............................45 9.1 Overview ............................45 9.1.1 What You Need to Know ..................... 45 9.2 VLAN Settings ..........................46 XGS1210-12 / XGS1250-12 User’s Guide...
- Page 7 Troubleshooting..........................65 15.1 Power, Hardware Connections, and LEDs ................. 65 15.2 Switch Access and Login ......................66 15.3 Switch Configuration ........................67 Appendix A Customer Support ....................... 68 Appendix B Legal Information ......................74 Index ..............................78 XGS1210-12 / XGS1250-12 User’s Guide...
-
Page 8: User's Guide
User’s Guide... -
Page 9: Getting To Know Your Switch
100/1000 Mbps / 2.5/5/10 Gbps Ethernet Ports – 10/100/1000 Mbps Ethernet Ports Multi-Gigabit Ethernet Up to 2.5 Gbps Up to 10 Gbps 1.2 Applications This section shows a few examples of using the Switch in various network environments. XGS1210-12 / XGS1250-12 User’s Guide... -
Page 10: Multi-Gigabit
Ethernet cable. You must use CAT 6A or better Ethernet cables to achieve 10 Gbps speeds. Figure 1 Multi-Gigabit Application (XGS1210-12) Figure 2 Multi-Gigabit Application (XGS1250-12) See the following table for the cables required and distance limitation to attain the corresponding speed. -
Page 11: Backbone Application
In this example the Switch connects different company departments (RD and Sales) to the corporate backbone. It can alleviate bandwidth contention and eliminate server and network bottlenecks. All users that need high bandwidth can connect to high-speed department servers via the Switch. Figure 4 Bridging Application XGS1210-12 / XGS1250-12 User’s Guide... -
Page 12: Vlan Application Example
• Change the password. Use a password that is not easy to guess and that consists of different types of characters, such as numbers and letters. • Write down the password and put it in a safe place. XGS1210-12 / XGS1250-12 User’s Guide... - Page 13 Switch to its factory default settings. If you backed up an earlier configuration file, you would not have to totally re-configure the Switch. You could simply restore your last configuration. XGS1210-12 / XGS1250-12 User’s Guide...
-
Page 14: Hardware Installation
2.2 Safety Precautions Please observe the following before using the Switch: • Do NOT stack Switches with fans (for XGS1250-12). • It is recommended to ask an authorized technician to attach the Switch on a desk or to the rack or wall. -
Page 15: Wall Mounting
Place the Switch so the wall mount holes line up with the screws. Slide the Switch down gently to fix it into place. Wall-mount the Switch with the Ethernet ports facing down and the ventilation holes on the side. Figure 7 Wall Mounting XGS1210-12 / XGS1250-12 User’s Guide... - Page 16 Chapter 2 Hardware Installation Figure 8 Screw Specifications (XGS1210-12) Figure 9 Screw Specifications (XGS1250-12) XGS1210-12 / XGS1250-12 User’s Guide...
-
Page 17: Hardware Panels
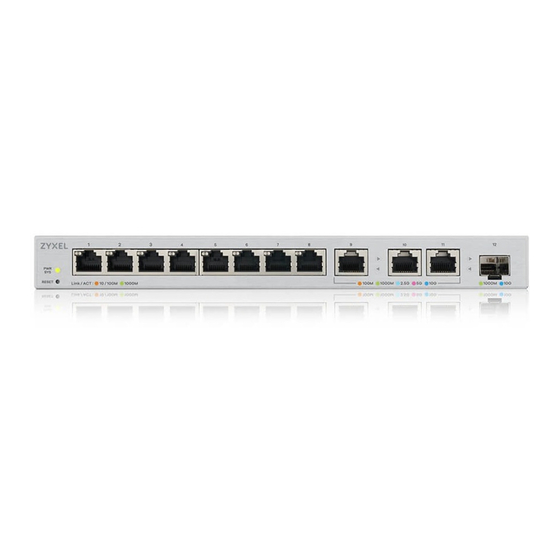
3.2 Front Panel The following figure shows the front panel of the Switch. Figure 10 Front Panel (XGS1210-12) Figure 11 Front Panel (XGS1250-12) 3.3 Rear Panel The following figure shows the rear panel of the Switch. Figure 12 Rear Panel (XGS1210-12) -
Page 18: Power Connector
Chapter 3 Hardware Panels Figure 13 Rear Panel (XGS1250-12) 3.3.1 Power Connector Note: Make sure you are using the correct power source as shown on the panel. To connect power to the Switch, insert the female end of the power cord to the AC power receptacle on the rear panel. -
Page 19: Leds
The port has a successful 1000 Mbps connection. Port 12 Blinking The Switch is transmitting data through the port. (Right LED) The port is disconnected or disabled. Table 6 LED Descriptions (XGS1250-12) COLOR STATUS DESCRIPTION PWR/SYS Green The Switch power is on. - Page 20 Chapter 3 Hardware Panels Table 6 LED Descriptions (XGS1250-12) (continued) COLOR STATUS DESCRIPTION Port 9 Blue The port has a successful 10 Gbps connection. (Left LED) Blinking The Switch is transmitting data through the port. Purple The port has a successful 5 Gbps connection.
-
Page 21: Web Configurator
("a – z", "A – Z", "0 – 9", ~!@#$%^&*()_+`–={}[]:;<>./\). The password must be 8 to 15 characters long. Retype it to confirm and click Apply to view the first Web Configurator screen. XGS1210-12 / XGS1250-12 User’s Guide... -
Page 22: Zyxel One Network (Zon) Utility
Note: To check for your Windows operating system version, right-click on My Computer > Properties. You should see this information in the General tab. Hardware Here are the minimum hardware requirements to use the ZON Utility on your computer. XGS1210-12 / XGS1250-12 User’s Guide... -
Page 23: Run The Zon Utility
If your device is not listed here, see the device release notes for ZON Utility support. The release notes are in the firmware zip file on the Zyxel web site. XGS1210-12 / XGS1250-12 User’s Guide... - Page 24 Select a network adapter to which your supported devices are connected. Figure 18 Network Adapter Click the Go button for the ZON Utility to discover all supported devices in your network. Figure 19 Discovery The ZON Utility screen shows the devices discovered. XGS1210-12 / XGS1250-12 User’s Guide...
- Page 25 7 Firmware Upgrade Use this icon to upgrade new firmware to selected devices of the same model. Make sure you have downloaded the firmware from the Zyxel website to your computer and unzipped it in advance. XGS1210-12 / XGS1250-12 User’s Guide...
-
Page 26: Web Configurator Layout
This field displays the hardware version of the discovered device. 4.4 Web Configurator Layout The System screen is the first screen that displays when you access the Web Configurator. The following figure shows the navigating components of the Web Configurator screen. XGS1210-12 / XGS1250-12 User’s Guide... - Page 27 Chapter 4 Web Configurator Figure 22 Web Configurator Layout A – Click the menu items to open the screen in the main window. B – Click this link to log out of the Web Configurator. XGS1210-12 / XGS1250-12 User’s Guide...
-
Page 28: Change Your Password
"A – Z", "0 – 9", ~!@#$%^&*()_+`–={}[]:;<>./\). The password must be 8 to 15 characters long. To change it, click Management to display the next screen to change your login password. Figure 23 Change Administrator Login Password XGS1210-12 / XGS1250-12 User’s Guide... -
Page 29: Switch Lockout/Resetting The Switch
Web Configurator. You have to log in with your password again after you log out. This is recommended after you finish a management session for security reasons. Note: You are automatically logged out of the Web Configurator after 5 minutes of inactivity. XGS1210-12 / XGS1250-12 User’s Guide... -
Page 30: Initial Setup Example
Figure 24 Change the IP Address Enter the new IP address 192.168.1.5 in the IP Address field. Click Apply. The following screen appears. Click OK to save the setting. Connection to the Web Configurator will be lost. XGS1210-12 / XGS1250-12 User’s Guide... -
Page 31: Change The Password
Enter the new system password in the New Password field using the keyboard characters (a – z, A – Z, 0 – 9, and ~!@#$%^&*()_+`–={}[]:;<>./\). The password must be 8 to 15 characters long. Enter the new password again to in the Confirm Password field for confirmation. XGS1210-12 / XGS1250-12 User’s Guide... - Page 32 Chapter 5 Initial Setup Example Click Apply. You will automatically be logged out of the Web Configurator. A Log in screen appears. Enter the new password and click SIGN IN to log in using the new password. XGS1210-12 / XGS1250-12 User’s Guide...
-
Page 33: Tutorials
If you want to have a port (for example port 1) belong to another VLAN as well, say VLAN 2, you need to create a VLAN first, and then add the port to the VLAN. Figure 27 Initial Setup Network Example: VLAN Click VLAN in the navigation panel and click Create New VLAN. XGS1210-12 / XGS1250-12 User’s Guide... - Page 34 Switch to remove VLAN tags before sending. Clicking the port’s check box loops between untagging, non-member, and tagging. Change the box color of other ports not a member of the VLAN group to gray. Click Apply to save the settings. XGS1210-12 / XGS1250-12 User’s Guide...
-
Page 35: Setting Port Vid
VLAN 2. Figure 28 Initial Setup Network Example: Port VID Click VLAN in the navigation panel. Enter 2 in the PVID field for port 2 and click Apply to save your changes back to the Switch. XGS1210-12 / XGS1250-12 User’s Guide... - Page 36 Chapter 6 Tutorials XGS1210-12 / XGS1250-12 User’s Guide...
-
Page 37: Technical Reference
Technical Reference... -
Page 38: System
7.2 System Settings The System screen displays when you log into the Switch or click System at the top of the Web Configurator. The System screen displays the Switch’s general device information, and the port statistics. XGS1210-12 / XGS1250-12 User’s Guide... - Page 39 Chapter 7 System Figure 29 System The following table describes the labels in this screen. Table 10 System LABEL DESCRIPTION System Information Model Name This field displays the model name of this Switch. XGS1210-12 / XGS1250-12 User’s Guide...
- Page 40 It displays Loop when the Switch detects a loop on the port. Otherwise, it displays Normal. Refresh Click this button to update the information in this screen. Clear Counters Click this button to clear the statistics in the TX(Pkts) and RX(Pkts) fields. XGS1210-12 / XGS1250-12 User’s Guide...
-
Page 41: Port
Switch to shut down a port automatically if it discover a loop on that port. See Section 3.4 on page 19 for more information about LEDs. 8.1.1.2 Broadcast Storm Control Broadcast storm control limits the number of broadcast packets the Switch receives per second on the XGS1210-12 / XGS1250-12 User’s Guide... -
Page 42: Port Settings
Enable this feature to reduce broadcast packets in your network. You can specify limits on each port. 8.2 Port Settings Click Port in the navigation panel to open the following screen. See Section 1.2.1 on page 10 information on Multi-Gigabit. Figure 33 Port XGS1210-12 / XGS1250-12 User’s Guide... - Page 43 9 – 10 connection speed of up to 2.5 Gbps, and ports 11-12 connection speed of up to 10 Gbps Select Auto to have the Switch obtain the following speeds (XGS1250-12): • ports 1 – 8 connection speed of up to 1000 Mbps •...
- Page 44 (mimicking a state of packet collision) causing the sending port to temporarily stop sending signals and resend later. Select the check box to enable it. Apply Click this button to save your changes to the Switch. XGS1210-12 / XGS1250-12 User’s Guide...
-
Page 45: Vlan
A broadcast frame (or a multicast frame for a multicast group that is known by the system) is duplicated only on ports that are members of the VID (except the ingress port itself), thus confining the broadcast to a specific domain. XGS1210-12 / XGS1250-12 User’s Guide... -
Page 46: Vlan Settings
VLAN group that the tag defines. Enter a number between 1 and 4094 as the port VLAN ID. Apply Click this button to save your PVID settings to the Switch. XGS1210-12 / XGS1250-12 User’s Guide... - Page 47 Click Modify to edit the VLAN settings. Delete Click Delete to remove the VLAN group. You cannot delete the default VLAN. Create New Click this button to configure a new IEEE 802.1Q VLAN for the Switch. VLAN XGS1210-12 / XGS1250-12 User’s Guide...
-
Page 48: Link Aggregation
10.2 Link Aggregation Use this screen to configure static link aggregation. Figure 35 Link Aggregation (XGS1210-12) XGS1210-12 / XGS1250-12 User’s Guide... - Page 49 Chapter 10 Link Aggregation Figure 36 Link Aggregation (XGS1250-12) The following table describes the labels in this screen. Table 13 Link Aggregation LABEL DESCRIPTION Link Aggregation Link Aggregation Select the outgoing traffic distribution type. Packets from the same source and/or to the same Algorithm destination are sent over the same link within the trunk.
-
Page 50: Mirroring
Use this screen to select a monitor port and specify the traffic flow to be copied to the monitor port. Note: A port cannot be the monitor port and the mirrored port at the same time. XGS1210-12 / XGS1250-12 User’s Guide... - Page 51 Note: Select one monitor port. Mirrored Port Select this option to mirror the traffic on a port. Note: Select one or multiple mirrored ports. Apply Click this button to save your changes to the Switch. XGS1210-12 / XGS1250-12 User’s Guide...
-
Page 52: Qos
(from 0 to 7) to define up to 8 traffic types. That is, each priority level defines a class of service. The table below shows the IEEE recommendations for traffic types, these may vary or be XGS1210-12 / XGS1250-12 User’s Guide... -
Page 53: Weighted Round Robin Scheduling (Wrr)
Figure 38 WRR Application Example 12.3 Port-Based QoS The Switch’s default settings for Port-Based QoS are shown in the next figure. XGS1210-12 / XGS1250-12 User’s Guide... -
Page 54: Ieee 802.1P Qos
Both Port-Based QoS and IEEE 802.1p QoS use the same priority queuing levels. Remember the difference amongst both features relies on how the priority queuing is assigned. Let us recap, Port-Based QoS assigns priority queuing by port, whereas IEEE 802.1p QoS assigns queuing by PCP priority tags. XGS1210-12 / XGS1250-12 User’s Guide... - Page 55 Section 12.2.3 on page Bandwidth is divided across the different traffic queues according to their weights. Queues with larger weights get more service than queues with smaller weights. Apply Click Apply to save your changes to the Switch. XGS1210-12 / XGS1250-12 User’s Guide...
-
Page 56: Igmp Snooping
Switch. 13.2 IGMP Snooping Settings Click IGMP Snooping in the navigation panel to display the screen as shown next. XGS1210-12 / XGS1250-12 User’s Guide... - Page 57 Chapter 13 IGMP Snooping Figure 41 IGMP Snooping (XGS1210-12) Figure 42 IGMP Snooping (XGS1250-12) The following table describes the labels in this screen. Table 18 IGMP Snooping LABEL DESCRIPTION IGMP Snooping Enable IGMP Select this option to enable IGMP Snooping to forward group multicast traffic only to ports that Snooping are members of that group.
- Page 58 The Switch forwards IGMP join or leave packets to an IGMP router port. Note: If link aggregation is enabled, the ports in a link aggregation group will not be available in this field. Apply Click Apply to save your changes to the Switch. XGS1210-12 / XGS1250-12 User’s Guide...
-
Page 59: Management
HTTPS connection requests from an SSL-aware web browser go to port 443 (by default) on the Switch’s WS (web server). HTTP connection requests from a web browser go to port 80 (by default) on the Switch’s WS (web server). XGS1210-12 / XGS1250-12 User’s Guide... -
Page 60: Management Settings
An administrator is someone who can both view and configure Switch changes. The default administrator password is 1234. Note: It is highly recommended that you change the default administrator password (1234). Click Management in the navigation panel to open the following screen. XGS1210-12 / XGS1250-12 User’s Guide... - Page 61 Chapter 14 Management Figure 44 Switch Management (XGS1210-12) XGS1210-12 / XGS1250-12 User’s Guide...
- Page 62 Chapter 14 Management Figure 45 Switch Management (XGS1250-12) The following table describes the labels in this screen. Table 19 Switch Management LABEL DESCRIPTION Device Setting Reset Click this button to clear all Switch configuration information you configured and return to the factory defaults.
-
Page 63: Firmware Upgrade
Switch. Be sure to upload the correct model firmware as uploading the wrong model firmware may damage your device. Do NOT disconnect power to the Switch while firmware upload is in progress! XGS1210-12 / XGS1250-12 User’s Guide... - Page 64 Path to locate it. After you select the firmware file, click the Upgrade button to load the new firmware. Figure 47 Firmware Upgrade Confirmation Figure 48 Firmware Uploading After a successful upload, the system will reboot, and you will need to log into the Switch again. XGS1210-12 / XGS1250-12 User’s Guide...
-
Page 65: Troubleshooting
Inspect your cables for damage. Contact the vendor to replace any damaged cables. Disconnect and re-connect the power adapter or cord to the Switch. If the problem continues, contact the vendor. A loop is detected. XGS1210-12 / XGS1250-12 User’s Guide... -
Page 66: Switch Access And Login
Switch, skip this step.) Reset the device to its factory defaults, and try to access the Switch with the default IP address. See Section 4.5 on page If the problem continues, contact the vendor. XGS1210-12 / XGS1250-12 User’s Guide... -
Page 67: Switch Configuration
Select the firmware file that you tried to upload to the Switch before and try upgrading the firmware again in the Firmware Upgrade screen. Wait for the firmware upgrade process to complete. After a successful upload, the system will reboot, and you will need to log into the Switch again. XGS1210-12 / XGS1250-12 User’s Guide... -
Page 68: Appendix A Customer Support
• Zyxel Communications Corporation • http://www.zyxel.com Asia China • Zyxel Communications (Shanghai) Corp. Zyxel Communications (Beijing) Corp. Zyxel Communications (Tianjin) Corp. • https://www.zyxel.com/cn/zh/ India • Zyxel Technology India Pvt Ltd. • https://www.zyxel.com/in/en/ Kazakhstan • Zyxel Kazakhstan • https://www.zyxel.kz XGS1210-12 / XGS1250-12 User’s Guide... - Page 69 • Zyxel Communications Corporation • https://www.zyxel.com/tw/zh/ Thailand • Zyxel Thailand Co., Ltd. • https://www.zyxel.com/th/th/ Vietnam • Zyxel Communications Corporation-Vietnam Office • https://www.zyxel.com/vn/vi Europe Belarus • Zyxel BY • https://www.zyxel.by Belgium • Zyxel Communications B.V. • https://www.zyxel.com/be/nl/ XGS1210-12 / XGS1250-12 User’s Guide...
- Page 70 • https://www.zyxel.com/fi/fi/ France • Zyxel France • https://www.zyxel.fr Germany • Zyxel Deutschland GmbH • https://www.zyxel.com/de/de/ Hungary • Zyxel Hungary & SEE • https://www.zyxel.com/hu/hu/ Italy • Zyxel Communications Italy • https://www.zyxel.com/it/it/ Latvia • Zyxel Latvia • https://www.zyxel.com/lv/lv/ XGS1210-12 / XGS1250-12 User’s Guide...
- Page 71 • Zyxel Communications Poland • https://www.zyxel.com/pl/pl/ Romania • Zyxel Romania • https://www.zyxel.com/ro/ro Russia • Zyxel Russia • https://www.zyxel.com/ru/ru/ Slovakia • Zyxel Communications Czech s.r.o. organizacna zlozka • https://www.zyxel.com/sk/sk/ Spain • Zyxel Communications ES Ltd. • https://www.zyxel.com/es/es/ Sweden • Zyxel Communications • https://www.zyxel.com/se/sv/ Switzerland •...
- Page 72 • Zyxel Communications Brasil Ltda. • https://www.zyxel.com/br/pt/ Colombia • Zyxel Communications Corporation • https://www.zyxel.com/co/es/ Ecuador • Zyxel Communications Corporation • https://www.zyxel.com/co/es/ South America • Zyxel Communications Corporation • https://www.zyxel.com/co/es/ Middle East Israel • Zyxel Communications Corporation • http://il.zyxel.com/ XGS1210-12 / XGS1250-12 User’s Guide...
- Page 73 Appendix A Customer Support Middle East • Zyxel Communications Corporation • https://www.zyxel.com/me/en/ North America • Zyxel Communications, Inc. – North America Headquarters • https://www.zyxel.com/us/en/ Oceania Australia • Zyxel Communications Corporation • https://www.zyxel.com/au/en/ Africa South Africa • Nology (Pty) Ltd. • https://www.zyxel.com/za/en/...
-
Page 74: Appendix B Legal Information
Regulatory Notice and Statement UNITED STATES of AMERICA The following information applies if you use the product within USA area. US Importer: Zyxel Communications, Inc, 1130 North Miller Street Anaheim, CA92806-2001, https://www.zyxel.com/us/en/ FCC EMC Statement • The device complies with Part 15 of FCC rules. Operation is subject to the following two conditions: (1) This device may not cause harmful interference, and (2) This device must accept any interference received, including interference that may cause undesired operation. - Page 75 (Energy-related Products directive) as well as ecodesign requirement laid down in applicable implementing measures, power consumption has satisfied regulation requirements which are: • Network standby power consumption < 8W, and/or • Off mode power consumption < 0.5W, and/or • Standby mode power consumption < 0.5W. XGS1210-12 / XGS1250-12 User’s Guide...
- Page 76 Various symbols are used in this product to ensure correct usage, to prevent danger to the user and others, and to prevent property damage. The meaning of these symbols are described below. It is important that you read these descriptions thoroughly and fully understand the contents. XGS1210-12 / XGS1250-12 User’s Guide...
- Page 77 You can download the latest firmware at www.zyxel.com. If you cannot find it there, contact your vendor or Zyxel Technical Support at support@zyxel.com.tw. To obtain the source code covered under those Licenses, please contact your vendor or Zyxel Technical Support at support@zyxel.com. XGS1210-12 / XGS1250-12 User’s Guide...
-
Page 78: Index
IP bandwidth link device name configuration bridging application DHCP server broadcast disclaimer broadcast frame disposal information broadcast packets distance limitation broadcast storm control cable types button distribution type RESET XGS1210-12 / XGS1250-12 User’s Guide... - Page 79 HTTP service installation scenarios enable Internet browser HTTPS pop-up window certificates supported implementation IP address public keys, private keys change HTTPS introduction default management XGS1210-12 / XGS1250-12 User’s Guide...
- Page 80 Low Power Idle (LPI) mode lower-speed link packet collision password administrator XGS1210-12 / XGS1250-12 User’s Guide...
- Page 81 TCI (Tag Control Information) TPID (Tag Protocol IDentifier) rear panel trademarks rear panel connections traffic distribution reboot the Switch traffic type mapping recycling information transmission speed registration cable types product Troubleshooting RESET button reset the Switch XGS1210-12 / XGS1250-12 User’s Guide...
- Page 82 Zyxel One Network (ZON) Utility VOD (Video on Demand) Voice over IP (VoIP) wall-mounting warranty note Web Configurator home inactivity timeout layout log out link login logout main window overview Weighted Round Robin Scheduling (WRR) Windows OS version XGS1210-12 / XGS1250-12 User’s Guide...