Cleveland OEB-6.20 Installation And Maintenance Instructions Manual
Combi electric models
Hide thumbs
Also See for OEB-6.20:
- Buyer's manual (6 pages) ,
- Specifications (2 pages) ,
- Service and parts manual (98 pages)
Table of Contents

Related Manuals for Cleveland OEB-6.20


Summary of Contents for Cleveland OEB-6.20
- Page 1 Installation Manual Installation and Maintenance Instructions CONVOTHERM BY CLEVELAND COMBI ELECTRIC MODELS 1333 East 179 Street Cleveland, Ohio 44110 Phone: (216) 481-4900 Fax: (216) 481 3782 www.clevelandrange.com Part No. COMBI-OE-INM REV. A, 8/05...
-
Page 2: For The Installer
CLEVELAND RANGE AUTHORIZED TECHNICIAN. Do not connect Combi steamer-oven drain connection to any drain material This Installation Manual is a part of your new Convotherm by Cleveland combination oven steamer. You must keep and maintain it for the entire life span of your Combi and pass it on to the next owner of the unit. - Page 3 CLEVELAND RANGE agrees to repair or replace, at its option, f.o.b. factory, any part which proves to be defective due to defects in material or workmanship during the warranty period, providing the equipment has been unaltered, and has been PROPERLY INSTALLED, MAINTAINED, AND OPERATED IN ACCORDANCE WITH THE CLEVELAND RANGE OWNER’S...
- Page 5 Consult your Customer Service Directory or call Cleveland Range at 216-481- 4900 to begin your free Start-Up Program. Your “Combi” in Action You can cook a variety of foods in your Convotherm by Cleveland Combination Oven-Steamer, or “Combi,” using hot air, steam, and Combi hot air and superheated steam.
-
Page 6: Table Of Contents
Chapter GENERAL INFORMATION ABOUT CONVOTHERM BY CLEVELAND GENERAL SAFETY GUIDELINES FOR INSTALLERS, USERS, AND SERVICE TECHNICIANS PRODUCT INFORMATION PRODUCT VIEWS CONTROL PANELS INSTALLATION INSTRUCTIONS GENERAL INSTALLATION OF THE COMBI – Overview and General Instructions INSTALLATION OF THE COMBI – Selecting a Location for the Combi... -
Page 7: General Information About Convotherm By Cleveland
Combi hand shower. 8. ELECTRIC SHOCK – Use the hand shower only on the inside of the oven. Use of the hand shower, hoses, power cleaners, or pressure washers on the outside of the Combi can cause electric shock and / or damage electrical and electronic components. -
Page 8: Product Information
B. PRODUCT INFORMATION Cleveland Range, LLC assigns two product identification numbers to each Combi: a model number and a serial number. The model number identifies the product characteristics. The serial number identifies the individual unit. 1. Model Number This manual covers installation of the OEB and OES model electric Combis. -
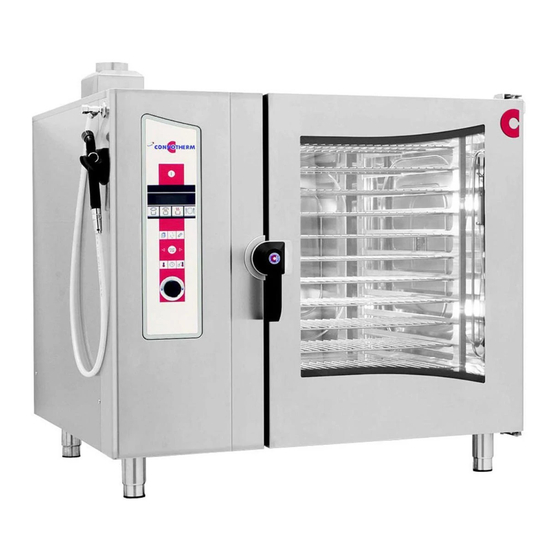
Page 9: Product Views
• Model Number. • Serial Number. 10. Side Wall • Removable for service by qualified Cleveland Range authorized service representatives. • Disconnect power before servicing. • Electrical Diagrams located on the inside of the Side Wall. 11. Door Drip Tray (behind door) Built-in, self-emptying. -
Page 10: Control Panels
Oven light comes on. • Steam generator fills and heats (OEB and OGB models). “Steam” cooking mode (2) • Oven temperature is continuously variable between 86°F and 248°F. “Combi Hot Air and Superheated Steam” cooking mode (3) • Oven temperature is continuously variable between 212°F and 482°F. - Page 11 LED below key lights up when corresponding recipe is started. Notes: Magnetic door switch If the oven door is opened during a program, the magnetic door switch automatically interrupts the cooking program. The timer stops. After closing the oven door, the Combi automatically continues the cooking program.
-
Page 12: Installation Instructions
Unpack the Combi and check for shipping damage. d. If the Combi is damaged or damage is suspected: 1) Inform your dealer at once. 2) Inform Cleveland Range in writing within 3 days. 3) Submit a Damage Claim to the shipper. 4. General Safety a. -
Page 13: Installation Of The Combi - Overview And General Instructions
B. INSTALLATION OF THE COMBI – Overview and General Instructions DEATH, INJURY, AND EQUIPMENT DAMAGE will result from improper lifting. Use enough workers with training and experience lifting heavy equipment to place the Combi on the supporting surface 1. Select the Combi’s operating location. 2. -
Page 14: Installation Of The Combi - Selecting A Location For The Combi
C. INSTALLATION OF THE COMBI 1. Selecting a Location for the Combi a. For safe and efficient operation, observe the following criteria when selecting an operating location for a Combi 1) Passages and doors must be high enough and wide enough for a Combi and its pallet. -
Page 15: Utilities Connections
D. UTILITIES CONNECTIONS FOR THE INSTALLATION OF THE COMBI 1. Install Electric Power Lines The electrical supply must match all electrical and wiring requirements specified on the rating plate and must be made in accordance with the following requirements: a. The Combi must be properly grounded and have the electrical power lines installed in accordance with: 1) The National Electric Code, ANSI/NFPA No. -
Page 16: Electrical Connection Data
2. Electrical Connection Data Volts Phase Amps Wires Wire Size, Cu, 90°C Volts Phase Amps Wires Wire Size, Cu, 90°C Volts Phase Amps Wires Wire Size, Cu, 90°C Volts Phase Amps Wires Wire Size, Cu, 90°C Volts Phase Amps Wires Wire Size, Cu, 90°C Volts Phase... -
Page 17: Install Water Supply
2) OR the frequency of maintenance, cleaning, and descaling must be increased beyond that recommended in the maintenance schedule. 3) Contact your Cleveland Range sales representative for details on how to provide water per Minimum Water Quality in Table 2-3, or how to increase the frequency of maintenance, cleaning, and descaling. - Page 18 Water Supply System Pressure Requirements The water supply must provide: • A minimum dynamic pressure of 35 psi (2.4 kg/cm • A maximum static pressure of 60 psi (4.1 kg/cm a. Install Water Supply Lines The Installer/Owner is responsible for the correct water connection of the Combi. When connecting water supply lines observe the following instructions, and any and all other applicable national, state, and local codes and regulations: 1) Connect the Combi to COLD WATER...
- Page 19 Injector, Dehumidification, Cleaning System Figure 2-11 Cleveland Range Separate Water Supply Arrangement * “Conditioned” indicates water that has been filtered or treated by a Cleveland Range approved method to meet or exceed the water quality standards of Table 2-3 Water Connection...
-
Page 20: Install Free Air Vented Drain Lines
Do not connect the Combi drain directly to drains or to the plumbing of any other equipment Refer to Figure 2-12: Run (do not connect) the Combi drain from the Combi as described below: 1) Use Drain Kit, Cleveland Range Part No. C3416730. See Figure 2-12 A 2) Cut the 2” (50 mm) tubing to length. - Page 21 Figure 2-12 Typical Drain Layout Figure 2-12 A NUMBER, DESCRIPTION, AND PART NUMBER GASKET, INTERNAL, DRAIN TO ELBOW, ELBOW, 87°, PIPE, BELL END, 50mm x 500mm (2” x 19.685”), ELBOW, DRAIN CONNECTION, GASKET, EXTERNAL, ELBOW TO DRAIN PIPE, P/N C6015406 P/N C6015402 P/N C6015403 P/N C6015405...
-
Page 22: Exhaust Hood Requirements
5. Exhaust Hood Requirements a. Installation under an exhaust hood may be required. Check local requirements before installing a Combi or any other food service equipment. b. The exhaust hood must extend over the exhaust ports and meet the following requirements: 1) The Exhaust hood must be sized for the cumulative ventilation requirements of all the appliances in the area under the hood, including the Combi. -
Page 23: Moving A Combi To Its Operating Location
(1 on Fig. 1). d. Remove all cartons, packing material, documents, shelves, loading trolley, etc. from the oven chamber. e. Remove the Combi from the pallet. 1) Note the weight of the units in Table 2-1. 2) Be sure the lifting forks of a forklift or low lift truck are in the correct position before picking up the Combi. -
Page 24: For All Combis
Use only genuine Convotherm by Cleveland Stacking Kits, Caster Kits, and replacement parts. c. Use of Stands, Stacking Kits, Caster Kits, and replacement parts other than genuine Convotherm by Cleveland Stands, Stacking Kits, and Caster Kits can result in injury and / or catastrophic equipment failure. - Page 25 Figure 4 Figure 5 Figure 6...
-
Page 26: Checkout And Startup
9. CHECKOUT and STARTUP The Checkout and Startup procedure prepares a recently installed or repaired Combi for operation. The procedures check proper electrical, gas, water, and drain connections to the Combi, and verify basic Combi operation. TASK Preparation Check operating location clearances. Test supply water quality. -
Page 27: Startup Procedure And Operational Tests
CHAPTER 3 STARTUP PROCEDURE AND OPERATIONAL TESTS Death, severe electrical shock, or equipment damage can result from touching any component inside a Combi when the main external power switch is in the ON position. Use extreme caution during testing with the access cover removed. When checking inside the Combi: always open the door slowly and stand to the hinge side and away from the Combi. -
Page 28: Startup Procedure
The cooking compartment high limit safety thermostat must be reset by a qualified Cleveland Range authorized service technician. Wait for the Combi to warm up to room temperature (about 72°F) before operating. - Page 29 7. SET CONTROL PANEL OPTIONS. a. Start Setup Procedure 1) Press Smart Key 2) Use the Selector Dial 3) Confirm: Press Smart Key 4) Answer “Yes” with Smart Key b. Set Language 1) Start Setup Procedure (Above). 2) Select Language 3) Confirm with Smart Key 4) Select desired language with the Selector Dial 5) Confirm with Smart Key...
- Page 30 Set Date 1) Start Setup Procedure (Above). 2) Select Date with the Selector Dial 3) Confirm with Smart Key 4) Select date format desired with the Selector Dial 5) Use the Paging / Scrolling keys 6) Set the date with the Selector Dial 7) Confirm with Smart Key g.
- Page 31 Set the time (10 minutes) with the Selector Dial g) Press the Start / Stop key h) The Program will start and the display will show the nominal oven temperature and time remaining. STEAM GENERATOR Models: The heating element for the oven heat exchanger and the heating element for the steam generator turn on, and the program runs.
- Page 32 Before starting, remove large pieces food or cooking residue from the oven chamber. This will help prevent the drain from becoming blocked. c. Check the level of CONVOTHERM by Cleveland oven cleaner and nozzle rinsing fluid. The containers must be full and the suction pipes must be located in the fluid.
- Page 33 TEST Temperature Probe: a. Remove plastic tip protector from probe. b. Replace probe in its hanger. c. Set Temperature to 350° F in any cooking mode. d. Set Probe Temperature to 210° F. e. Begin cooking program. Display shows set (nominal) temperature on the left and probe temperature on the right. g.
-
Page 34: Troubleshooting
CHAPTER 4 TROUBLESHOOTING Convotherm by Cleveland Combi Oven-Steamers are equipped with an automatic error diagnosis system. If an error occurs, the system will display error codes and a description of the error. To continue operating, emergency operation is available (see below). -
Page 35: Error Messages And Remedies
Not enough water Connection area temp. too high Fan malfunction Connection area fan malfunction No gas Excess temp. in oven / oven E11 / E21 sensor failure Excess temp. of steam E13 / E23 generator/steam gen. sensor failure Excess temp. of condenser /... -
Page 36: These Operating Irregularities Do Not Have Error Messages
These operating irregularities do not have error messages. Error Suction plate not correctly locked Nominal oven temperature too high Uneven browning Not pre-heated Bypass pipe greasy Incorrect accessories, container Control elements not illuminated and No power connection, external failsafe do not react when switched on... -
Page 37: Emergency Operation
CHAPTER 5 Emergency Operation To continue to use your Convotherm by Cleveland Combi Oven-Steamer in the case of an error, which cannot be solved immediately, an “Emergency Operation” function is available. This allows you to use at least some of the Combi functions despite a malfunction. -
Page 38: The Combi Will Operate If These Errors Occur
Message Error on display Not enough water Connection area temp. too high malfunction Connection area fan malfunction N o gas Excess oven temperature Excess temperature of steam generator Excess temperature condenser Oven sensor failure Core temp. sensor fault Steam... - Page 39 Steam generator safety temp. limiter sensor failure E23& Steam generator safety temp. limiter and steam generator sensor failure Excess temperature Steam generator heater E 29 Error in ground connection Steam generator heater error Steam generator pump error ID error Program memory error Working...