Brother PS-2200 Operation Manual
Brother sewing machine operation manual
Hide thumbs
Also See for PS-2200:
- Manuel d'utilisation (86 pages) ,
- Manual (42 pages) ,
- Operation manual (20 pages)
Table of Contents
Advertisement
Quick Links
Advertisement
Table of Contents

Related Manuals for Brother PS-2200


Summary of Contents for Brother PS-2200
- Page 1 OPERATION MANUAL MANUAL DE INSTRUCCIONES ®...
-
Page 2: Important Safety Instructions
Replace bulb with same type rated 15 watts (for Models PS-2200, STAR 110). WARNING – 1. Do not allow this machine to be used as a toy. Close attention is necessary when the sewing machine is used by or near children. - Page 3 Cambie la bombilla por otra del mismo tipo de 12 V y 5 W (para los modelos PS-2500, PS-2400, PS-2300, STAR 140E, STAR 130E y STAR 120E). Cambie la bombilla por otra del mismo tipo de 15 W (para los modelos PS-2200, STAR 110). CUIDADO –...
- Page 4 FOR USERS IN UK, EIRE, MALTA AND CYPRUS ONLY. If your sewing machine is fitted with a 3 pin non-rewireable BS plug then please read the following. IMPORTANT (in the United Kingdom) Main supply (AC 230/240V~, 50Hz) DO NOT cut off the mains plug from equipment. If the...
- Page 5 (Model PS-2200, STAR110) 1. Connect the power cord or three-prong plug into the machine. 2. Connect the electrical supply plug into a wall outlet. When leaving the sewing machine unattended, the main switch of the machine must be switched off or the plug must be removed from the socket outlet.
-
Page 6: Table Of Contents
Principal parts ... 1 Principal parts ... 3 Accessories ... 5 OPTIONAL ACCESSORIES ... 6 OPERATING YOUR SEWING MACHINE ... 7 Connecting Plugs ... 7 Main Power and Sewing Light Switches ... 8 Foot Controller ... 8 Replacing the Needle ... 9 Checking the Needle ... - Page 7 CONOZCA SU MÁQUINA DE COSER Elementos principales ... 1 Elementos principales ... 3 Accesorios ... 5 Funcionamiento de la máquina de coser ... 7 Conexión de los enchufes ... 7 Interruptor principal y de luz ... 8 Pedal ... 8 Cambio de la aguja ...
-
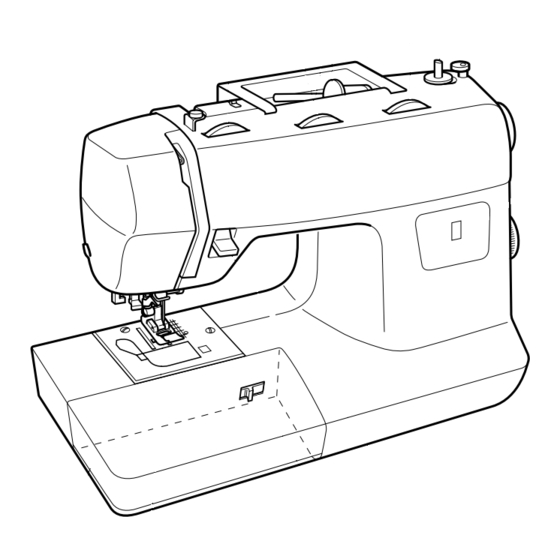
Page 8: Principal Parts
Principal parts Elementos principales Modelos PS-2500, PS-2400, PS-2300, Model PS-2500, PS-2400, PS-2300 STAR 140E, STAR 130E y STAR 120E STAR140E, STAR130E, STAR120E... - Page 9 1 BOBBIN WINDER DEVICE Winds the thread onto the bobbin to be used for the lower thread. 2 STITCH LENGTH DIAL Controls the length of the stitches. 3 SPOOL PIN AND SPOOL HOLDER 4 STITCH WIDTH DIAL Controls the stitch width. 5 UPPER TENSION CONTROL DIAL Controls the tension of the upper thread.
-
Page 10: Principal Parts
Principal parts Elementos principales (Model PS-2200, STAR110) (Modelo PS-2200, STAR110) - Page 11 1 BOBBIN WINDER DEVICE Winds the thread onto the bobbin to be used for the lower thread. 2 STITCH LENGTH DIAL Controls the length of the stitches. 3 SPOOL PIN AND SPOOL HOLDER 4 STITCH WIDTH DIAL Controls the stitch width. 5 UPPER TENSION CONTROL DIAL Controls the tension of the upper thread.
-
Page 12: Accessories
Accessories 1 X59370-051 2 XA3811-051 XA3812-052 5 XA4973-051 6 X59375-051 9 X59476-051 0 130920-051 1 Zipper Foot (1 pc.) 2 Bobbin (3 pcs.) XA3811-051 (For U.S.A) XA3812-052 (For other countries) Replacements (10-piece set) 3 Needle Pack (Regular Single Needle No. 14) (3 pcs.) 4 Twin Needle (1 pc.) 5 Buttonhole Foot (1 pc.) -
Page 13: Optional Accessories
Código: XA3931051 Nota (sólo para EE UU) Este pedal puede utilizarse para los modelos de máquinas de coser PS-2500, PS-2400 y PS- 2300. (Modelos PS-2200 y STAR 10) Pedal: modelo N Códigos: J00360051 (110/120 V Área) J00016051 (220/240 V Área) -
Page 14: Operating Your Sewing Machine
2. Connect the power supply plug into a wall outlet. CAUTION 1. When changing the needle, bobbin or light bulb or when the sewing machine is not in use, it is recommended that the power supply plug be disconnected from the wall socket to avoid electrical hazards. -
Page 15: Main Power And Sewing Light Switches
Main Power and Sewing Light Switches This switch turns the main power and sewing light on or off. 1 Turn on (toward the “I” mark) 2 Turn off (toward the “O” mark) Foot Controller When the foot controller is depressed lightly, the machine will run at a low speed. -
Page 16: Replacing The Needle
Replacing the Needle 1. Remove the power supply plug from the outlet. 2. Raise the needle bar to its highest position. 3. Lower the presser foot. 4. Remove the needle by loosening the needle clamp. 5. Insert a different needle as far as possible up against the needle stopper with its flat side facing the back. -
Page 17: Changing The Presser Foot
Changing the Presser Foot It may be necessary to change the presser foot according to your sewing needs. SNAP-ON TYPE 1. Raise the needle to its highest position by turning the balance wheel toward you (counter clock- wise) and raise the presser foot lever. 2. -
Page 18: Various Controls
20 21 22 23 24 25 26 27 28 29 30 31 32 33 34 35 36 37 PS-2300 STAR120E 15 16 17 18 19 20 21 22 23 24 25 26 27 PS-2200 STAR110 12 13 14 15 16 17 18 19 20 21 NOTE:... -
Page 19: Recommended Widths And Lengths For Stitches
RECOMMENDED WIDTHS AND LENGTHS FOR STITCHES PATTERN STITCH NAME 1-STEP AUTOMATIC BUTTONHOLE STRAIGHT STITCH ZIGZAG STITCH BLIND HEM STITCH SHELL TUCK STITCH ELASTIC STITCH STRETCH BLIND STITCH SCALLOP STITCH DOUBLE ACTION STITCH BRIDGING STITCH RAMPART STITCH ELASTIC SHELL TUCK STITCH LIGHTNING STITCH SQUARE STITCH DECORATIVE STITCH... -
Page 20: Anchos Y Largos Recomendados Para Cada Puntada
Anchos y largos recomendados para cada puntada PUTADA NOMBRE OJAL AUTOMÁTICO DE 1 PASO PUNTADA RECTA PUNTADA ZIGZAG PUNTADA INVISIBLE PUNTADA ONDAS PUNTADA ELÁSTICA PUNTADA INVISIBLE ELÁSTICA PUNTADA FESTÓN PUNTADA DE ACCIÓN DOBLE PUNTADA PUENTE PUNTADA ONDAS ABIERTAS PUNTADA ONDAS ELÁSTICAS PUNTADA ESCALERA PUNTADA FESTÓN DOBLE PUNTADA DECORATIVA... -
Page 21: Stitch Length Dial
Stitch Length Dial Depending on your selected stitch, you may need to adjust the stitch length for best results. The numbers marked on the Stitch Length Dial represent the length of the stitch in millimeters (mm). THE HIGHER THE NUMBER, THE LONGER THE STITCH. -
Page 22: Stitch Width Dial
Stitch Width Dial Depending on the stitch selected, you may need to adjust the stitch width. The numbers marked on the dial represent the stitch width. THE HIGHER THE NUMBER, THE WIDER THE STITCH. 1 Stitch width dial NOTE: When you choose the Straight Stitch or the Triple Stretch Stitch you can change the needle position from left to center. -
Page 23: Reverse Sewing Button
Reverse Sewing Button To sew in reverse, push the Reverse Sewing Button in as far as possible and hold in that position while pressing lightly on the foot pedal. To sew forward, release the Reverse Sewing Button. The machine will then sew forward. Reverse sewing is used for back tacking and reinforcing seams. -
Page 24: Drop Feed Lever
Drop Feed Lever Use the Drop Feed Lever to raise or lower the feed dogs according to the job that is being done. When monogramming, embroidering, darning or sewing on buttons, the feed dogs should be lowered. (The garment will not be fed.) NOTE: When raising or lowering the feed dogs, move the Drop Feed Lever as far as possible to the appropriate... -
Page 25: Start/Stop Button
• Without automatic thread cutter model, the nee- dle stops in its highest position when sewing stops. 1 START/STOP button * The sewing machine will not start sewing if the Presser Foot Lever is raised. Be sure to lower the Presser Foot Lever before sewing. -
Page 26: Speed Range Control Lever
Model PS-2500, PS-2400, PS-2300 STAR140E, STAR130E, STAR120E Speed Range Control Lever Controls the speed range. In case the foot controller is used, you can control maximum speed by the speed range control lever. The control lever should be set at right (fastest) position for normal usage with foot controller. -
Page 27: Automatic Thread Cutter
NOTE: Do not operate the Thread Cutter Lever while sewing or when there is no fabric in the sewing machine. Threads may become tangled or other problem may be incurred. 2. After the threads are cut, the needle moves up and the Thread Cutter Lever returns to its original position. -
Page 28: Converting To Free-Arm Style
* During twin needle sewing and when sewing with thread thicker than #30 or with nylon, metallic and other specialty threads, cut the threads with the thread cutter on the left side of the machine. * After the threads are cut using the Thread Cutter Lever, you can continue sewing without drawing up the lower thread. -
Page 29: Threading The Machine
THREADING THE MACHINE Winding the Bobbin 1. Place the spool of thread on the spool pin. The thread end should come from the bottom front of the spool. The spool holder closest to the thread spool size should be used to hold the spool securely on the spool pin. - Page 30 2. Place the bobbin on the bobbin winder shaft. Push the bobbin winder shaft to the right. 1 Spring on the shaft 2 Groove of the bobbin * Align the groove of the bobbin with the spring on the shaft. 3.
- Page 31 7. Corte el hilo, deslice el eje de hacer canilla hacia la izquierda y retire la canilla. (Modelos PS-2200 y STAR110) 4. Pise el pedal para comenzar a coser. 5. Cuando la máquina se detenga automáticamente porque la canilla está llena, retire el pie del pedal.
-
Page 32: Lower Threading
Lower Threading 1. Raise the needle to its highest position by turning the balance wheel toward you (counterclockwise) and raise the presser foot lever. 2. Slide the button and open the cover. 1 Slide button 2 Cover 3. Insert bobbin and deliver thread end through the slit, then pull the thread to cut. -
Page 33: Upper Threading
Upper Threading 1. Raise the presser foot using the Presser Foot Lever. 2. Raise the needle to its highest position by turning the balance wheel toward you (counterclockwise). 1 Presser foot lever 3. Place a spool of thread on the horizontal spool pin and press a spool holder onto the spool pin to hold the thread spool firmly in place. - Page 34 4. Deliver the upper thread as shown in this diagram. The upper thread shutter opens when the Presser Foot Lever is raised. 1 Upper thread shutter 5. Make sure to guide the thread through the thread take-up lever from the right to the left. 2 Thread take-up lever 6.
-
Page 35: Using Needle Threader
Using Needle Threader The needle threader can be used to thread the needle more easily. 1. Lower the presser foot lever. Lower the threader slightly and position the thread under the guide. 1 Needle threader 2 Guide 2. Move the threader to its lowest position and guide the thread under the hook which passes through the eye of the needle. -
Page 36: Manually Drawing Up Lower Thread
Manually Drawing Up Lower Thread When sewing gathers or darts, the lower thread can be manually drawn up so that it will have some excess. 1. Pass the thread along the groove in the direction of the arrow, and leave it there without cutting it. 1 Shuttle •... -
Page 37: Twin Needle Sewing
Twin Needle Sewing Your sewing machine is designed for twin needle sewing, which allows you to sew with two top threads. You can use the same color or two different colors of thread for making decorative stitches. Any of the patterns, except the buttonhole pattern, can be sewn with the twin needle. -
Page 38: Thread Tension Control
Model PS-2500, PS-2400, PS-2300 STAR140E, STAR130E, STAR120E Thread Tension Control * Set the Upper Tension Control Dial within [3~5] for the most appropriate tension for normal sew- ing. Adjust the Upper Tension Control Dial to the correct tension for the type of thread and fabric being used. -
Page 39: Thread Tension
(Model PS-2200, STAR110) Thread Tension Thread tension will affect the quality of your stitches. It may need to be adjusted when you change fabric or thread type. NOTE: It is recommended that a test sample be made on a fabric scrap before sewing on your project. - Page 40 Correct tension Correct tension is important since too much or too little tension will weaken your seams or cause puckers on your fabric. 1 Reverse 2 Surface Tensión correcta Es ecesario tener una tensión correcta dado que una tensión insuficiente o demasiado fuerte va a debilitar sus costuras o fruncir el tejido.
-
Page 41: Relative Chart Of Sewing Fabrics, Needles And Threads
RELATIVE CHART OF SEWING FABRICS, NEEDLES AND THREADS SEWING FABRICS Fine Tricot, Fine Lace, Thin Linen, VERY THIN Silk, Organza, Chiffon Voile, Taffeta, Synthetics, Silk, LIGHT WEIGHT Batiste Cotton, Gingham, Poplin, Percale, Pique, Satin, Velvet, Lightweight MEDIUM WEIGHT Wool, Fine Corduroy, Suitings, Linen, Muslin Denim, HEAVY WEIGHT... -
Page 42: Tabla De Relación Entre Tejidos, Hilos Y Agujas
Tabla de relación entre tejidos, hilos y agujas Tejidos Punto fino, Encaje fino, Lino fino, Muy fino Seda, Tul, Gasa Velo, Tafetán, Sintéticos, Seda, Ligero Batista Algodón, Guinga, Popelina, Percal, Piqué, Satén, Terciopelo, Lana li- Medio gera, Pana fina, Forros, Lino, Muse- lina Tejano, Gabardina, Tweed, Pana, Pesado... -
Page 43: Straight Stitching
Straight Stitching Pattern Stitch Length Stitch Width (Straight Stitch) (Triple Stretch Stitch) Fixed 2.5 Starting Sewing 1. Turn the Pattern Selection Dial to show your desired stitch in the Pattern Indication Window. Setting the Pattern Selection Dial to Straight Stitch or Triple Stretch Stitch is required. 2. - Page 44 Changing Sewing Direction 1. Stop the machine at the point where you wish to change direction with the needle still in the fabric. 2. Raise the presser foot and turn the fabric to line up its new direction using the needle as a turning point.
- Page 45 1. Pare la máquina. 2. Levante al máximo la aguja y asegúrese de que la palanca del tirahilos también está en su posición más elevada (Modelos PS-2200 y STAR110). 3. Levante el prensatelas y saque suavemente el tejido por la izquierda.
- Page 46 * During twin needle sewing and when sewing with thread thicker than #30 or with nylon, metallic and other specialty threads, cut the threads with the thread cutter on the left side of the machine. * After the threads are cut using the Thread Cutter Lever, you can continue sewing without drawing up the lower thread.
-
Page 47: Zigzag Stitching
Zigzag Stitching Pattern Stitch Length Stitch Width (Zigzag Stitch) ZIGZAG STITCH Select the Zigzag Stitch using the Pattern Selection Dial. Then, select the Stitch Length and the Stitch Width. It is recommended to sew using the Straight Stitch at the beginning and end of the Zigzag Stitches. (This acts as a reinforcement stitch.) SATIN STITCH When the Zigzag Stitch length is set in the “F”... -
Page 48: Blind Hem Stitching
Blind Hem Stitching Pattern Stitch Length Stitch Width (Blind Hem Stitch) (Stretch Blind Stitch) F-1.5 The Blind Hem Stitch is used to finish the edge of a project like the hem of a pair of pants without the stitch showing. Use the Blind Hem Stitch for any non- stretch fabrics and the Stretch Blind Stitch for stretch fabrics. -
Page 49: Shell Tuck Stitching
Shell Tuck Stitching Pattern Stitch Length Stitch Width (Shell Tuck Stitch) The Shell Tuck Stitch can be used to sew a picot (lace like) edge on a lightweight fabric. 1. Set the Pattern Selection Dial to Shell Tuck Stitch. 2. Sew the fabric on the bias, placing it under the presser foot so that the straight stitches are sewn on the seamline and the zigzag stitches are sewn slightly over the folded edge. -
Page 50: Elastic Stitching
Elastic Stitching Pattern Stitch Length Stitch Width (Elastic Stitch) F-2.5 The Elastic Stitch can be used for 3 functions: mending, sewing elastic or joining fabric. Each is explained below. Set the Pattern Selection Dial to Elastic Stitch. MENDING 1. Set the Stitch Length Dial between F and 2.5 and set the Stitch Width Dial between 3 and 6. -
Page 51: Double Action Stitching
Double Action Stitching Pattern Stitch Length Stitch Width (Double Action Stitch) (Bridging Stitch) (Rampart Stitch) (Decorative Stitch) This stitch is used for joining two pieces of fabric, for example, when making patchwork. Set the Pattern Selection Dial to Double Action Stitch. -
Page 52: Scallop Stitching
Scallop Stitching Pattern Stitch Length Stitch Width (Scallop Stitch) F-1.5 This machine automatically produces a Scallop Stitch which may be used as a decorative edging. 1. Set the Pattern Selection Dial to Scallop Stitch. 2. Sew the Scallop Stitch along the edge of the material. -
Page 53: Decorative Stitching
Decorative Stitching Pattern Stitch Length Stitch Width (Lightning Stitch) (Square Stitch) (Decorative Stitch) (Triangle Stitch) (Bead Stitch) (Arrow Head Stitch) (Parallelogram Stitch) (Decorative Stitch) These stitches can be used for making decorative top stitching and for smocking. Set the Pattern Selection Dial to Lightning Stitch or Bead Stitch or etc. -
Page 54: Patchwork
Patchwork Pattern Stitch Length Stitch Width (Link Stitch) (Fagoting Stitch) These stitches are used to join two pieces of fabric while leaving a space between their edges. 1. Fold over the edges of the two pieces of fabric for the hem and baste the edges to a thin piece of paper leaving a small space between them. -
Page 55: Overedge Stitching
Overedge Stitching Pattern Stitch Length Stitch Width (Comb Stitch) (Slant Overlock Stitch) (Elastic Overlock Stitch) (Elastic Shell Tuck Stitch) These stitches are used to join together seams and finish them in one operation. The Elastic Overlock Stitche is useful when sewing stretch materials. 1. -
Page 56: Feather Stitching
Feather Stitching Pattern Stitch Length Stitch Width (Feather Stitch) Use the Feather Stitch as a decorative top stitch or when hemming blankets, tablecloths or draperies or when embroidering. 1. Set the Pattern Selection Dial to Feather Stitch. 2. Place the fabric right side up and sew 1 cm (3/8") from the edge of the fabric. -
Page 57: Triple Zigzag Stretch Stitching
Triple Zigzag Stretch Stitching Pattern Stitch Length Stitch Width (Triple Zigzag Stretch Stitch) This stitch can be used to sew heavyweight stretch fabrics wherever a Zigzag Stitch could be used. The Triple Zigzag Stretch Stitch can also be used as a decorative top stitch. -
Page 58: Making A Buttonhole
Making a Buttonhole Pattern Stitch Length Stitch Width F-1.5 NOTE: 1. It is recommended to practice making a button- hole on a scrap piece of fabric before attempting it on the actual garment. 2. When making buttonholes on soft fabrics, place a stabilizer material on the underside of the fabric. - Page 59 NOTE: Do not lower the Presser Foot Lever while pushing in the area of the presser foot marked a in fig.C. Otherwise the buttonhole will not be sewn with the correct size. 1 Do not close this gap. 2 Align the lines on the presser foot. 5.
-
Page 60: Odd-Shaped Buttons That Do Not Fit Into The Button Holder Plate
6. Hold the upper thread and press the “START/ STOP” Button. 7. After stitches 1, 2, 3 and 4 are automatically sewn, stop the sewing machine. Odd-shaped buttons that do not fit into the button holder plate Add the button diameter to its thickness, then set the buttonhole presser foot scale to this measurement. -
Page 61: Buttonhole Fine Adjustment
SECURING THE STITCHING AND CUTTING THE BUTTONHOLE 1. To secure the stitching, turn the material 90 degrees counterclockwise and sew Straight Stitches to the end of the front bar tack of the buttonhole. 2. Remove the material from the machine. It is recommended that pins be placed across both ends of the buttonhole as protection against cut- ting the stitches. - Page 62 1 Right row 2 STITCH LENGTH 3 Shorter 4 Longer 5 Adjusted stitch 3. After obtaining a satisfactory feeding on the right side, stitch the left side of the buttonhole and observe the feeding. 4. If the left side is too coarse or fine compared to the right side, adjust the buttonhole fine adjustment screw as described below.
- Page 63 When the buttonhole is not sewn correctly: There are two different procedures for correct- ing buttonhole sewing, depending on which part of the buttonhole is not sewn correctly. Correction Procedure 1 (See fig. A) 1. Raise the Presser Foot Lever, then remove the fabric and all of the sewn thread.
-
Page 64: Button Sewing
Button Sewing Pattern Stitch Length Stitch Width Less than 5 1. Measure the distance between the holes and set the appropriate stitch width using the Stitch Width Dial. For example, if the distance between the holes is 1.5 mm, set the stitch width to 1.5. 2. -
Page 65: Zipper Insertion
Zipper Insertion Pattern Stitch Length Stitch Width The zipper foot is used to sew various types of zippers and can easily be positioned to the right or left side of the needle. When sewing the right side of the zipper, attach the shank to the left pin of the zipper foot. -
Page 66: Gathering
Gathering Pattern Stitch Length 1. Set the Pattern Selection Dial to Straight Stitch. 2. Loosen the tension of the upper thread so that the lower thread lies on the underside of the material. 3. Sew a single row or multiple rows of Straight Stitch(es). -
Page 67: Appliques
6. Repeat this motion until the portion to be darned is filled with parallel lines of stitching. Appliques Pattern Stitch Length An applique is created by cutting a contrasting piece of fabric into a shape to be used as a decoration on a garment or project. -
Page 68: Monogramming And Embroidering
Monogramming and Embroidering Pattern Stitch Length Stitch Width PREPARING FOR MONOGRAMMING AND EM- BROIDERING 1. Lower the feed dogs by setting the Drop Feed Lever to the Down Position as shown on page 17. 2. Set the Pattern Selection Dial to the appropriate Zigzag Stitch setting. - Page 69 MONOGRAMMING 1. Sew, moving the hoop slowly along the lettering at a constant speed. 2. Secure with a few straight stitches at the end of the last letter. EMBROIDERING 1. Stitch the outline of the design by moving the embroidery hoop. 2.
-
Page 70: Optional Accessories
OPTIONAL ACCESSORIES Using the Walking Foot Pattern Stitch Length Stitch Width (Straight Stitch) (Zigzag Stitch) This foot is very useful for sewing materials such as vinyl cloth, synthetic leather, thin leather, etc. These materials are difficult to feed when sewing the walk- ing foot prevents such materials from crumpling, slipping or sticking between presser foot and mate- rial due to even feeding of upper and lower materials. - Page 71 NOTE: Please sew in slow to medium speed. Nota: Cosa a una velocidad entre baja y media.
-
Page 72: Using The Spring-Action Quilting Foot
OPTIONAL ACCESSORIES Using the Spring-action Quilting Foot Pattern Stitch Length Stitch Width 0 (center) The Spring -action Quilting Foot is useful for darning and freemotion machine quilting. 1. Remove the power supply plug from the outlet. 2. Raise the needle and the presser foot. 3. - Page 73 * Before starting to sew, draw the quilting design on the fabric. 7. Use both hands to keep the fabric firmly stretched and move the fabric to sew over the drawn design. (See fig. C) A Quilting design (Line) 8. The stitch length depends on how quickly the fabric is moved and on the machine’s sewing speed.
-
Page 74: Using The 1/4" Seam Guide Foot
OPTIONAL ACCESSORIES Using the 1/4" Seam Guide Foot Pattern Stitch Length Stitch Width (Straight Stitch) 2-2.5 The 1/4" Seam Guide Foot is used to sew fixed seam allowance 6.4 mm (1/4") when piecing together a quilt. (See fig.A) 1. Set the Pattern Selection Dial to Straight Stitch. Set the Stitch Length between 2 and 2.5. -
Page 75: Changing The Bulb
Changing the Bulb 1. Remove the power supply plug from the outlet. 2. Loosen the screw on the reverse side of sewing head as shown in fig. A. 3. Remove the face plate from the machine as illustrated in fig. A. Model PS-2500, PS-2400, PS-2300 STAR140E, STAR130E, STAR120E... - Page 76 (Model PS-2200, STAR110) 4. Replace the sewing light bulb. (See fig. B) 1 Bulb 2 Loosen 3 Tighten 5. Reattach the face plate and fasten the screw as shown in fig. C. (Modelo PS-2200, STAR110E) 4. Cambie la bombilla tal como se muestra en la fig.
-
Page 77: Cleaning
Cleaning 1. Remove the power supply plug from the outlet. 2. Raise the needle and the presser foot. 3. Loosen the presser foot screw and the needle clamp screw to remove the presser foot holder and the needle. (See fig. A) 4. - Page 78 6. Remove the shuttle hook. (See fig. C) 7. Clean out lint and dust. * Use soft fabric to clean the shuttle hook. DO NOT oil the shuttle hook or shuttle race. (See fig. D) 4 Shuttle hook 5 Shuttle race * DO NOT OIL.
-
Page 79: Automatic Thread Cutting
(Model PS-2500, STAR140E) NOTE: Do not operate the Thread Cutter Lever while sewing or when there is no fabric in the sewing machine. Threads may become tangled or other problems may be incurred. * When sewing with thread thicker than #30 or with... -
Page 80: Correcting A Problem With The Automatic Thread Cutter
(Model PS-2500, STAR140E) Correcting a Problem with the Automatic Thread Cutter CAUTION: Be sure to unplug the power supply cord in order to reduce the risk of injuries or electric shock. 1. Turn off the main power supply. 2. Raise the Presser Foot Lever and slightly turn the hand wheel either toward or away from you so that the tangled thread and the fabric can be removed. - Page 81 5. Turn off the main power supply. 6. Raise the Presser Foot Lever and remove the fabric as explained in step 2 above. If the fabric cannot be removed, cut the thread on the back of the fabric with scissors and remove the fabric. 7.
-
Page 82: Performance Checklist
Performance Checklist Whenever sewing difficulties are encountered, re- view the section in this instruction manual that details the operation you are performing to make sure you are correctly using the machine. If the problem continues, the following check list may help you to improve the operation. -
Page 83: Performance Check List
PERFORMANCE CHECK LIST UPPER THREAD LOWER THREAD BREAKS BREAKS Upper thread is Lower thread is not correctly tangled. installed. Page 26 Page 25 Bobbin is not Upper thread is threaded properly tangled. in the shuttle hook. Page 26 Page 25 Upper thread tension is too tight. - Page 84 LISTADO DE POSIBLES INCIDENCIAS ROTURA DEL ROTURA DEL HILO SUPERIOR HILO INFERIOR El hilo superior no El hilo inferior está bien enhe- está enredado brado Página 26 Página 25 La canilla no está El hilo superior bien enhebrada está enredado en el garfio Página 26 Página 25...
- Page 85 PERFORMANCE CHECK LIST FABRIC DOES NEEDLE NOT FEED BREAKS PROPERLY Stitch Length Needle is not Dial is set at no correctly inserted. feeding. ("0") Page 14 Page 9 The combination of needle size/ Inferior needle is thread size/fabric used. is incorrect. Page 34 Page 9 The combination...
- Page 86 LISTADO DE POSIBLES INCIDENCIAS EL TEJIDO NO LA AGUJA SE ARRASTRA BIEN ROMPE El selector de largo La aguja está de puntada está mal colocada puesto para que el tejido no alimente Página 14 Página 9 La combinación tamaño de aguja/ Se está...
- Page 87 (Model PS-2500,STAR140E) THREADS AUTOMATIC CANNOT BE CUT THREAD CUT- WITH AUTOMATIC TER DOES NOT THREAD CUTTER WORK The Thread Nylon or another Cutter Lever is not specialty thread pulled down as far is being used. as possible. Page 20 Page 21 The Presser Foot The threads are Lever is not...
- Page 88 (Modelo PS-2500,STAR140E) NO SE PUEDEN CORTAR LOS HILOS CORTAHILOS CON EL CORTAHILOS AUTOMÁTICO AUTOMÁTICO NO FUNCIONA La palanca del Se está utilizando cortahilos no está nylon u otro hilo bajada al máximo. especial. Page 20 Page 21 La palanca del Los hilos están prensatelas no enredados.
-
Page 89: Repacking The Machine
Repacking the Machine Keep the carton and packing materials for future use. It may become necessary to reship the sewing machine. Improper packing or improper packing material could result in damage during shipping. Instructions for repacking the machine are illustrated below. - Page 90 Accessories ... 5 Applique ... 60 Arrow Head Stitch ... 46 Bead Stitch ... 46 Blind Hem Stitch ... 41 Bridging Stitch ... 44 Buttonhole ... 51 Buttonhole Fine Adjustment ... 54 Button Sewing ... 57 Changing Presser Foot ... 10 Changing the Bulb ...
- Page 91 Overedging ... 48 Parallelogram Stitch ... 46 Patchwork ... 47 Pattern Selection Dial ... 11 Performance Checklist ... 76 Principal Parts ... 1 Rampart Stitch ... 44 Relative Chart of Sewing Fabrics, Needles and Threads ... 34 Repacking ... 82 Reverse Sewing Button ...
- Page 92 Overedging ... 48 Parallelogram Stitch ... 46 Patchwork ... 47 Pattern Selection Dial ... 11 Performance Checklist ... 76 Principal Parts ... 1 Rampart Stitch ... 44 Relative Chart of Sewing Fabrics, Needles and Threads ... 34 Repacking ... 82 Reverse Sewing Button ...
- Page 93 ENGLISH SPANISH 194377-011 Printed in Taiwan...