Table of Contents
Advertisement
Available languages
Available languages
Quick Links
Cat. No. / No de cat.
2776R-20
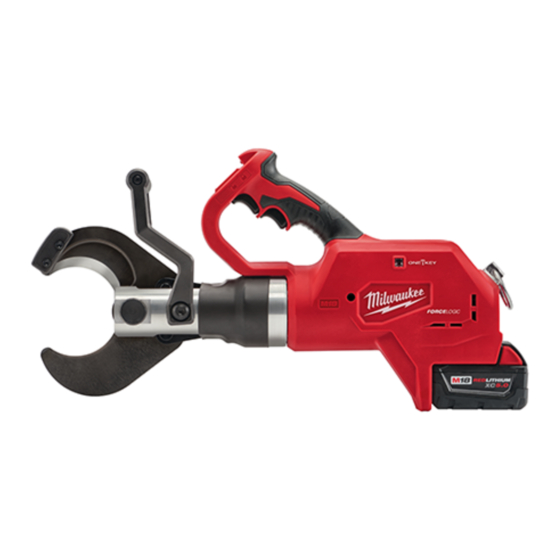
M18™ FORCE LOGIC™ 3" UNDERGROUND CABLE CUTTER
WITH WIRELESS REMOTE
COUPE-CÂBLE SOUTERRAIN DE 76 mm FORCE LOGIC™
M18™ AVEC TÉLÉCOMMANDE SANS FIL
CORTADOR DE CABLE SUBTERRÁNEO DE 76 mm
M18™ FORCE LOGIC™ CON MANDO A DISTANCIA
WARNING
AVERTISSEMENT
comprendre le manuel.
ADVERTENCIA
To reduce the risk of injury, user must read and understand operator's manual.
Afin de réduire le risque de blessures, l'utilisateur doit lire et bien
Para reducir el riesgo de lesiones, el usuario debe leer y entender el manual.
OPERATOR'S MANUAL
MANUEL de L'UTILISATEUR
MANUAL del OPERADOR
Advertisement
Table of Contents

Related Manuals for Milwaukee M18 FORCE LOGIC 2776R-20


Summary of Contents for Milwaukee M18 FORCE LOGIC 2776R-20
- Page 1 OPERATOR'S MANUAL MANUEL de L'UTILISATEUR MANUAL del OPERADOR Cat. No. / No de cat. 2776R-20 M18™ FORCE LOGIC™ 3" UNDERGROUND CABLE CUTTER WITH WIRELESS REMOTE COUPE-CÂBLE SOUTERRAIN DE 76 mm FORCE LOGIC™ M18™ AVEC TÉLÉCOMMANDE SANS FIL CORTADOR DE CABLE SUBTERRÁNEO DE 76 mm M18™...
-
Page 2: General Power Tool Safety Warnings
GENERAL POWER TOOL attached to a rotating part of the power tool may result in personal injury. SAFETY WARNINGS • Do not overreach. Keep proper footing and bal- Read all safety warnings, instruc- WARNING ance at all times. This enables better control of the tions, illustrations and specifica- power tool in unexpected situations. -
Page 3: Functional Description
Do not use this tool if you do not understand these operating instructions or you feel the work is beyond your capability; contact Milwaukee Tool or a trained professional for additional information or training. • Maintain labels and nameplates. These carry 1. -
Page 4: Specifications
Replace the blades when they become chipped or damaged. Always replace blades as a set. Use only Keep hands away from all cutting edges and MILWAUKEE blades. Refer to Specifications for moving parts. Laceration and amputation replacement blade numbers. can occur. - Page 5 6. When the cut is complete, the cut indicator will light: Green = Done Cutting Red = Cut Failed Per NFPA 70E 7. To reset, pull the trigger (1) to unlock. Pull the release trigger (2) to reset the jaws. Turn OFF the remote cut switch (3).
-
Page 6: Maintenance
2 hours if swallowed or enters the body. or replace any part on an electric power tool which, after examination, is determined by MILWAUKEE to be defective in material or workman- Always secure the battery cover. If it does not... -
Page 7: Sécurité Électrique
Warranty Registration is not necessary to obtain the applicable war- de sécurité, consignes, ranty on a MILWAUKEE power tool product. The manufacturing date illustrations et spécifications fournies avec cet of the product will be used to determine the warranty period if no proof of purchase is provided at the time warranty service is requested. -
Page 8: Sécurité Individuelle
SÉCURITÉ INDIVIDUELLE • Entretenir les outils électriques et les acces- soires. Vérifier qu'aucune pièce mobile n'est mal • Rester attentif, prêter attention au travail et faire alignée ou bloquée, qu'aucune pièce n'est brisée preuve de bon sens lors de l'utilisation de tout et s'assurer qu'aucun autre problème risque outil électrique. -
Page 9: Entretien
; celles dans NFPA 70E, ont été prises à veuillez contacter Milwaukee Tool ou un professionnel l’avance. formé pour recevoir plus d’information ou formation. Garder les mains •... -
Page 10: Description Fonctionnelle
à l’aide de l’appli ONE-KEY™. Remplacement des lames Remplacer les lames ébréchées ou endommagées. Les lames doivent toujours être remplacées en paires. Utiliser uniquement des lames MILWAUKEE. Se référer aux spécifications pour les numéros de lame de remplacement. - Page 11 ON THE TOOL: Turn ON (I) the remote cut Pull the trigger and Turn ON (I) the remote. MANIEMENT switch on the tool. slide the trigger lock to Light 1 steady blue. 1. Mettre l’interrupteur de coupe à dis- Press and hold button 2 for Remote cut light steady red.
- Page 12 Pour réduire les risques AVERTISSEMENT saires, comme le remplacement du fluide. Retournez de blessures, ne couper l’outil à un centre de service MILWAUKEE pour tout que des matériaux recommandés pour les service d’entretien et de réparation. mâchoires (voir « Caractéristiques techniques »).
- Page 13 L’enregistrement de la garantie n’est pas nécessaire pour bénéficier de la garantie en vigueur sur un outil électrique MILWAUKEE. La date s'y infiltrer. de fabrication du produit servira à établir la période de garantie, si Nettoyage aucune preuve d’achat n’est fournie lorsqu’une demande de service...
-
Page 14: Seguridad En El Área De Trabajo
• Si es inevitable utilizar una herramienta eléctrica en un lugar húmedo, utilice un alimentador de Modèle : corriente protegido con un interruptor de circuito Date d’achat : por falla de conexión a tierra (GFCI). El uso de un Sceau du distributeur ou du magasin : GFCI reduce el riesgo de descarga eléctrica. -
Page 15: Mantenimiento
• Cuando la batería no esté en uso, manténgala trabajo a realizar supera sus capacidades, comuníquese alejada de otros objetos metálicos como sujeta- con Milwaukee Tool o con un profesional capacitado papeles, monedas, llaves, clavos, tornillos u otros para recibir capacitación o información adicional. -
Page 16: Especificaciones
ESPECIFICACIONES DESCRIPCION FUNCIONAL Cat No.............2776R-20 Volts ...............18 cd Tipo de batería ..........M18™ 9 10 Tipo de cargador ..........M18™ Temperatura ambiente recomendada para operar .....-18°C to 50°C (0°F to 125°F) Calificación de campo de alto voltaje ..34,5 kV Capacidad máx. * Conductor sencillo .....1 500 MCM Cu, 15KV 1 500 MCM Al, 46KV 3 Conductores .....350 MCM Cu, 15 KV... - Page 17 Reemplace las cuchillas cuando se hayan astillado desbloquearla el dueño a través de o dañado. Siempre reemplace las cuchillas en con- la aplicación ONE-KEY™. junto. Use solamente cuchillas MILWAUKEE. Haga OPERACION referencia a las Especificaciones para conocer los números de las cuchillas de reemplazo.
- Page 18 Corte he remote cut Pull the trigger and Turn ON (I) the remote. 1. Encienda en ON ( ) el interruptor de tool. slide the trigger lock to Light 1 steady blue. • Antes de cortar, asegúrese de que el pasador TO RESET: corte a distancia en la herramien- ght steady red.
- Page 19 Al devolver la herramienta eléctrica a un Centro de Servicio de la fábrica de MILWAUKEE o a una Estación quemaduras internas graves y causar la muerte de Servicio Autorizada de MILWAUKEE, se requiere que el flete esté...
- Page 20 Sello del Distribuidor: Consulte la “Búsqueda de centro de servicio” en la sección de Partes y servicio del sitio web de MILWAUKEE en www.milwaukeetool.com o llame al 1.800.SAWDUST (1.800.729.3878) para localizar su centro de servicio más cercano para darle servicio con y sin garantía a una herramienta eléctrica de Milwaukee.