Table of Contents
Advertisement
Advertisement
Table of Contents

Related Manuals for Brother PE-400D


Summary of Contents for Brother PE-400D
- Page 1 PERATION MANUAL ®...
-
Page 2: Important Safety Instructions
“IMPORTANT SAFETY INSTRUCTIONS” When using a sewing machine, basic safety precautions should always be taken, DANGER – To reduce the risk of electric shock. 1. The sewing machine should never be left unattended while plugged in. Always unplug the sewing ma- chine from the electrical outlet immediately after using and before cleaning. - Page 3 FOR USERS IN THE UK, EIRE, MALTA If your sewing machine is fitted with a three-pin non-rewireable BS plug then please read the following. If the available socket outlet is not suitable for the plug supplied with this equipment, it should be cut off and an appropriate three-pin plug fitted.
- Page 4 In the event that a malfunction occurs or adjustment is required, first follow the troubleshooting table in the back of the operation manual to inspect and adjust the machine yourself. If the problem persists, please consult your nearest authorized Brother service center.
-
Page 5: Warning Labels
WARNING LABELS There should be several warning labels on your sewing machine. Please heed warning labels when operating the sewing machine. If you don't understand the warnings, please contact the place of purchase. CAUTION Always remove the embroidery unit before moving the sew- ing machine. -
Page 6: Table Of Contents
CONTENTS SETTING UP ... 5 PRINCIPAL PARTS ... 5 OTHER INCLUDED ACCESSORIES ... 7 OPTIONS ... 8 SELECTION KEYS ... 9 Screen messages guide you through each operation ... 9 OPERATION BUTTONS ... 10 Using the operation buttons ... 10 BASIC SEWING MACHINE OPERATION ... - Page 7 CHECKING THREAD COLORS AND TIME REQUIRED ... 81 Checking thread colors ... 81 Checking time required to complete a pattern ... 82 CHOOSING EMBROIDERY PLACEMENT ... 83 Moving the embroidery location ... 84 Checking the embroidering area ... 84 Embroidering from a specific starting point .. 85 ROTATING AND MIRRORING PATTERNS ...
-
Page 8: Setting Up
SETTING UP PRINCIPAL PARTS 1– Handle 2– Spool cap 3– Thread guide for bobbin winding 4– Upper tension control dial 5– Speed range control lever 6– Thread cutter 7– Buttonhole lever 8– Needle threader 9– Presser foot 10– Feed dog 11–... - Page 9 The location of each accessory is shown in fig- ure III. Buttonhole foot “A” Overcasting foot “G” Seam ripper Bobbin Needle set Spool cap (Large) Spool cap (Small) Always use BROTHER accessories with this machine. Part Name Part Code X57789-101 X51162-001 X54243-001 X80309-001 XA6627-001...
-
Page 10: Other Included Accessories
If using metallic thread, we recommend that you use a 90/14 home sewing machine needle. Note (For U.S.A. only) Foot controller : Model N5V This foot controller can be used for sewing machine model PE-300S/PE-400D. Blind stitch foot “R” Zipper foot “I” Button sew-on foot... -
Page 11: Options
No.37 Applique Alphabet SA337 No.38 Angel SA338 No.39 Doll Face SA339 No.40 Sports 3 SA340 WARNING Embroidery Cards purchased overseas or non Brother brand embroidery cards may not work with your machine. Part Code Others XA6630-002 X80914-001 X58317-001 X58321-001 X58497-001 X59322-001... -
Page 12: Selection Keys
SELECTION KEYS Screen messages guide you through each operation SELECTION KEYS 1 “ ” KEY Press while in the pattern selection screens to go back one page. (also used in Save and Restore screens) 2 “ ” KEY Press to advance one screen while in pattern selec- tion screens. -
Page 13: Operation Buttons
OPERATION BUTTONS Using the operation buttons OPERATION BUTTONS 1 Speed range control lever Slide this lever to change the sewing speed. 2 “NEEDLE POSITION” button Press this button to move the needle either up or down. 3 “REVERSE STITCH” button Hold down this button to sew either backwards or in the same place at a slow speed. -
Page 14: Basic Sewing Machine Operation
BASIC SEWING MACHINE OPERATION FLAT BED EXTENSION TABLE Sewing machine cover converts to a flat bed extension table. Free arm 1. Slide the sewing machine cover to the left and off the ma- chine. 2. With the cutout section of the cover up, lift the machine a little bit and slide the cover, under the sewing machine along the grooves. -
Page 15: Power Supply
In addition, do not place heavy objects on the cord or subject it to heat, otherwise the cord may be damaged or a fire or an electric shock may occur. If the power cord or plug are damaged, contact your nearest authorized Brother dealer or service center. -
Page 16: Using The Screen Keys
USING THE SCREEN KEYS ABOUT THE SCREEN NOTES – All or parts of the screen may become darker or lighter at times because of changes in the ambient temperature around the screen. This is normal and is not the sign of a malfunction. Adjust the screen if it is difficult to read. -
Page 17: How To Change Language
HOW TO CHANGE LANGUAGE While touching a selection key, turn the power off and then back on again. Example: To change the display language to Spanish 1. Touch the “ ” key. 2. Touch “ESPAÑOL (SPANISH)”. This will change the language setting to Spanish. 3. -
Page 18: How To Clear The Language Selection
How to clear the language selection While touching a selection key, turn the power off and then back on again. Example: To change the display language from Spanish back to English 1. Touch the “ENGLISH” key. This will cancel the Spanish language setting. The display will then return to the screen which was previously being displayed. -
Page 19: Bobbin Winding / Bobbin Thread Setting
BOBBIN WINDING / BOBBIN THREAD SETTING Note: Always use bobbins that are especially made for this machine. Using bobbins not designed for this machine could result in bodily injury and/or damage to the machine. For sewing, use the plastic bobbin (X80309-001) for sewing. 9·10 入... - Page 20 3. Set the thread spool. The thread end should come from the bottom front of the spool. The spool cap closest to the thread spool size should be used to hold the spool securely on the spool pin. 1 Spool cap 2 Spool CAUTION If the spool is placed onto the pin in the wrong direction,...
- Page 21 5. Guide the thread through the small hole in the side of the bob- bin from the inside. Align the groove in the bobbin with the spring on the shaft and place the bobbin on the bobbin winder shaft. While holding the thread end, push the bobbin winder shaft to the right.
-
Page 22: Setting The Bobbin
Setting the bobbin 1. Slide open the bobbin cover. 1 Bobbin cover 2 Bobbin cover release button 2. Insert the bobbin into the shuttle with the thread direction as noted in the diagram. CAUTION Always make sure the bobbin is inserted so the thread feeds out of the bobbin in the correct direction. -
Page 23: Upper Threading
UPPER THREADING 前 ページ 次 ページ CAUTION Always make sure to thread the machine properly as shown in the directions. If the machine is not threaded properly, the thread could get stuck, needles could break and bodily injury could result. 1. - Page 24 4. Guide the thread as illustrated by the numbers and arrow marks on the machine. Threading is easy if you hold the thread gen- tly with your right hand while guiding the and of the thread with your left hand. 1 Run the thread all the way through the thread guides.
- Page 25 6. Run thread through the guide above the needle. HOW TO USE THE AUTOMATIC NEEDLE THREADER CAUTION Be careful not to turn the machine on while using the automatic needle threader. Use the automatic needle threader with size #11-16 sewing machine needles. Use the quick reference chart (p.
-
Page 26: Starting And Stopping Sewing
3. When pressure on the foot controller is released, the machine will stop. When the foot controller is being used, the “START/STOP” button has no effect on the sewing. Note (For U.S.A. only) Foot controller: Mxodel N5V This foot controller can be used for sewing machine model PE- 300S/PE-400D. -
Page 27: Stitch Selection (Utility Stitches)
STITCH SELECTION (UTILITY STITCHES) Stitches G Straight (Left) G Straight (Middle) G Zigzag G Elastic zigzag G Blind hem stitch G Buttonhole G Scallop G Decorative stitch Press the “ ” key and “ the stitch y ou wish to use . Then press the desired stitch to select it. -
Page 28: Trial Sewing
TRIAL SEWING CAUTION – Be aware of the needle at all times while sewing, and keep your hands away from all moving parts such as the needle, balance wheel and thread take-up lever, otherwise injury may result. – Do not pull or push the fabric too hard while sewing, otherwise injury may result. –... - Page 29 4. Lower the presser foot. Press the “REVERSE STITCH” button to sew a reverse stitch, and then press the “START/STOP” button. The machine will start sewing at slow speed. Sew reverse stitches at the beginning and end of stitches to reinforce them. 5.
-
Page 30: Stitch Width And Stitch Length
STITCH WIDTH AND STITCH LENGTH Your machine will automatically set stitch length and width when a stitch is selected. See the following instructions if you wish to further adjust stitch length or width. Adjusting the stitch width Adjusting the stitch length The two arrow buttons next to the stitch width mark (top pair of arrows) adjust stitch width. -
Page 31: Quick Adjustment Reference Chart For Stitch Width And Stitch Length
Quick adjustment reference chart for stitch width and stitch length STITCH Straight (Left) Straight (Middle) Triple stitch Stretch stitch Zigzag Elastic zigzag Overcasting Overcasting Blind hem stitch Blind hem stitch Buttonhole Buttonhole Buttonhole Bar tack Applique Scallop Stitch width [mm (inch.)] Auto. - Page 32 STITCH Patchwork stitch Fagoting Triple zigzag Decorative stitch Decorative stitch Decorative stitch Decorative stitch Decorative stitch Decorative stitch Decorative stitch Decorative stitch Decorative stitch Decorative stitch Decorative stitch Decorative stitch Decorative stitch *–: Non-adjustable Stitch width [mm (inch.)] Auto. Manual 2.5 —...
-
Page 33: Thread Tension
THREAD TENSION Use the tension dial to adjust thread tension in accordance to the fabric and thread you are using. For stitches with fairly small stitch lengths, such as the satin stitch and buttonhole stitching, you can get a better stitch by slightly reducing tension. Use the tension dial to adjust thread tension for lightweight or heavyweight fabrics and for gathers. -
Page 34: Presser Foot
PRESSER FOOT Changing the presser foot CAUTION Always make sure to turn the machine off and unplug it when changing presser feet. If the power accidentally comes on, the machine might start running and bodily injury could result. 1. Push the “NEEDLE POSITION” button to raise the needle, and then turn off the power. -
Page 35: Changing The Embroidery Foot And The Zipper Foot
Changing the Embroidery foot and the zipper foot Embroidery foot “Q” Zipper foot “I” 1. Push the “NEEDLE POSITION” button to raise the needle, and then turn off the power. 2. Remove the screw on the presser foot holder. 1 Disk-shaped screwdriver 3. -
Page 36: Feed Dogs
FEED DOGS The feed dog adjustment lever can be seen at the back of the sewing machine. Sliding the lever to the left will lower the feed dogs, for example during button sewing. If you wish to continue sewing normally, slide the lever to the right in order to raise the feed dogs. -
Page 37: Needle
NEEDLE CAUTION – Always make sure to turn the machine off before changing needles. There is a danger of injury if the machine accidentally starts running during this operation. – Never use bent or damaged needles. If the needle breaks while sewing, the broken tip could fly away from the machine and cause injury. -
Page 38: Fabric/Thread/Needle Combination Chart
FABRIC/THREAD/NEEDLE COMBINATION CHART Sewing fabrics Broad cloth Medium Taffeta/Satin Flannel, Gabardine Lawn Lightweight Georgette Challis Denim Heavy Corduroy Tweed Jersey Stretch Tricot Woven fabrics that unravel easily For top stitching Use the golden needle when sewing on stretch fabrics and fabrics where skipped stitches easily occur. Use a needle with a size between 14 and 16 when sewing with transparent nylon thread. -
Page 39: Utility Stitches
UTILITY STITCHES STRAIGHT STITCHES 1 Straight (Left) 2 Straight (Mid dle) 1. Attach the J f oot. Handle thread and fabric with y our left hand while tur ning the balance wheel with the r ight. Pierce the nee- dle through the f abric as shown. 2. -
Page 40: Changing Needle Position
Changing needle position Sewing corners When sewing a straight stitch along the left edge of the f abric, you can press the stitch width arro ws to mo ve the needle position from left to r ight. This allows you to adjust the distance of the stitches from the edge of the f abric, while still allowing y ou to r un the edge of the f oot along the edge of the f abric. -
Page 41: Sewing Curves
Sewing curves Sewing thick seams Sewing thick fabric Sew slowly, while keeping the seams parallel with the f abric edge as you guide the f abric around the cur ve. When the f oot angles up at the approach of a thic k seam, lower the needle and raise the presser foot. -
Page 42: Sewing Thin Fabric
Sewing thin fabric Using the free arm Place thin paper or stabiliz er material under the fabric, and then start sewing. 1 Paper The free arm is handy when sewing hard-to-reach areas like hems and cuffs on pant legs . Remove the accessor y case to use it. -
Page 43: Stretch Stitch And Triple Stitch
STRETCH STITCH AND TRIPLE STITCH Stretch stitch Triple stitch 1 Stretc h stitc h 2 Reinforced stitc h Use on knit f abrics that stretch. Do not stretch f abric while sewing with this stitch. Use on high stress areas like the arm holes of sleeves and the crotch of slac ks as a strengthening stitch. -
Page 44: Zigzag Stitches
ZIGZAG STITCHES The zigzag stitch is handy f or overcasting or w orking with applique and patchw ork. Overcasting (using a zigzag stitch) Applique (using a zigzag stitch) Zigza g Sew the o vercasting along the edge of the f abric so that the r ight hand side needle drop point is o ver the edge of the f abric. -
Page 45: Patchwork (For Crazy Quilt)
Patchwork (for crazy quilt) Sewing a curve with a zigzag stitch Turn back the desired width of f abric and position it o ver the lower fabric, then sew so that the stitch br idges both pieces of f abric. 1 Upper f abric 2 Lower fabric An attractive stitch can be achie ved when sewing around cor ners... -
Page 46: Dotted Zigzag
DOTTED ZIGZAG Attaching elastic bands Overcasting Elastic zigza g Stretch elastic while se wing. 1 Elastic Band Use when sewing stretchab le fabrics. Allow the needle to drop off over the edge of the f abric while sewing. -
Page 47: Overcasting
OVERCASTING Caution Always be sure to use the right foot for the stitch you are sewing. Using the wrong foot could cause the needle to hit the foot while sewing, which could result in broken needles and possible injuries. Overcasting Overcasting 1 Over casting (Presser f oot “G”) 2 Over casting (Presser f oot “G”) -
Page 48: Overcasting
Overcasting Overcasting For use on stretchab le fabrics. Attach J f oot. Keep foot on the edge of f abric so that needle drops slightly o ver the edge of f abric while sewing. 1 Needle Drop Point For use on a wide r ange of f abrics. Attach J f oot. Keep foot on the edge of f abric so needle drops slightly o ver the edge while se w- ing. -
Page 49: Blind Hem Stitches
BLIND HEM STITCHES Use the on stretch f abrics and the for other f abrics. 1 Blind hem stitc h 2 Blind hem stitc h 1. Fold the f abric and baste it as illustr ated. 1 0.5 cm (1/64”) 2 Basting stitch 3 Overcasting 4 0.5 cm (1/64”) -
Page 50: If The Needle Does Not Catch The Fold Of Hem Enough
If the needle does not catch the fold of hem enough. If the needle catches the fold of hem too much. Touch the “ ” key stitch width setting k ey. This moves the needle closer to the f old. Touch the “... -
Page 51: Buttonhole Stitches
BUTTONHOLE STITCHES Always make your stitch samples out of scr aps from the f abric you will be using. For standard b utton holes , select . Select sewing b utton holes into stretch f abrics and 1 Buttonhole 2 Buttonhole 3 Buttonhole 1. -
Page 52: Order Of One Cycle
Order of one cycle Reinforcement stitch 5. Press the “START/ST OP” button to star t the machine, while gently holding the end of the upper thread. Gently, feed the f abric by hand. The machine will stop with a reinf orcement stitch automati- cally after sewing is completed. -
Page 53: Sewing Stretch Fabrics ( )
Sewing stretch fabrics ( Buttons that do not fit into the guide plate (Odd-shaped buttons) When sewing b uttonholes onto stretch f abric, insert a gimp thread into the b uttonhole seam (b uttonholes only). 1. Hook the gimp thread onto the end of presser f oot “A”, inser t it into the g roove at the front of the presser f oot and tempor arily tie it there . -
Page 54: Bar Tacking
BAR TACKING Use for reinforcing the openings of poc kets, etc. 1 Bar tac k 1. Attach p resser foot “A” and set the size by measuring the area to be b ar tacked. 1 Scale 2 0.5 cm (13/64”) 3 Length of bar tac k 0.5 to 3 cm (13/64”... -
Page 55: Thick Fabrics
Thick fabrics 5. Start the machine while holding the end of the upper thread gently. The machine will sew a reinforcement stitch and stop au- tomatically after se wing is completed. If the zipper slide gets in the w ay, lower the needle all the w ay through the cloth, lift the f oot, and mo ve the slider out of the w ay. -
Page 56: Appliques
APPLIQUES Sewing the applique around corners 1 Applique 2 Zig zag 3 Fagoting Preparations: Attach the applique to the fabric. The applique should be at- tached with fabric glue or a basting stitch so that it will not move during sewing. 1 Applique 2 Fabric glue 1. -
Page 57: Scallop
SCALLOP Use to put a decorative trim on shirt collars and handkerchiefs. 1 Scallop 2 Scallop 1. Attach the J foot. While sewing, take care to leave a little space between the stitches and the edge of the fabric. 2. Carefully cut along the outsides of the stitching, taking care not to cut the threads. -
Page 58: Patchwork Stitch
PATCHWORK STITCH 1 Patchwork stitch Preparations: Press the seam open from the wrong side of the cloth. 1 Straight stitch 2 Seam allowance 3 1 cm (3/8”) 4 Reverse side Attach the J foot. Line the presser foot up along the center of the seam and sew. -
Page 59: Zipper Insertion (Centered And Side Application)
ZIPPER INSERTION (CENTERED AND SIDE APPLICATION) Caution Before sewing, gently turn the hand wheel to check the needle position. Make sure that the needle does not come down onto the foot, or it could break and cause injury. Centered application 1 Straight Preparations: Attach presser foot “J”... -
Page 60: Side Application
Side application Preparations: Attach presser foot “J” and sew straight stitches up to the crotch end. Change to a basting stitch and sew to the top of the fabric. 1 Reverse stitch 2 Basting stitch 3 Crotch end 4 Reverse side 5 Straight stitch 1. - Page 61 4. Close zipper. Turn fabric over to the right side and baste. 1 Left pressed edge of zip opening (wrong side) 2 Right pressed edge of the zip opening (wrong side) 3 Zipper 4 Basting stitch 5 Left pressed edge of zip opening (right side) 5.
-
Page 62: Smocking
SMOCKING Use to add a decorative touch to garments. Select a straight stitch with a stitch length of 4.0 mm Reduce thread tension and sew a few rows of stitches about one centimeter apart. 1 About 1 cm (25/64”) Pull the bottom of the threads to gather the cloth and iron gathers. -
Page 63: Button Sewing
BUTTON SEWING Caution Before starting always turn the hand wheel to check to make sure the needle isn't hitting the button. If the needle hits the button while sewing, it could break and cause injury. 1 Zig zag 1. Raise the presser foot lever and slide the feed dog adjustment lever to the right to lower the feed dog. -
Page 64: Attaching Buttons With Four Holes
Attaching buttons with four holes 5. Once sewing is completed, return the feed dog to its original position, pull the bobbin thread at the sewing end down and pull the upper thread at the sewing end through to the reverse side of the fabric. -
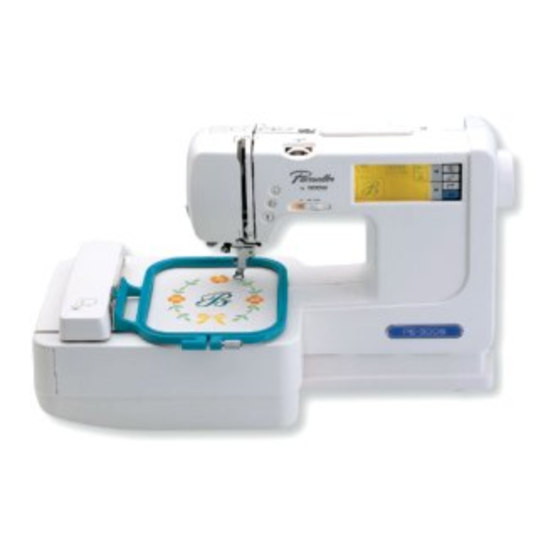
Page 65: Embroidering
EMBROIDERING BEFORE YOU BEGIN 1. Embroidery unit and memory cards (optional). CAUTION – Do not touch the embroidery unit connectors. Doing so could cause damage to the machine. – Do not move the sewing machine while the embroidery unit is attached. The embroidery unit could fall and cause injury. -
Page 66: Attaching The Embroidery Unit
3. Attaching the embroidery unit CAUTION Always make sure the power is off when attaching the embroidery unit or damage could result. 1. Turn off sewing machine. 2. Slide accessory case to the left and remove it. 3. Remove cover of the embroidery unit. Attach unit to the ma- chine as shown in the drawing until you hear a click sound. -
Page 67: Removing Embroidery Unit
Removing embroidery unit 1. Remove embroidery hoop. Push “ key. The carriage will move to the storage position. CAUTION – If the carriage is not in the storage position, you might not be able to put the cover on the embroidery unit. –... -
Page 68: Choosing Embroidery Patterns (Part I)
CHOOSING EMBROIDERY PATTERNS (PART I) This computerized sewing machine comes with pre-programmed alphabet and patterns. You may also use optional memory cards for more designs. 1. Turn on the machine and touch the screen. You should see the message displayed in the diagram on your screen. 2. -
Page 69: One-Point Patterns
One-point patterns 1. Push “ ” key. If you are not at the screen shown in the diagram, simply push “ ” key to come to this screen. mean pattern number/total number of pat- terns *this shows the first and second patterns out of a group of 70 to choose from. - Page 70 3. The Sew screen will appear. Pushing “ ” key will bring you back to the previous screen.
-
Page 71: Borders
Borders Allows you to select a border pattern you like by choosing the shape of the border and stitch for your border. 1. Push “ ” key. If you are not on the screen shown in the diagram, simply push “ ”... -
Page 72: Lettering
Lettering Press “ ” key. If you are not on the screen shown in the diagram, simply push “ ” key to come to this screen. Example: For practice, try the word "BUS": 1. Press " " key. The letter “B” should appear at the top of your screen as shown in the diagram. -
Page 73: Numerals And Punctuation
Numerals and punctuation Lower and upper case letters Pushing the “ ” key will take you to the Punctuation and Number screens. The “ ” key button allows you to alternate between upper and lower case lettering. -
Page 74: Selecting Patterns From A Memory Card
Selecting patterns from a memory card 1. Turn off the power. 2. Insert the memory card you wish to use into the card slot, which is located on the right side of the sewing machine. The arrow on card should be facing you and pointing to the left, into the machine. -
Page 75: Choosing Embroidery Patterns (Part Ii)
CHOOSING EMBROIDERY PATTERNS (PART II) If you accidentally choose the wrong design If you choose the wrong character To change size 1. Press the “ ” key to go back to the previous screen. Press “ ” key. Each time you press delete it will delete the last character on the top of the screen. -
Page 76: To Make Words
To make words Example: For practice, try entering the characters "ABCDEFGH" 1. Press “ ” key. The letters will scroll across your screen to the left starting with the first letter selected. The screen only scrolls if the letters will not all fit in the screen. -
Page 77: Embroidering
Home sewing machine needle 75/11 NEEDLE Do not use ballpoint needles. Use Brother embroidering thread (X81164-001) for the bobbin thread. Types of embroidery frames CAUTION Depending on the size of the pattern and the position of the pattern to be embroidered, it may not be possible to use the small frames. -
Page 78: Setting The Fabric Into The Embroidery Frame
Setting the fabric into the embroidery frame 1. Mark the fabric using a chalk pen or fabric marking pen to indicate the embroidering position. 2. Loosen the adjusting screw and separate the inner and outer frames. Lay the fabric on top of the outer frame and secure it between the inner and outer frame, and tighten the adjusting screw just enough to secure the fabric. - Page 79 5. Press down into the outer frame so that the mark doesn’t move out of place. 1 Outer frame 2 Inner frame 3 Surface of fabric Press down firmly until the outer frame and inner frame are at the same height. 6.
-
Page 80: Fitting The Embroidery Frame To The Embroidery Unit
Fitting the embroidery frame to the embroidery unit CAUTION Be sure to wait until the embroidery unit has finished initializing before fitting the embroidery frame. (Refer to page 65.) Removing the embroidery frame 1. While holding the frame with both hands, pull the front of the hoop up to lift it out of the front pin. -
Page 81: Embroidering
Embroidering CAUTION – When sewing embroidery, Brother embroidering thread (X81164-001) must be used for the bobbin thread. – Check bobbin thread before beginning to sew. If you embroider when the bobbin thread is low, the thread could tangle up or other problems could result. - Page 82 Embroidering order for pattern parts 5. Change the thread to the next color and start sewing again. The machine will continue to stop for thread changes. 6. Continue changing threads and starting the machine through the third and fourth colors. After it has sewn the fourth and last color, it will stop automatically.
-
Page 83: Thread Tension
THREAD TENSION Set thread tension according to the fabric you are using with the tension dial. Correct thread tension Surface of the fabric is about one-third of the total width. <Top surface <Reverse side of the fabric> of the fabric> Poor stitch tension can result in poor stitch conformation, puckered fabric and thread breakage. -
Page 84: Checking Thread Colors And Time Required
CHECKING THREAD COLORS AND TIME REQUIRED Checking thread colors Press “ ” key. Colored sections will move one after another to the left, from the first colored section to be stitched to last. Automatically scrolls at a rate of one screen per .3 seconds. After scrolling through all color changes, you will be taken back to the first screen. -
Page 85: Checking Time Required To Complete A Pattern
Checking time required to complete a pattern Press “ ” key. The amount of time required for the pattern will be calculated and displayed on the screen. Press “ ” key to return to previous screen. “ ” means time remaining/time required The machine's calculations do not include the amount of time it takes you to change threads 2 minutes/2 minutes Press “... -
Page 86: Choosing Embroidery Placement
CHOOSING EMBROIDERY PLACEMENT 1. Press “ ” key to go to the edit screen. You cannot choose or delete patterns from the “ key screen. If you wish to do so, press to the previous screen. 2. Press “ ” key. Press the directional arrows to set needlework placement. -
Page 87: Moving The Embroidery Location
Moving the embroidery location Checking the embroidering area Use directional arrows to change the placement of pattern on the fabric. CAUTION Do not lower the needle while the hoop is in motion. Doing so could cause broken needles and possible injury. Press “... -
Page 88: Embroidering From A Specific Starting Point
Embroidering from a specific starting point 1. Mark the point to begin embroidering as shown in the dia- gram. 2. Press “ ” key. The embroidery hoop will move to place the needle above the lower left corner of the pattern. 3. -
Page 89: Rotating And Mirroring Patterns
ROTATING AND MIRRORING PATTERNS Rotating patterns Mirroring patterns 1. Press “ ” key. Each time you press it, your design will rotate in 90° increments to the right. The arrow indicates di- rection. CAUTION When rotating the pattern, make sure you are using a hoop that can do this. -
Page 90: Changing Size And Stitch Density Of Characters And Borders
CHANGING SIZE AND STITCH DENSITY OF CHARACTERS AND BORDERS To change size 1. Press “ ” key to go to the edit screen. You cannot select or delete a pattern from the “ key screen. If you wish to do so, push “ return to the previous screen. -
Page 91: To Change Stitch Density (Limited To Certain Alphabets And Borders)
To change stitch density (limited to certain alphabets and borders) Multi-colored lettering 1. Press “ ” key, then press “ 2. Press “ ” key for a finer stitch density, or “ key for a coarser stitch density. <Fine density> <Normal density>... -
Page 92: If The Thread Breaks During Embroidery
IF THE THREAD BREAKS DURING EMBROIDERY If the upper thread breaks 1. Stop the machine, raise the needle and foot, and rethread the machine. · If the bobbin thread breaks 1 Cut the upper thread, raise needle and foot, and re- move hoop. -
Page 93: When Starting Over From The Beginning
When starting over from the beginning Continuing after the power shuts off 5. Lower the presser foot and push “START/STOP” button. · The machine might not start sewing right away after press- ing “ ” key or “ alarmed about. Just push “START/STOP” button again. 1. -
Page 94: Embroidery Applications
EMBROIDERY APPLICATIONS Combining characters to form words 1. Enter "ABC", press “ key. 2. Press “ ” key to move the position of the needle over the fabric from the center to the lower left corner. 3. Press “START/STOP” button. After “ABC” has been stitched, move the fabric so the foot is in position to stitch "DE". -
Page 95: Outline Embroidery
Outline Embroidery Try something different by stitching only the outline of the pattern. <Multi-color <Single-color sewing > sewing> 6. Use “ ” key to move the foot so the needle will make its first stitch at the point it ended off "ABC". 1 Needle position of last stitch 7. -
Page 96: Embroidering Appliques (Using A Frame Pattern)
Embroidering appliques (using a frame pattern) You can use frame patterns with the same shape and size to sew appliques. 1. Select the frame shape to be embroidered and select the “ ” stitch. Embroider onto the applique material. Remove the fabric from the embroidery frame. -
Page 97: Embroidering Onto Small Pieces Of Fabric Or Onto Corners
Embroidering onto small pieces of fabric or onto corners Use a stabilizer to support the fabric while stitching. When finished, remove the stabilizer carefully. We recommend Brother stabilizers designed especially for use with our machines. • Example A 1 Iron on to attach to fabric (If you don't wish to use an iron, you may attach by basting). -
Page 98: Memory
MEMORY You can save patterns of linked characters and restore them when you wish to use them. (See page 5 for directions on saving designs) Saving groups of characters For example, to save the word “one” on page one. 1. Enter the letters “ONE”. 2. -
Page 99: Restoring Saved Designs
Restoring saved designs For example, to restore the word "GIRL". 1. Press “ ” key. 2. Press “ ” key. 3. Press “ ” key. 4. Pattern has been restored. -
Page 100: Maintenance
MAINTENANCE CLEANING CAUTION Disconnect the power cord from the wall socket before cleaning, otherwise injury or electric shocks may result. Cleaning the screen If the front panel is dirty, wipe it gently with a soft, dry cloth. Do not use any organic solvents or detergents. Cleaning the sewing machine surface If the surface of the sewing machine is dirty, lightly soak a cloth in neutral detergent, squeeze it out firmly and then wipe the surface. - Page 101 3. Turn the hand wheel towards you. Line up the shelf of race with the notch of shuttle and remove race. 1 Shuttle 2 Notch of shuttle 3 Race 4 Shelf of race 4. Remove accumulated lint and thread from the inner shuttle and race with a brush or a vacuum cleaner.
-
Page 102: Changing The Light Bulb
Light bulbs are available through your dealer. (8V, 2.4 W/ Parts code X50228001) CAUTION Do not use Brother 12V 5W light bulbs designed for use with this machine (part# XA2037001). Do not use other bulbs. Bulbs can be purchased at a Brother dealer near you. -
Page 103: Troubleshooting
P.30 If you have gone through the troubleshooting tips and are still unable to find the source of the problem, please take your machine back to the place of purchase or your nearest Brother dealer for repairs. Skipped stitches Needle is not correctly inserted. - Page 104 P.30 If you have gone through the troubleshooting tips and are still unable to find the source of the problem, please take your machine back to the place of purchase or your nearest Brother dealer for repairs. Embroldered pattern is out of shape...
- Page 105 If you have gone through the troubleshooting tips and are still unable to find the source of the problem, please take your machine back to the place of purchase or your nearest Brother dealer for repairs. Note This machine comes equipped with an upper thread sensor to prevent the machine from turning on if not properly threaded.
-
Page 106: Error Messages
ERROR MESSAGES Warning messages A warning buzzer will sound and error message flash on your screen if the “START/STOP” or “REVERSE STITCH” button are pressed when the machine is not properly set up, or operated incorrectly. Please read the error message and follow instructions carefully. The following is a list of the machine's error messages and what each means. - Page 107 This message will appear when attempting to re- store a memory card pat- tern that has been saved to a different memory card than the one inserted in the machine. This message will appear if you attempt to combine over 36 characters in a single pattern.
-
Page 108: Instruction Messages
This message will appear if you press the “START/ STOP” button while the foot controller is attached. This message is dis- played if a non-buttonhole pattern is selected and the “START/STOP” button or “REVERSE STITCH” button is pressed while the buttonhole lever is lowered. -
Page 109: Sewing Chart
SEWING CHART General sewing, STRAIGHT gather, Pintuck, etc. TRIPLE General sewing for STITCH reinforcement Straight stitching STRETCH (attaching sleeves, STITCH reinforcing, sewing stretch fabrics) Overcasting, ZIGZAG Patchwork Overcasting ELASTIC (medium and stretch ZIGZAG fabrics) Tape STITCH attaching, darning Reinforcing of thin and medium fabric OVER- CASTING... -
Page 110: Patterns (Programmed In Machine)
PATTERNS (PROGRAMMED IN MACHINE) Utility stitches Character embroidering chart Sizes: [L] 30mm (1-3/16”), [M] 15mm (9/16”), [S] 7.5mm (1/4”), Sizes: [L] 30mm (1-3/16”), [M] 15mm (9/16”), [S] 9mm (0-3/8”), Frame pattern embroidering chart Sizes can be enlarged or reduced. Frames Stitch Sizes: [L] 30mm (1-3/16”), [M] 15mm (9/16”), [S] 10mm (0-3/8”),... -
Page 111: Pattern
PATTERNS (MEMORY CARD) ONE POINT MARK EMBROIDERY PATTERN <Embroidering times: 2 - 31 min. (It does not include the time needed to change colors.)> 1 ... 019 1 ... 323 1 ... 086 2 ... 800 2 ... 085 2 ... 058 3 ... - Page 112 ENGLISH 882-147 194147-011 Printed in Taiwan...