Table of Contents
Advertisement
PET HAIR ERASER® SLIM CORDLESS
MODEL 2907F
What's in the Box? ............................................................. 3
Assembly .............................................................................. 3
Charging the Battery ........................................................ 5
Using the Vacuum .............................................................. 6
Attaching Tools for Hand Vac Use ............................... 6
Emptying the Dirt Tank .................................................... 7
Cleaning & Replacing the Filters ................................... 8
Maintaining the Brush Roll .............................................. 9
Troubleshooting ................................................................. 10
Warranty ............................................................................... 11
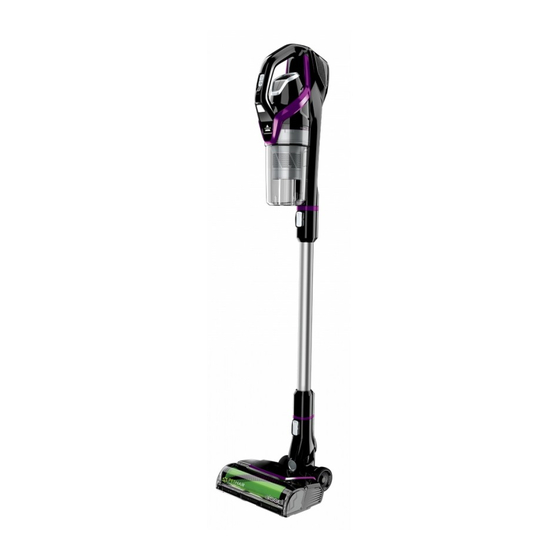
Product Overview
1. Hand Vacuum
2. Power Button
3. Cleaning Mode Button
4. Tank Release Button
5. Dirt Tank
6. Hand Vacuum
Release Button
7. Extension Wand
8. Foot Release Button
9. Tangle-Free Brush Roll
10. Motorised Floor Cleaning Foot
11. Charging Port
Go online for a comprehensive walkthrough
of your product!
This guide has everything you need to get ready for first use,
including setting up, using and maintaining your machine,
but online you'll find additional resources like tips and
troubleshooting, videos, product registration, parts, and more.
Go to global.BISSELL.com.
1
2
3
4
5
6
7
8
10
9
11
Advertisement
Table of Contents

Related Manuals for Bissell 2907F


Summary of Contents for Bissell 2907F
-
Page 1: Table Of Contents
PET HAIR ERASER® SLIM CORDLESS MODEL 2907F What’s in the Box? ............. 3 Assembly ................3 Installing the Wall Storage & Charging Station ..4 Charging the Battery ............5 Using the Vacuum .............. 6 Attaching Tools for Hand Vac Use ....... 6 Emptying the Dirt Tank ............ - Page 2 • Do not use on wet surfaces. Do not expose to rain. Store indoors. SAVE THESE INSTRUCTIONS ORIGINAL INSTRUCTIONS. FOR OPERATION ON A 220-240 VOLT A.C. 50-60 HZ POWER SUPPLY ONLY. THIS MODEL IS FOR HOUSEHOLD USE ONLY. 2 global.BISSELL.com...
-
Page 3: What's In The Box
Wall Storage & Charger Charging Station (Includes 3 Screws & Anchors) Assembly Go to global.BISSELL.com for assembly videos. Connect the extension wand Connect the hand vacuum Make sure to charge your to foot. You’ll hear a “click” to the extension wand. You’ll stick vacuum before first use. -
Page 4: Installing The Wall Storage & Charging Station
Installing the Wall Storage & Charging Station Go to global.BISSELL.com for more tips and video instructions. >1.2m >1.2m Install your Wall Storage Using a level, mark the screw Insert tool holder on the & Charging Station at least hole locations on the wall with side of the wall mount. -
Page 5: Charging The Battery
Charging the Battery Go to global.BISSELL.com for for additional how-to videos. Charging the Hand Vacuum Before first use, make sure Plug the charger into the Let the hand vacuum to fully charge your stick charging port on the back of charge for 5 hours or until all vacuum. -
Page 6: Using The Vacuum
Using the Vacuum Looking for more guidance? Go to global.BISSELL.com for tips and 24-7 support. Pet Hair Eraser® Slim Cordless can be used as a stick vacuum, hand vacuum or for extended reach with the hand vacuum and extension wand. -
Page 7: Emptying The Dirt Tank
Emptying the Dirt Tank More of a video person? Go to global.BISSELL.com for additional how-to videos. Turn OFF your machine. Grab the middle grip of Fully remove the separator Remove the dirt tank from the filter and pull up. This will... -
Page 8: Cleaning & Replacing The Filters
Cleaning & Replacing the Filters Go to global.BISSELL.com for tips on maintaining and replacing your vacuum filter. Pre-Motor Filter For best cleaning Twist top to remove filter Rinse under warm water performance, always clean frame from the separator. and squeeze to remove dirt. -
Page 9: Maintaining The Brush Roll
Maintaining the Brush Roll Go to global.BISSELL.com for tips on maintaining and replacing your vacuum. Turn the machine OFF and Use a flathead screwdriver Remove the brush and clear press the foot release button or coin to twist the bottom... -
Page 10: Troubleshooting
Troubleshooting Below are some of the issues you may run into. If you don’t see the issue you’re experiencing below, visit global.BISSELL.com. Problem Possible Cause Remedies Filters are dirty. Remove and rinse pre- and post-motor filters. Allow enough time for them to dry completely before reinserting. -
Page 11: Warranty
Australian Consumer Law. If you need additional excludes, limits or modifies any liability of instruction regarding this warranty or have BISSELL which is imposed by law, or limits or questions regarding what it may cover, please modifies any remedy available to the consumer contact your local BISSELL®... - Page 12 But wait, there’s more! Join us online for a complete guide to your new product, including troubleshooting, parts and more. Go to global.BISSELL.com. INFO VIDEOS PARTS REGISTER INFO VIDEOS PARTS SUPPORT ©2021 BISSELL Inc. All rights reserved. Part Number 1624201 01/21 RevC...