Table of Contents
Advertisement
Quick Links
Advertisement
Table of Contents

Related Manuals for Baby Lock Acclam BLES4


Summary of Contents for Baby Lock Acclam BLES4
- Page 1 Model BLES4...
- Page 2 ʺIMPORTANT SAFETY INSTRUCTIONSʺ W h en us ing ov erloc k m ac h ine, b as ic s af et y prec aut ions s h ould alw ays b e f ollow ed , inc lud ing t h e f ollow ing . R ead all ins t ruc t ions b ef ore us ing t h is ov erloc k m ac h ine.
- Page 3 Welcome to the Baby Lock Acclaim The Baby Lock Acclaim has an exclusive « Thread Delivery System » t h at elim inat es c onf us ing tension adjustments. The Acclaim enables you to accomplish a perfect stitch with any type of thread on any type of fabric.
- Page 4 Table of Contents OVERVIEW How Your Acclaim Operates O v e rv i ew of t h e A c c l aim A c c e s s o ries N eed les T h read O pt ional A c c e s s o ries Setting Up Your Acclaim Cutting Blade Locking Dial T h read C ut t er...
-
Page 5: Table Of Contents
Table of Contents ( Cont. ) 2-THREAD OVERLOCK 2 - T h read O v e rloc k C onv e rt ing f rom 3 - T h read O v e rloc k t o 2 - T h read O v e rloc k 2-Thread Flatlock - Wide 2-Thread Flatlock - Narrow Flatlock "Topstitching"... - Page 6 Serging is kind of a knitting process that loops two, three or four threads together to create a stitch. Your Baby Lock Acclaim operates with one or two needles and one or two « loopers , » eac h c arrying a t h read t o f orm t h e ov erloc k s t it c h .
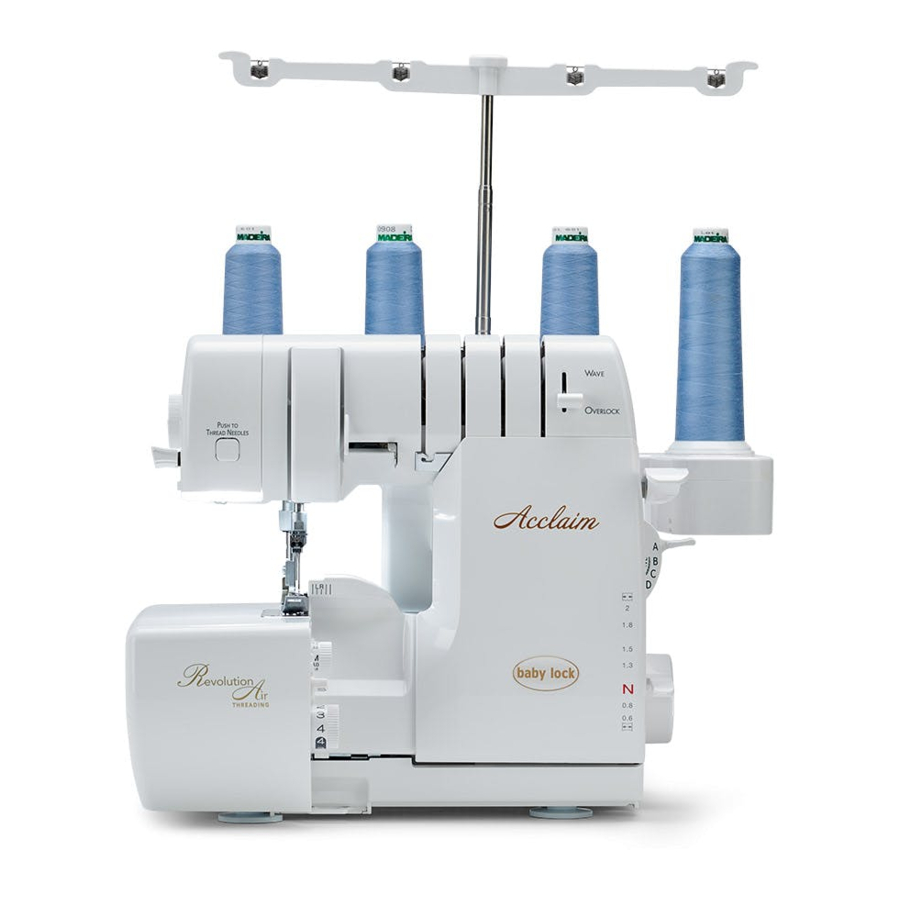
- Page 7 Overview of the Acclaim 1. Carrying handle 19. Front cover 2 . T h read c ut t er 2 0 . T h read ing lev er 3. Presser foot pressure adjusting dial 21. Cord channel 4. Presser foot release lever 22.
- Page 8 Accessories Your Baby Lock Acclaim serger has a built-in accessory compartment. To open, swing the lower s ec t ion f or t h e c om part m ent of t h e t h read s t and t o t h e rig h t t o rev eal t h e t ray h old ing s om e of t h e ac c es s ories lis t ed b elow .
- Page 9 Needles Your Baby Lock Acclaim serger is set up with 90/14 machine needles, which are suitable for most medium and heavy weight fabrics. For lightweight fabrics, change to a size 75/11 needle. The needle’s semi-ball point design is suitable for knits and wovens. Some manufacturers’ needles may produce better quality stitches with your Baby Lock than others.
- Page 10 1. Remove machine from box After removing the packing materials from the box, gently lift your Baby Lock serger by grasping the h and le prov id ed on t h e t op of t h e m ac h ine. P lac e t h e m ac h ine on a s erg er s ew ing t ab le or any s t urd y lev el s urf ac e t h at prov id es am ple w ork area t o t h e lef t of t h e m ac h ine.
- Page 11 Cutting Blade Locking Dial W h en no t rim m ing is d es ired , as w h en s t it c h ing on a f old , rot at e t h e c ut t ing b lad e loc k ing d ial c loc k w is e t o t h e L O C K pos it ion. T h e c ut t ing b lad e no long er m ov es up and d ow n, b ut rem ains in it s low ered pos it ion.
- Page 12 Stitch Length/Rolled Hem The stitch length / rolled hem adjusting dial is conveniently located just to the left of the front cover, near the base plate. (fig. A) The dial shows two stitch-length ranges, from 0.75, for t h e s h ort es t s t it c h , t o 4 f or t h e long es t . A s t h e d ial ind ic at es , one rang e is f or s t and ard s ew ing and one is f or rolled ed g ing or narrow s eam ing .
- Page 13 Differential Feed Your Baby Lock serger is equipped with differential feed. T h e s et of f eed d og s w ork ind epend ent ly in ord er t o ens ure s m oot h s ew ing on all f ab ric s .
- Page 14 Thread Delivery System The Baby Lock Acclaim revolutionizes the way a serger works with its Thread Delivery System. You no longer have to manually adjust the tension settings for the type of stitch you are serging. Select the type of stitch you wish to serge, the Acclaim will automatically feed the correct amount of t h read t h roug h t h e loopers and t h read g uid es t o f orm a perf ec t s t it c h ev ery t im e.
- Page 15 2-Thread Subsidiary Looper Either needle thread may be engaged for 2-thread overlock sewing. To engage the subsidiary looper 1 . O pen t h e f ront c ov er and t h e b lad e c ov er, c ut t h e upper looper thread just above the threading port.
- Page 16 Looper Air Threading System Your Baby Lock Acclaim serger is equipped with an exclusive Push to Thread Loopers button. T h read your loopers all at onc e us ing t h e P us h t o T h read L oopers b ut t on.
- Page 17 Notes:...
- Page 18 Threading Preparation W h en us ing t h read s on c ones or k ing s pools plac e t h e c one or s pool s ec urely ov er t h e c one h old ers f urnis h ed on your m ac h ine. T o av oid b end ing t h e t h read s t and , you m ay need t o plac e one h and und er t h e s t and w h ile pos it ioning t h e c one.
- Page 19 Threading Your Acclaim Your Baby Lock Acclaim is equipped with an exclusive “Electronic RevolutionAir Threading System” for f as t , eas y t h read ing of t h e upper and low er loopers . One touch of the “Push to Thread” buttons will automatically thread the loopers and needles.
- Page 20 Upper Looper 1. With the presser foot up and threading lever in the threading position. ( fig. A, page 17) 2. Place the thread cone or spool on the second spool pin on right side of the thread stand. (fig.C) Slip the thread into the telescopic antenna thread guide “A”...
- Page 21 Right Needle 1 . R ais e t h e pres s er f oot t o t h e up pos it ion and eng ag e t h e m ac h ine t o t h e t h read ing pos it ion. (fig.
- Page 22 How to Use RevolutionAir Needle Threader 1 . O pen t h e f ront c ov er and t h e b lad e c ov er. 2. Set the threading lever from serging position to thread- ing position. (fig.A) 3 .
- Page 23 Needle Threading Mode A c c laim h as 3 t ypes of t h read ing M od es . P us h t o t h read need les MODE 1: b ut t on Press the “Push to thread needles button” once, threading pum p w ill w ork .
- Page 24 Serging with fabric W it h t h e need le and looper t h read s und er t h e f oot and t o t h e b ac k , low er t h e pres s er f oot . W h ile h old ing t h e t h read s in your lef t h and , pres s d ow n on t h e f oot control gently to begin a thread chain before serging fabric.
- Page 25 C los e t h e f ront c ov er and s ew a t es t s am ple. Note: When re-threading your Baby Lock Acclaim using the “RevolutionAir Threading” feature, make s ure t h at t h e prev ious t h read t h at w as in t h e looper ( t ub e) is c om plet ely rem ov ed .
- Page 26 4-Thread Overedging Overedging to finish facings, hems and seams before construc- t ion, is one of t h e m os t b as ic us es of a s erg er, s uc h as m ak ing a garment or project with 5/8 inch (16mm) pressed open seams. (fig.
- Page 27 4-Thread Overlock With the Acclaim Thread Delivery System, the upper and lower looper threads lock together evenly over the cut fabric edge(s) to form a flat, non-rolling pattern of overlocking stitches on both sides of the fabric. T h e lef t need le t h read int erloc k s w it h b ot h looper t h read s at t h e s t it c h ing line t o c reat e t h e s eam . T h e rig h t need le t h read , v is ib le on t h e t op s id e of t h e s t it c h , int erloc k s w it h b ot h t h e loopers t o ad d d u- rab ilit y.
- Page 28 3-Thread Overlock-Wide The 3-thread overlock wide stitch is perfect for edge-finishing most woven fabrics and for seaming knits that do not require t h e ex t ra d urab ilit y t h at a f ourt h t h read prov id es . I t ’...
- Page 29 3-Thread Overlock-Narrow I t ’ s eas y t o c onv ert your A c c laim t o s erg e a narrow s eam w it h 3 t h read s b y s im ply elim inat ing t h e lef t need le. T o c onv ert t o narrow 3 - t h read ov erloc k ( 3 .
- Page 30 3-Thread Overlock-Narrow Hem Narrow hemming is an attractive finish for most fabrics weights. I t is rec om m end ed t o t es t s ew w it h s am ple piec e of f ab ric . R em ov e t h e lef t need le and lef t need le t h read c om plet ely f rom t h e machine.
- Page 31 Rolled Edging The rolled edge setting is used to achieve the narrowest stitch possible (1.5mm) on your Baby Lock s erg er. T h e s t it c h is s uit ab le f or s eam ing s h eer and lig h t w eig h t f ab ric s and f or ed g ing and h em m ing lig h t w eig h t f a b ri c s .
- Page 32 Seaming Sheers Use the 3-thread rolled hem setting when sewing sheer fabrics that otherwise would require French s eam s . Set the stitch length at 2.5. Then simply sew the seams, aligning the fabric edges with the serger seam g uid e, t rim m ing aw ay t h e ex c es s s eam allow anc e.
- Page 33 3-Thread Flatlock Flatlock seams are most suited to fabrics which do not ravel such as interlock knits, tricot, sweatshirt fleece and synthetic s ued e. T h e need le t h read is c arried b elow t h e f ab ric and t o t h e c ut ed g e of t h e f ab ric .
-
Page 34: 2-Thread Overlock
2-Thread Overlock T h e 2 - t h read f unc t ion prov id es an ec onom ic al and les s b ulk y m eans of ov ered g ing all f ab ric s . The standard 2-thread overlock is the same as a 2-thread flatlock stitch. -
Page 35: 2-Thread Flatlock - Wide
2-Thread Flatlock - Wide Sew 2-thread flatlock seams in the same way as 3-thread flatlock seams, then pull the two fabric layers apart until the seam lies flat. (fig. A) Because the threads show on the outside as well as the inside of the garment or project, the 2-thread flatlock seam is often considered a decorative application. -
Page 36: 2-Thread Flatlock - Narrow
2-Thread Flatlock - Narrow Sew a 2-thread flatlock seam then pull the two fabric layers apart until the seam lies flat. (fig. A) Because the threads show on the outside as well as the inside of the garment or project, the flatlock seam is often considered a decorative application. -
Page 37: Flatlock "Topstitching
Flatlock "Topstitching" The flatlock stitch need not be limited at seamlines. When sewn on a fold, flatlocking can create attractive d ec orat iv e ef f ec t s w it h in t h e b od y of a g arm ent or project. -
Page 38: Blind Hemming
Blind Hemming Your Baby Lock Acclaim can create a sturdy, nearly invisible b lind h em . 1. Set the machine for 2-Thread Overlock-Narrow with the right needle threaded. Set the stitch width at 5.0 and the s t it c h leng t h at 4 . 0 in t h e s t and ard rang e. -
Page 39: Blanket Stitch - Decorative Stitch
Blanket Stitch - Decorative Stitch Set up the machine for 2-thread flatlock-wide but the needle threading path is different for this technique. 1 . I ns ert a s iz e 9 0 t op s t it c h need le in lef t ov erloc k need le pos it ion. 2. -
Page 40: Ladder Stitch - Decorative Stitch
Ladder Stitch - Decorative Stitch Note: T h e t h read ing pat h f or t h e need le t h read is d if f erent in t h is L ad d er R ig h t technique. -
Page 41: R Et Urning T O 3 Or 4 - T H Read O V E Rloc
Returning to 3 or 4-Thread Overlock 1 . O pen t h e f ront c ov er and rot at e t h e h and w h eel c ount er- c loc k w is e t o b ring t h e need le c lam p t o it s h ig h es t pos it ion. 2. - Page 42 Wave Stitch The Wave Stitch provides a decorative “wavy” edging on fabric. (This is not to be confused with “Lettuce Edge” on page 30). T h e upper looper t h read and t h e low er looper t h read g rad ually appear ev ery 2 5 s t it c h es t o c reat e a stitch that looks like a “Wave”.
-
Page 43: 3-Thread Wave Stitch
3-Thread Wave Stitch 1. Turn the Wave/Overlock Selector lever from “OVERLOCK” to “WAVE”. 2 . C ut t h e t h read s f rom t h e t h read c ones , rais e pres s er f oot and rem ov e t h read s f rom t h e t h read pat h s . -
Page 44: 3-Thread Rolled Wave Stitch
3-Thread Rolled Wave Stitch 1. Turn the Wave/Overlock Selector lever from “OVERLOCK” to “WAVE”. 2 . C ut t h e t h read s f rom t h e t h read c ones , rais e pres s er f oot and rem ov e t h read s f rom t h e t h read pat h s . -
Page 45: 3-Thread Reversed Wave Stitch
3-Thread Reversed Wave Stitch Y ou c an als o g et t h e w av e s t it c h in t h e b ac k of f ab ric b y c ros s ing t h e upper and low er looper t h read s before the threading ports. - Page 46 Securing Ends T h e s erg er s t it c h w ill not unrav el read ily, and in m os t c as es s erg ed s eam s are s ec ured b y an int ers ec t ing s eam . I f t h at ’ s not the case, there are several options for securing a seam.
-
Page 47: Securing Ends
Securing Ends (Cont.) To lock the end of the seam: 1. Take one stitch off the end of the seam. (fig. F) 2 . R ais e t h e pres s er f oot and b ring t h e need le( s ) t o t h e h ig h es t pos it ion. -
Page 48: T Urning O Ut S I D E C Orners 4
Turning Outside Corners 1. Stitch along one edge until you reach the corner. Take one stitch off the edge of the fabric (fig. A). ( A s you approac h t h e ed g e, you m ay w ant t o s t op and m anually t urn t h e h and w h eel t ow ard s you. -
Page 49: Serging Curves
Serging Curves T o s erg e around ins id e or out s id e c urv es , g uid e t h e f ab ric int o t h e c ut t ing b lad e, not t h e need le( s ) . R em em b er, c ut t ing t ak es plac e b ef ore t h e f ab ric reac h es t h e need le. -
Page 50: T H Read Ing L Ig H T W Eig H T T H Read 4
Using Specialty Threads Beautiful stitches can be formed by serging with specialty threads, cords and ribbons. These heavier or s h inier t h read s c an b e us ed t o enh anc e appearanc e, ad d s t reng t h or elas t ic it y, or c reat e s pec ial ef f ec t s , d epend ing on t h e t h read you c h oos e. -
Page 51: Thread Cradle For Loopers
Thread Cradle for Loopers 1 . O pen t h e c ov ers , and t h en rais e t h e pres s er f oot . 2 . A t t h e t h read ing port , c lip t h e looper t h read t h at is t o b e replaced. -
Page 52: Looper Threading Tool
Looper Threading Tool 1 . O pen t h e f ront and c ut t ing b lad e c ov ers , and t h en rais e t h e pres s er f oot . 2 . A t t h e t h read ing port , c ut t h e looper t h read t h at is t o b e replac ed . -
Page 53: Bypassing The Threading Port
Bypassing the Threading Port Heavy weight threads c an b e us ed t h roug h your reg ular looper t h read pat h s . Specific techniques may require that the thread bypass the t h read port f or t h e t h read pull t o b e loos ened . Start with the machine threaded with regular serger thread. -
Page 54: Specialty Thread Guide Chart
Specialty Thread Guide Chart Topstitching Woolly Nylon Machine Embroidery Buttonhole Twist Thread Metallic Threads Soft stretchy seams on Edging or flatlock D ec orat iv e ed g es f or ling erie, s w im w ear, APPLICATION s eam ing f or s port s w ear c lot h ing , g if t it em s , ac t iv e w ear, and f or and h om e d é... - Page 55 Specialty Thread Guide Chart (Cont.) Machine Embroidery Designer 6 Threads: Rayon and Pearl Crown Rayon Clear Nylon Polyester, 30, 40, 50 Candlelight Monofilament weight. Jeans Stitch Lingerie Thread Ribbon Thread Techniques L ing erie and lig h t w eig h t D ec orat iv e ed g ing , requiring the thread fabrics, edging of fine...
-
Page 56: R Eplac I Ng N Eed Les 5
, please take your machine to your nearest Baby Lock retailer. It is pos s ib le t h at t h e res ult of poor c ut t ing m ay ind ic at e ot h er prob lem s . -
Page 57: C Leaning 5
Cleaning Your Baby Lock will operate at best performance if it is kept clean at all times. The serger’s cutting action creates much more lint than you will find on conventional sewing machine. Your serger’s major moving parts are well protected and do not need to be oiled. -
Page 58: T Roub Les H Oot Ing 5 6 / 5
Troubleshooting Before taking your machine in for service, check the following: Machine fails to start: 1 . A re elec t ric al plug s properly c onnec t ed ? 2 . I s t h e pow er s w it c h on? 3 . -
Page 59: D Os And D On' T
Troubleshooting (Cont.) Needle threading difficulties: 1 . I s t h e t h read end in t h e proper need le eye? 2 . I s t h e t h read end c ut s h arp? 3 . -
Page 60: Technical Data
Technical Data Stitch Types: 2 need les , 2 loopers : 4 - T h read O v erloc k 1 need le ( lef t or rig h t ) , 2 loopers 3 - T h read O v erloc k ( w id e, narrow , and narrow h em ) 3-Thread Flatlock (wide and narrow) right needle only 3-Thread Rolled Edge 3 - T h read W av e... -
Page 61: Chart For Stitch Selection Settings
Chart for Stitch Selection Settings Stitch Stitch Stitch Differential Wave Stitch Type Needle Page Length Width Selector Feed Selector L ef t 4-Thread 2 . 5 - 3 . 5 6 . 0 - 7 . 5 Overlock R ig h t L ef t 4-Thread 2 .