Advertisement
Quick Links
Notice d'installation
déclencheur manuel adressable IQ8MCP
Installation Instruction
IQ8MCP
(Réf. / Part No. 804973.F0, 804973.NU)
Sous réserve de modifications techniques!
798936.F0
Technical changes reserved!
F
GB
07.2014 / AA
© 2014 Honeywell International Inc.
Novar France S.A.S.
Internet::
www.esser-systems.com/fr
Hotline:
N° indigo 0 825 018 825
F
Lors de l'utilisation d'un déclencheur manuel, un boîtier rouge
avec symbole conforme aux schémas 3 et 4 doit être
obligatoirement installé. Toute autre inscription ou couleur du
boîtier ne conviennent pas pour un déclencheur manuel d'alarme.
Respecter le câblage indiqué!
Bornier de raccordement 1-4: IN (Entrée) OUT (Sortie).
Utiliser un câble de télécommunication Syt 1 n x 2 x 0,8 mm avec
le marquage adapté ou un câble de détection incendie!
Veiller à isoler et à connecter l'écran à la terre du système de
détection afin de le protéger contre intérférences.
Informations actuelles et complémentaires
Les caractéristiques des produits correspondent à l'état lors de
la mise à l'impression et peuvent diverger des informations
présentées ici en raison de modifications de produits, de
normes/directives modifiées, le cas échéant. Pour obtenir des
informations actualisées, voir à l'adresse www.esser-systems.com/fr.
La référence se terminant par " .NU " n'est pas couverte par la
marque NF.
GB
When the MCP is used as a manual call point it must be installed
in a red housing with an identification label showing the
standardize-conformal symbol as shown in Fig. 3/4. When
housings with different colours and identification labels are used
the unit is classed as a manual activation device and not as a
manual call point.
Observe the correct wiring sequence for the loop!
Terminals 1-4 IN (Input) OUT (Output).
Use designated communication cable I-Y (St) Y n x 2 x 0.8 mm or
fire alarm cable!
Connection of the cable shield to the ground terminal protects the
signal cables against interference.
Install inlaying cable with a dripping bend to protect the device
from dampness.
Additional and updated Informations
The alarm activation and triggering of notifying systems e.g.
manned centre link (Master box) must be observed during any
Service of the MCP.
The product specification relate to the date of issue and may differ
due to modifications and/or amended Standards and Regulations
from the given informations.
For updated informations, to commissioning and maintenance of
Fire alarm detectors refer to www.esser-systems.com/fr.
Observe technical manuals of the FACP to ensure compliance to
standards and local requirements of Systems features!
esserbus
®
and essernet
®
are registered trademarks in Germany.
The part number ".NU" is not covered by the NF mark.
F
Attention!
Ces instructions doivent être soigneusement étudiées avant la mise en service
du composant. Les dommages causés par le non respect des instructions
d'installation annule la garantie. En outre, aucune responsabilité ne peut être
acceptée pour des dommages consécutifs découlent de ce manquement.
Consignes de sécurité
Le déclencheur ne doit pas être raccordé au secteur de 230 Vac et doit être
utilisé dans la plage de température ambiante spécifiée.
La maintenance et la réparation du déclencheur ne doivent être confiées
qu'à un spécialiste connaissant les risques et les prescriptions y afférents.
Il n'est pas permis de modifier ou de démonter le déclencheur.
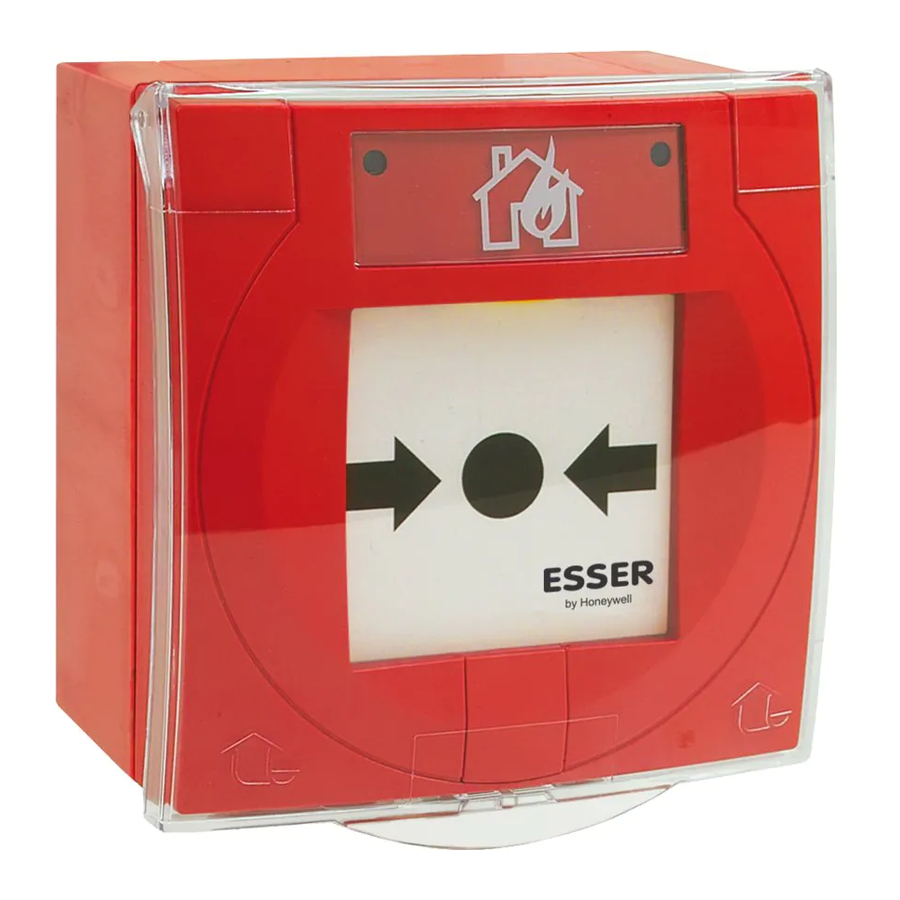
Généralités / Application
Le déclencheur manuel adressable IQ8 dans le boîtier rouge identifié avec le
symbole "maison enflammée" s'utilise pour le déclenchement manuel d'une
alarme incendie ou la signalisation de danger dans les endroits secs et ne
présentant pas de risques d'explosion. Le fonctionnement du déclencheur
manuel est signalé par le clignotant de la LED verte (Fig. 4).
Utilisation
Déclenchement:
Enfoncer la vitre ou la membrane déformable jusqu'à ce que
l'indicateur (G) jaune soit apparent sur la partie supérieure
de la fenêtre et que la LED rouge (F) clignote. (Fig. 4).
Réarmement:
Relever le cache de la serrure (A) pour insérer la clé (Fig. 1)
Déclencheur avec membrane déformable
Tourner la clé (C) sur la droite jusqu'à la position d'arrêt
(Fig. 5). Ajuster la membrane (J), la pousser vers le haut en
tournant la clé sur la gauche jusqu'à la position d'arrêt (Fig. 6).
Déclencheur avec vitre (en option)
Ouvrir le boîtier et enlever la vitre brisée. Tourner la clé (C)
sur la droite jusqu'à la position d'arrêt (Fig. 5). Insérer une
nouvelle vitre, la pousser vers le haut en tournant la clé sur
la gauche jusqu'à la position d'arrêt (Fig. 6).
Mode test:
Tourner la clé (C) sur la droite jusqu'à ce que la vitre se
baisse et que le déclenchement soit indiqué (Fig. 5).
Réarmer le déclencheur après le test en tournant la clé vers
la gauche jusqu'à la position d'arrêt.
Ouverture du
Insérer les deux tenons situés sur l'extrémité de la clé dans les
boîtier:
orifices situés sous le boîtier (Fig. 2) pour le déverouiller.
Baculer légerement la partie supérieure du boîtier et la
séparer de la partie inférieure.
Signalétique:
Ouvrir le boîtier et extraire la protection transparente (D/E).
Insérer l'inscription appropriée à l'endroit prévu à cet effet,
replacer la protection transparente et presser (Fig. 3).
Fermeture du
Tourner la clé sur la gauche jusqu'à la position d'arrêt (Fig. 6).
boîtier:
Replacer la partie supérieure du boîtier sur la partie
inférieure et clipser.
Arrière de l'écran
en verre ou
étiquette:
Indique que le déclencheur ne fonctionne pas (L).
Membrane
Tourner la clé sur la droite jusqu'à la position d'arrêt (Fig. 5).
déformable ou
Positionner la vitre correctement (F/G) dans le renfoncement
vitre:
du boîtier et tourner la clé sur la gauche jusqu'à la position
d'arrêt (Fig. 6).
Bornier de
Afin de simplifier l'installation, les borniers 1-8 sont débrochables
raccordement:
(Fig. 10).
Les câbles d'écran doivent être interconnectés. Pour les boîtier
en saillie une vis intégrée est à disposition (Fig. 7).
Volet de
Protège
contre
les
déclenchements
protection:
augmente l'indice de protection de IP 43 à IP 55.
Réf. 704965
Le volet de protection (O) est à introduire dans les trous
(en option)
latéraux (P) prévus à cet effet, positionnés sur la partie
supérieure du boîtier. Il est possible de sceller le boîtier par
une bande de garantie (B). Fixer les rondelles et les
entrées de câble 1-4 selon la Fig. 2/9.
Montage
encastré:
Le déclencheur est monté sur socle standard
(Ø 55-60 mm).
En saillie:
Le déclencheur, boîtier en saillie inclu (en option) est fixé
sur une surface de mur plane avec des chevilles (S6) et
deux vis (Longueur 40 mm), (Fig. 7/8).
Raccordement
Le déclencheur manuel peut être raccordé au bus esserbus
d'une équipement de contrôle et de signalisation. Pour le raccordement au bus
utiliser les bornes 1-4. Ces bornes peuvent être retirées pour faciliter l'installation.
Enlever l'isolant du câble à l'intérieur du boitier. L'écran du câble doit être raccordé
au connecteur (Fig. 7)
Déclencheur avec isolateur et déclencheurs externe
Les isolateurs garantissent la continuité du fonctionnement lors d'un court
circuit. Lorsque ce dernier se produit, les isolateurs s'ouvrent avant et après le
court circuit et la partie du bus situé entre les isolateurs concernés. Une simple
coupure n'entrave pas le bon fonctionnement de la ligne.
Un groupe de déclencheurs externes avec dix déclencheurs conventionnels
(résistance alarme: 1 KOhm) au maximum peuvent être raccordés au déclencheur
IQ8. Lors d'un déclenchement, l'adresse et le libellé supplémentaire programmé du
déclencheur IQ8 auquel le groupe standard est connecté sont affichés. La
longueur de câble maximale ne doit pas dépasser 500 mètres!
Non applicable dans le cadre de la marque NF!
Le dernier déclencheur conventionnel doit comporter une résistance de fin de
ligne de 10 KOhm (Fig. 10).
Lorsque aucun déclencheur conventionnel n'est connecté, la résistance de
10 KOhm doit être connectée directement aux borniers 7/8 (Fig. 10).
Spécifications
Tension d'alimentation
:
8 V DC à 42 V DC
Courant de repos
:
environ 45 µA @ 19 V DC
Courant d'alarme
:
environ 9 mA @ 19 V DC, pulsé
Nombre de déclencheurs
:
max. 127 déclencheurs par boucle
Indicateur d'alarme
:
LED rouge/ indicateur jaune
Signalisation de service
:
LED verte
Bornes de raccordement
:
max. 1,5 mm² (AWG 30-14)
Température d'utilisation
:
-20 °C à +70 °C
Température de stockage
:
-30 °C à +75 °C
Indice de protection
:
IP 43 (dans le boîtier )
:
IP 55 (avec option)
Boîtier
:
Matière plastique ASA
Couleur
:
rouge (similaire au RAL 3020)
Poids
:
environ 110 g
Dimensions du boîtier (L x H x P)
:
88 x 88 x 21 (mm)
Dimensions avec boîtier en saillie
:
88 x 88 x 57 (mm)
Spécification
:
EN 54-11:2001 / -17:2005, Type A
Approbation VdS
:
G 205132
:
DoP-20492130701
Déclaration de performance
Important!
These instructions must be studied carefully before commissioning the device.
Any damage caused by failure to observe the installation instructions voids the
warranty. Furthermore, no liability can be accepted for any consequential
damage arising from such failure.
Safety information
NEVER connect the MCP directly to a 230 V AC mains power supply and
only operate in the specified ambient temperature range.
Only qualified technicians who are fully familiar with all the associated hazards
and the applicable legislation and regulations may perform maintenance
and repair work on the call point.
The call point may not be changed or modified in any way.
General / Application
The IQ8MCP in the red housing identified with a "burning house" symbol is
designated for use as a call point for manually triggering fire alarms or other hazard
alarms in dry workplaces not subject to explosion hazards.
The operation mode is displayed via the flashing green LED (H); (Fig. 4).
Operation
Trigger alarm:
Press screen centre inwards until the yellow tab indicator (G)
is visible in the upper area and the red LED (F) is flashing
(Fig. 4).
Reset:
Push up the keyhole cover (A) to insert the key (Fig. 1).
Detector with plastic operating panel
Turn key (C) clockwise until the right (M) stop position
(Fig. 5). Align the plastic operating panel (J) and turn key
anti-clockwise until the left stop position to lift screen upwards
(Fig. 6).
Detector with glass screen (option)
Open housing and remove the broken glass. Turn key (C)
clockwise until the right (M) stop position (Fig. 5). Replace
glass screen and turn key (N) anti-clockwise until the left stop
position to lift screen upwards (Fig. 6).
Test mode:
Turn key (C) clockwise until the screen moves downwards
and the activation is indicated (Fig. 5). To reset the detector
after a test simply turn key to the left stop position to lift
screen upwards.
MCP opening.
Insert the key with the both tenons in the opening at the
bottom of the housing (Fig. 2) to release the cover lock. Lift
up the bottom edge of the cover a little to release it and then
remove it.
MCP Symbolism: With the housing open, remove the transparent plastic cover
(D/E) by prising it out. Insert the appropriate identification
label from the front. Align the cover and snap it back into
place (Fig. 3).
MCP closing:
Turn key lock anti-clockwise until the left stop position
(Fig. 6). Position the upper edge of the cover in the groove at
the top of the base and then press the cover down until it
locks into position.
Glass screen rear
side or Paper
inlay:
To indicate that the detector is out of order (L)
Plastic operating
Turn key lock clockwise until the right stop position
panel or
(Fig. 5). Insert screen aligned (F/G) in the front recess und
glass screen:
move screen upwards by turning the key anti-clockwise until
the left stop position (Fig. 6).
Terminals:
The screw terminals 1-8 can be removed to simplify the
installation (Fig. 10).
The cable shield of the connection cable must be interconnected
by using a single terminal block. The back box (option)
provides an integrated screw terminal for the shield
connection (Fig. 7).
intempestifs
et
Protection kit:
To protect the detector for unintended activation and to
Part No. 704965
increase the protection rating from IP 43 up to IP 55.
(Option)
The hinged cover (O) is fixed by the sideway dents (P) of the
housing and may be plumbed (B) if required. Mount washers
and cable entries 1-4 according to Fig. 2/9.
Installation
Flush
The Manual Call Point is installed on a conventional standard
mounting:
housing (Ø 55 – 60 mm).
Surface
The MCP is installed on a back box for surface mounting
mounting:
(option) or with an installation frame (option). The MCP
securely on a suitable wall with a smooth surface, e.g. with 2
screws (length 40 mm) and dowels (S6) (Fig. 7/8).
Wiring
/ esserbus
-PLus
®
®
The MCP can be connected to the esserbus
control panel. Manual call points must be configured together in their own detector
zones. Only remove insulation from cable sections inside the housing. For wiring use
terminals 1-4. These terminals can be removed to simplify the installation.
The cable shield of the connection cable must be interconnected by using a single
terminal block. The mounting box provides an integrated terminal for the shield
connection (Fig. 7).
Zone isolator and ext. detector zone
The zone isolators ensure that the system continues to function even if a segment of
the loop circuit fails due to a short circuit. When a short occurs the zone isolators
before and after the short open, disconnecting the section of the loop between the
isolators. Simple wire breaks do not affect the functionality of the loop circuit.
You can connect an external detector zone with up to to ten conventional MCP
(internal Alarm resistor for each MCP 1 KOhm). When an alarm is triggered the
address and the programmed additional text of the MCP to which the ext.
detectoris connected are displayed automatically. Cable length max. 500 metres!
Not applicable for NF regulation!
Fit the last conventional MCP with a 10 KOhm terminating resistor.
If no external detector zone is connected the 10 KOhm terminating resistor must
be installed directly to terminals 7/8 (Fig. 10).
Specifications
Power supply
Quiescent current
Alarm current
No. of call points
Alarm indicator
Operation indicator
Connection terminals
Application temperature
Storage temperature
Protection rating
Housing
Colour
Weight
Dimensions MCP (w x h x d)
Dimensions with back box
Specification
VdS approval
Declaration of Performance :
GB
/ esserbus
-PLus loop of a fire alarm
®
®
:
8 V DC to 42 V DC
:
approx. 45 µA @ 19 V DC
:
approx. 9 mA @ 19 V DC, pulsed
:
max. 127 MCP per loop
:
red LED / yellow tab
:
green LED
:
max. 1,5 mm² (AWG 30-14)
:
-20 °C to +70 °C
:
-30 °C to +75 °C
:
IP 43 (in housing)
:
IP 55 (with option)
:
ASA plastic
:
red (similar RAL 3020)
:
approx. 110 g
:
88 x 88 x 21 (mm)
:
88 x 88 x 57 (mm)
:
EN 54-11:2001 / -17:2005, type A
:
G 205132
:
DoP-20492130701
Advertisement

Related Manuals for Honeywell ESSER IQ8MCP


Summary of Contents for Honeywell ESSER IQ8MCP
- Page 1 Tourner la clé (C) sur la droite jusqu’à la position d’arrêt 07.2014 / AA © 2014 Honeywell International Inc. (Fig. 5). Ajuster la membrane (J), la pousser vers le haut en (Fig. 5). Align the plastic operating panel (J) and turn key anti-clockwise until the left stop position to lift screen upwards tournant la clé...
- Page 2 Options Réf. Options Part No. Membrane deformable (J) 704964 Plastic operating panel (J) 704964 Protection (O) protège contre les déclenchements intempestifs et augmente l’indice de protection Hinged cover (O) to protect the detector for unintended activation and washers to increase 704965 704965 de IP 43 à...