Table of Contents
Advertisement
Advertisement
Table of Contents

Related Manuals for Canon ivy Cliq+ 2


Summary of Contents for Canon ivy Cliq+ 2
- Page 1 Instant Camera Printer User Manual...
-
Page 2: Table Of Contents
CONTENT SAFETY INFORMATION P. 3-4 Read Before Use OVERVIEW P. 5 Supplied Items Product Features SETUP P. 6-9 Charging Loading Paper External Memory OPERATION P. 10-15 Power ON/OFF Taking and Printing a Photo Viewfinder Selfie Mirror Shooting Modes Filter and Border Buttons Live View Shoot P. -
Page 3: Safety Information
SAFETY INFORMATION READ BEFORE USE Please read the following instructions and safety precautions before using the device. For regulatory and additional safety information, refer to the Regulation and Warranty Information sheet included in your package contents. RMN: PP2002 Regulatory Model Identification Number is assigned for regulatory identification purpose. Used to indicate a potentially hazardous situation which, WARNING if not avoided, could result in death or serious injury. - Page 4 • If the device is not functioning properly, please contact the dealer you purchased this product from or Canon Service & Support at www.usa.canon.com/support • Never expose the battery to high temperatures, direct heat, or dispose by incineration.
-
Page 5: Overview
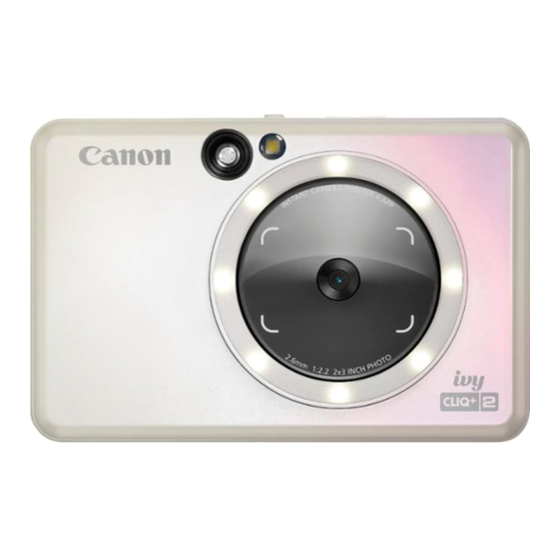
OVERVIEW SUPPLIED ITEMS Regulation and CANON ZINK® Instant Camera Printer Quick Start Guide Warranty Photo Paper USB Cable Wrist Strap Information sheet (10 sheet) PRODUCT FEATURES Camera Lens Viewfinder Selfie Mirror Border Button Ring Light (8 LEDs) Filter Button Print Output Slot... -
Page 6: Setup
SETUP CHARGING Charging status LED Charging: Red Fully Charged: Green The device has a built-in battery. Please fully charge the device via the USB cable provided before using. Insert the smaller end of the supplied USB cable into the device and other end into a chargeable USB adapter. -
Page 7: Loading Paper
LOADING PAPER Remove the cover by sliding it forward in the direction of the arrow. Open a single pouch of photo paper (10 sheets + blue SMART SHEET®). Place all 10 photo paper sheets and the one blue SMART SHEET® into the photo paper compartment. -
Page 8: External Memory
50% or higher. • Make sure you’re using the latest Canon Mini Print app version. If your apps don’t automatically update, go to app store and check if you need to update. - Page 9 • For optimal print results, use photo paper for Canon Ivy. − You may purchase additional photo papers within the Canon Mini Print App by tapping "Buy Paper" in the main menu. • If there is a paper jam, simply turn the printer OFF and ON to automatically clear the paper jam.
-
Page 10: Operation
OPERATIONS POWER ON/OFF Press and hold the Power button until the LED indicator light turns on. When the LED indicator turns to a steady white , the device is ready to Use. Press and hold the Power button turn off the device. AUTO POWER OFF •... -
Page 11: Selfie Mirror
SELFIE MIRROR Compose an image with the frame mark in the Selfie Mirror. 1.6ft - ∞ 2 x 3 Focusing distance at 1.6ft SHOOTING MODES You can select the different camera modes by the Slide Switch at the top of the device for different scenarios. -
Page 12: Filter And Border Buttons
• User can add border to a photo by pressing button before taking photo. • User can customize border through Canon Mini Print App after connected the device with compatible smartphone (white border is default). Go to the Home Screen, press "Go wireless!" --> "Snap". -
Page 13: Live View Shoot
LIVE VIEW SHOOT User can remotely control the device through the App such as taking photos. Go to the Home Screen to enter the Live View Page. Selected mode will be shown Live view image Zoom in or out Change orientation Select timer (default: OFF) Take a photo... - Page 14 TIMER Press to capture a photo instantly. Press and select 3 seconds/ 5 seconds/ 10 seconds timer (default: OFF), press to begin the countdown. • The LED light around the selfie mirror will alert you if the timer is enabled. ZOOM Press to zoom in.
- Page 15 ORIENTATION Press to switch between horizontal and vertical.
-
Page 16: Led Indicator
LED INDICATOR Status Mode LED Status LED Power On Press and hold Power button White White Standby After the device is powered on White Power Off Press and hold Power button When the device detects wrong Blue SMART ® blue SMART SHEET is inserted, ®... - Page 17 LED INDICATOR Status Mode LED Status LED Temperature When device temperature is too hot Red (Until temperature Too High returns to normal) Temperature When device temperature is too Cyan (Until temperature Too Low cold returns to normal) Checking the printer head Printer Head temperature and letting it cool down Cooling...
-
Page 18: Troubleshooting
Magenta • Check if the MicroSD card is compatible Paper Feeding • Open the paper compartment cover to check if Canon ZINK® photo paper is inserted Failed Paper Jam • Power off and on the device, the photo paper will be fed out automatically... -
Page 19: Specifications
Approximately 50 secods - Motor starts and stops, Printing Speed at room temperature 77 °F (25 °C) Photo Aspect Ratio 2" x 3" Canon Photo Paper : ZP-2030-20 (20 sheets) Compatible Paper ZP-2030-50 (50 sheets) / 2" x 3" / Peel-and-Stick Back Paper Capacity Up to 10 sheets of photo paper + 1 blue SMART SHEET®... -
Page 20: Installing App
INSTALLING APP ① OPTION SEARCH FOR "CANON MINI PRINT" IN APP STORES For Android™ - from Google Play™ For iOS® - from the App Store®... - Page 21 ② OPTION USING QR CODE - SCAN THE QR CODE ON THE "QUICK START GUIDE" For Android For iOS ③ OPTION GO TO HTTPS://APP.CANONMINIPRINT.COM/ WITH YOUR DEVICE INTERNET BROWSER ④ OPTION USING NFC - ANDROID ONLY TAP IT...
-
Page 22: Pairing Mobile Device
PAIRING MOBILE DEVICE & INSTANT CAMERA PRINTER Android and iOS Pairing Turn on the printer by pressing and holding the Power button until the status LED light turns on. Open mobile device "Settings" to enable Bluetooth and pair it with the printer. Pair - Tap on the icon on the top right corner and choose your printer. - Page 23 Reconnect Printer - The printer will automatically reconnect to the app once paired already. If the printer has not connect to the app, tap on the icon on the top right corner and choose your printer on the list.
-
Page 24: Android Pairing (With Nfc)
" " to choose the printer. • Search for and pair a printer named "Canon (xx:xx) Instant Camera". Match the last 4 digits of the MACnumber (xx:xx) on the label inside the printer. • Bluetooth searching and transferring may fail depending on the environment. -
Page 25: User Interface
USER INTERFACE HOME SCREEN Print Quene Main Menu Printer Status Photo Album Collage Pre-cut Sticker Live View and SD card to print Smartphone Camera MAIN MENU View in-app messages Access paired printer information & settings View Online User Manual & FAQ Purchase photo paper from Online Store Check App version, user Agreement and Privacy Statement... -
Page 26: Printer Setting
PRINTER SETTING When the printer is connected with a mobile device, user can customize the printer name, voice and auto power off time. , select your device to customize the printer name, voice and auto power off time through the App. RENAME User can customize the printer name as you wish. - Page 27 VOICE The user can customize the sound effects for "Power On", "Power Off", and "Shutter". User can record 3 sound files for printer voice. Tap on the desired sound file icon to apply the sound. Printer To start a recording, tap on the desired sound file icon Press for audio playback and the playback audio will be automatically selected.
-
Page 28: Photo Album
PHOTO ALBUM You can browse photos in the Photo Album, with filters by folders and search by date. On the Home Screen, Tap to view the Photo Album. Once you’ve selected a photo, you can Print, Edit, Share, or Save. To print, tap Search by Date All Photos - Gallery... -
Page 29: Send A Photo To Mini Print App
SEND A PHOTO TO MINI PRINT APP SEND A PHOTO IN YOUR DEVICE’S PHOTO GALLERY OR CAMERA ROLL TO THE CANON MINI PRINT APP For Android Find a photo in your device Gallery and tap the share button. Tap the Mini Print Icon to send the photo to the app so that you can edit and print. -
Page 30: Edit Photo
EDIT PHOTO You can customize your image with edits like filters, stickers, text, and more. Tap the icons on the bottom bar of your screen. Customize as you wish. Don’t forget to Save, Share, or Print your changes before you exit the screen. Print Tile Print Share... -
Page 31: Using Tile Print
USING TILE PRINT Use the Tile Print function to print a single photo onto multiple sheets to create a large tiled photo. When you're ready to print, tap on and tap the tiled choice of 2 x 2 or 3 x 3 prints. (Lines will appear to show how your image will be split.) to print your tiles and then put them together to create a larger tiled print. -
Page 32: Using Collage Print
USING COLLAGE PRINT Use the Collage function to print up to 6 photos on one 2x3 sheet. in Home Screen. Tap on the photos to add into collage. Number of photos selected will be shown. You can choose different template by pressing , or swapping right to left on the image preview. - Page 33 Edit and adjust the images in your collage as you'd like and then tap to print, to share or to save. Border Layout Draw Stickers Text Collage (Edit as whole image) Adjust Filters Rotate Replace Duplicate Collage (Edit specified image)
-
Page 34: Pre-Cut Sticker Print
PRE-CUT STICKER PRINT Use the Pre-cut sticker function to print up the photo/text on the circle sticker. in Home Screen. Tap on the photos to add into the circle sticker. Press to edit the pre-cut sticker. - Page 35 Adjust the images in your sticker as you'd like and then tap to print, to share or to save. Pre-cut sticker Pre-cut sticker (Edit as whole image) (Edit specified image) Background Adjust Text Stickers Filters Text Draw Rotate Replace Duplicate...
-
Page 36: Smartphone Camera
SMARTPHONE CAMERA On the Home Screen, tap to take a photo with your smartphone camera. (Optional, tap on the icons at the bottom to take a photo with effects.) Once you’ve taken a photo, you can Print, Edit, Share, or Save. To print, tap Flash Back... -
Page 37: Print From Ivy Cliq+2 Microsd Card
PRINT FROM IVY CLIQ+2 MicroSD CARD On the Home Screen , tap "Go Wireless!", then tap "SD Card to print". Tap on the photo you want to print, then press You can also delete the photo in microSD card by pressing the Print Delete... -
Page 38: Print Quene
PRINT QUENE To manage your print queue, tap In the Print queue page, you can to remove photo in print queue To change the print order, tap and hold on a photo, and reposition its order. Tap on the specified photo you would not want to print it at the moment, a pause sign will be shown. - Page 39 Canon U.S.A., Inc. Canon is a registered trademark of Canon Inc. in the United States and may be a registered trademark, or trademark, in other countries. IVY is a trademark of Canon U.S.A., Inc. in the United States. SMART SHEET, the ZINK Technology and ZINK Trademarks are owned by ZINK Holdings LLC.