Table of Contents
Advertisement
Quick Links
Advertisement
Table of Contents

Related Manuals for Audiovox CE448


Summary of Contents for Audiovox CE448
- Page 1 - E1 -...
-
Page 2: Explanation Of Graphical Symbols
To reduce the risk of fire or electric shock, do not expose this appliance to rain or moisture. WARNING ISK OF ELECTRIC SHOCK DO NOT OPEN "WARNING: TO REDUCE THE RISK OF ELECTRIC SHOCK, DO NOT REMOVE COVER (OR BACK). NO USER-SERVICEABLE PARTS INSIDE. - Page 3 IMPORTANT Switch off the power before connecting speakers and other equipment. SPEAKER CORD CONNECTION Connect the wires with the printed red lines to the red (+) terminals and the plain-black wires to the black (-) terminals. NOTE : Connecting speakers other than the speakers supplied with the unit, may damage the unit.
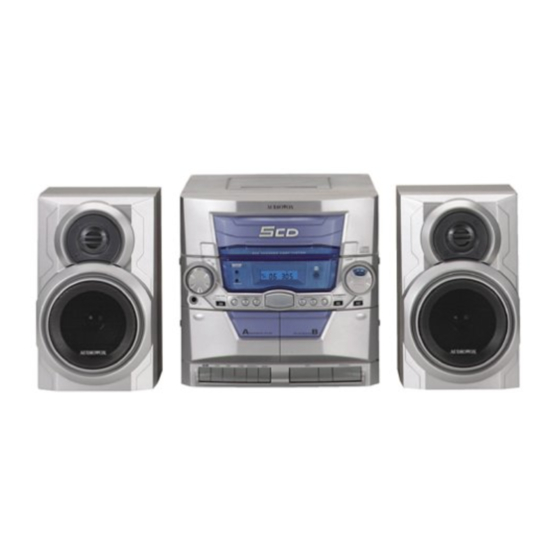
- Page 4 1) CD door 2) STEREO WIDE indicator 3) POWER button OPEN / CLOSE button 5) REMOTE SENSOR 6) DISPLAY window 7) PHONES jack 8) FUNCTION KEY door 9) Cassette holder (Deck A) 10) Cassette operation controls (Deck A) RECORD button PLAY button REWIND button F.FWD (fast foward) button...
-
Page 5: Power Indicator
1. TRACK and CHANNEL indicators. 2. FUNCTION indicators. 3. SLEEP indicator. 4. TIMER indicator. 5. ON/OFF indicators. 6. AM/PM indicators. 7. X-Bass indicator. 8. Band FM/MW(AM)indicators. 9. Playback Indicator. 10. STEREO indicator POWER INDICATOR While the AC cord is connected and the unit is on stand-by, power will be consumed and only the clock display will be lit. -
Page 6: To Adjust The Volume
TO ADJUST THE VOLUME Press the VOLUME buttons to adjust the sound. To increase the volume press here. To decrease the volume press here. STEREO WIDE creates the feeling that the sound is being spread to the left and right, beyond the actual position of the speakers. - Page 7 To set the current time (Select POWER STANDBY mode) MEMORY/ CLOCK 1. Press the mode. Hours flash. MEMO RY CLOC K TIMER 3. Press the MEMORY/ CLOCK make the correct minutes flash. MEMO RY CLOC K TIMER To set the timer on (time to turn on) 1.
- Page 8 1. Press the SLEEP button while the power is on. "SLEEP 90" lights in the display. NOTE: SLEEP can only be adjusted in TUNER, TAPE and AUX modes. 2. Press and hold the SLEEP button to select the length of remaining time until the unit turns off. It changes the indicator in the following way: SLEEP 90 SLEEP 10...
- Page 9 Fully unwind the wire antenna. Then extend the wire antenna and place it in the position that sounds best. NOTE: Do not connect to outside antenna. The system can store a total of 40 stations. (Each band has a maximum of 20 available preset stations). Presetting allows you to tune into a station directly.
- Page 10 1. Press the FUNCTION button to TUNER. FU NCTIO N 4. Press the MEMORY/ CLOCK button. MEMO RY CLOC K TIMER 1. Press the FUNCTION button to TUNER. FU NCTIO N The contents (preset channel number, frequency and frequency band) which have been stored in memory will appear on the display in numerical order, irrespective of the frequency bands.
- Page 11 1. Press the FUNCTION button to CD. BA ND FU NCTIO N 3. Place the first disc onto the disc holder, with the label side up. WARNING: • Before transporting the unit, take out all discs from CD tray. 5. Press the OPEN/CLOSE button to close the tray. It takes a short while for your player to check the discs.
-
Page 12: Locating A Particular Point In A Track
Notes: 1. During playback, disc tray can be opened to change/add disc and the current disc playback will not be interrupted but DISC SKIP button will become invalid. 2. The SKIP buttons can only be used to choose a track of the current disc. To choose a track of another disc, DISC SKIP button should be pressed to get to the desired disc first. -
Page 13: In Playback Mode
SHUFFLE PLAY - PLAYING IN A RANDOM ORDER 1. Press the DISC SKIP button to select a disc. BA ND FU NCTIO N 3. Press PLAY/PAUSE button. Some abnormal symbols will be shown on the display and a short period of time is needed for track shuffling, before playback can be started. - Page 14 REPEAT PLAYBACK DURING PLAYBACK MODE DURING STOP MODE The REPEAT operations can also be done in the stop mode. The player will start playing from Track 1 of the currently selected disc after PLAY/PAUSE button is pressed. STOP PLAY / PAU SE To Repeat the Current Track •...
-
Page 15: To Check The Program
A program of up to 32 tracks from all the available discs in the disc tray can be played in a preset order. 1. Press the MEMORY/ CLOCK button (in stop mode). MEMO RY CLOC K TIMER 3. Press the SKIP buttons to select the desired track. - Page 16 To stop programmed play for a moment: • Press the PLAY/PAUSE button and " Press this button again to resume playing. STOP PLAY / PAUSE To add additional tracks during program playback: • Press the STOP button once, press the MEMORY/ CLOCK button until the track indication is "--" and then repeat steps 2 to 4 (Compact Disc Programmed Playback) on page E15.
- Page 17 TAPE A OR TAPE B PLAYBACK Usable tapes - use only normal (type I) tapes for playback You can playback only the front sides of the tapes in Tapes A and B. 1. Press the FUNCTION button to TAPE. BA ND FU NCTIO N DISC SKIP To stop playback...
- Page 18 Preventing accidental erasure 1. Cassette tapes have two erase-protection tabs-one for each side. To protect a recording from being accidentally recorded over or erased, use a screwdriver to re- move one or both of the cassette tape's erase-pro- tection tabs. Use only normal (type I) tapes for recording and playback.
-
Page 19: To Install Batteries
RECORDING FROM THE CD PLAYER 1. Press the FUNCTION button to CD. BA ND FU NCTIO N 3. Press the RECORD button which also engages the PLAY button. TO STOP RECORDING Press the STOP/EJECT button of Deck A. TO INTERRUPT RECORDING Press the PAUSE button of Deck A. - Page 20 DECK A DECK B SYMPTOM GENERAL No sound. No sound from one channel or unbalanced left and right volume. Reversed left and right sound. Lack of bass sound or apparently imprecise physical location of musical instruments. Severe hum or noise. RADIO RECEPTION The FM STEREO indicator flashes.
- Page 21 TUNER SECTION Frequency range Antenna AMPLIFIER SECTION Output power Frequency Response Power consumption Power requirements COMPACT DISC PLAYER SECTION Channels S/N ratio Wow & Flutter Sampling frequency Quantization Pick up light source Pick up wave length CASSETTE SECTION Track format Frequency response Signal to noise ratio Wow and flutter...
- Page 22 PRINTED IN CHINA 811-277891-010...