
Related Manuals for Sentry Sample Sentry II Low Pressure


Summary of Contents for Sentry Sample Sentry II Low Pressure
- Page 1 Original Instructions Installation, Operation & Maintenance Manual Sentry Sample Sentry II Sample Conditioning Automation S-SW-IOM-00269-20 05-21...
-
Page 2: Table Of Contents
Otherwise, injury, damage, or both may result. Copyright © 2019 by Sentry Equipment Corp. All rights reserved. All product and company names are property of their respective owners. This document contains proprietary information. No part of this document may be photocopied or reproduced without the prior written consent of Sentry Equipment Corp. -
Page 3: Safety Information
. Â NOTE Information that requires special emphasis . Â TIP Alternate techniques or clarifying information. SHALL: This word is understood to be mandatory. SHOULD: This word is understood to be advisory. Sentry Sample Sentry II... -
Page 4: General Safety Precautions
High pressures! This equipment may contain fl uids at very high pressures . Prior to installing, removing, or maintaining this equipment, ensure that the equipment is isolated from all connecting piping, the equipment is depressurized, the contents have been drained, and the equipment is cool . Sentry Equipment Corp... -
Page 5: Specifications
Specifications Specifications are subject to change without notice. Applications: Sentry® Sample Sentry® II Communications: is designed to meet requirements for ƒ Protocol: MODBUS® representative sampling by maintaining ƒ Network: RS-485 a constant flow rate with varying inlet conditions. Display: Models: Graphical Vacuum Fluorescent Display... -
Page 6: General Description
The traditional manual sample conditioning system can require constant adjustment during startup or as plant conditions change. Sample Sentry II is designed to meet requirements for representative sampling by maintaining a constant flow rate with varying inlet conditions. Automated flow control is achieved by continuously monitoring the sample flow rate and controlling a motorized pressure reduction valve (PRV). - Page 7 Figure 1. Typical P&ID of a Sample Sentry II System Sentry Sample Sentry II...
- Page 8 Figure 2. P&ID of a Sample Sentry II system with Secondary Cooling Sentry Equipment Corp...
- Page 9 PRV is being located. After the PRV positions are stored, the system returns the PRV to the home setting and enters Operation screen in Manual mode. Refer to Figure 5. Any time that the Sample Sentry II power is reset, the unit enters its startup routine.
-
Page 10: Operation
To ensure the protection provided by this equipment is not impaired, this equipment must not be installed or used in any manner other than that which is specified in this manual . Description of Controls Table 1 and Figure 3 describe controls on the Sample Sentry II controller. Table 1. Control Descriptions Description... - Page 11 Figure 3. Controller Front Panel Sentry Sample Sentry II...
- Page 12 Screen Descriptions Figure 4 shows the screen structure in the Sample Sentry II controller. Figure 4. Screen Navigation Opera on Screen Main Menu Setup Analog Inputs Display Flow Rates Blowdown Scale Sample Auto Calibra on Shutdown Manual Cal Blowdown Time Comp.Error Offset...
- Page 13 S V 2 P R V Figure 5 shows a typical operation screen for the Sample Sentry II. The top line displays temperature and pressure data. The screen periodically refreshes to show a different measurement. Only measurements that are enabled are displayed.
- Page 14 On newer models (11/16/11 and later) a couple of options have been added. 1. When in a high temperature alarm, the user can cool the Sample Sentry II down by opening SV1 and opening the PRV. Press and hold the ESC button to open SV1. Release the ESC button to close SV1.
- Page 15 1. SV-1 and SV-2 valves close. 2. Sample Sentry II pulses the motor in the opposite direction of the previous motor direction movement. It performs this part of sequence for 15 seconds. If the motor movement is detected Sample Sentry II displays “PRV Calibration” on the display and performs PRV calibration where Sample Sentry II determines the number of turns in the PRV.
- Page 16 5. Replace VREL valve (replacing VREL valve near the fully open position reduces startup time). 6. Apply power to the Sample Sentry II. 7. Wait for Sample Sentry II unit to finish its startup routine (date screen will no longer be shown). Main Menu Figure 7.
- Page 17 MENU key while using the ▲ and ▼ keys. To return to the setup screen, press the ESC key. Â NOTE To disable blowdown, set the blowdown time to 0:00:00 . Sentry Sample Sentry II...
- Page 18 Ensure that there is sufficient pressure differential between the startup pressure set point and shutdown pressure setpoint so that the Sample Sentry II does not enter a continuous loop senario . (ie . Startup pressure must always be suffieciently higher than Shutdown pressure to account for pressure drops during startups .
- Page 19 For example, Recalibrate should be done if a VREL valve is replaced after it has been taken off the Sample Sentry II for cleaning. Also, if the coupling slips on the shaft of the PRV, a recalibration is required. For older models, this setting is not available and resetting the PRV must be done by a reboot of the unit.
- Page 20 (11/16/11 or later) the high temperature setpoint can be changed when in a high temperature alarm by holding the ESC button down and pressing the Enter button. This sets the high temperature setpoint to 5 degrees above the current outlet Sentry Equipment Corp...
- Page 21 To advance to the next measurement option, use the ENTER key. After all options have been set, the screen returns to the continued setup screen (screen 2). Available options are: Inlet Pressure and Temperature, Outlet Pressure and Temperature, and Cooling Water Temperature. Sentry Sample Sentry II...
- Page 22 BAUD rate to be changed. For further information on using the MODBUS feature, please refer to “Appendix A - MODBUS” on page 41. The PID parameters should only be changed with the assistance of Sentry Equipment. For this reason, PID parameters are password protected. If the system needs tuning, please contact Sentry Equipment for assistance.
-
Page 23: Installation
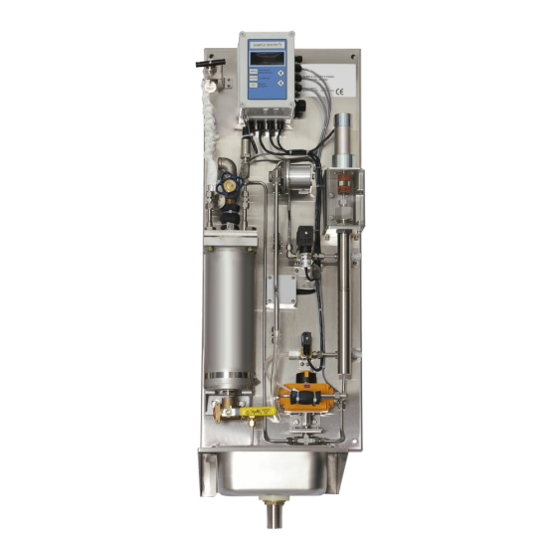
Password protected. Flow Meter Calibration The Sample Sentry II system has a stated flow accuracy of ± 3% of full scale which correlates to ± 102cc. Under normal operation of the system this value is fine; however, if additional accuracy is required it possible to generate a multiple point correlation table to normalize each system to a specific sample point. - Page 24 Figure 25. General Arrangement (High Pressure Model) Sentry Equipment Corp...
- Page 25 Sample Sentry II automatically operates with power supplied in this range. A power supply lead of 16 AWG (1.3 mm²) copper wire is recommended. The Sample Sentry II should be connected to an electrical outlet or outlet strip with surge suppression and filtering. A suitable external over-current protection device such as a fuse or circuit breaker (15 A) is recommended for both the hot (L) and neutral (N) leads.
- Page 26 Figure 26. Electrical Wiring Diagram Sentry Equipment Corp...
-
Page 27: Maintenance
Replace gaskets that show visible leaks. Keep spare shell gaskets on hand for this need. 3. During reassembly, tighten the bolts only enough so that shell side leaking does not occur. Over tightening ma y cause gasket failure. Sentry Sample Sentry II... - Page 28 6. Apply power to the Sample Sentry II. 7. Wait for Sample Sentry II unit to finish its startup routine (date screen will no longer be shown). 8. Open sample inlet isolation valve on the Sample Sentry II.
- Page 29 Make sure that the tube is not bending or flexing while loosening the nut. New flow transmitters are supplied with the fitings assembled to them to minimize the possibility of damaging the tube, however care must be taken during assembly. Wrench Flat Sentry Sample Sentry II...
- Page 30 3. Replace the top motor bracket and tighten the bracket screws. 4. Verify that there is clearance between the coupling pins and the top bracket. a. If the coupling is rubbing, remove some material from the guide pins. Sentry Equipment Corp...
- Page 31 PRV valve type . 1 . Connect power to the Sample Sentry II . 2 . While the Sample Sentry II boots, hold down the and MENU buttons at the same time to bypass the startup sequence and enter the main menu .
- Page 32 Analog Input Calibration  NOTE The analog circuitry of the Sample Sentry II is calibrated at Sentry prior to shipment . Re- calibration should be performed by properly trained personnel . Refer to the following procedures to calibrate the analog circuits of the Sample Sentry II .
- Page 33 Figure 27. Channel Configuration on Sample Sentry II CPU Board Terminals labeled V# are not used during calibration. Calibrate each channel per Table 3 and instructions below. Table 3. Channel Calibration Reference Channel # Range Input P&ID Ref – Channel 1...
- Page 34 11. Repeat steps 8-11 for remaining channels requiring 0-2.5 V calibrations. 12. After calibration of all channels has been completed, use the ESC key to return to the Operation Screen. Flow Meter Calibration Consult Factory for assistance. Sentry Equipment Corp...
- Page 35 Factory Settings The settings below are factory settings for Sample Sentry II units. These values are adjustable and can be changed according to customer requirements. Table 4. Factory Settings for the Sample Sentry II High Pressure Low Pressure Flowrates Blowdown...
-
Page 36: Troubleshooting Guide
PRV coupling. If this fails, close sample isolation valve, remove power from Sample Sentry II, remove PRV and clean debris from PRV. Replace PRV, supply power to Sample Sentry II, wait for unit to finish its startup routine, and open sample isolation valve. -
Page 37: Spare Parts List
Spare Parts List Description Sentry P/N BPR/RV Sentry Backpressure Regulator/Relief Valve (20 PSI) 7-00868A Replacement Diaphragm Kit 6-04084A FE/FT-1 Flow Sensor with Fittings 6-04953D Motor Call Factory VREL – Motor Coupling Kit 6-05642C Needle Valve – Motor Coupling Kit 7-04767B*... - Page 38 Output Board Fuse, 0.25 A 250 V Fast Acting 4-05630E Output Board Fuse, 2.0 A 250 V Fast Acting 4-05630A Power Supply Fuse, 4.0 A 250 V Fast Acting 4-02055F CPU Board 6-03912D Output Board 6-03912E Display Board 2-05578J Power Supply 4-05590C Sentry Equipment Corp...
-
Page 39: Standard Warranty
Standard Warranty Sentry Equipment Corp (“Seller”) warrants products manufactured by it and supplied hereunder (“Products”) to be free from defects in workmanship and, to the extent materials are selected by Seller, to be free from defects in materials, in each case for a... -
Page 40: Customer Support
Customer Support With proven sampling expertise since 1924, Sentry products and services provide business operations the critical insights to optimize process control and product quality. We deliver true representative sampling and analysis techniques to customers around the globe, empowering them to accurately monitor and measure processes for improved production effi ciency, output, and safety. -
Page 41: Appendix A - Modbus
Each device on the network must be assigned a unique address. The address for each Sample Sentry II can be in the range of 1 to 247. Use the ▲ and ▼ keys to change the address setting. Use the ENTER key to toggle between the address setting and the BAUD setting. - Page 42 1 = Remote blowdown 2 = Remote Sample Use this register to control the mode of the Sample Sentry II. A 0 in this register gives local control to the system. Blowdown and Sample modes are initiated based on controller setup parameters.
- Page 43 This page is intentionally left blank. Sentry Sample Sentry II...
- Page 44 This page is intentionally left blank. Sentry Equipment Corp...
- Page 45 Serving customers in more than 50 countries across six continents worldwide. sentry-equip.com 966 Blue Ribbon Circle North, Oconomowoc, WI 53066 U.S.A. | +1-262-567-7256 | support@sentry-equip.com...