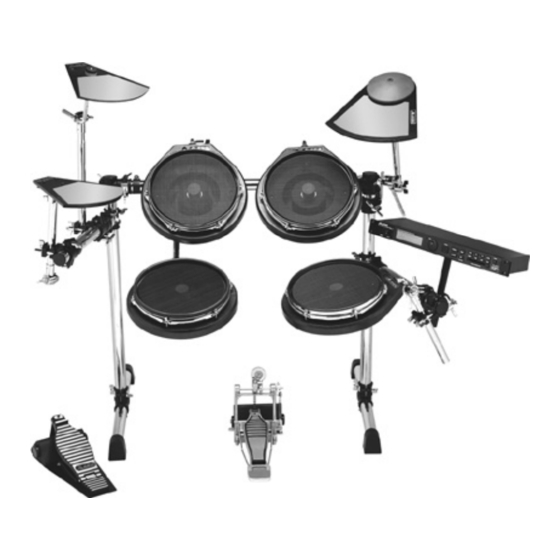
Alesis DM Pro Kit Setup Manual
Electronic percussion system
Hide thumbs
Also See for DM Pro Kit:
- Reference manual (175 pages) ,
- Service manual (44 pages) ,
- Basic user's manual (16 pages)
Table of Contents
Advertisement
Quick Links
Advertisement
Table of Contents

Related Manuals for Alesis DM Pro Kit


Summary of Contents for Alesis DM Pro Kit
- Page 1 Setup Guide...
-
Page 2: Table Of Contents
DM Pro Drum Module Checklist ........3... -
Page 3: Introduction
DM Pro Kit is an all-in-one solution for everyone from hobbyists to pro drummers. To assure proper setup and take full advantage of the DM Pro Kit’s wide-ranging features, p l e a s e read this Setup Guide and the DM Pro Module Reference Manual carefully. -
Page 4: Rack And Mounting Hardware Checklist
Q t y. P a rt Description Hardware Clamps Tom A r m s Long Snare A r m Cymbal Booms DM Pro Rack Mounting Tray w/screws and washers Small Utility Tray (not pictured) Drum Keys (not pictured) Cable Ties (not pictured) Q t y. -
Page 5: Cable Checklist
DM Pro A d d e n d u m Items You Will Need In addition to the drum keys that come with DM Pro Kit, you will need a phillips head screwdriver and flat head screwdriver. An adjustable wrench or pliers will prove useful for final tightening of clamps. - Page 6 Loosely tighten wing nuts. d) Compare the two Upright Tubes to make sure they are the same height. e) Firmly tighten wing nuts on each clamp. Then, firmly tighten the drum-key bolts on each clamp. 2. Attach Right Side Tube to Upright Tube a) Choose a T-Clamp and loosen all wing nuts.
- Page 7 T- C l a m p . h) Firmly tighten each memory lock’s bolt. i ) Firmly tighten T-Clamp wing nuts labeled “tighten first.” j ) Firmly tighten all remaining wing nuts. DM Pro Kit Setup Guide...
-
Page 8: Attaching Pads And Cymbals
You’ve now assembled the DM Pro Kit’s Mounting Rack. Before moving on, make sure that the mounting rack is standing upright and stable, with all wing nuts securely tightened. Attaching Pads and Cymbals Your next step is to attach pads and cymbals to the DM Pro Kit Mounting Rack. -
Page 9: High To M
Note: for even more flexible positioning of your Snare Pad, you can choose to use your f a vorite snare drum stand. The Snare Pad will easily fit any basket-style snare drum stand. Attach High Tom a) Choose a Hardware Clamp and loosen large wing nut until clamp’s large opening releases. -
Page 10: Low/Floor To M
Adjust hi-hat’s memory lock (this is the memory lock at the far left end of the Left Side Tube) by loosening drum key bolt and sliding it into the Hi-Hat’s Hardware Clamp. Make sure you align the memory lock’s notch with the indentation in the clamp. -
Page 11: Crash Cymbal
Firmly tighten all wing nuts. Note: For players who prefer a softer feel and quieter p e r formance, the DM Pro Kit includes a Rubb e r Cymbal Mat that can be attached to the top surface of the Crash Cymbal. -
Page 12: Installing Dm Pro Module And Attaching Cables
The DM Pro Kit comes with color-coded labels for all connector cables. These labels will make it much easier for you to connect your trigger pads to the DM Pro Sound Module. Attach matching color-coded labels to the smooth plastic cylindrical surface immediately above the metal jack at both ends of each cable. -
Page 13: Ready To Play
• Connect S n a re Pad to the “S n a re ” Input jack on the back of the DM Pro • Connect C r a s h Cymbal Pad to the “C y m b a l ” Input of the DM Pro •... -
Page 14: Adjust Triggering Parameters
64 different Drumkits, and then press the {KIT} button again to “Load” the Drumkit of your choice into the “Play Memory” of the DM Pro. If the Drumkit number and the {KIT} button are flashing, the Drumkit currently shown on the display has not yet been loaded – the previously loaded Drumkit still resides in the Play Memory and will sound until you press {KIT} to load the new Drumkit. -
Page 15: Advanced User Tips And Tricks
Use this in conjunction with “t h r e s h o l d ” on the DM Pro pedal input to adjust the exact action to suit your playing style. Snare Pad The Snare Pad drum head is fully adjustable to suit your playing style. -
Page 16: Ride Cymbal
Tom Pad The drum head on each DM Pro Kit Tom is also fully adjustable. You can adjust the tension tighter for “mounted” toms and looser for “floor” toms so the feel of the drums duplicates the same corresponding acoustic drum size. - Page 17 Proof of purchase must be presented in the form of a bill of sale, canceled check or some other positive proof that the product is within the warranty period. ALESIS reserves the right to update any unit returned for repair. A L E S I S reserves the right to change or improve design of the product at any time without prior notice.