Table of Contents
Advertisement
Quick Links
S830
KSJS830-A1604
PRINTED IN CHINA
正しくご愛用くださいますよう、お願い申し上げます。
なお、この説明書はお手元に保管し、必要に応じてご覧ください。
※ 金属バンドの調整は、お買い上げ店にご依頼ください。
ご贈答、ご転居などにより、お買い上げ店での調整が受けられない場合は、
弊社お客様相談窓口へご依頼ください。お買い上げ店以外では有料もしくは
お取扱いいただけない場合があります。
※ 商品に傷防止用の保護シールがはられている場合があります。
必ずはがしてお使いください。はられたままにしておくと、汚れ、汗、ゴミ、
水分などが付着してさび発生の原因となります。
取 扱 説 明 書
S830 Bluetooth
Ⓡ
通信機能付き
高度・気圧・温度・方位計測機能付き
ソーラーデジタルウオッチ
T-1
この度は弊社製品をお買い上げいただき、
誠にありがとうございました。
ご使用の前にこの説明書をよくお読みの上、
Advertisement
Chapters
Table of Contents

Related Manuals for Seiko S830


Summary of Contents for Seiko S830
- Page 1 S830 KSJS830-A1604 取 扱 説 明 書 S830 Bluetooth Ⓡ 通信機能付き 高度・気圧・温度・方位計測機能付き ソーラーデジタルウオッチ PRINTED IN CHINA この度は弊社製品をお買い上げいただき、 誠にありがとうございました。 ご使用の前にこの説明書をよくお読みの上、 正しくご愛用くださいますよう、お願い申し上げます。 なお、この説明書はお手元に保管し、必要に応じてご覧ください。 ※ 金属バンドの調整は、お買い上げ店にご依頼ください。 ご贈答、ご転居などにより、お買い上げ店での調整が受けられない場合は、 弊社お客様相談窓口へご依頼ください。お買い上げ店以外では有料もしくは お取扱いいただけない場合があります。 ※ 商品に傷防止用の保護シールがはられている場合があります。 必ずはがしてお使いください。はられたままにしておくと、汚れ、汗、ゴミ、 水分などが付着してさび発生の原因となります。...
-
Page 2: Table Of Contents
目次 1.この製品について (1)Bluetooth 通信のしかた ………… 31 製品取扱上のご注意 …………………………4 時刻・カレンダーモードの使いかた … …… 32 電波法について ………………………………9 (1)ボタンの名称とはたらき ………… 32 Bluetooth について … …………………… 11 (2) 時 刻・カレンダー・都市名・ Ⓡ 特長 ………………………………………… 13 サマータイムの合わせかた ……… 33 ボタンの名称と表示の切替 ……………… 15 (3)コントラスト調整のしかた ……… 35 この製品でできること ... - Page 3 (3) ア ラームを鳴らしたい場合、鳴らしたくない場合 … 45 (4)表示の説明 ………………………… 73 (4)鳴っているアラームを止めるには … 45 (5)磁北と真北について ……………… 73 ワールドタイムモードの使いかた ………… 46 (6)磁気偏角補正のしかた …………… 74 (1)ボタンの名称とはたらき ………… 46 (7) 磁 気キャリブレーション (2)都市選択のしかたと時差表示 …… 47 (磁気補正)のしかた … …………… 75 ...
-
Page 4: 製品取扱上のご注意
製品取扱上のご注意 注意 こ こ 取り扱いを誤った場合に、軽症を負う危険性や物質的損害をこうむることが想定されることを示します。 の の 警告 製 製 ・以下の場所での携帯・保管は避けてください 品 品 に に ○揮発性の薬品が発散しているところ (除光液などの化粧品、防虫剤、シンナーなど) 取り扱いを誤った場合に、重症を負うなどの重大な結果になる危険性が想定されることを示します。 つ つ ○ 5℃〜 35℃を外れる温度に長期間なるところ ○高湿度なところ い い ・次のような場合、ご使用を中止してください ○磁気や静電気の影響があるところ ○ホコリの多いところ て て ... -
Page 5: 電波法について
警告 注意 こ こ この時計はスキューバダイビングや飽和潜水には の の 本製品は、日本国内でのみご使用いただけます。 絶対に使用しないでください 製 製 海外では国によって電波使用制限があるため、本製品を使用した場合、使用 品 品 スキューバダイビングや飽和潜水用の時計に必要とされる に に 者が罰せられることがあります。 過酷な環境を想定した様々な厳しい検査を行っていません。 つ つ 専用のダイバーズウオッチをご使用ください。 い い て て 本製品の発する電波が影響を及ぼし、 本製品を強力な磁気を発する機器の近くや磁場が強い場所で 誤動作による事故の原因となるおそれがあります。 使用すると、方位などの計測に誤差が生じたり、計測不能にな ・ 本 製品を医療機器の近くで使用しないで下さい。 ることがありますので、ご注意ください。 電波が心臓ペースメーカーや医療用電気機器に影響を与えるおそれがあり また、建物内の金属物など地磁気を遮蔽する環境では、正しく ます。 計測する事ができません。 満員電車などの混雑した場所や医療機関の屋内では使用しないでください。 回りに金属の遮蔽物のない環境で計測下さい。 ・ ... -
Page 6: Bluetooth について
Bluetooth Ⓡ について こ こ ■ 2.4 GHz 機器使用上の注意事項 ■ Bluetooth 仕様 の の 製 製 本製品の使用周波数は 2.4 GHz 帯です。 ・ 通信方式:Bluetooth 標準規格 Ver 4.1 品 品 こ の周波数帯では電子レンジ等の産業・科学・医療用機器のほか、他の同種無線局、工場 ・ 使 用周波数帯域:2.4 GHz 帯 (2,402 MHz 〜 2,480 MHz) に に の製造ライン等で使用される免許を要する移動体識別用構内無線局、免許を要しない特定 ・変調方式:GFSK(1MHz) つ つ い い... -
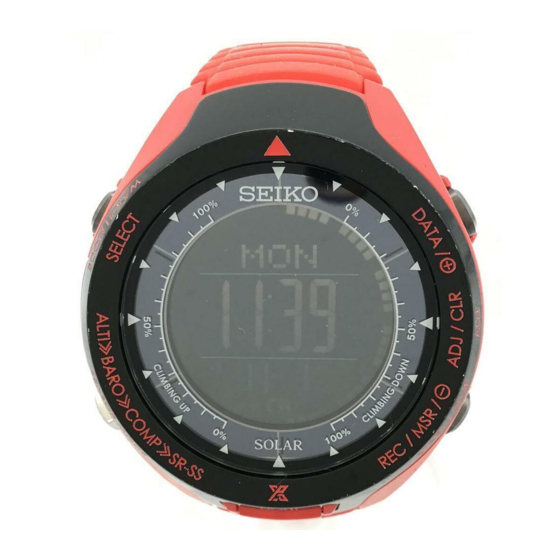
Page 7: ボタンの名称と表示の切替
ボタンの名称と表示の切替 こ こ ■日の出日の入時刻表示機能 ・ボタンの名称は、左下から時計回りにボタンⒶ〜ボタンⒻと割り振られています。 の の ・ボタンⒶでセンサー機能を、ボタンⒷで時計機能を切り替えます。 製 製 …スマートフォンから送られた位置情報を基に、日の出日の入時刻を表示します。 ・各ボタンの近くにはそのボタンの主な機能を表記しています。 品 品 に に ・ 各 モードで使用頻度の高いボタンにはガイダンスマーク (▲)が点灯しますので、操作時の ■ソーラー充電機能 つ つ 参考としてください。 い い … 文 字板上のソーラーパネルで光を電気エネルギーに換え、充電します。フル充電後、光が 外側の表記:主に時計機能で使うための説明 て て 当たらない状態でも、約 5 か月間の動作が可能です。 内側の表記:主にセンサー機能で使うための説明 また、無駄なエネルギー消費を抑えるためパワーセーブ・スリープ機能がはたらきます。 ボタンⒸ ※ 光のあたるところに置く、保管するなど日常的に十分な充電を心がけましょう。 【ご注意】 DATA/+SET 本製品の操作ボタンは側面に設け... -
Page 8: センサー計測の範囲と精度について
センサー計測の範囲と精度について 各種マークの説明 こ こ この時計には気圧、方位、温度の各センサーを搭載し、高度、気圧、温度、方位を計測します。 電池残量表示 :現在の電池残量の概略をグラフィックで表します。 の の 計測範囲、精度は以下になります。 パワーセーブマーク :パワーセーブ状態であることを表します。 製 製 品 品 スリープマーク :スリープ状態であることを表します。 に 高度計:表示単位 1m / 5ft に サマータイムマーク :時刻表示のサマータイム設定がONの時、点灯します。 つ つ 計測範囲 − 699 〜 9164m /− 2290ft 〜 30065ft アラームマーク :アラームの設定がONの時、点灯します。 い い 精度 高度 6000m 以下:± ( 高度差× 3% +30m) て... -
Page 9: 2)充電にかかる時間のめやす
(2)充電にかかる時間のめやす (3)表示と電池残量について 下記の時間を参考に、充電を行ってください。 ■電池残量について 液晶パネルの表示でおおまかな電池残量が分かります。 一日分の 電池残量表示 全消灯 充電時間 電池残量表示 操作・機能の制限 そのときは ご 環境1 晴れた日の屋外 ご 約1時間 約2時間 約2時間 約1時間 約2分 10万ルクス 使 使 十分 用 用 ありません そのままお使いください ❶ 環境2 晴れた日の窓際 の の 約10時間 約16時間 約24時間 約11時間 約22分 1万ルクス 前 前 に... -
Page 10: ペアリングについて
・パワーセーブ設定のしかた ペアリングについて 「時刻・カレンダーの合わせかた」で OFF または ON の時間設定を行います。 時間設定は 30 分、1 時間、2時間、4時間から選ぶことができます。 Bluetooth 機器では接続する機器同士をあらかじめ登録しておく必要があります。この登録 初期設定は 30 分です。 P.37 の 「パワーセーブ設定のしかた」を参照してください。 のことをペアリングといいます。一度ペアリングを行うと、時計とスマートフォンにペアリング 情報が登録され、以降は自動で認識されます。 ご ※ パ ワーセーブ設定はアプリケーションからも行うことができます。 使 用 自 動時刻同期を除いた設定の同期を行った場合は、アプリケーション側の設定に上書きさ 以下の場合は再ペアリングが必要になります。 の れます。 ・時計の修理などでペアリングの情報が削除されたとき。 時 前 計 ・スマートフォンの機種変更をしたとき。 に... -
Page 11: Bluetooth 通信について
(1)Bluetooth 通信のしかた Bluetooth Ⓡ 通信について ① ス マートフォンにインストールした専用のアプリケーションから 「設定を同期」を選択し、 通信を開始します。 本製品は Bluetooth による無線通信機能を使い、時計とスマートフォンの間で以下のデータ ② 時 計のボタンⒻを確認音が鳴るまで長押しします。上段に接続のアニメーションが表示さ 通信を行います。 れ マークが点滅します。接続すると マークが点灯し、データ通信を開始します。 ●スマートフォンから時計へ ③ デ ータ通信が完了すると LINK OFF と表示され、 確認音が鳴り自動で接続を解除します。 重量設定 荷物重量、 体重 ④ ア プリケーションにも接続メッセージが表示されます。完了後は画面表示に従ってくださ 時計設定 自動時刻同期設定 い。 時 時 時計設定 (アラーム、 時制、 ライト点灯時間、 パワーセーブ設定、 現在地日の出日の入) ⑤ ... -
Page 12: 3)コントラスト調整のしかた
③ ボ タンⒷを押して 「秒」 を点滅状態にし、 時報と同時にボタンⒸまたはボタンⒺを押すと 「00」 (3)コントラスト調整のしかた に合います。 表示のコントラスト(濃薄)の調整ができます。出荷時及びシステムリセットの後の設定は0 ※ 秒 表示が30〜59秒の時、ボタンⒸまたはボタンⒺを押すと1分繰り上がって「00」に合います。 となります。 ※時刻合わせは、電話の時報サービス(TEL.117)が便利です。 ・ボタンⒷを押して「時刻・カレンダー表示」状態にしてください。 ④ ボ タンⒷを押して合わせたいところを選択した後、ボタンⒸを 1 回押すごとに点滅している ① ボ タンⒹを長押しすると現在設定されている都市名が表示され、 「時刻・カレンダー合わせ」 数字・都市名が1つずつ進みます。 状態になります。スマートフォンの時刻と同期した場合は LOCAL が表示されます。 反対にボタンⒺを押すごとに1つずつ戻ります。 ( 「秒」を除く。 ) ②ボタンⒷを繰り返し押して「コントラスト調整」状態(CONT)にしてください。 ※ボタンⒸまたはボタンⒺを長押しすると早送りができます。 ③ボタンⒸ、またはⒺを押してコントラストを調整します。 時 時 ⑤ 「時刻・カレンダー合わせ」が終わりましたら、ボタンⒹを押してください。修正状態を解 計... -
Page 13: 操作確認音のセットと解除のしかた
(6)アラーム音の試し聞き、報時並びに操作確認音のセットと解除のしかた 現在地 日の出日の入時刻モードの使いかた ・ 「時刻・カレンダー表示」でボタンⒺを押すごとに報時・操作確認音のセットと解除が Ⓒ できます。 自動時刻同期を除いたデータ通信時にスマートフォンに登録されている位置情報を利用し、そ ・ ま た、ボタンⒸとボタンⒺを同時に押し続けると「アラーム音の試し聞き」ができ の緯度経度海抜 0m 地点での日の出日の入時刻を表示します。 ます。 Ⓔ ※現在地の緯度が北緯 65 度以上、南緯 65 度以上のときは表示できません。 ※ 現 在地 日の出日の入時刻表示を行う場合は、アプリケーションの 「設定」で 「現在地日の出日の入時刻」の機能 (7) ホーム選択都市・接続時刻確認のしかた を ON にしてから設定を同期してください。 ONの場合点灯 現在ホームに選択している都市名と時差の確認ができます。 ※ ス マートフォンがアプリケーションに対して位置情報の使用を許可する設定になっていることをご確認ください。許 可されていない場合は現在地日の出日の入時刻は表示されず --- の表示になります。 また、直前に Bluetooth 通信で時刻同期した日時の確認ができます。 時... -
Page 14: 2)ストップウオッチの使いかた
(2)ストップウオッチの使いかた アラームモードの使いかた リセット状態 計測状態 停止状態 リセット状態 設定した時刻 (時・分)で毎日報知する 3 チャンネルのデイリーアラームです。 ストップ チャンネル毎に、アラームの on/-- ( セット/解除)切り替えができます。 Ⓒ Ⓔ Ⓔ Ⓒ ※アラーム設定はアプリケーションからも行うことができます。 自動時刻同期を除いた設定の同期を行った場合は、アプリケーション側の設定に上書きされます。 Ⓔ Ⓔ Ⓔ Ⓔ 【ご注意】 時 刻、カレンダーモードで表示される時刻と一致した場合に、アラームが鳴ります。 スタート 再スタート リセット ワールドタイムモードで設定した時刻では鳴りません。 時 時 計 計 (1)ボタンの名称とはたらき ①リセット状態でボタンⒺを押すと、ストップウオッチの計測をスタートします。 機 機 ②計測状態でボタンⒺを押すと、ストップウオッチの計測をストップします。... -
Page 15: ワールドタイムモードの使いかた
(2)都市選択のしかたと時差表示 ワールドタイムモードの使いかた ONの場合点灯 ・ボタンⒸまたはボタンⒺを押して都市名を変更します。 ※ボタンⒸまたはボタンⒺを長押しすると早送りします。 世界 42 都市、UTC に加え、世界7大陸最高峰と富士山の時刻と時差を表示します。UTC ・ 都 市を選択すると、下段に UTC からの時差を表示し、 Ⓓ を除き各都市または山ごとにサマータイム (DST)の設定ができます。 無操作 2 秒後にホームタイムの時刻になります ※ワールドタイム設定はアプリケーションからも行うことができます。 自動時刻同期を除いた設定の同期を行った場合は、アプリケーション側の設定に上書きされます。 (3)サマータイムの設定のしかた ※ U TCは国際協定により定められた世界共通の標準時です。全世界で時刻を記録する際に公式な時刻と ・ 「ワールドタイム表示」でボタンⒹを押すごとに設 定と して使われています。 DST ON 時 時 解除ができます。 計 (1)ボタンの名称とはたらき 計 サマータイムセット時は 「DST」マークが点灯し、時間が 1 時間進みます。 機 機... -
Page 16: 1)ボタンの名称とはたらき
(1)ボタンの名称とはたらき (2)表示の説明 登高スピード:10秒ごとに表示を更新します。 ボタンⒶを押して高度計モードに切り替えてください。上段に 「ALTI」と表示した後、現在の 表示範囲:−9999〜9999[m/h]/−9999〜9999[ft/h] 高度表示に切り替わります。 高 度:10秒ごとに表示を更新します。 表示範囲:−699〜9164[m]/−2290〜30065[ft] ボタンⒶ:気圧・温度計モードへの切替 現 在 時 刻 :現在時刻を表示します。 ボタンⒷ ボタンⒸ ボタンⒷ:時計機能への切替 ※表示例の単位は初期設定の状態です。 ボタンⒸ:登山計画番号表示/高度補正(プラス) ボタンⒹ ボタンⒸ(長押し) :登山記録番号表示/登山記録 (3)高度補正とドリフトキャンセル 一時中断/再開 ボタンⒹ(長押し) :高度補正状態、 ボタンⒶ ボタンⒺ 高度の補正について セ セ ドリフトキャンセル設定状態への切替 本製品の高度計は気圧を基に算出します。 ン ン ボタンⒹ(さらに長押し)リバースモード設定への切替 気圧の変化や大気や標高差による温度変化が原因で、誤差が生じる場合があります。 サ サ ボタンⒻ... -
Page 17: 6)登山記録の取りかた
(6)登山記録の取りかた ●登山記録の開始から終了までの間に、次の項目を記録します。 ■記録開始日付 専用のアプリケーションで作成した登山計画を最大7つまで時計に登録することができます。 ■所要時間 時計で計画概要を表示し、計画を選択して登山記録を取ることができます。また、計画なしでも ■平均登高スピード (上り/下り) 記録が取れます。登山記録は 10 件まで、 1 件につき最大 24 時間まで記録することができます。 上り :区間1 、3、4の登高スピードの平均値 下り :区間2、5の登高スピードの平均値 登山記録について ■積算上昇高度/下降高度 ●内蔵のセンサーや時刻情報から様々な登山記録を取ります。 上り : 区 間1 、3、4の上昇高度の合計値 下り : 区 間2、5の下降高度の合計値 ③ [高度] ■消費エネルギー ■記録開始高度と時刻①、終了高度と時刻④ ■最高高度と時刻③、最低高度と時刻② セ セ ●登山記録の記録途中に、次の項目についてその地点までの途中経過を確認できます。... - Page 18 ②登山記録を開始するときは、目的の登山計画が表示された状態でボタンⒺを長押しします。 ③ 登 山記録を一時停止するときは、記録中にボタンⒸを長押しします。 PAUSE HOLd と REC HOLd と表示され、そのまま押し続け外周のグラフィックが一周すると記録が開始 表示され、そのまま押し続け外周のグラフィックが一周すると記録が一時停止されます。上 され、REC マークが点滅します。 段に PAUSE と表示され REC マークが点灯します。 ※登山計画を選択した場合は画面に PLAN のマークが点灯します。 記 録を再開するときは、ボタンⒸを長押しします。 REC HOLd と表示され、そのまま押 登 山計画なしで記録を開始するときはボタンⒸを押して ---- が表示された状態でボタンⒺを長押 し続け外周のグラフィックが一周すると記録が再開され、REC マークが点滅します。 しします。このとき PLAN のマークは点灯しません。 ※ 登 山記録は1件につき一時停止時間も含めて最大24時間まで記録できます。24時間が経過すると停 ...
-
Page 19: 7) 登 山記録の呼び出しかた
⑥リバースモードについて ⑦ 登 山計画を消去する場合は、REC マークが消灯している状態でボタンⒸを押し、登山計画 予 定していた登山計画を中断して同じルートを引き返す場合、リバースモードを設定するこ が表示された状態でボタンⒹを長押しします。 CLR ? ALL と表示され、そのまま押し とで現在地点からスタート地点までの進捗を減算表示します。 続け外周のグラフィックが一周すると確認音が鳴り、時計本体に登録された登山計画を全て 登 山記録中にボタンⒹを 5 秒以上長押しします。 ADJ の表示のあと確認音が鳴り REV 消去します。 HOLd と表示されます。さらにそのまま押し続け外周のグラフィックが一周すると再び確 このとき、計画は全て一括で消去されます。個別に消去することはできません。 ※登山記録の記録中は登山計画の消去は出来ません。 認音が鳴りリバースモードが設定され、 が下段に点灯します。外周のグラフィックはそ ※ ア プリケーションと設定を同期した場合は、アプリケーション側で設定されている計画に上書きされ の地点の表示から減算されていきます。 ます。 ※一度リバースモードを設定すると、登山記録終了まで解除はできません。 登山記録中 高度補正 リバースモード移行中 セ セ Ⓓ長押し... -
Page 20: 8)高度計測の仕組み
③ 確 認が終わりましたらボタンⒶを押して高度計表示状態に戻ります。忘れた場合でも2〜3 (8) 高度計測の仕組み 分で自動的に戻ります。 ・ 本 製品は国際民間航空機関 (ICAO)が定めている国際標準大気の高度と気圧の関係を使っ て高度を推定する方法を採用しています。 ④ 登 山記録を消去する場合は、REC マークが消灯している状態でボタンⒸを長押しし、登山 ・ あ らかじめ高度が分かる場所で高度の補正を行い、そこからの気圧変化量を基に高度差を 計測し、現在の高度として表示します。 記録が表示された状態でボタンⒹを長押しします。 CLR? ALL と表示され、そのまま 図の例では、はじめに登山口等で高度を補正します (200 m) 。そして移動によって生じた高度 押し続け外周のグラフィックが一周すると確認音とともに時計本体に保存された登山記録を 差 (400 m)を計測し、補正値と合わせることで、移動後の高度 (600 m)を表示します。 全て消去します。個別に消去することはできません。 ・ 気 圧の変化を高度に換算しているため、同じ場所で高度を計測しても、気圧が変化すれば高 ※登山記録の記録中は登山記録の消去は出来ません。 度の表示も変わります。 ※アプリケーション側に保存された登山記録は時計の操作では消去されません。 600m (現在高度=補正値+計測値) ... -
Page 21: 3)気圧・温度の再計測のしかた
※気圧が下降傾向の時は天気は下り坂(例1)、上昇傾向の時は天気が回復傾向(例2)にあります。 方位計(COMP) モードの使いかた ※ 大 きな高度差の生じる移動および急激な天気、温度変化などによって気圧が大幅に変化すると、過去の 気圧データがグラフ表示領域からはずれて、表示外となることがあります。(例3) 時計の 12 時位置が向いている方位と角度、および真北の方向を確認することができます。 例1 : 下降傾向にあるとき 例2 : 上昇傾向にあるとき 例3 : 表示外となる場合 外周のグラフィックで北を示し、上段に 16 方位を、中段に方位角を表示します。 地理上の真北を指すための磁気偏角補正機能があります。 (1)ボタンの名称とはたらき ・ ボ タンⒶを押して方位計モードに切り替えてください。上段に COMP と表示したのち、方位 (3)気圧・温度の再計測のしかた 計測を開始し 30 秒間方位を表示します。 ・ 気 圧・温度計モードに切り替えた後、気圧と温度を計測し計測結果を 30 秒間表示します。 セ セ 30 秒が経過すると、... -
Page 22: 6)磁気偏角補正のしかた
(6)磁気偏角補正のしかた (7)磁気キャリブレーション(磁気補正)のしかた 磁気コンパスで計測した磁北を真北と一致させるために、磁気偏角補正値を入力します。 ・ 本 製品は強い磁場環境におかれた場合、磁北の検出が不正確になり、正しい方位を表示で きない場合があります。その場合は下記の手順で磁気補正を行ってください。 補正値は計測する緯度経度により異なりますので、地図や国土地理院のHPなどに示された 磁気偏角補正値をセットしてください。例えば日本国内でも地域によって 4 〜9度程度の差 【ご注意】 永 久磁石や家電製品、携帯電話の近くでは正しくキャリブレーションが出来ないこ があります。 とがあります。 ① 方 位 計 測 状 態 もしくは 方位 計 測 停止状 態 からボタンⒹ を長 押しして 磁 気偏 角 補 正 状 態 ① ... -
Page 23: 使いかた
(2)登山計画 日の出日の入時刻モードの使いかた ●登山記録中でない場合 ●登山記録中の場合 ① 時 計本体に登録されている登山計画の番号が表示されます。ボタンⒸを押すたびに、計 ①記録中の登山計画の位置情報、記録開始日付での日の出日の入時刻を表します。 画番号が切り替わります。 ②登山計画無しで登山記録中の場合は、 - - - - が表示されます。 ② 目 的の計画番号が表示されたら、ボタンⒺで日の出日の入時刻を確認します。このとき上 段には日付、中段に日の出時刻、下段に日の入時刻が表示されます。 ③ 表 示する日付を変更したい場合はボタンⒸで日付を進め、ボタンⒺで日付を戻すことがで Ⓒ きます。 (2015 年 1 月 1 日から 2064 年 12 月 3 日まで表示できます。 ) Ⓔ ※ボタンⒸまたはボタンⒺを長押しすると早送りができます。 ※年は表示されませんのでご注意ください。 Ⓔ ④ サ マータイム期間での時刻を確認する場合はボタンⒹを押します。画面に DST が表... -
Page 24: お手入れについて
③ボタンⒸ、Ⓔを押して、荷物重量と体重のセット、および単位のセットを行います。 お手入れについて 出荷時の設定: 荷物重量 1 (kg) ※設定範囲:0 〜 200 ご 体重 60 (㎏) ※設定範囲:20 〜 400 注 意 単位 U-1 (高度) m ●日ごろからこまめにお手入れしてください い 単位 U-2 (気圧) た ・ 水分や汗、汚れはこまめに柔らかい布でふき取るように心がけてください。 単位 U-3 (温度) ℃... -
Page 25: 性能と型式について
性能と型式について バンドについて ご ご 注 注 バンドは直接肌に触れ、汗やほこりで汚れます。そのため、お手入れが悪いと 意 意 時計の裏ぶたで性能と型式の確認ができます い い バンドが早く傷んだり、肌のかぶれ・そで口の汚れなどの原因になります。 た た 長くお使いになるためには、こまめなお手入れが必要です。 だ だ き き 防水性能 ●金属バンド た た P.84 い ・ ステンレスバンドも水や汗・汚れをそのままにしておくと、さびやすくなります。 い を参照してください こ こ ・ 手入れが悪いと、かぶれやワイシャツのそで口が黄色や金色に汚れる原因になります。 と と ... -
Page 26: アフターサービスについて
アフターサービスについて ご ご 注 注 ※ 過充電防止機能 ●保証と修理について 意 意 い い た た ・ 修理や点検調整のための分解掃除 (オーバーホール)の際は、お買い上げ店、 フル充電までの所要時間を超えて充電しても、 時計が破損することはありません。 だ だ または弊社お客様相談窓口にご依頼ください。 二次電池がフル充電になると、それ以上充電されないように、自動的に過充電 き き た た ・ 保証期間内に不具合が生じた場合は、必ず保証書を添えてお買い上げ店へ 防止機能がはたらきます。 い い お持ちください。 こ こ ※ フル充電までの所要時間については 「充電にかかる時間のめやす P.22」を参照してください。 と と ・... -
Page 27: こんなときは
こんなときは こんなときには 回答 参照ページ こんなときには 回答 参照ページ 時計が表示されなくなった 電池残量が少なくなりました。 時計に光を当てて充 正確な温度が計測できない 時計を腕に装着している場合、 温度計は体温の影響 P.21 電してください。 を受けます。 外気温を測定する場合は、 時計を腕か P.68 ら外し、 しばらくしてから計測してください。 時計の時刻がずれた ホーム都市の設定を確認してください。 また、 サマータイム P.33 がONになっていると、 時刻表示は1 時間早くなります。 気圧のグラフィックが グラフィ ックは縦方向の表示範囲が限られているた 困 困 とんでいる 消えた め、 大きな気圧の変動があった場合や、 エレベーター アラームが鳴る が点灯している場合、 3 つのアラームのいずれか っ... -
Page 28: システムリセットのしかた
※ L ength adjustment service for metallic bands is available at the retailer from whom the watch was purchased. If you cannot have your watch repaired by the retailer from whom the watch was purchased because you received the watch as a gift, or you moved to a distant place, please contact SEIKO CUSTOMER SERVICE CENTER. T he service may also be available on a chargeable basis at other retailers, however, some retailers may not undertake the service. - Page 29 Contents 1.About this product (1)How to perform Bluetooth communication … 131 Handling cautions …………………… 104 How to use the time/calendar mode … 132 About the Radio Act ………………… 109 (1)Buttons and functions …… 132 About Bluetooth …………………… 111 (2) H ow to set the time, calendar, city Ⓡ Features ………………………………… 113 name and summer time …… 133 Names of the buttons and switching of display … 115 (3)How to adjust the contrast … 135 What you can do with this technology … 116 ...
- Page 30 (3) E ngagement and disengagement of the alarm … 145 (4)Explanation of display ……… 173 (4)How to stop the alarm while it is sounding … 145 (5)Magnetic north and true north … 173 How to use the world time mode … 146 (6)How to correct magnetic declination … 174 (1)Buttons and functions …… 146 (7) H ow to carry out magnetic calibration (2)How to select the city……… 147 (magnetic correction) ………… 175 (3)How to set the DST ………… 147 How to use mountaineering plan sunrise and sunset time mode … 177 ...
-
Page 31: Handling Cautions
○ Places where the temperature drops below 5 ℃ or rises above 35 ℃ for a long time ○ If the watch body or band becomes edged by corrosion etc. ○ Places of high humidity ○ Places aff ected by strong magnetism or static electricity ○ If the pins protrude from the band ○ Dusty places ○ Places aff ected by strong vibrations ※ Immediately consult the retailer from whom the watch was purchased or SEIKO CUSTOMER SERVICE CENTER. ・Keep the watch and accessories out of the reach of babies and children. ・If you observe any allergic symptoms or skin irritation C are should be taken to prevent a baby or a child accidentally swallowing the accessories. Stop wearing the watch immediately and consult a specialist such as a dermatologist or an allergist. I f a baby or a child swallows the battery or accessories, immediately consult a doctor, as it will be harmful to the health of the baby or child. ・Other cautions ○ R eplacement of the metal band requires professional knowledge and skill. Please ask ... -
Page 32: About The Radio Act
WARNING CAUTIONS Do not use the watch in scuba diving or saturation diving. This product can be used only in Japan. The various tightened inspections under simulated harsh Since some other countries have limitation on use of radio waves, environment, which are usually required for watches designed for scuba diving or saturation diving, have not been conducted on the person who uses this product may face penalties for usage. this watch. For diving, use special watches for diving. The radio waves emitted from this product may have a Note that if this product is used near devices that negative impact and cause an accident due to a malfunction. -
Page 33: About Bluetooth
U nder the following conditions, the Bluetooth connection may take a long ・ I f radio wave interference occurs between this product and other radio sta- time or a connection error may occur. tions , change the location in which this product is used or stop using this Places where a wireless LAN exists product (stop emitting radio waves) immediately. Around microwave ovens in use ・ I f you have any questions or troubles, please contact the SEIKO CUSTOMER When other products with a communication function are used SERVICE CENTER. I n such cases, data sending/receiving may fail, however, it is not a malfunc- tion. Use the product in other environment. Features ・ T he radio waves emitted by this product may aff ect operations of electronic ... -
Page 34: Names Of The Buttons And Switching Of Display
Names of the buttons and switching of display ■ Mountaineering recording function ・ Names of the buttons are assigned as Button Ⓐ to Button Ⓕ clockwise from the left bottom. ・Button Ⓐ switches sensor function and Button Ⓑ switches watch function. … T his product can store up to 10 measured mountaineering records in the ・ The primary function of the button is described next to each button. body of the watch. ・ G uidance marks ( ▲ ) light up for frequently used buttons in each mode, therefore, re- fer to them for operation. ■ Sunrise and sunset time display function External description:Explanation for use mainly in watch function … T his product displays the sunrise and sunset times based on the location Internal description: ... -
Page 35: About Ranges And Accuracies Of Sensor Measurements
About ranges and accuracies of sensor measurements Marks and indicators This watch is equipped with sensors for atmospheric pressure, direction, and tem- Battery life indicator : The approximate remaining amount of battery power is shown. perature to measure the altitude, atmospheric pressure, temperature, and direction. Power Save mark : The mark indicates that the watch is in power save mode. The measurement ranges and accuracies are as follows. Sleep mark : The mark indicates that the watch is in sleep mode. Daylight Saving Time mark : The mark appears when DST is turned on in the time display. Altimeter: Display unit 1 m/5 ft Alarm mark : The mark appears when alarm is engaged. Measurement range Between -699 and 9,164 m/-2,290 ft and 30,065 ft Hourly time signal mark : T he mark appears when the confi rmation sound for but- Accuracy Altitude lower than 6,000 m: ± (diff erence in altitude x 3% + 30 m) ton operations is turned on. When the confi rmation sound Altitude higher than 6,000 m: ± (diff erence in altitude x 3% + 45 m) for button operations is turned on, the hourly time signal Temperature range to ensure accuracy Between -5° C and 40° C Barometer: Display unit 1 hPa/0.01 inHg sounds every hour on the hour. -
Page 36: 2)Standard Charging Time
(2)Standard charging time (3)Battery life indicator and power reserve For an approximate time required to charge the watch, refer to the table below. ■ Power reserve To run The battery life indicator on the display shows the remaining amount of battery The display the watch Battery life indicator is blank. power. for one day Environment 1 Approximately Approximately Approximately Approximately Battery life indicator Restrictions on Solutions Outdoor on a sunny day Approximately 1 hour 2 hours 2 hours 1 hours 2 minutes 100000 lux operations and functions Environment 2 Approximately Approximately Approximately Approximately Sufficient By the window on a sunny day Approximately 10 hour 16 hours 24 hours 11 hours 22 minutes ❶... -
Page 37: Pairing
・How to set the transition time to the power save mode Pairing T he transition time to the power save mode can be selected from among 30 minutes, 1 hour, 2 hours, and 4 hours in the time/calendar setting mode. With Bluetooth devices, devices to be connected to each other should be reg- The default setting is 30 minutes. Refer to "How to set the power save mode" on page 137. istered in advance. This registration is called pairing. Once pairing is performed, the pairing information is registered in the watch and the smartphone, and is ※ You can make the power save setting also from the application. recognized automatically afterward. I f synchronization of settings except for automatic time synchronization is performed, the settings are overwritten by those on the application side. Re-pairing is required in the following cases. ・When system reset of the watch is made. -
Page 38: Bluetooth Communication
(1)How to perform Bluetooth communication Bluetooth Ⓡ communication ① S elect Synchronize setting from the exclusive application installed in the smartphone to start communication. This product uses a radio communication function with Bluetooth and performs ② P ress and hold Button Ⓕ of the watch until a confi rmation sound beeps. An the following data communication between the watch and the smartphone. animation that indicates connection appears at the top row, and the mark ● From the smartphone to the watch blinks. When connection is established, the mark is turned on, and data Weight setting Baggage weight, body weight communication is started. Watch setting Automatic time synchronization setting ③... -
Page 39: 3)How To Adjust The Contrast
③ T o reset the second digits to "00," press Button Ⓑ to select the fl ashing sec- (3)How to adjust the contrast ond, and then press Button Ⓒ or Button Ⓔ in accordance with a time signal. The contrast of the display can be adjusted. If all the settings are cleared, the ※ I f Button Ⓒ or Button Ⓔ is pressed while the second digits count any number between contrast is reset to its factory setting "0." 30 and 59, one minute is added and the second digits are immediately reset to "00." ・Press Button Ⓑ to switch to the time/calendar mode. ※The telephone time signal service (TEL 117) is useful to set the time. ① P ress and hold Button Ⓓ to show the currently selected city name and enter ④... -
Page 40: 7)How To Check City Selected For Home/Connection Time
(6) H ow to test the alarm sound and how to engage/disengage the hourly time signal and confi rmation sound for button operations How to use the current location sunrise and sunset time mode ・ W ith each press of Button Ⓔ in the time/calendar mode, the hourly time signal Ⓒ and confi rmation sound for button operations can be engaged or disengaged. By using the location information registered in the smartphone at the time of ・ T he alarm sound can be heard by keeping pressing down both Button Ⓒ and Button Ⓔ at the same time. data communication except for automatic time synchronization, the sunrise and Ⓔ sunset times 0 m above sea level at that latitude and longitude are displayed. (7)How to check city selected for home/connection time ※ T hey cannot be displayed when the current location is at a latitude of 65 degrees north or more or The mark appears when the latitude of 65 degrees south or more. hourly time signal is turned ON. You can check the city name currently selected for the home and the time diff erence. ※... -
Page 41: 2)How To Use The Stopwatch
(2)How to use the stopwatch How to use the alarm mode Reset Measurement Stopped Reset The three-channel daily alarm sounds at a designated time (hour and minute) every 24 hours. Stop Each alarm channel can be engaged ("on") or disengaged ("--") independently. Ⓒ Ⓔ Ⓔ Ⓒ ※You can set the alarm also from the application. I f synchronization of settings except for automatic time synchronization is performed, the settings are overwritten by those on the application side. Ⓔ Ⓔ Ⓔ Ⓔ [Note] T he alarm sounds when the time in the time/calendar mode reaches the designated time. The Start Restart Reset alarm does not sound when the time in the world time mode reaches the designated alarm time. ① After the stopwatch is reset, press Button Ⓔ to start a measurement. (1)Buttons and functions ②... -
Page 42: How To Use The World Time Mode
(2)How to select the city Turned on with ON How to use the world time mode ・Press Button Ⓒ or Button Ⓔ to select the city name. ※ P ress and hold Button Ⓒ or Button Ⓔ to quickly move the city names. In addition to 42 cities around the world and the UTC, the times on the World s ・ W hen you select a city, the time diff erence from the UTC Ⓓ Seven Summits and Mt. Fuji and time diff erences are displayed. You can set the appears at the bottom row and changes to the home summer time (DST) to each city or mountain except for UTC. time 2 seconds later if no operation is conducted. ※You can set the world time from the application. (3)How to set the DST I f synchronization of settings except for automatic time synchronization is performed, the settings are overwritten by those on the application side. -
Page 43: 1)Buttons And Functions
(1)Buttons and functions (2)Explanation of display Press Button Ⓐ to switch to the ALTI mode. After ALTI is displayed at the top Climbing speed: the indication is updated every 10 seconds. row, the display is switched to the current altitude display. Range of display: between -9999 and 9999 m/h, between -9999 and 9999 ft./h Altitude: the indication is updated every 10 seconds. Range of display: between -699 and 9164m, between -2290 and 30065 ft. Button Ⓐ : To switch to the barometer Current time: current time is displayed /thermometer mode Button Ⓑ Button Ⓒ ※The units used in the illustration are the default settings. Button Ⓑ : To switch to the watch function Button Ⓒ : Mountaineering plan no. display Button Ⓓ (3)How to correct altitude /altitude correction (plus) Button Ⓒ (Press and hold): To display mountaineering record no. About correction of altitude Button Ⓐ Button Ⓔ /interrupt temporarily mountaineering The altimeter of this product calculates based on the atmospheric pressure. data recording/restart Some errors may occur by change in atmospheric pressure and temperature Button Ⓓ ... -
Page 44: 6)How To Keep Mountaineering Records
(6)How to keep mountaineering records ● These data below are recorded during the start and fi nish. ■ Recording start date A maximum of 7 mountaineering plans created by the exclusive application can be registered in the watch. ■ Required time You can keep a mountaineering record by displaying the plan outline on the watch and selecting a plan. ■ Average climbing speed (ascending/descending) You can also keep a record without a plan. A maximum of 10 mountaineering records can be kept, and a Ascending: Average value of the climbing speed in zones 1, 3, and 4 Descending: Average value of the climbing speed in zones 2 and 5 maximum of 24 hours can be recorded in one record. ■ Accumulated ascending/descending altitude About mountaineering record Ascending: Total value of the ascending altitude in zones 1, 3, and 4 ●Recording various mountaineering data from the internal sensor and time information. Descending: Total value of the descending altitude in zones 2 and 5 ■ Altitude and time when recording starts, altitude and time when recording ends ③ [Altitude] ■ Consumed energy ■ Maximum altitude and time, minimum altitude and time ● It is possible to confi rm the information below while you are recording. ■ Mountaineering plan achievement rate (ascending/descending) Ascending: P rogress rate at the current point with the accumulated ascending altitude (zone 1 + 3 + 4) of the entire plan as 100 Descending: P rogress rate at the current point with the accumulated descending altitude (zone 2 + 5) of the entire plan as 100 Present ■... - Page 45 ② T o start mountaineering recording, press and hold Button Ⓔ with the target ③ T o stop mountaineering recording temporarily, press and hold Button Ⓒ during recording. Hold down the mountaineering plan displayed. Hold down the button continuously after REC button continuously after PAUSE HOLd appears. When the outer circumference graphic rotates once, HOLd appears. When the outer circumference graphic rotates once, re- recording is interrupted. PAUSE appears at the top row, and the REC mark is turned on. T o restart recording, press and hold Button Ⓒ...
-
Page 46: 7) H Ow To Call Mountaineering Records
⑥ About reverse mode ⑦ T o delete mountaineering plans, press Button Ⓒ while the REC mark is off , and W hen a scheduled mountaineering plan is ended halfway to go back in the same route, the progress press and hold Button Ⓓ with a mountaineering plan displayed. When CLR ? from the current point to the starting point is displayed with subtraction by setting reverse mode. ALL appears and the outer circumference graphic rotates once, all the moun- P ress and hold Button Ⓓ for 5 seconds or more during mountaineering recording. After ADJ ap- taineering plans registered in the body of the watch are deleted with a comple- pears, a confi rmation sound beeps, and REV HOLd is displayed. When you hold down the button tion sound. A t that time, all the plans are deleted collectively. They cannot be deleted indi- continuously and the outer circumference graphic rotates once, another confi... -
Page 47: 8)Mechanism Of Altitude Measurement
③ W hen checking is fi nished, press Button Ⓐ to return to the altimeter display. (8) Mechanism of altitude measurement Even if Button Ⓐ is not pressed, the display automatically returns to the al- ・ T his product adopts a method to estimate altitude using the relationship between altitude and atmospheric timeter display within 2 to 3 minutes. pressure of the International Standard Atmosphere specifi ed by the International Civil Aviation Organization. ・ U sing a reference altitude set at a place where the correct altitude is known in advance, the watch mea- sures the diff erence in altitude based on the change in atmospheric pressure from there and display the ④ T o delete mountaineering records, press and hold Button Ⓒ while the REC mark result as the current altitude. is off . Hold down the button Ⓓ continuously after CLR? ALL appears. When ... -
Page 48: 3)How To Re-Measure Atmospheric Pressure And Temperature
※ W hen atmospheric pressure is decreasing, the weather may change for the worse(ex.1), and when How to use the compass mode atmospheric pressure is increasing, the weather may improve(ex.2). ※ I f atmospheric pressure signifi cantly changes due to signifi cant diff erence in altitude, rapid change of weather and temperature, the past atmospheric pressure data is deviated from the range of graph display and cannot be displayed(ex.3). Direction and angle to which the twelve o'clock position of the watch is directed and the ex.1 Downward tendency ex.2 Upward tendency ex.3 Out of range true north direction can be checked. North is indicated on the outer circumference graphic, 16-point directions are indicated at the top row, and directional angle is indicated at the middle row of the display. There is a magnetic deviation angle setting function to indicate the true geographic north. (1)Buttons and functions (3)How to re-measure atmospheric pressure and temperature ・ P ress Button Ⓐ to switch to the compass mode. After "COMP" appears at the ・ ... -
Page 49: 6)How To Correct Magnetic Declination
(6)How to correct magnetic declination (7)How to carry out magnetic calibration (magnetic correction) Enter magnetic declination in order to match the magnetic north measured with ・ W hen placed in a strong magnetic environment, this product incorrectly de- a magnetic compass with the true north. tects the magnetic north, and may not indicate correct direction. In this case, The correction value diff ers depending on the latitude and longitude to be mea- carry out the magnetic correction by the following procedures. sured. Set the magnetic declination correction value shown on a map or the 【CAUTION】 C alibration may not be correctly carried out near permanent mag- website of the Geospatial Information Authority of Japan. For example, there is ... -
Page 50: 2) H Ow To Use Mountaineering Plan
(2)How to use mountaineering plan sunrise and sunset time mode ● When mountaineering recording is not in progress ● When mountaineering recording is in progress ① A mountaineering plan no. registered in the body of the watch is displayed. ① T he sunrise and sunset times are displayed according to the location infor- The plan no. is switched every time you press Button Ⓒ mation of the mountaineering plan being recorded and the recording start ② I f the target plan no. is displayed, check the sunrise and sunset times with date. -
Page 51: Daily Care
③ Press Button Ⓒ or Button Ⓔ to set the body weight and display units. Daily care Factory settings:Baggage weight 1(㎏ ) ※ Setting range between 0 and 200 Body weight 60(㎏ ) ※ Setting range between 20 and 400 Unit U-1 (altitude) m ● The watch requires good daily care Unit U-2 (atmospheric pressur) hPa Unit U-3 (temperature) ℃ ・ Wipe away moisture, sweat or dirt with a soft cloth Unit U-4 (consumed energy) kcal ・ A fter soaking the watch in seawater, be sure to wash the watch in clean ... -
Page 52: Performance And Type
Performance and type Band The band touches the skin directly and becomes dirty with sweat or dust. The case back shows the caliber and performance of your watch Therefore, lack of care may accelerate deterioration of the band or cause skin irritation or stain on the sleeve edge. The watch requires a lot of attention for long usage. Water resistant performance ● Metallic band Refer to pages 184 ・ Moisture, sweat or soil will cause rust even on a stainless steel band if they are left for a long time. ・ Lack of care may cause a yellowish or gold stain on the lower sleeve edge of shirts. ・ Wipe off moisture, sweat or soil with a soft cloth as soon as possible ・ T o clean the soil around the joint gaps of the band, wipe it out in water and then brush it off with a soft toothbrush. (Protect the watch body from water splashes by wrapping it up in plastic wrap etc.) ・ B ecause some titan bracelets use pins made of stainless steel, which has outstanding strength, rust may form in the stainless steel parts. -
Page 53: After-Sale Service
When the secondar y batter y is fully charged, the overcharge prevention function is automatically activated to avoid further ・ C ontact the retailer from whom the watch was purchased or SEIKO charging. There is no need to worry about damage caused by ... -
Page 54: Troubleshooting
Troubleshooting Troubles Solutions Ref. pages Troubles Solutions Ref. pages The display went blank. The remaining amount of battery power has decreased. Correct temperature If you wear the watch on your arm, the temperature P.121 Expose the watch to light to recharge the battery. indicator is affected by body temperature. When cannot be measured P.168 measuring ambient temperature, remove the watch from The time is gained or Check the home city setting. When the summertime is P.133 your arm and measure after some time has elapsed. lost. turned on, the time indication is advanced by one hour. The graphic Because display range in the vertical direction on the graph The alarm goes off. When the mark appears on the display, at least is limited, the graph may not be partially displayed when atmospheric pressure P.143 one of the 3 alarm channels is turned on. atmospheric pressure significantly varies or you are getting P.125 is lost or cleared. How to measure A ltitude is derived by calculation o f conver sion f r om on an elevator. -
Page 55: How To Reset The System
How to reset the system Specifications In the case that the watch moves abnormally, reset the system. Then the watch 1. Frequency of crystal oscillator ···· 32,768 Hz (Hz = Hertz ... Cycles per second) 2. Loss/gain (monthly rate) · ·············· Less than 20 seconds at normal temperature range (between 5℃ and 35℃) will resume its normal operation. 3. Operational temperature range ··· between −10℃ and +60℃ (Temperature range for display function between 0℃ and+50℃) ① P ress and hold Button Ⓐ, Ⓑ, Ⓒ and Ⓔ simultaneously. When the display 4. Display medium · ································ Nematic Liquid Crystal, FEM (Field Eff ect Mode) 5. Power source ····································· Secondary battery, 1 piece becomes blank, release all the buttons. 6. Duration of operation ······················ A pproximately 5 months without being recharged after fully charged, under the conditions that the illuminating light is turned on once within 5 seconds per day, ...