Table of Contents
Advertisement
Advertisement
Table of Contents

Related Manuals for Aiphone JF-2MED


Summary of Contents for Aiphone JF-2MED
- Page 1 JF-2MED, JF-2HD HANDS-FREE COLOR VIDEO INTERCOM INTERPHONE VIDEO COULEUR MAINS LIBRES JF-2MED Master monitor station Moniteur maître JF-2HD Sub monitor station Moniteur secondaire INSTALLATION & OPERATION MANUAL MANUEL D'INSTALLATION ET D'UTILISATION - 1 - FK1260 0706 A...
-
Page 2: Package Contents
3. When mounting the unit on wall, install the unit in a convenient location, but not where it could be jarred or bumped. Injury could result. 4. For power supply, use Aiphone power supply model specified with system. If non- specified product is used, fire or malfunction could result. -
Page 3: Mounting Locations
Never use individual conductors, twisted pair cable or coaxial cable. The master monitor station and sub monitor station have switches on both sides. Allow at least 5 cm (2") of open space on either side. JF-2MED / JF-2HD + 5 cm (2") Incorrect method JF-DA JF-2HD JF-DA... -
Page 4: Wiring
Optional selective door release adaptor RY-3DL EL-9S Use RY-3DL when connecting door release to 2 locations. EL-9S AC Transformer JF-2MED Master monitor station DC 18 V Power supply +, - (DC 18 V) PS-1810DIN PS-1820 230V AC IN 230V~ 50/60Hz... - Page 5 Call-in from door station 2 Optional long distance adaptor JBW-BA Use JBW-BA when the wiring distance between the video door station and JF-2MED is within the distance range shown in the table. 1. Use PE (polyethylene) insulated cable. Do not use PVC.
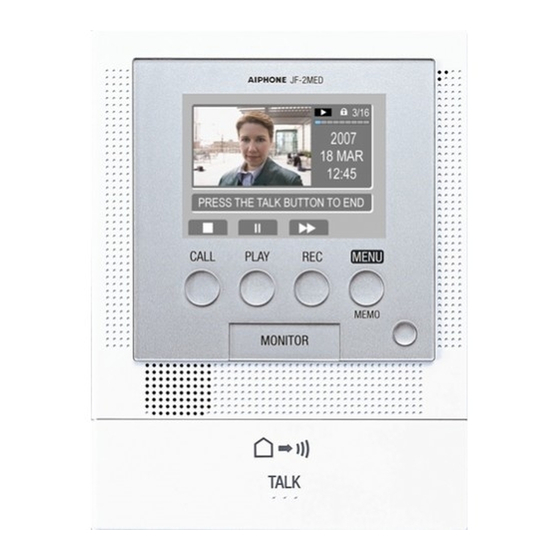
- Page 6 Microphone Color LCD video monitor (3-1/2" color) CALL button, door call-in LED (red) PLAY button, play LED (red) REC button, record LED (red) MENU/MEMO button, memo LED (red) (JF-2MED) MENU button (JF-2HD) POWER switch MONITOR button 1-gang box 83,5 mm (3-5/16")
-
Page 7: Operating Method
∗ The name of the operation button may differ from the name of the symbol. JF-2MED Press PLAY button or REC button to select the item you want to set or check, and set with CALL button. -
Page 8: Set The Date/Time
After performing steps 1 and 2 in section 7-1, select "RECORD MESSAGE" and press CALL button. RECORD MESSAGE JF-2MED Press CALL button to set the "Year" and move the cursor to "Month". 2006 01 JAN 00 : 00 SELECT Perform the same steps to set the "Month", "Day", "Hour"... -
Page 9: Restore Default Setting
SET DOOR2 JF-2MED When connecting door station 2, set "Video", "Audio" or "None (door station 2 not connected)". These operations must be performed by an installer. Please do not change these settings yourself. After performing steps 1 and 2 in section 7-1, select "SET DOOR2"... - Page 10 OPERATIONS Answering a door call (HANDS-FREE mode, PTT mode) Press CALL button. Chime tone sounds, caller is seen on video monitor, and outside sound is heard. • Audio and video turns off after approx. 45 seconds in not answered. Press TALK button momentarily, and after the beep, communicate hands-free.
-
Page 11: Entrance Monitoring
Message for entrance During communication, instant voice call or entrance monitoring, press MENU/MEMO button to display the menu screen. PRE SS THE TALK BUTT ON TO END Press PLAY button. PRESS THE TALK BUTTON TO END Entrance monitoring Press MONITOR button in the standby mode. The video monitor displays the image from door station 1 and the incoming audio is heard. -
Page 12: Automatic Recording
Transfer entrance call During communication with door station, press CALL button to call the transferring station. • CALL button (red) flashes and the communication with door station is put on hold. • The "All Call" function is activated to link all the master/sub stations. If TALK button is pressed at the transferred station, the unit enters room-to-room communication. - Page 13 Play recorded picture If there are automatically recorded pictures, such as those taken while you were out, the play LED (red) flashes. Press PLAY button in the standby mode to display the play screen. PRESS THE TALK BUTTON TO END Press PLAY button on the play screen.
-
Page 14: Recording Voice Memos
Press PLAY button to stop the erasure and return to the play screen. Once a picture is erased, it cannot be restored. JF-2MED Press CALL button to end the recording. Alternatively, it ends automatically after approx. 15 seconds have passed. -
Page 15: Erasing Voice Memos
• The video image may distort slightly during activation of door release. But this is not a unit malfunction. SPECIFICATIONS • Power: DC 18 V (JF-2MED, JF-2HD) • Current consumption: (Max.) 520 mA (JF-2MED) (Max.) 230 mA (JF-2HD) • Calling: Chime and image, approx. 45 seconds • Communication: (HANDS-FREE mode) Approx. -
Page 16: Warranty
This warranty shall not apply to any Aiphone product which has been subject to misuse, neglect, accident, or to use in violation of instructions furnished, nor extended to units which have been repaired or altered outside of the factory.