
Related Manuals for Kenwood KDC-6090R


Summary of Contents for Kenwood KDC-6090R
- Page 1 KDC-V6090R KDC-6090R KDC-5090R CD-RECEIVER INSTRUCTION MANUAL B64-1873-00 (EN) COMPACT DIGITAL AUDIO...
-
Page 2: Table Of Contents
Contents Safety precautions Safety precautions ...3 Handling Compact discs ...6 General features Power...8 Switching Modes ...8 Volume ...9 Attenuator ...9 Loudness ...9 Theft Deterrent Faceplate...10 Clock display ...11 TEL Mute ...11 System Q ...12 Speaker Setting...12 Non-Fading Output...12 Audio control features Audio Control Setting...13 Bass Level...14 Middle Level ...14... -
Page 3: Safety Precautions
DNPS, DNPP, Magazine random play, and CD Text display. Note that none of the KDC-C100, KDC-C302, C205, C705, and non-Kenwood CD changers can be connected. 2CAUTION You can damage both your unit and the CD changer if you connect them incorrectly. - Page 4 Safety precautions NOTE • If you experience problems during installation, consult your Kenwood dealer. • Press the reset button if the CD auto changer is first controlled and operates incorrectly. The original operating condition will return. Reset button • Characters in the LCD may become difficult to read in temperatures below 41 ˚F (5 ˚C).
- Page 5 CDs may be impossible to play. In such a situation, remove the disc and wait for the condensation to evaporate. If the unit still does not operate normally after a whilst, consult your Kenwood dealer. — 5 —...
-
Page 6: Handling Compact Discs
Handling Compact discs Playing a CD that is dirty, scratched or warped can cause the sound to skip and the unit to operate incorrectly, resulting in worsened sound quality. Take the following precautions to prevent your CDs from getting scratched or damaged. Handling CDs •... - Page 7 Do Not Load CD Accessories in Slot Do not use commercially available CD accessories that can be loaded into the CD slot, such as stabilisers, protective sheets, or CD cleaning discs, since they can cause the unit to malfunction. Removing the CD Only remove the CD from the machine in a horizontal direction.
-
Page 8: General Features
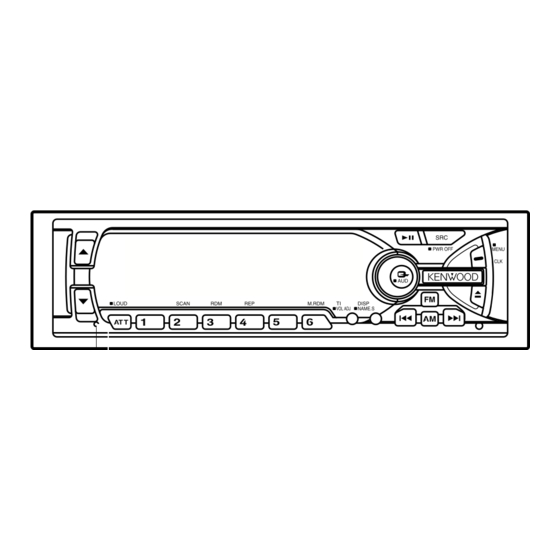
General features 5 / ∞ ATT/LOUD DISP KDC-6090R/KDC-5090R Clock indicator LOUD indicator ATT indicator Speaker Setting indicator KDC-V6090R Clock indicator ATT indicator LOUD indicator Speaker Setting indicator Power SRC / PWR OFF Turning on the power: Press the SRC button. -
Page 9: Volume
NOTE • The mode switches to the next mode from any mode which cannot be used. • The external disc control mode will differ depending on the unit that is connected. • To enable the selection of External disc control mode 2/AUX mode, you should connect optional switching adapter KCA- S210A (which allows you to select both External disc control mode 2 and AUX mode) or CD changer (KDC-CPS87, KDC-... -
Page 10: Theft Deterrent Faceplate
General features Theft Deterrent Faceplate The faceplate can be reversed to hide the control panel or detached form the unit, helping to deter theft. Removing the Faceplate: • When the control panel is visible: Press the release button. • When the control panel has been hidden: Press the upper side of the faceplate. -
Page 11: Clock Display
NOTE Whilst the control panel is sliding, only available buttons are 0, ATT, and SRC. Clock display Changing the Clock Display: Each time you press the CLK button, the display switches between the clock and each mode display. NOTE The clock indicator lights whilst the clock is displayed. TEL Mute Shut down the audio system temporarily whenever an incoming call is received. -
Page 12: System Q
Turning non-fading output On/Off : Hold down the NF button for one second or more to set the function ON or OFF. "NF ON" is displayed when the non-fading output is set ON. — 12 — Function of the KDC-6090R... -
Page 13: Audio Control Features
Each source (CD, FM, AM, and disc changer) has its own memory in which to store the bass, middle, treble and N-F level settings. (N-F level : KDC-6090R only) Setting value The settings made for a particular source are then recalled automatically whenever you use that source (e.g., FM mode... -
Page 14: Bass Level
You can separately set the high-pass filter for front and rear output, including preouts. The high-pass filter works except during non-fading preout when switched to non-fading. — 14 — Function of the KDC-6090R Function of the KDC-6090R Function of the KDC-6090R... -
Page 15: Low-Pass Filter Frequency For Non-Fading Output
Function of the KDC-6090R Low-pass Filter Frequency for Non-Fading Output Adjust the frequency of the Low-pass filter for Non-Fading output. Display and setting: "LPF NF" : 50 Hz / 80 Hz / 120 Hz / Through NOTE This mode is available only when the non-fading output function is set to on. -
Page 16: Tuner Features Tuning
Tuner features Tuning Press the SRC button repeatedly until the tuner mode is obtained. "TUNER" is displayed only when the tuner mode is selected. Press either the FM or AM button to select the band. Each time you press the FM button, the band switches between the FM1, FM2 and FM3. - Page 17 2WARNING To prevent accidents, drivers should not look at the display whilst driving. RDS features #1-6 KDC-6090R/KDC-5090R PTY indicator NEWS indicator KDC-V6090R PTY indicator NEWS indicator — 17 — DISP VOL ADJ ¢ TI indicator RDS indicator TI indicator RDS indicator...
-
Page 18: Rds Features Rds (Radio Data System)
RDS features RDS (Radio Data System) RDS is a digital information system that lets you receive signals besides those of regular radio programmes, such as network information being transmitted from radio stations. When listening to an RDS station (ie, a station with RDS capability), the programme service name of the station is displayed along with the frequency, advising you quickly which station is being received. -
Page 19: Presetting Volume For Traffic Information/News
Presetting Volume for Traffic Information/News Preset the volume level to be used for traffic information and news broadcasts. Tune into the station for which you want to set the volume. Adjust the volume to the desired level. Hold down the VOL ADJ button for two seconds or more. The volume level blinks once in the display to indicate that the data has been stored. -
Page 20: Programme Type (Pty) Function
RDS features Programme Type (PTY) Function Conduct auto seek tuning only on those stations with selected kinds of programmes. Press the PTY button. "PTY" is displayed, and the Programme Type Selection (PTY) Mode entered. If you make no key input in 30 seconds, the mode will automatically turn off. -
Page 21: Changing Language For Programme Type(Pty) Function
English German Spanish Swedish French Portuguese Dutch Norwegian Press the DISP button to end the changing language mode. CD/External disc control features SCAN KDC-6090R/KDC-5090R Track number IN indicator KDC-V6090R Track number — 21 — DISP/ Release NAME.S button ¢ M.RDM... -
Page 22: Cd/External Disc Control Features Playing Cds
CD/External disc control features Playing CDs Playing CDs: Press the release button to slide open the faceplate, showing the CD insertion slot. Holding the CD with the labeled side facing up, insert it in the slot. The CD will start playing. Push back the bottom of the faceplate with your hand until it locks. -
Page 23: Fast Forwarding And Reversing Disc Play
Fast Forwarding and Reversing Disc Play Fast Forwarding Disc Play: Hold down on the ¢ button. Release your finger to play the disc at that point. Reversing Disc Play: Hold down on the 4 button. Release your finger to play the disc at the point. NOTE You cannot use reverse play between tracks depending on the model being connected. -
Page 24: Track / Disc Repeat
CD/External disc control features Track / Disc Repeat Repeat playing the current track or disc. Turning Repeat Play Function On/Off: Press the REP button to switch the repeat play function on and off as follows : Track Repeat ON Disc Repeat ON (Function of disc changers) Repeat OFF "Repeat ON"/"T-Repeat ON"... -
Page 25: Switching Display For Discs
To change the track being heard, press the ¢ button. Another disc/track is selected and played. NOTE • Magazine random play is cancelled when you eject the disc. • The time needed for random selection depends on the number of discs loaded in the disc magazine. Switching Display for Discs Switch the display that appears whilst discs are playing. -
Page 26: Text / Title Scroll
CD/External disc control features Text / Title Scroll This function permits the text to be scrolled and the entire text to be displayed. The scrolling method differs depending on the setting of scrolling in the menu. To scroll manually: Press the DISP button to display the disc title or the track title. Holding down the DISP button for one second or more results in one scrolling display of the titles. - Page 27 3 and 4 to input the changes. • Pressing the reset button erases the disc names stored in this unit, but does not erase the names stored in a disc changer. Menu settings #1-6 KDC-6090R/KDC-5090R Menu display NEWS indicator AUTO indicator KDC-V6090R Menu display...
-
Page 28: Menu Settings Menu System
Menu settings Menu System You can set the defaults for additional functions in the menu mode. Make a setting for each function, referring to the following operations. Enter the menu mode Hold down the MENU button for one second or more. "MENU"... -
Page 29: Touch Sensor Tone
"CODE" appears in the display, you can start inputting the code. Press the Preset button and input the security code again. Hold down the DISP button again for three seconds or more. "APPROVED" will appear in the display, with the code security function turning on. -
Page 30: Manual Time Adjustment
Menu settings Manual Time Adjustment Adjust the time manually. NOTE This adjustment is available only when the automatic time adjustment is set to off. (page 30) Display and setting: Select the display "Clock Adjust" during the selecting function in the menu system. Hold down either the 4 or ¢... -
Page 31: Variable Illumination Colour Setting
Function of the KDC-V6090R Variable Illumination Colour Setting You can set the display to a desired colour. Display and setting: Select the display "Color" during the selecting function in the menu mode. To set a colour manually: Hold down on the 4 or ¢ button. Pressing the ¢... -
Page 32: Switching Preout
Menu settings Function of the KDC-6090R Switching preout Switch the preout between the rear and non-fading. When you switch to non-fading, you can adjust the volume separately. Display and setting: "SWPRE Rear" : Rear preout (Default setting) "SWPRE N-Fad" : Non-fading preout NOTE You cannot use the high-pass filter with non-fading preout. -
Page 33: Local Seek Function
Local Seek Function <In Tuner mode> With the local seek function turned on, auto seek tuning skips stations with relatively poor reception. Display and setting: "Local.S ON" : The local seek function is on. "Local.S OFF" : The local seek function is off. (Default setting) Selecting Tuning Mode <In Tuner mode>... -
Page 34: Af (Alternative Frequency) Function
Menu settings AF (Alternative Frequency) Function When poor reception is experienced, automatically switch to another frequency broadcasting the same programme in the same RDS network with better reception. The RDS indicator lights up when the AF function is turned on. Display and setting: "AF ON"... -
Page 35: Power Off Timer
Power OFF Timer Set the time for the OFF Timer function activated when you selected Standby mode. If the predefined time elapses, this unit's power is automatically turned off. Display and setting: "OFF – – – –" : Power OFF Timer function is cancelled. "OFF 20min"... -
Page 36: Accessories
2CAUTION • If your car is not prepared for this special connection-system, Number of items consult your Kenwood dealer. • Only use antenna conversion adapters (ISO-JASO) when the antenna cord has an ISO plug. • Make sure that all cable connections are securely made by inserting jacks until they lock completely. -
Page 37: Connecting Cables To Terminals
Connector B come out from the tab. — 37 — Rear right output (Red) / Non-fading right output (Red) (KDC-6090R only) Rear left output (White) / Non-fading left output (White) (KDC-6090R only) Front right output (Red) Front left output (White) NOTE To "EXT.AMP.CONT."... -
Page 38: Installation
Connecting Cables to Terminals 2WARNING Connecting the ISO Connector (see p.37) The pin arrangement for the ISO connectors depends on the type of vehicle you drive. Make sure to make the proper connections to prevent damage to the unit. The default connection for the wiring harness is described in 1 below. - Page 39 Removing the hard rubber frame Refer to the section “Theft deterrent faceplate (P. 10)” and then remove the faceplate. Engage the catch pins on the removal tool and remove the two locks on the upper level. Push upward the frame and pull it forward as shown in the figure.
- Page 40 Installation Locking the faceplate to the unit If you want to lock the faceplate to the unit so that it does not fall off, follow the directions below. Refer to the function "Theft deterrent faceplate" (page 10) and remove the faceplate. Insert the provided screw into the hole at the centre of the bottom side of the faceplate which you have removed from the unit.
-
Page 41: Troubleshooting Guide
Troubleshooting Guide What might appear to be a malfunction in your unit may just be the result of slight misoperation or miswiring. Before calling service, first check the following table for possible problems. PROBLEM The power does not turn on. The fuse has blown. - Page 42 Troubleshooting Guide PROBLEM The sound skips on a CD. The CD is scratched or dirty. The specified track does not Random play has been selected. play. Can’t remove disc. The cause is that more than 10 minutes has elapsed since the vehicle ACC switch was turned OFF. Free switching of the sound The system Q function is set on Scan mode.
- Page 43 The following messages are displayed when certain problems are occurring in your system. Take the recommended actions. No disc magazine has been loaded in the changer. The disc magazine is not completely loaded. Eject Load the disc magazine properly. No CD in the unit. Insert the CD.
-
Page 44: Specifications
Specifications Specifications subject to change without notice. FM tuner section Frequency range (50 kHz space) ...87.5 MHz – 108.0 MHz Usable sensitivity (S/N = 26dB) ...0.7 µV/75 ½ Quieting Sensitivity (S/N = 46dB) ...1.6 µV/75 ½ Frequency response (±3 dB) ...30 Hz – 15 kHz Signal to Noise ratio (MONO) ...65 dB Selectivity (DIN) (±400 kHz)...³...