Sony DSX-GS80 Operating Instructions Manual
Fm/am bluetooth car audio
Hide thumbs
Also See for DSX-GS80:
- Operating instructions manual (109 pages) ,
- Service manual (67 pages) ,
- Operating instructions manual (41 pages)
Table of Contents
Advertisement
FM/AM
Bluetooth® Car Audio
Owner's Record
The model and serial numbers are located on the
bottom of the unit.
Record these numbers in the spaces provided below.
Refer to these numbers whenever you call upon your
Sony dealer regarding this product.
Model No. DSX-GS80
Serial No.
To cancel the demonstration (DEMO) display,
see page 8.
For the connection/installation, see page 13.
Pour annuler l'affichage de démonstration
(DEMO), reportez-vous à la page XX.
Pour le raccordement/l'installation, reportez-vous à
la page XX.
DSX-GS80
5-006-640-11(1)
Operating Instructions
Mode d'emploi
GB
FR
Advertisement
Table of Contents

Related Manuals for Sony DSX-GS80


Summary of Contents for Sony DSX-GS80
- Page 1 The model and serial numbers are located on the bottom of the unit. Record these numbers in the spaces provided below. Refer to these numbers whenever you call upon your Sony dealer regarding this product. Model No. DSX-GS80 Serial No. To cancel the demonstration (DEMO) display, see page 8.
- Page 2 For safety, be sure to install this unit in Warning the dashboard of the car as the left side of the unit becomes hot during use. FOR THE CUSTOMERS IN THE USA. For details, see “Connection/ Installation” (page 13). NOT APPLICABLE IN CANADA, INCLUDING IN THE PROVINCE OF QUEBEC.
- Page 3 Visit: https://www.sony.com/electronics/ swallowed or placed inside any part of the support body, seek immediate medical attention. Contact: Sony Customer Information Service Note on the lithium battery Center at 1-800-222-7669 Do not expose the battery to excessive heat Write: Sony Customer Information Service such as direct sunlight, fire or the like.
-
Page 4: Important Notice
– near automatic doors or a fire alarm This unit supports security capabilities that Caution comply with the BLUETOOTH standard to IN NO EVENT SHALL SONY BE LIABLE FOR provide a secure connection when the ANY INCIDENTAL, INDIRECT OR BLUETOOTH wireless technology is used,... -
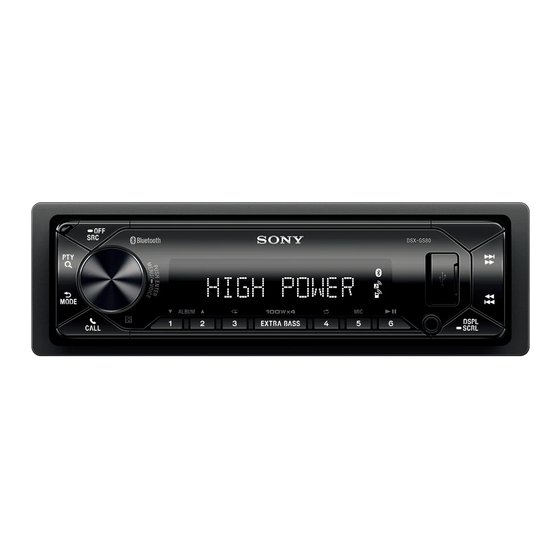
Page 5: Guide To Parts And Controls
Guide to Parts and Controls Main unit PUSH ENTER Front panel removed (inner panel) Enter the selected item. Press SRC, rotate then press to change the source (timeout in 2 seconds). MENU Open the setup menu. VOICE Press and hold for more than 2 seconds to activate voice dial, voice ... -
Page 6: Rm-X231 Remote Commander
RESET (inner panel) Select a setup item, etc. ENTER Enter the selected item. Press and hold for more than 2 seconds to establish or terminate the “Sony | Music Center” function. / (prev/next) +/– (album +/–) VOL (volume) +/–... -
Page 7: Detaching The Front Panel
Getting Started Detaching the Front Panel Note You can detach the front panel of this unit to Resetting the unit will erase the clock setting and prevent theft. some stored contents. Press and hold OFF until the unit turns off, press the front panel Pairing with a Bluetooth®... -
Page 8: Updating The Firmware
Updating the Firmware Canceling the Demonstration To update the firmware, visit the support site on Mode the back cover, then follow the online instructions. You can cancel the demonstration display which appears when the source is off and the Notes clock is displayed. -
Page 9: Additional Information
Please note that the use of this accessory with an Apple product may affect wireless performance. If you have any questions or problems concerning your unit that are not covered in this manual, consult your nearest Sony dealer. -
Page 10: Maintenance
Maintenance Specifications Replacing the lithium battery (CR2025) FOR THE CUSTOMERS IN THE USA. NOT of the remote commander APPLICABLE IN CANADA, INCLUDING IN When the battery becomes weak, the range THE PROVINCE OF QUEBEC. of the remote commander becomes shorter. POUR LES CLIENTS AUX ÉTATS-UNIS. -
Page 11: Power Amplifier Section
Power amplifier section FLAC (.flac) Bit depth: 16 bit, 24 bit Output: Speaker outputs Sampling rate: 44.1 kHz, 48 kHz Speaker impedance: 2 Ω/4 Ω – 8 Ω Maximum power output: 100 W × 4 (at 2 Ω/ Wireless Communication 4 Ω) Communication System: General... - Page 12 Bluetooth SIG, Inc. and distribution. any use of such marks by Sony Corporation is – Neither the name of the Xiph.org Foundation nor under license. Other trademarks and trade names the names of its contributors may be used to are those of their respective owners.
-
Page 13: Parts List For Installation
Parts List for Installation Connection/Installation Mounting sleeve(1) Release keys (2) Cautions • Run all ground (earth) leads to a common ground (earth) point. • Do not get the leads trapped under a screw, or caught in moving parts (e.g., seat ... - Page 14 Connection Subwoofer* Power amplifier* Satellite radio tuner (SiriusXM)* * Smartphone* , iPod/ iPhone* , USB device White White/black striped Front speaker* Gray Gray/black striped Green Green/black striped Rear speaker* Purple Purple/black striped Blue/white striped Orange/white striped Black Yellow For details, see “Making connections”...
-
Page 15: Making Connections
10 A, make the power *11 Use speakers with 50W RMS or higher power connection to the battery directly to avoid input capacity. Using Sony XB series full range short circuits. speakers is recommended. *12 When the amperage rating of the fuse used on ... -
Page 16: Installing The Microphone
Subwoofer Easy Connection Installing the microphone You can use a subwoofer without a power To capture your voice during handsfree amplifier when it is connected to a rear calling, you need to install the microphone speaker lead. . Front speaker Subwoofer ... -
Page 17: Using The Wired Remote Control
Using the wired remote control Installation When using the steering wheel remote control Removing the mounting Installation of the connection cable RC-SR1 sleeve (not supplied) is required before use. To enable the steering wheel remote Before installing the unit, remove the trim control, select [STEERING] ... -
Page 18: Fuse Replacement
You may not be able to install this unit in original fuse. If the fuse some makes of Japanese cars. In such a blows, check the power case, consult your Sony dealer. connection and replace the fuse. If the fuse blows again after TOYOTA replacement, there may be an internal ... -
Page 20: Support Site
Pour plus de détails sur les fonctions et opérations qui are not covered in this manual, please visit the ne sont pas abordées dans ce mode d'emploi, veuillez web site below: visiter le site Web ci-dessous : https://rd1.sony.net/help/ev/xxx-xxxx/h_zz/ ©2019 Sony Corporation Printed in Thailand https://www.sony.net/...