Sony DSX-S310BTX Operating Instructions Manual
Fm/am digital media player
Hide thumbs
Also See for DSX-S310BTX:
- User manual ,
- Operating instructions manual (20 pages) ,
- Specifications (7 pages)
Table of Contents
Advertisement
Available languages
Available languages
FM/AM
Digital Media Player
Owner's Record
The model and serial numbers are located on the bottom of the unit.
Record the serial number in the space provided below.
Refer to these numbers whenever you call upon your Sony dealer regarding this product.
Model No. DSX-S310BTX Serial No.
To cancel the demonstration (Demo) display, see page 8.
Para cancelar la pantalla de demostración (Demo), consulte la página 8.
DSX-S310BTX
©2011 Sony Corporation
4-286-015-11(1)
Operating Instructions
Manual de instrucciones
US
ES
Advertisement
Chapters
Table of Contents

Related Manuals for Sony DSX-S310BTX


Summary of Contents for Sony DSX-S310BTX
- Page 1 The model and serial numbers are located on the bottom of the unit. Record the serial number in the space provided below. Refer to these numbers whenever you call upon your Sony dealer regarding this product. Model No. DSX-S310BTX Serial No.
- Page 2 (sold separately). Please see your nearest authorized Sony dealer for details on the satellite radio tuner module. Please refer to the manuals included in the satellite radio tuner module. Sirius or XM Subscription required.
- Page 3 12 TONE ANALYSIS and its logo are trademarks of Sony Corporation. “WALKMAN” and “WALKMAN” logo are registered trademarks of Sony Corporation. SensMe and the SensMe logo are trademarks or registered trademarks of Sony Ericsson Mobile Communications AB. Music recognition technology and related data are provided by Gracenote®.
-
Page 4: Table Of Contents
Table of Contents Getting Started Notes on Bluetooth ..... . 7 Resetting the unit ......7 Canceling the Demo mode . - Page 5 Searching for a track Searching a track by name — Quick-BrowZer™....30 Searching by skip items — Jump mode ..... . . 30 Searching by alphabetical order —...
- Page 6 Support site If you have any questions or for the latest support information on this product, please visit the web site below: http://esupport.sony.com http://www.sony.com/mobileAV Provides information on: • Models and manufacturers of compatible digital audio players • Supported MP3/WMA/AAC files •...
-
Page 7: Getting Started
IMPORTANT NOTICE! Safe and efficient use Changes or modifications to this unit not expressly approved by Sony may void the user’s authority to operate the equipment. Please check for exceptions, due to national requirement or limitations, in usage of Bluetooth equipment before using this product. -
Page 8: Canceling The Demo Mode
Canceling the Demo mode You can cancel the demonstration display which appears during turning off. Press and hold the multi-way encoder. The setup display appears. Rotate the multi-way encoder to select “Demo,” then press it. Rotate the multi-way encoder to select “off.”... -
Page 9: Attaching The Front Panel
Attaching the front panel Place the hole A of the front panel onto the spindle B on the unit, then lightly push the left side in. Press (SOURCE/OFF) on the unit to operate the unit. Note Do not put anything on the inner surface of the front panel. -
Page 10: Quick Guide For Bluetooth Function
After pairing is made, connect this unit and the Bluetooth device. Depending on the device, connection is automatically made along with the pairing. Handsfree calling/Music streaming/Playing back Pandora You can make/receive a handsfree call, listen to audio and Pandora internet radio through this unit. Support site http://esupport.sony.com http://www.sony.com/mobileAV... -
Page 11: Buttons And Icons
Buttons and icons Icon status descriptions Flashing None Flashing None Flashing None Flashing None Icons Multi-way encoder Bluetooth signal is on. Pairing is in standby mode. Bluetooth signal is off. Connected to a cellular phone. Connection is in progress. No cellular phone is connected for handsfree calling. Connected to a device. -
Page 12: Pairing
Connect to this unit using an audio device. Note You can connect from this unit to a Bluetooth device (page 33). If you cannot connect from this unit to the Bluetooth device, start pairing again. DR-BT30Q Select “Sony Automotive.” Sony Automotive XXXXXXX (Pairing successful) -
Page 13: Handsfree Calling/Music Streaming/Playing
3 Handsfree calling/Music streaming/Playing back Pandora Handsfree calling Receive a call/end a call Reject a call Redial Transfer a call Music streaming Listen Playback/pause* Skip tracks* * The operation may differ depending on the audio device. Playing back Pandora Listen Playback/pause Skip tracks Operation... -
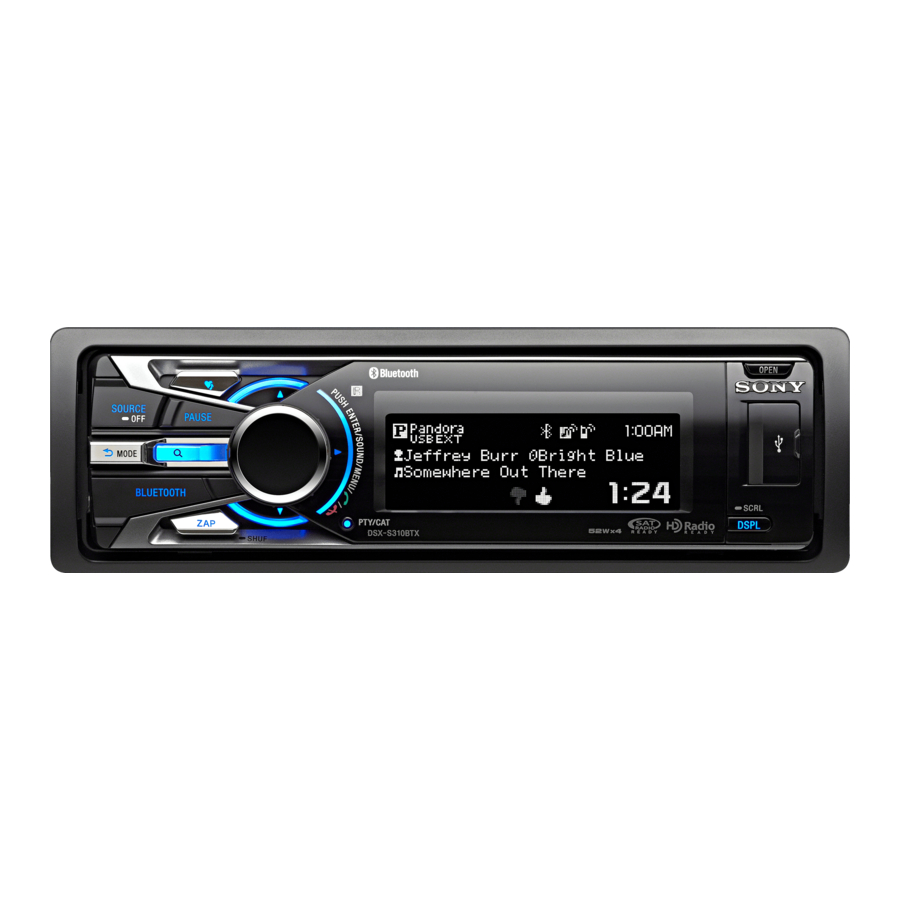
Page 14: Location Of Controls And Basic Operations
Location of controls and basic operations Main unit Front panel removed This section contains instructions on the location of controls and basic operations. For details, see the respective pages. A SOURCE/OFF button* Press to turn on the power/change the source (Radio/USB/SensMe™* Bluetooth Audio/Bluetooth Pandora/ Bluetooth Phone). - Page 15 Pandora USB: Push right to: –Skip tracks Push up/down to: –Thumbs up/down (push for 1 second). Bluetooth Audio* Push left/right to: – Skip tracks (push). – Reverse/fast-forward a track (push and hold). Bluetooth Pandora: Push right to: –Skip tracks Push up/down to: –Thumbs up/down (push for 1 second).
-
Page 16: Rm-X306 Card Remote Commander
RM-X306 Card Remote Commander Remove the insulation film before use (page 8). A CALL/ (handsfree) button To change the source (Bluetooth Phone). Bluetooth Phone: To receive a call. B SRC (source) button* To turn on the power; change the source (Radio/USB/SensMe™* Bluetooth Audio/Bluetooth Pandora/ Bluetooth Phone). - Page 17 Bluetooth Phone: To input numbers (phone number, etc.). button page 34, 35 J OFF/ (end call) button To turn off the power; stop the source; end or reject a call. K BLUETOOTH button page 32 For Bluetooth signal on/off, pairing. L M (+)/m (–) buttons The same as pushing the multi-way encoder up/down on the unit.
-
Page 18: Radio
Radio Storing and receiving stations Caution When tuning in stations while driving, use Best Tuning Memory (BTM) to prevent an accident. Storing automatically — BTM Press (SOURCE/OFF) repeatedly until “TUNER” appears. To change the band, press (MODE) repeatedly. You can select from FM1, FM2, FM3, AM1 or AM2. -
Page 19: Rds
Overview FM stations with Radio Data System (RDS) service send inaudible digital information along with the regular radio program signal. Display items A Radio band B Clock C Preset number D Frequency* (Program service name), RDS data * While receiving the RDS station, “RDS” is displayed on the left of the frequency indication. -
Page 20: Usb Devices
USB devices For details on the compatibility of your USB device, visit the support site. Support site http://esupport.sony.com http://www.sony.com/mobileAV • MSC (Mass Storage Class) type USB devices compliant with the USB standard can be used. • Corresponding codec is MP3 (.mp3), WMA (.wma), AAC (.m4a) and AAC (.mp4). -
Page 21: Playing Back Via The Usb (External)
Playing back via the USB (external) connector Slide the USB cover. Connect the USB device to the USB connector. When using a cable, use the one supplied with the USB device to connect. Press (SOURCE/OFF) repeatedly until “USB” appears, and then press (MODE) to switch the USB device. -
Page 22: Repeat Play
Playing tracks on shuffle play is selected from a current USB device. Enjoying music according to your mood — SensMe™ Sony’s unique “SensMe™ channels” features automatically group tracks by channel, and allow you to enjoy music intuitively. Before using the SensMe™... -
Page 23: Installing "Sensme™ Setup" And "Content Transfer" In Your Computer
Download the “SensMe™ Setup” and “Content Transfer” software from the support site. Install the software in your computer. For more details on the installation, visit http://esupport.sony.com http://www.sony.com/mobileAV Registering a USB device using “SensMe™ Setup” USB device registration is required to enable the SensMe™... -
Page 24: Playing Tracks In The Channel - Sensme™ Channels
Playing tracks in the channel — SensMe™ channels “SensMe™ channels” automatically group tracks into channels by their tunes. You can select and play a channel that fits your mood, activity, etc. This function works for USB devices connected to the internal/external or both USB connector. To switch the USB device, press (MODE). -
Page 25: Playing Back Ipod
Support site http://esupport.sony.com http://www.sony.com/mobileAV Notes • Do not place a cellular phone or a device with wireless communication functions on the TUNE TRAY, as it may not receive phone signals or communication may be terminated. -
Page 26: Playing Back Via The Usb (External)
Press (SOURCE/OFF) repeatedly until “USB” appears, and then press (MODE) to switch the USB device. “USB Internal” appears. The iPod will turn on automatically, and the display will appear on the iPod screen as below.* The tracks on the iPod start playing automatically from the point last played. -
Page 27: Display Items
Notes • Do not remove the iPod during playback, otherwise data may be damaged. • Do not place non-USB devices on the TUNE TRAY, or foreign objects, such as coins, keys, cards, liquids, etc. • Do not place a flammable object such as a lighter on the TUNE TRAY, as this may cause smoke, fire, or other accident. -
Page 28: Shuffle Play
Shuffle play During playback, press and hold (ZAP/SHUF). Press (ZAP/SHUF) repeatedly until the desired setting appears. (with the card remote commander) During playback, press (2) (SHUF) repeatedly until the desired setting appears. After 3 seconds, the setting is complete. Select To play Shuffle Album* album in random order. -
Page 29: Pandora® Via Usb (Iphone)
Download the latest version of Pandora and obtain more information from www.pandora.com For details on usable devices, visit the following support site. Support site http://esupport.sony.com http://www.sony.com/mobileAV Notes • Do not place a cellular phone or a device with wireless communication functions on the TUNE TRAY, as it may not receive phone signals or communication may be terminated. -
Page 30: Station List
Station list The station list allows you to easily select a desired station. During playback, press Pandora stations on your list appear. Push the multi-way encoder right to select the sorting order: “Date” or “A- Z.” “Date” sorts stations by the date they were added to the account, and “A-Z”... -
Page 31: Searching By Alphabetical Order - Alphabet Search
Press the multi-way encoder. The display returns to the Quick-BrowZer mode and the selected item appears. Push the multi-way encoder up/down to select the desired item, then press Playback starts if the selected item is a track. To cancel Jump mode Press (BACK) or push the multi-way encoder left. -
Page 32: Bluetooth (Handsfree Calling And Music Streaming)
Set the Bluetooth device to search for this unit. A list of detected devices appears in the display of the device to be connected. This unit is displayed as “Sony Automotive” on the device to be connected. DR-BT30Q Sony Automotive... -
Page 33: Connecting
Set the Bluetooth device to connect to this unit. “Connection Complete” appears and connection is complete. “ ” or “ ” appears when the connection is made. * Passkey may be called “passcode,” “PIN code,” “PIN number” or “password,” etc., depending on the device. -
Page 34: Handsfree Calling
Handsfree calling Once the unit is connected to the cellular phone, you can make/receive handsfree calls by operating this unit. Making calls Calling from the phonebook You need to make sure the appropriate phonebook has been selected. For details on how to select a phonebook, see “Selecting a phonebook”... -
Page 35: Call Transfer
To adjust the ringtone volume: Rotate the multi-way encoder while receiving a call. “Ring Volume” appears and ringtone volume can be adjusted. To adjust the talker’s voice volume: Rotate the multi-way encoder during a call. “Talk Volume” appears and the talker’s voice volume can be adjusted. -
Page 36: Preset Dial
• Before receiving phonebook data, disconnect any cellular phone or audio device. • To cancel the transfer of phonebook data, operate the cellular phone. • If the power supply lead is disconnected, the stored phonebook data will be erased. Deleting from the phonebook in this unit 1 Press (SOURCE/OFF) repeatedly until “Bluetooth Phone”... -
Page 37: Music Streaming
Music streaming Listening to music from an audio device You can listen to music of an audio device on this unit if the audio device supports A2DP (Advanced Audio Distribution Profile) of Bluetooth technology. Connect this unit and the Bluetooth audio device (page 33). -
Page 38: Pandora Via Bluetooth (Android™ & Blackberry® Phones)
Download the latest version of Pandora and obtain more information from www.pandora.com For details of usable devices, visit the following support site. Support site http://esupport.sony.com http://www.sony.com/mobileAV Notes • Do not place a cellular phone or a device with wireless communication functions on the TUNE TRAY, as it may not receive phone signals or communication may be terminated. -
Page 39: Station List
Note Under certain circumstances, “Thumbs” feedback may be unavailable, and “Cannot Thumbs Up/Down” will be displayed. Station list The station list allows you to easily select a desired station. During playback, press Pandora stations on your list appear. Push the multi-way encoder right to select the sorting order: “Date”... -
Page 40: Enjoying Sophisticated Sound Functions - Advanced Sound Engine
Bluetooth Audio Level (page 37) Enjoying sophisticated sound functions — Advanced Sound Engine Advanced Sound Engine, Sony’s new sound engine, creates an ideal in-car sound field with digital signal processing. Advanced Sound Engine contains the following features: EQ7, Listening Position, DM+ Advanced, Rear Bass Enhancer, Dynamic Loudness. -
Page 41: Optimizing Sound By Time Alignment - Listening Position
Other equalizer curves are also adjustable. Optimizing sound by Time Alignment — Listening Position The unit can change the localization of sound by delaying the sound output from each speaker to suit your position, and simulate a natural sound field with the feeling of being in the center of it wherever you sit in the car. -
Page 42: Dm+ Advanced
DM+ Advanced DM+ Advanced improves digitally compressed sound by restoring high frequencies lost in the compression process. This function works when the USB, SensMe™, Pandora USB, Bluetooth Audio or Bluetooth Pandora source is selected only. During playback, press the multi-way encoder. - Page 43 Display Demo (Demonstration) Activates the demonstration: “on,” “off.” Image Sets various display images. – “All”: to display all images. – “Movie”: to display a movie. – “SA 1 – 3, All”: to display the Spectrum Analyzer. – “Wall.P 1 – 4, All”: to display a wallpaper. –...
-
Page 44: Additional Information
Additional Information Precautions • Cool off the unit beforehand if your car has been parked in direct sunlight. • Power antenna (aerial) extends automatically. Playback order of MP3/WMA/AAC files MP3/WMA/AAC About Device Inside Alert If you turn the ignition switch to the OFF position without removing the USB device or iPod, “Device Inside”... -
Page 45: Maintenance
• If you experience discomfort after using the Bluetooth device, stop using the Bluetooth device immediately. Should any problem persist, consult your nearest Sony dealer. If you have any questions or problems concerning your unit that are not covered in this manual, consult your nearest Sony dealer. -
Page 46: Removing The Unit
If the fuse blows again after replacement, there may be an internal malfunction. In such a case, consult your nearest Sony dealer. Cleaning the connectors The unit may not function properly if the connectors between the unit and the front panel are not clean. In order to prevent this, detach the front panel (page 8) and clean the connectors with a cotton swab. -
Page 47: Specifications
MB or more (For Windows Vista or later) • USB port Windows XP, Windows Vista, Windows 7 For details on compatible editions or Service Pack, visit the following support site: http://esupport.sony.com http://www.sony.com/mobileAV in) (w/h/d) × 6 in) (w/h/d) tuner: XT-100HD... -
Page 48: Troubleshooting
Before going through the checklist below, check the connection and operating procedures. If the problem is not solved, visit the following support site. Support site http://esupport.sony.com http://www.sony.com/mobileAV General No power is being supplied to the unit. • Check the connection or fuse. - Page 49 Radio reception The stations cannot be received. The sound is hampered by noises. • The connection is not correct. t Connect a power antenna (aerial) control lead (blue) or accessory power supply lead (red) to the power supply lead of a car’s antenna (aerial) booster (only when your car has built-in FM/AM antenna (aerial) in the rear/side glass).
-
Page 50: Error Displays/Messages
No sound is heard from the Bluetooth audio device. The audio device is paused. t Cancel pause of the audio device. The sound skips during playback of a Bluetooth audio device. • Reduce the distance between the unit and the Bluetooth audio device. - Page 51 Bookmark is not allowed. t Wait until the commercial ends. t Select another song or station, then try it again. Bookmark Error Bookmarking failed. t Try bookmarking again. If these solutions do not help improve the situation, consult your nearest Sony dealer. ”...
- Page 52 ZAPPIN y Quick-BrowZer son marcas comerciales de Sony Corporation. La marca de la palabra y logotipos de Bluetooth son propiedad de Bluetooth SIG, Inc. y Sony Corporation posee licencia para utilizar cualquiera de dichas marcas. Otras marcas registradas y nombres comerciales pertenecen a sus respectivos propietarios.
- Page 53 BlackBerry® es propiedad de Research In Motion Limited y está registrada y/o se utiliza en los EE.UU. y en países de todo el mundo. Se utiliza bajo licencia de Research In Motion Limited. Advertencia: si el encendido del automóvil no dispone de una posición Asegúrese de ajustar la función de desconexión automática (página 46).
- Page 54 Tabla de contenido Procedimientos iniciales Notas sobre Bluetooth ....7 Restauración de la unidad ....7 Cancelación del modo Demo.
- Page 55 Búsqueda de una pista Búsqueda de una pista por nombre — Quick-BrowZer™....31 Búsqueda por omisión de elementos — Modo de Omisión ....31 Búsqueda por orden alfabético —...
- Page 56 Sitio Web de soporte técnico en línea Para resolver cualquier duda u obtener la información más reciente sobre el soporte técnico de este producto, visite el siguiente sitio Web: http://esupport.sony.com http://www.sony.com/mobileAV Proporciona información acerca de: • Modelos y fabricantes de reproductores de audio digital compatibles •...
-
Page 57: Procedimientos Iniciales
AVISO IMPORTANTE Utilización segura y eficaz Los cambios o las modificaciones que se realicen en esta unidad sin la aprobación de Sony pueden anular la autorización del usuario para utilizar el equipo. Revise las excepciones, debido a requisitos nacionales o limitaciones, en cuanto a la utilización de los equipos Bluetooth antes de utilizar el producto. -
Page 58: Cancelación Del Modo Demo
Cancelación del modo Demo Es posible cancelar la pantalla de demostración que aparece durante el apagado. Mantenga presionado el codificador multidireccional. Aparecerá la pantalla de ajustes. Gire el codificador multidireccional para seleccionar el ajuste “Demo” y, a continuación, presiónelo. Gire el codificador multidireccional para seleccionar “off”. -
Page 59: Colocación Del Panel Frontal
Colocación del panel frontal Coloque el orificio A del panel frontal en el eje B de la unidad y, a continuación, presione ligeramente el lado izquierdo hacia adentro. Presione (SOURCE/OFF) en la unidad para utilizarla. Nota No coloque nada sobre la superficie interior del panel frontal. -
Page 60: Guía Rápida Para La Función Bluetooth
Llamadas con manos libres/Transmisión de música/Reproducción en Pandora Por medio de esta unidad, usted puede realizar/recibir una llamada con manos libres, escuchar audio y la radio por Internet Pandora. Sitio web de asistencia al cliente http://esupport.sony.com http://www.sony.com/mobileAV... -
Page 61: Botones E Iconos
Botones e iconos Descripciones de los iconos de estado Encendido Parpadea Ninguno Encendido Parpadea Ninguno Encendido Parpadea Ninguno Encendido Parpadea Ninguno Iconos Codificador multidireccional La señal de Bluetooth está activada. El emparejamiento está en modo de espera. La señal de Bluetooth está desactivada. Conectado a un teléfono celular. -
Page 62: Emparejamiento
Realice la conexión a esta unidad mediante un dispositivo de audio. Nota Puede conectar esta unidad a un dispositivo Bluetooth (página 35). Si no puede conectar esta unidad a un dispositivo Bluetooth, realice el emparejamiento de nuevo. DR-BT30Q Seleccione “Sony Automotive”. Sony Automotive XXXXXXX (Emparejamiento exitoso) -
Page 63: Llamadas Con Manos Libres Y
3 Llamadas con manos libres y transmisión de música Realización de llamadas con manos libres Para Recibir o finalizar una llamada Rechazar una llamada Volver a marcar Transferir una llamada Transmisión de música Para Escuchar música Reproducir/pausar* Omitir pistas* * La operación puede variar en función del dispositivo de audio. Reproducción en Pandora Para Escuchar música... -
Page 64: Ubicación De Los Controles Y Operaciones Básicas
Ubicación de los controles y operaciones básicas Unidad principal Panel frontal extraído Este apartado contiene instrucciones acerca de la ubicación de los controles y las operaciones básicas. Consulte las páginas indicadas para obtener información detallada. A Botón SOURCE/OFF* Presiónelo para encender la unidad o cambiar la fuente (Radio/USB/SensMe™* Pandora USB/audio Bluetooth/Bluetooth Pandora/teléfono Bluetooth). - Page 65 USB: Presiónelo hacia arriba/abajo para: – omitir álbumes (presionar). – omitir álbumes en forma continua (mantener presionado). Presiónelo hacia la izquierda/derecha para: – omitir pistas (presionar). – omitir pistas en forma continuada (presiónelo una vez, vuelva a presionarlo transcurridos aproximadamente 2 segundos y manténgalo presionado).
-
Page 66: Control Remoto De Tarjeta Rm-X306
Control remoto de tarjeta RM-X306 Retire la película de aislamiento antes de usar la unidad (página 8). A Botón CALL/ Para cambiar la fuente (teléfono Bluetooth). Teléfono Bluetooth: Para recibir una llamada. B Botón SRC (fuente)* Para encender la unidad; cambiar la fuente (radio/USB/SensMe™* audio Bluetooth/Bluetooth Pandora/teléfono Bluetooth). - Page 67 Audio Bluetooth* (1): REP página 40 (2): SHUF página 40 (6): PAUSE página 40 Para pausar la reproducción. Para cancelarla, vuelva a presionar la tecla. Bluetooth Pandora: (6): PAUSE página 41 Para pausar la reproducción. Para cancelar esta función, vuelva a presionarlo.
-
Page 68: Radio
Radio Almacenamiento y recepción de emisoras Precaución Para sintonizar emisoras mientras maneja, utilice la función BTM (Memoria de la mejor sintonía) para evitar accidentes. Almacenamiento automático — BTM Presione (SOURCE/OFF) varias veces hasta que aparezca “TUNER”. Para cambiar de banda, presione (MODE) varias veces. -
Page 69: Rds
Descripción general Las emisoras de radio FM que tienen el servicio de Sistema de datos de radio (RDS) envían información digital inaudible junto a la señal habitual del programa de radio. Elementos de la pantalla A Banda de radio B Reloj C Número de presintonía D Frecuencia* (nombre del servicio de programa), datos de RDS... -
Page 70: Dispositivos Usb
Para obtener más información acerca de la compatibilidad del dispositivo USB, visite el sitio web de soporte técnico. Sitio Web de soporte técnico en línea http://esupport.sony.com http://www.sony.com/mobileAV • Es posible utilizar dispositivos USB de almacenamiento masivo (MSC) que cumplan con el estándar USB. -
Page 71: Reproducción Mediante El Conector Usb
Si ya hay un dispositivo USB conectado, repita el paso 6 para empezar la reproducción. Mantenga presionado (SOURCE/OFF) durante 1 segundo para detener la reproducción. Extracción del dispositivo USB 1 Detenga la reproducción del dispositivo USB. 2 Presione (OPEN). 3 Presione PUSH OPEN en la TUNE TRAY. 4 Extraiga el dispositivo USB. -
Page 72: Reproducción Repetida
Para cambiar los elementos de la pantalla C, presione (DSPL). Notas • Los elementos que se muestran variarán en función del tipo de dispositivo USB, el formato de grabación y los ajustes. Para obtener más información, visite el sitio web de soporte técnico. •... -
Page 73: Reproducción De Música Según Su Estado De Ánimo - Sensme
USB actual. Reproducción de música según su estado de ánimo — SensMe™ Las funciones exclusivas de “SensMe™ channels” de Sony agrupan automáticamente las pistas por canal y permiten disfrutar música de modo intuitivo. Antes de utilizar la función SensMe™... -
Page 74: Reproducción De Pistas En El Canal - Sensme™ Channels
Registro de un dispositivo USB mediante “SensMe™ Setup” Para activar la función SensMe™ en esta unidad, se debe registrar el dispositivo USB. Si el registro no se realiza junto con el procedimiento de instalación, siga los pasos que aparecen a continuación. Inicie “SensMe™... -
Page 75: Reproducción En Un Ipod
Sitio Web de soporte técnico en línea http://esupport.sony.com http://www.sony.com/mobileAV Notas • No coloque un teléfono celular o un dispositivo con funciones de comunicación inalámbrica en la TUNE TRAY, ya que es posible que no reciba señales... -
Page 76: Reproducción Mediante El Conector Usb
Conecte el adaptador suministrado al conector USB. Conecte el iPod al adaptador suministrado. Deslice hacia adentro la TUNE TRAY presionando PUSH CLOSE en la TUNE TRAY hasta que se cierre completamente. Cierre el panel frontal. Presione (SOURCE/OFF) varias veces hasta que aparezca “USB” y, a continuación, presione (MODE) para cambiar el dispositivo USB. -
Page 77: Elementos De La Pantalla
Presione (SOURCE/OFF) varias veces hasta que aparezca “USB” y, a continuación, presione (MODE) para cambiar el dispositivo USB. Aparece “USB External”. El iPod se encenderá automáticamente y la indicación siguiente aparecerá en la pantalla del iPod tal y como se ilustra a continuación.* Sugerencia Para ello, le recomendamos que utilice el cable RC-100IP USB (no suministrado). -
Page 78: Reproducción Repetida
Reproducción repetida Mantenga presionado el codificador multidireccional. Gire el codificador multidireccional para seleccionar el ajuste “Repeat” y, a continuación, presiónelo. Gire el codificador multidireccional para seleccionar el ajuste y, a continuación, presiónelo. El ajuste finalizó. Presione (BACK). El ajuste finaliza y la pantalla regresa al modo de recepción/reproducción normal. -
Page 79: Utilización Directa Del Ipod - Control De Pasajero
Para obtener más información acerca de los dispositivos que se pueden utilizar, visite el sitio web de soporte técnico. Sitio Web de soporte técnico en línea http://esupport.sony.com http://www.sony.com/mobileAV Notas • No coloque un teléfono celular o un dispositivo con funciones de comunicación inalámbrica en la TUNE TRAY, ya que es posible que no reciba señales... -
Page 80: Clasificación Por "Thumbs (Pulgares)
Conecte el iPhone al conector USB a través del conector de base conectado al cable USB. Presione (SOURCE/OFF) varias veces hasta que aparezca “Pandora USB” y luego presione (MODE) para cambiar el dispositivo USB. Aparecerá “Pandora USB EXT” y “Please launch Pandora Application on mobile device.”. -
Page 81: Búsqueda De Una Pista
Nota Bajo ciertas circunstancias, el marcador podría no guardarse. En ese caso, aparecerá en pantalla “Bookmark Error”. Si esto sucede, intente agregar el marcador más tarde. Búsqueda de una pista Búsqueda de una pista por nombre — Quick-BrowZer™ Puede buscar una pista fácilmente en un dispositivo USB por categorías. -
Page 82: Búsqueda Por Orden Alfabético - Búsqueda Alfabética
Gire el codificador multidireccional hasta que aparezca el elemento deseado o uno próximo a él. Salta en incrementos del 10% del número total de elementos. Presione el codificador multidireccional. Vuelve a la pantalla del modo Quick-BrowZer y aparece el elemento seleccionado. Presione el codificador multidireccional hacia arriba y hacia abajo para seleccionar el elemento... -
Page 83: Búsqueda De Una Pista Por Segmentos - Zappin
Puede realizar o contestar llamadas con un dispositivo manos libres, o escuchar audio a través de la unidad. Para obtener más información acerca de los dispositivos que se pueden utilizar, visite el sitio web de soporte técnico. Sitio Web de soporte técnico en línea http://esupport.sony.com http://www.sony.com/mobileAV... -
Page 84: Acerca De Los Iconos Bluetooth
Configure el dispositivo Bluetooth para buscar esta unidad. Aparece una lista de los dispositivos detectados en la pantalla del dispositivo que desea conectar. La unidad se muestra como “Sony Automotive” en el dispositivo que se va a conectar. DR-BT30Q Sony Automotive... -
Page 85: Conexión
• Es posible que la búsqueda o la conexión demore un poco. • Según el dispositivo, la pantalla de confirmación de la conexión aparece antes de introducir la clave de paso. • El plazo para introducir la clave de paso varía según el dispositivo. -
Page 86: Realización De Llamadas Con Manos Libres
Realización de llamadas con manos libres Una vez que la unidad está conectada al teléfono celular, puede realizar o contestar llamadas con esta unidad. Realización de llamadas Realización de llamadas desde la agenda telefónica Debe asegurarse de haber seleccionado la agenda telefónica correspondiente. -
Page 87: Operaciones Durante Una Llamada
Ajuste de Auto Answer (respuesta automática) Puede seleccionar un ajuste de respuesta automática de “off”, “Short” o “Long” (página 47). Ajuste de Ringtone (tono de llamada) Puede seleccionar un tono de llamada de “Default” o “Cellular” (página 47). * En función del teléfono celular, es posible que el tono de llamada de esta unidad se emita incluso si se configura en “Cellular”. -
Page 88: Marcación Preajustada
1 Mantenga presionado (SOURCE/OFF) durante 1 segundo. 2 Mantenga presionado el codificador multidireccional. 3 Gire el codificador multidireccional hasta que aparezca “PhoneBook Select” y, a continuación, presiónelo. 4 Gire el codificador multidireccional para seleccionar “Cellular” o “Head Unit” y, a continuación, presiónelo. -
Page 89: Indicador De Sms
Notas • Antes de comenzar, compruebe que la unidad y el teléfono celular estén conectados. • Almacene una etiqueta de voz en el teléfono celular de antemano. • Si activa la marcación por voz con un teléfono celular conectado a la unidad, es posible que esta función no esté... -
Page 90: Operación De Un Dispositivo De Audio Con Esta Unidad
Operación de un dispositivo de audio con esta unidad Puede realizar las siguientes operaciones en esta unidad si el dispositivo de audio es compatible con AVRCP (Audio Video Remote Control Profile) de la tecnología Bluetooth. (La operación puede variar en función del tipo de dispositivo de audio). -
Page 91: Pandora A Través De Bluetooth (Teléfonos Android™ Y Blackberry®)
Para obtener más información acerca de los dispositivos que se pueden utilizar, visite el sitio web de soporte técnico. Sitio Web de soporte técnico en línea http://esupport.sony.com http://www.sony.com/mobileAV Notas • No coloque un teléfono celular o un dispositivo con funciones de comunicación inalámbrica en la TUNE TRAY, ya que es posible que no reciba señales... -
Page 92: Clasificación Por "Thumbs (Pulgares)
Clasificación por “Thumbs (Pulgares)” La clasificación por medio de “Thumbs Up (Pulgares arriba)” o “Thumbs Down (Pulgares abajo)” le permite personalizar las estaciones según su gusto personal. Thumbs Up (Pulgares arriba) Durante el modo de reproducción, mantenga presionado el codificador multidireccional hacia arriba durante 1 segundo. -
Page 93: Ajustes De Sonido Y Menú De
— Advanced Sound Engine Advanced Sound Engine, el nuevo motor de sonido de Sony, crea un campo de sonido ideal en el automóvil gracias a su procesamiento digital de sonido. Advanced Sound Engine ofrece las siguiente funciones: EQ7, Listening Position, DM+ Advanced, Rear Bass Enhancer y Dynamic Loudness. -
Page 94: Personalización De La Curva De Ecualizador - Eq7 Parametric Tune
Sugerencia La configuración ajustada de la curva de ecualizador se puede memorizar por separado para fuentes Tuner, USB (SensMe™, Pandora USB) y audio Bluetooth (Bluetooth Pandora). Personalización de la curva de ecualizador — EQ7 Parametric Tune “Custom” de EQ7 le permite realizar sus propios ajustes en el ecualizador. -
Page 95: Calibración Precisa Por Alineación De Tiempo - Listening Position Custom Tune
“Normal” (B): normal “Far” (C): lejos Durante la recepción/reproducción, presione el codificador multidireccional. Gire el codificador multidireccional hasta que aparezca “Listening Position Front/Rear” y, a continuación, presiónelo. Presione el codificador multidireccional hacia arriba y hacia abajo para seleccionar “Front R”, “Front L”, “Front”, “All”... -
Page 96: Uso De Los Altavoces Posteriores Como Altavoz Potenciador De Graves - Rear Bass Enhancer
Uso de los altavoces posteriores como altavoz potenciador de graves — Rear Bass Enhancer Rear Bass Enhancer mejora los sonidos graves ya que aplica el ajuste del filtro de paso bajo (página 43) a los altavoces posteriores. Esta función permite que los altavoces posteriores funcionen como altavoces potenciadores de graves si uno no está... - Page 97 Information Permite mostrar los elementos (en función de la fuente, etc.): “on”, “off”. Dimmer Cambia el brillo de la pantalla. – “Auto”: para que la pantalla se atenúe automáticamente al encender la luz. (Disponible únicamente si la antena monitorizada de iluminación está conectada). –...
-
Page 98: Información Complementaria
Información complementaria Precauciones • Deje que la unidad se enfríe antes de usarla si el automóvil ha estado estacionado bajo la luz directa del sol. • La antena motorizada se extiende automáticamente. Orden de reproducción de los archivos MP3/WMA/AAC MP3/WMA/AAC Acerca de Device Inside Alert Si ajusta el interruptor de la llave de encendido en la posición OFF sin extraer el dispositivo USB... -
Page 99: Mantenimiento
• Si no se siente cómodo después de utilizar el dispositivo Bluetooth, deje de utilizarlo inmediatamente. Si el problema persiste, consulte con el distribuidor Sony más cercano. Si desea realizar alguna consulta o solucionar algún problema relativo a la unidad que no se trate en este manual, póngase en contacto con el distribuidor... -
Page 100: Extracción De La Unidad
En tal caso, consulte con el distribuidor Sony más cercano. Limpieza de los conectores Es posible que la unidad no funcione correctamente si los conectores entre ésta y el panel frontal están sucios. -
Page 101: Especificaciones
Windows XP, Windows Vista, Windows 7 Para obtener más información acerca de las ediciones compatibles o Service Pack, visite el siguiente sitio de soporte: http://esupport.sony.com http://www.sony.com/mobileAV Monitor Color de alta densidad (16 bits) o superior, 800 × 600 puntos o más Otros Conexión a Internet... -
Page 102: Solución De Problemas
Si no se resuelve el problema, visite el siguiente sitio web de soporte técnico. Sitio Web de soporte técnico en línea http://esupport.sony.com http://www.sony.com/mobileAV Generales La unidad no recibe alimentación. • Revise la conexión o el fusible. - Page 103 PTY muestra “- - - - - - - -”. • La emisora actual no es una emisora RDS. • No se recibieron datos RDS. • La emisora no especifica el tipo de programa. Reproducción USB No es posible reproducir elementos a través de un concentrador USB.
-
Page 104: Mensajes/Indicaciones De Error
El nombre del otro interlocutor no aparece al recibir una llamada. • El número y el nombre del interlocutor no se encuentran almacenados en la agenda telefónica. t Almacene dichos datos en la agenda telefónica (página 38). • El teléfono desde el que se llama está ajustado para no mostrar el número de teléfono. - Page 105 Seleccione otra canción o estación y luego inténtelo de nuevo. Bookmark Error Falló la colocación de marcadores. t Intente agregar un marcador de nuevo. Si estas soluciones no ayudan a mejorar la situación, póngase en contacto con el distribuidor Sony más cercano. ”...
- Page 108 If you have any questions/problems regarding this product, try the following: Read Troubleshooting in these Operating Instructions. Reset the unit. Note: Stored data may be erased. Please contact (U.S.A. only); Call http://www.sony.net/ Sony Corporation Printed in Thailand 1-800-222-7669 http://www.SONY.com...