Table of Contents
Advertisement
Available languages
Available languages
Advertisement
Chapters
Table of Contents

Related Manuals for Kenwood CookEasy+ CCL50


Summary of Contents for Kenwood CookEasy+ CCL50
- Page 1 TYPE CCL50 Instructions...
- Page 2 English 2–26 Français 27–49...
- Page 4 DIRECT PREP KENWOOD WORLD APP...
-
Page 6: Table Of Contents
English Contents Safety Connecting To The Kenwood World App Using Your All in One Cooker Lid Off Cooking Using Preset Programmes 9-10 Using Your Direct Prep Using Your Weighing Tray Display Screen Explained Preset Usage Chart 13-14 Recipes Recommended Usage Chart... -
Page 7: Safety
Remove all packaging and any labels. If the cord is damaged it must, for safety reasons, be replaced by KENWOOD or an authorised KENWOOD repairer. For correct operation ensure that the bowl base is clean and dry before fitting to the power unit. - Page 8 Take care when lifting this appliance as it is heavy. Ensure the bowl is empty and outlet cover is secure before moving. Do not lift the appliance by the bowl handles or pouring handle. Do not move the unit whilst in operation or still hot. The bowl should only be filled to the 3 litre maximum fill level when using the slow cook plug.
- Page 9 Always fit the filler cap when using the chopping function or pureeing ingredients. Always operate the appliance with the filler cap in place, unless specified in the recipe. Only use the bowl and tools supplied with this appliance. Never use the bowl with any other heat source. Never operate the appliance in the cooking mode with the bowl empty.
- Page 10 Only use the appliance for its intended domestic use. Kenwood will not accept any liability if the appliance is subject to improper use, or failure to comply with these instructions. Do not use the pouring handle to remove or carry the bowl.
- Page 11 Cook meat, fish and seafood thoroughly, and never cook them from frozen. If you are using the steamer tray base and shelf, put meat, poultry and fish in the bottom basket so that its raw juice cannot drip onto food below. Do not reheat cooked rice in your steam tray attachment.
-
Page 12: Key
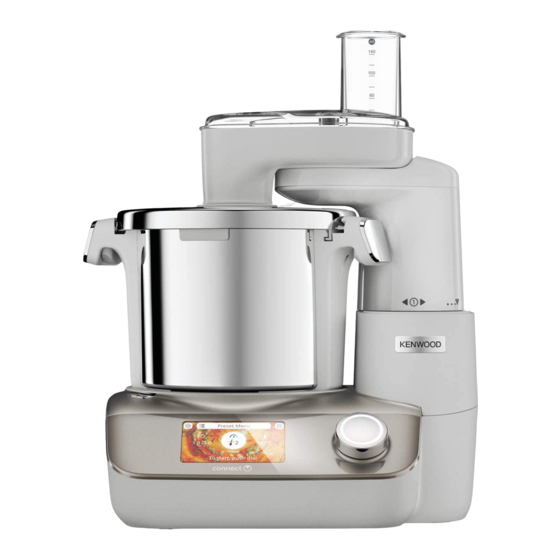
Direct Prep Direct Prep outlet cover Direct Prep outlet Lid filler cap Direct Prep start / stop button Lid outer (metal) Pusher/measuring cup Lid inner (clear) Feed tube Lid filler cap opening Direct Prep lid Interlock tabs Drive shaft Lid seal Disc Extra fine grating disc (if supplied) Bowl Tools... -
Page 13: Connecting To The Kenwood World App
Kenwood World App clockwise until aligned with the Refer to Illustrations – cooking bowl handles. The Kenwood World App will allow you to Set the required time, speed and control your appliance through your smart temperature. phone or tablet. Press the control dial to start the Plug in and press the On/Off switch at cooking process. -
Page 14: Using Your Direct Prep
The pouring handle is designed For fitting or removing the to assist with the removal of final Direct Prep assembly. Do not ingredients from the bowl. operate the Direct Prep when The underside of the bowl will remain located in this position. hot long after the heating has stopped. -
Page 15: Using Your Weighing Tray
Using Your Weighing Tray Place the weighing tray on the power unit. Alternatively, the weighing tray can also be used on top of the bowl and lid with the lid filler cap removed. If weighing directly into the bowl, fit the desired bowl tool first. -
Page 16: Display Screen Explained
Display Screen Explained Tap this icon to open the settings menu. Tap this icon to open the pre-set programmes menu. Tap this icon to weigh ingredients either into the bowl or using the weighing tray. Shows the time selected in hours (h), minutes (m) and seconds (s). -
Page 19: Recipes
Recipes Recipe Tool Used Preset / Ingredients Manual Settings Minestrone Chunky Soup Add the following all at once: 100g pancetta, diced 20 mins 2 garlic cloves, chopped 50g Arborio rice 2½ tbsp tomato puree 70g savoy cabbage 1 tsp dried rosemary 2 tsp dried sage 98˚C 1 celery stick, sliced... -
Page 20: Recommended Usage Chart
Recommended Usage Chart This is for guidance only and will vary depending on the exact recipe and ingredients being processed. For best results, always use soft, room temperature butter and margarine when making cakes. If the machine slows or starts to labour, increase the speed. Function Knife Blade For chopping ingredients before cooking and for pureeing after cooking is... - Page 21 Recommended Usage Chart – Continued Function Knife Blade For chopping ingredients before cooking and for pureeing after cooking is complete. For making doughs and cake batters. Brioche Recipe Stage 1 Milk 5/30˚C 2 mins 120g Dried active yeast Stage 2 Strong white bread 7/OFF 15 secs...
- Page 22 Direct Prep For slicing or grating ingredients directly into the cooking bowl or into a side container. Disc Function Hints & Tips Extra fine grating Always use fresh food. for Parmesan Do not cut food up too small. Fill the cheese width of the feed tube fairly full.
- Page 23 Steaming Recipe Example: Food Steam Tray Position Frozen salmon fillet – Base 25 – 35 mins 250g (depending on thickness) Potatoes, waxy Peel and Base 30 mins 400g quartered lengthways Carrots Peeled, halved Shelf 30 mins 200g lengthways and cut into 6cm pieces Broccoli Cut into florets...
-
Page 24: Care And Cleaning
Care and Cleaning 2 Then lift out the drive shaft or slow cook plug. Always switch off and unplug before 3 Remove and wash the sealing ring. cleaning. 4 Brush the bowl drive assembly or slow Remove the lid and tool from the bowl cook plug clean with hot soapy water, before cleaning. -
Page 25: Service And Customer Care
If your Kenwood product malfunctions or you find any defects, please send it or bring it to an authorised KENWOOD Service Centre. To find... -
Page 26: Helpful Hints
Helpful Hints Area Hints & Tips Maximum Do not exceed the 2.6 litres maximum fill level marked on the capacities inside of the bowl when using a bowl tool. Never exceed the 3 litres maximum fill level marked on the inside of the bowl. -
Page 27: Troubleshooting Guide
Helpful Hints – Continued Area Hints & Tips Direct Prep Not all of the discs listed will be included in your pack as discs supplied are dependent upon the model variant. Refer to the ‘Service and Customer Care’ section for information on how to buy a disc not included in your pack. - Page 28 E:34 Forget WiFi network, go to Settings > WiFi > Forget Network. Restart Appliance Setup from the Kenwood World App. Unable to find known WiFi Appliance may have moved, slow flashing network router may be turned off or may require a restart.
- Page 29 WiFi network). If the problem persists contact your nearest authorised Kenwood Service Centre. To find up to date details of your nearest Kenwood Service Centre visit www.kenwoodworld.com or the website specific to your country.
-
Page 30: Ecodesign Information
Ecodesign Information Network Port: Single WiFi port, activated by default. TYPE CCL50 2412 - 2472 MHz RF Frequency Range: < 20 dBm Maximum Transmit Power: Communications Protocol: IEEE802.11 b, g, n The CCL50 has a single WiFi Network Port and is intended for use as remotely operated, network equipment. - Page 31 Français Table des matières Sécurité 28-32 Légende Connexion à l’application Kenwood World Utilisation du robot cuiseur multifonction Cuisson à bol ouvert Utilisation des programmes prédéfinis 34-35 Utilisation du Direct Prep 35-36 Utilisation du plateau de pesage Écran : explications Preset Usage Chart...
-
Page 32: Sécurité
Retirez tous les éléments d’emballage et les étiquettes. Si le cordon est endommagé, il doit être remplacé, pour des raisons de sécurité, par Kenwood ou par un réparateur agréé Kenwood. Pour un bon fonctionnement, veillez à ce que le fond du bol soit propre et sec avant d’être installé... - Page 33 Faites attention lorsque vous soulevez l’appareil car il est assez lourd. Veillez à ce que le bol soit vide et que le cache-sortie soit bien fixé avant de bouger l’appareil. Ne soulevez pas l’appareil par les poignées du bol ou par la poignée pour verser. Ne déplacez pas l’appareil tant qu’il fonctionne ou qu’il est encore chaud.
- Page 34 Faites attention à la vapeur s’échappant du bol, et notamment lorsque vous retirez le couvercle ou le bouchon sur le couvercle pendant le mode cuisson ou après la cuisson. N’ôtez pas le couvercle ou le bouchon de remplissage tant que le liquide est en train de bouillir.
- Page 35 Ne laissez jamais le cordon pendre de façon telle qu’un enfant puisse s’en saisir. N’employez l’appareil qu’à des fins domestiques. Kenwood décline toute responsabilité dans les cas où l’appareil est utilisé incorrectement ou que les présentes instructions ne sont pas respectées.
- Page 36 N’utilisez jamais vos doigts pour pousser les aliments vers le fond de la cheminée d’alimentation. Utilisez uniquement le poussoir fourni. Ne forcez jamais pour pousser les aliments à l’intérieur de la cheminée d’alimentation - vous pourriez endommager votre accessoire. Évitez tout contact avec les pièces en mouvement. Ne mettez pas les doigts dans la sortie de l’appareil.
-
Page 37: Légende
Cuiseur vapeur Avant de brancher l’appareil Retirez la protection en plastique du Couvercle couteau. Cette protection doit être Étage mise au rebut car elle ne sert à protéger Base le couteau que durant les phases de Piège à condensat fabrication et de transport Lavez les pièces : reportez-vous à... -
Page 38: Connexion À L'application Kenwood World
Kenwood World permettant de le désenclencher Voir les illustrations à (situés sous les poignées du bol) et L’application Kenwood World vous permet soulevez-le. de contrôler votre appareil par le biais de Installez le couteau, le mélangeur, votre smartphone ou tablette. -
Page 39: Utilisation Du Direct Prep
Suivez les consignes apparaissant à Remarque : Si le disque d’éjection n’est pas l’écran. installé, les aliments s’accumuleront Pour arrêter l’appareil à tout moment, sous le disque et ne sortiront pas de appuyez sur le bouton de commande. la goulotte. Faites attention car le bol et le couvercle seront chauds. -
Page 40: Utilisation Du Plateau De Pesage
10 Pour retirer l’accessoire, tournez dans Utilisation du le sens des aiguilles d’une montre plateau de la jusqu’à ce que soit aligné sur balance et soulevez. Placez le plateau de Éteignez toujours l’appareil avant de pesage sur le bloc moteur. retirer le couvercle du Direct Prep. -
Page 41: Écran : Explications
Écran : explications Tapotez cette icône pour ouvrir le menu des paramètres. Tapotez cette icône pour ouvrir le menu des programmes prédéfinis. Tapotez cette icône pour peser des ingrédients dans le bol ou à l’aide du plateau de pesage. Affiche la durée choisie en heures (h), minutes (m) et secondes (s). -
Page 44: Recettes
Recettes Recette Accessoire Paramètres Ingrédients utilisé prédéfinis /manuels Minestrone Soupe épaisse Ajouter tous les ingrédients suivants au même moment : 20 min 100 g pancetta, coupée en dés 2 gousses d’ail, hachées 50 g de riz Arborio 2,5 c. à soupe de purée de tomates 70 g de chou 1 c. -
Page 45: Tableau Des Conseils D'utilisation
Tableau des conseils d’utilisation Ce tableau est fourni à titre d’information uniquement. Les données qui s’y trouvent varient selon la recette exacte et les ingrédients utilisés. Pour de meilleurs résultats, utilisez toujours du beurre doux et de la margarine à température ambiante lorsque vous faites des gâteaux. - Page 46 Tableau des conseils d’utilisation – Suite Fonction Couteau Pour hacher les ingrédients avant la cuisson ou les réduire en purée une fois la cuisson terminée. Pour faire des pâtes à cuire et à gâteaux. Recette de brioche Étape 1 Lait 5/30 ˚C 2 minutes 120 g...
- Page 47 Direct Prep Pour émincer ou râper des ingrédients directement dans le bol de cuisson ou dans un récipient extérieur. Disque Fonction Astuces & conseils Pour râper extra-fin Utilisez toujours des aliments frais. le parmesan. Ne coupez pas les ingrédients trop petits. Remplissez la largeur de la cheminée Disque 1 en quantité...
- Page 48 Cuisson à la vapeur Le plateau récupérateur de jus peut être placé entre le couvercle du bol et la base du cuiseur vapeur, une fois le bouchon retiré. Ceci empêche les liquides provenant de la condensation des aliments chauds de s’écouler dans le bol.
-
Page 49: Entretien Et Nettoyage
Entretien et nettoyage brosse de nettoyage. Même si le bol est décoloré, cela n’altère en rien ses Éteignez et débranchez toujours performances. l’appareil avant de le nettoyer. Axe d’entraînement du bol/De Retirez le couvercle et l’accessoire du l’adaptateur fond plat pour cuisson lente bol avant le nettoyage. -
Page 50: Service Après-Vente
à un centre de réparation KENWOOD revendeurs assurant ce service. autorisé. Pour trouver des détails actualisés sur votre centre de réparation KENWOOD le plus proche, veuillez consulter www.kenwoodworld.com ou le... - Page 51 Conseils pratiques – suite Domaine Astuces et conseils Cuire dans le bol La viande crue et les légumes durs doivent être coupés en petits morceaux avant d’être insérés dans le bol. Coupez les ingrédients en morceaux de taille égale car cela permet d’obtenir une cuisson homogène.
-
Page 52: Guide De Dépannage
Conseils pratiques – suite Domaine Astuces et conseils Direct Prep Tous les disques à découper énumérés ne sont pas tous inclus dans votre emballage, les disques fournis variant selon le modèle du robot. Reportez-vous à la section « Service après- vente »... - Page 53 Guide de dépannage – suite Problème Cause Solution Des aliments Mélangeur ou couteau Utilisez toujours le mélangeur accrochent ou brûlent non installé(e) lorsque les ou couteau. dans le fond du bol. légumes ont ramolli. La température sélectionnée Vérifiez que la température est trop élevée pour le type sélectionnée est bien la d’aliment.
- Page 54 Pour oublier le réseau WiFi, allez sur les Paramètres > WiFi > Forget Network (Oublier le réseau). Redémarrez la Configuration appareil à partir de l’appli Kenwood World. Impossible de trouver un L’appareil a peut-être été clignotement réseau WiFi connu. déplacé, le routeur est lent peut-être éteint ou pourrait...
- Page 55 WiFi local). Si le problème persiste, veuillez contacter le centre d’assistance Kenwood agréé le plus proche. Pour obtenir les coordonnées de votre centre Kenwood le plus proche, veuillez consulter le site www.kenwoodworld.com ou le site Web propre à votre pays.
-
Page 56: Ecodesign
Informations sur Ecodesign Port réseau : un seul port WiFi activé par défaut. TYPE CCL50 2412-2472 MHz Plage de fréquences RF : < 20 dBm Puissance d’émission maximale : Protocole de communication : IEEE802.11 b, g, n Le CCL50 est doté d’un seul port réseau WiFi et il est conçu pour être utilisé à distance et en réseau. - Page 58 Kenwood Ltd New Lane Havant Hampshire PO9 2NH kenwoodworld.com © 2019 Kenwood Limited. All rights reserved. 140110/1...