Advertisement
Quick Links
Advertisement

Related Manuals for TCS QD2040c


Summary of Contents for TCS QD2040c
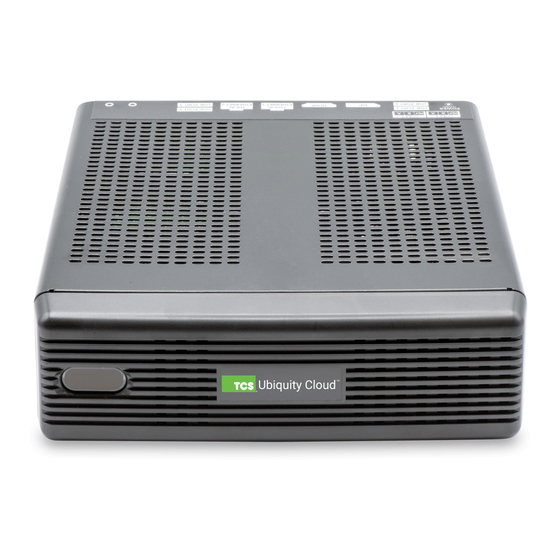
- Page 1 PRODUCT MANUAL QD2040c The QD2040c Ubiquity Cloud Building Controller connects the the building controls network with the Ubiquity Cloud™ servers. Ubiquity Cloud Building Controller 2800 Laura Lane • Madison, WI 53562 | 800.836.9044 • fax: 608.836.9044 | www.tcsbasys.com...
-
Page 2: Table Of Contents
• Building gateway to Ubiquity Cloud: enables network controller’s interoperability with Ubiquity Cloud • Provides programming and scheduling of the building through Ubiquity Cloud • Compatible with all TCS Basys supported controllers • TCSbus and Modbus protocol support • Supervisory control routines •... -
Page 3: Connections
Mounting The QD2040c is designed to be hung on a wall using the included mounting bracket and mounting screws. It may also be set on a shelf or table. Do not allow the mounting screws to touch the circuit board inside the enclosure. When selecting a location to mount the QD2040c, be sure to allow space for cable connections. - Page 4 CONNECTIONS QD2040c Connections Diagram To Controllers Rx/Tx Activity LED’s COM 1 COM 2 POWER (12VDC) USB PORT 2 USB PORT 4 HDMI ETHERNET 1 ETHERNET 2 USB PORT 1 USB PORT 3 Not Used Not Used Not Used Additional NIC is for management use.
- Page 5 A bus resistor (120 Ohm) is to be placed at the end of the bus network between the “A” and “B” wires. The bus resistor (120 Ohm) may be placed at the QD2040c, between the “A” and “B” wires if the controller is at the end of the network.
-
Page 6: Wiring
120Ω Terminating Resistor Last in Daisy Chain Earth Ground Only at one end QD2040c in the end of the network NOTES: Shielded, twisted If using more than 64 controllers, use the second QD2040c in the middle of the network 3-conductor... - Page 7 Terminating Resistor Last in Daisy Chain Earth Ground Only at one end QD2040c in the end of the network NOTES: Can be used with up to If using more than 64 controllers, use the second QD2040c in the middle of the network a total of 64 controllers.
-
Page 8: Device Configuration
This section contains unit-related information used to uniquely identify the unit when it is being serviced in the field. The Site Time is used by the local network and the QD2040c until the Ubiquity central server performs a time synchronization with the site. - Page 9 The default setting is 1 minute. You must select whether or not to allow caching the host name via DNS. Typically, this is left unchecked. You must select how often the QD2040c connects to the central server.
- Page 10 Here you will configure each of the COM ports for this site. Typically, you will leave Auto Detection of Controls on All Ports enabled so the QD2040c will find and add the controller as they are included on one of the networks (wired or wireless).
- Page 11 DEVICE CONFIGURATION COMMUNICATION INFORMATION This section contains settings which control how the QD2040c connects out through the LAN or WAN to the Internet. All of these settings are determined by your local network administrator or IT department. The correct settings, network permissions, and port openings (WAN Outbound, ports 80, 443, 8443) need to be verified with them prior to installation and connecting to the local network.
- Page 12 Once you are finished entering information in this section, click the Update Commissioning Info button. SECURITY INFORMATION This section contains settings which control the security of the device within the QD2040c and whether or not it can be accessed through the web interface.
-
Page 13: Commissioning Tools
2) Connected -- means the unit is able to communicate to the Ubiquity central server BUT is not being matched up with a specific Site, typically this indicates that the site is not initialized on the central server side yet, please contact TCS Basys Controls to assign or initialize the QD2040c to a site 3) Established -- means the unit is communicating with the Ubiquity central server AND is ready to go. - Page 14 SYSTEM COMMANDS In this section you are able to set a couple of system flags for the QD2040c itself. “Reboot Unit” sets a flag which will shut off and restart the QD2040c within a 5 minute Cycle. “Check for Update” contacts the Ubiquity Central Server for any updates relevant to its particular model number and software version.
- Page 15 DEVICE CONFIGURATION Device Configuration CLI UI Once you have made connection and have logged in you are able to configure the operation of the unit by selecting the proper parameters for your application. All Ubiquity Cloud Application software and functionality is accessed by logging into the Central Server (www.ubiquitysystems.net) not by using this configuration page.
- Page 16 DEVICE CONFIGURATION Set Application Options Set Proxy Options 2800 Laura Lane • Madison, WI 53562 | 800.288.9383 • fax: 608.836.9044 | www.tcsbasys.com...
- Page 17 DEVICE CONFIGURATION Set Extended Application Options 2800 Laura Lane • Madison, WI 53562 | 800.288.9383 • fax: 608.836.9044 | www.tcsbasys.com...
-
Page 18: Checkout And Troublshooting
No Communications with Controllers on the Network Make sure the baud rate selection for the QD2040c is set to match the baud rate of all the controllers on each port network. All controllers on the network must have a unique address, excluding the reserved address ‘248’. Network wiring should also be checked. -
Page 19: Appendix A: Local Management Port
CONNECTION SETUP Ethernet Cable Connect the cable to Local Management Ethernet Port on the QD2040c and then the other end to the Laptop NIC. Laptop The steps below require changing the network settings of the laptop, this is done at your own risk. - Page 20 Appendix A: Local Management Port On the Ethernet Settings pane and click the “Change adapter options” link. On the Network Connections pane locate the ethernet interface that is connected to the cable. Right click on the item and select “Properties” 2800 Laura Lane •...
- Page 21 Appendix A: Local Management Port On the Ethernet Properties pane locate the “Internet Pro- tocol Version 4 (TCp/IPv4)”. Select that item then click on the “Properties” button. 2800 Laura Lane • Madison, WI 53562 | 800.288.9383 • fax: 608.836.9044 | www.tcsbasys.com...
- Page 22 Appendix A: Local Management Port Setup Management Port to Static Settings On the Internet Protocol Version 4 (TCp/IPv4) Properties change the IP schema to: IP Address: 10.248.248.2 Subnet Mask: 255.0.0.0 Default Gateway: 10.248.248.2 DNS: Leave Blank Then click on the “OK” button.
- Page 23 Appendix A: Local Management Port Revert Back to DHCP Settings 2800 Laura Lane • Madison, WI 53562 | 800.288.9383 • fax: 608.836.9044 | www.tcsbasys.com...
-
Page 24: Appendix B: Monitor And Keyboard
3. USB Keyboard CONNECTION SETUP Monitor and Cable Connect the cable to Monitor and QD2040c matching up the corresponding ends (VGA,HDMI,DP). Power the on the monitor and switch to the proper input, base on the cable connected. Keyboard Plug in the USB into a free USB port. * Test keyboard connectivity by pressing caps lock to see if the LED illuminates.